9.5 Creating Master Detail Forms

Developers can create a master detail form with either the Create Application Wizard or the Create Page Wizard.

9.5.1 About Master Detail Forms

A master detail form enables users to query, insert, update, and delete values from two related tables or views. You choose the tables on which to build the master and detail regions.

A master detail form reflects a one-to-many relationship between tables in a database. Typically, a master detail form displays a master row and multiple detail rows. When you create a master detail form using the Create Page or Create Application Wizards, you choose the tables on which to build the master form and the detail form. App Builder supports three types of master detail form options: Stacked; Drill Down; and Side by Side. While the Create Page Wizard supports all master detail form options, the Create Application Wizard supports only Stacked and Side by Side.

Stacked Master Detail

A Stacked master detail form contains a single page with editable interactive grids based on two related tables or views. Users select a row in the master grid to update the detail grids. Developers can create a stacked master detail with either the Create Application Wizard or the Create Page Wizard.

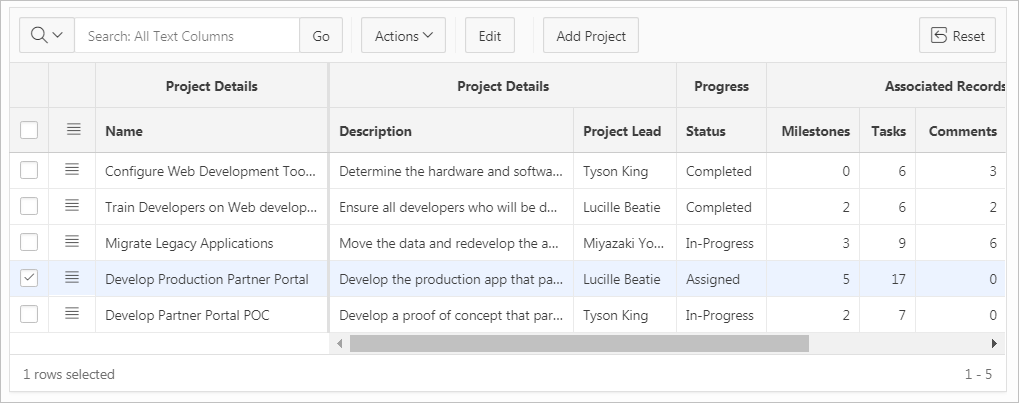
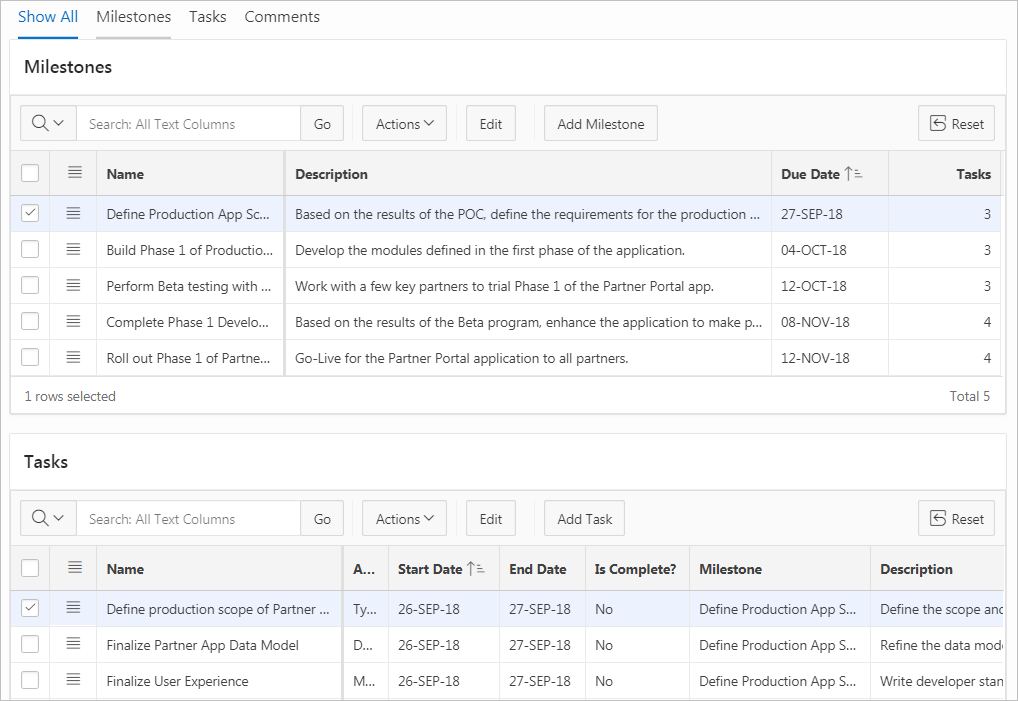
The following example displays master detail interactive grids on the same page. The user has option of interacting with either the master or the detail without leaving the page.
Description of master_detail_single_1.png follows
Description of the illustration master_detail_single_1.png

The previous illustration shows the master interactive grid with the project, Develop Production Partner Portal selected. The next illustration shows detail interactive grids for Milestones and Tasks.
Description of master_detail_single_2.png follows
Description of the illustration master_detail_single_2.png

Drill Down Master Detail

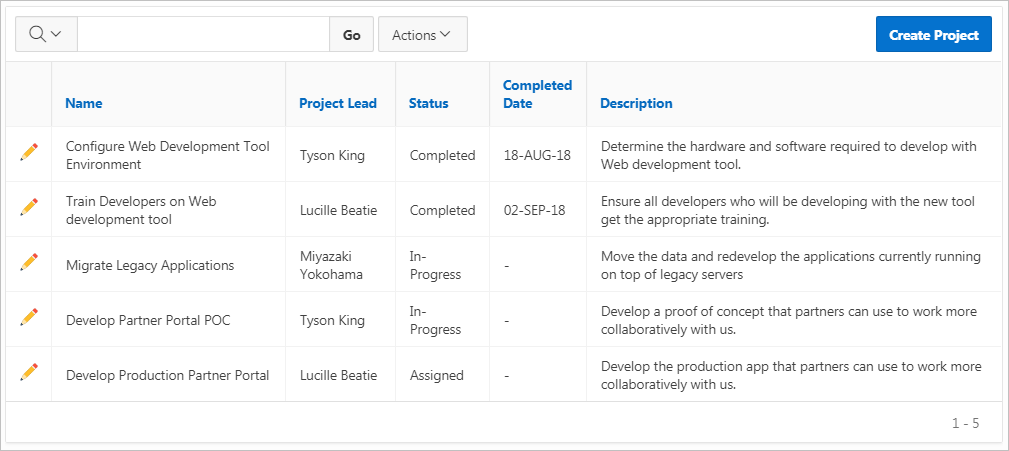
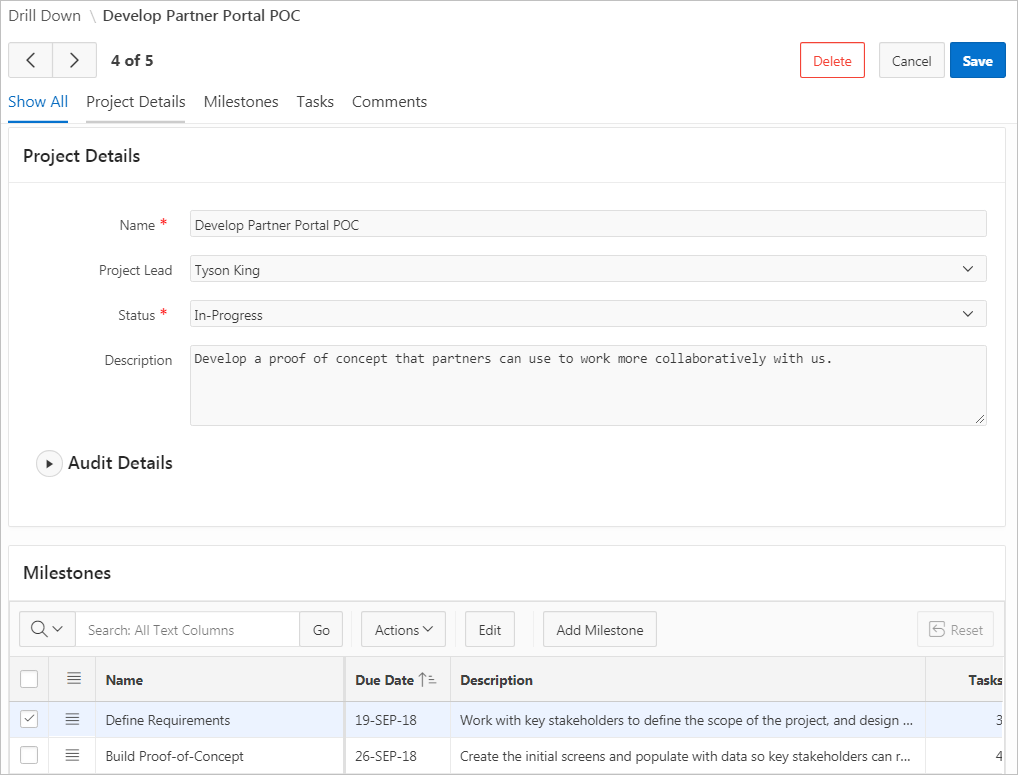
A Drill Down master detail contains two pages based on two related tables or views. The first page contains an interactive report for the master table. The second page features a standard form for the master and interactive grids for the detail. Developers can create a Drill Down master detail with the Create Page Wizard.

In this example, users click the Edit icon to view project details. The second page includes both a standard form (for the master) and editable interactive grids.

For numeric and date fields, you can also pre-define date and number format masks, or apply those format masks after generating the initial form. Wizard generated master detail forms also automatically create validations for some columns. Validations are created for columns that are set to NOT NULL in the underlying table and columns of type NUMBER, DATE or TIMESTAMP. Note that validations are not created for columns if the column is set to read-only, either based on the user's selection, or defined user interface defaults.

Tip:

You can control the appearance of a specific column by editing column attributes.

Side by Side Master Detail

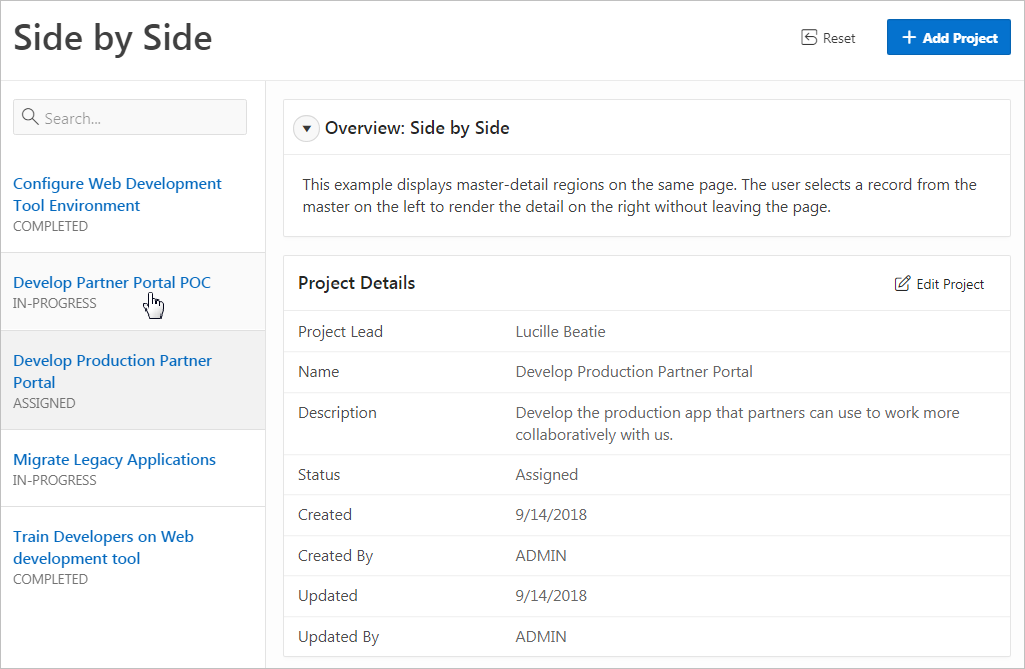
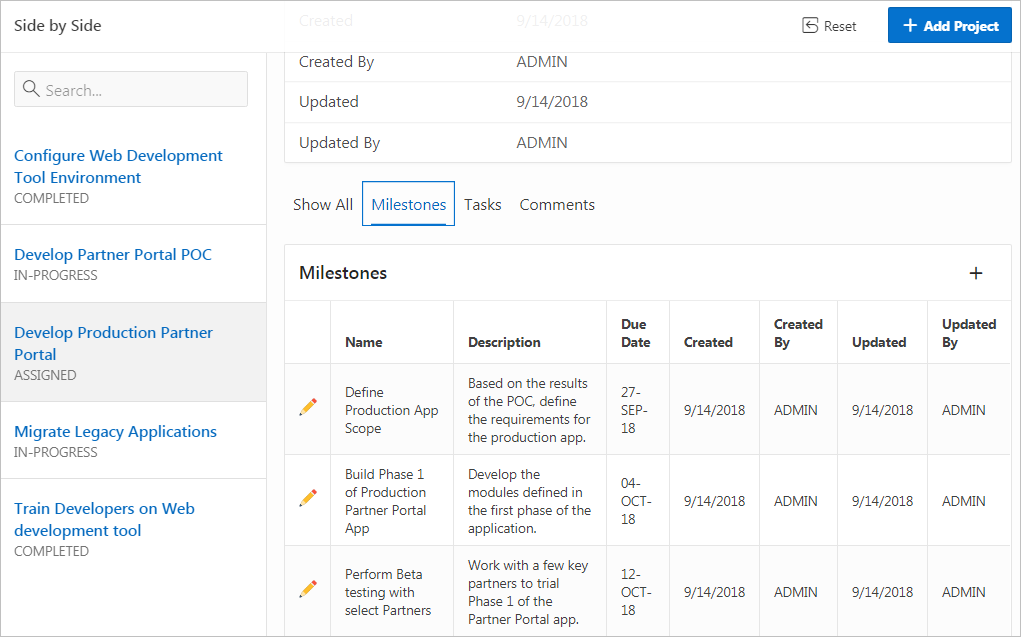
A Side by Side master detail form contains a single page master detail utilizing a side by side layout and report regions with modal edit windows. The left side contains a master list to navigate to the master record. The right side contains the selected master record and the associated detail report(s). Developers can create Side by Side master detail with either Create Application Wizard or Create Page Wizard.

The illustration that follows shows the Milestones detail interactive report. Users can Milestones by clicking an Edit icon.

9.5.2 Creating a Master Detail Form Using the Create Application Wizard

Run the Create Application Wizard to create a new application that contains a Stacked or Side by Side master detail forms.

Tip:

The Create Application Wizard uses general best practices to generate the application and does not include several advanced options included in the Create Page Wizard.

To create a master detail form using the Create Application Wizard:

  1. On the Workspace home page, click the App Builder icon.
  2. Click the Create button.
  3. Click New Application.
  4. Set Icon - Click Set Icon to select an application icon. The icon you select is used as the Favicon, the PWA icon, the Apple touch icon, and the App Builder icon.
  5. Name - Enter the name used to identify the application to developers.
  6. Appearance - Accept the default or click Set Appearance to change it.
  7. Click Add Page and select Master Detail.
  8. On Add Master Detail Page:
    1. Page Name - Enter a name for this page.
    2. Set Icon - Select an icon to display in the navigation menu for this page.
    3. Page Type - Select one of the following:
      • Side by Side - Creates a single page (or Side by Side) master detail with a master table and detail table. The left side contains a master list to navigate to the master record. The right side contains the selected master record and the associated detail report.
      • Stacked - Creates single page master detail with editable interactive grids.

      If Page Type is Side by Side:

      • Table - Select the master table for the page.
      • Primary Display Column - Select the column to display in the list of master records.
      • Secondary Display Column - Select the descriptive column to display in the list of master records, under the Primary Display Column.
      • Detail Table - Select the detail table.

      If Page Type is Stacked:

      • Table - Select the master table for the editable interactive grid.
      • Detail Table - Select the detail table for the page.
    4. Advanced - Expand Advanced:
      • Page Help - Enter text to be displayed when the user selects Page Help.

        Tip:

        This setting requires you select the Help Pages feature. If the Help Pages feature is not selected, the Help icon is not be generated and end users cannot access page help.

    5. Click Add Page.
  9. Under Features, select features to include with the application. Features provide application-level functionality and are typically added once per application. To learn more, click the Help icon adjacent to Features.

    Tip:

    Click the Check All button to select all features.

  10. Under Settings, specify settings used to generate this application. To learn more about an attribute, click the Help icon adjacent to Settings.
  11. Click Create Application.

9.5.3 Creating a Stacked Master Detail Using the Create Page Wizard

Use the Create Page Wizard to add a stacked master detail to an existing application.

A Stacked master detail form contains a single page with editable interactive grids based on two related tables or views. Users select a row in the master grid to update the detail grids.

To create a Stacked master detail on a new page:

  1. On the Workspace home page, click the App Builder icon.
  2. Select an application.
  3. Click Create Page.

    Create a Page appears and features three tabs: Component, Feature, and Legacy Pages.

  4. Under Component, select Master Detail.
  5. Master Detail Style - Select Stacked and click Next.
  6. Page Definition:
    1. Page Number - The page number is an integer value that identifies a page within an application.
    2. Name - Specify a text name for this page.

      Tip:

      This text is also used for page Title. After page creation, you can modify the Title in Page Designer.

    3. Page Mode - Identify the page mode: Normal or Modal.

      See field-level Help for more details.

  7. Master Data Source:
    • Data Source - Select a Data Source:

      • Local Database - Data is sourced from the local database.

      • REST Enabled SQL Service - Data is sourced from a remote database, where the connection is defined using REST Enabled SQL. To create or maintain REST Enabled SQL references, navigate to Shared Components, REST Enabled SQL.

      • REST Data Source - Data is sourced from a RESTful web service defined using REST Data Sources. To create or maintain REST Data Sources, navigate to Shared Components, REST Data Sources.

    • Table /View Owner - Select the owner of the table on which you are building the page.

    • Table/View Name - Select the table or view on which the page will be based.

    The steps that follow differ depending upon the selected Data Source. This task assumes the Data Source is Local Database.

  8. Navigation - Expand the region and enable or disable navigation. If either flag is enabled, additional attributes appear. To learn more about an attribute, see field-level Help.
    1. Breadcrumb - Enable to create a breadcrumb entry for this page. By default, the page name is used as breadcrumb entry name.
    2. Navigation - Enable to create a navigation menu entry for this page. By default, the page name is used as breadcrumb entry name.
    3. Click Next.
  9. Primary Key Column:
    • Primary Key Column 1 - Select a primary key column.
    • Primary Key Column 2 - Select a primary key column.
  10. Click Next.
  11. For Detail Data Source:
    1. Detail Region Title - Enter a region title for the detail region.
    2. Data Source - Select a Data Source for the page:
      • Local Database - Data is sourced from the local database.

      • REST Enabled SQL Service - Data is sourced from a remote database, where the connection is defined using REST Enabled SQL. To create or maintain REST Enabled SQL references, navigate to Shared Components, REST Enabled SQL.

      • REST Data Source - Data is sourced from a RESTful web service defined using REST Data Sources. To create or maintain REST Data Sources, navigate to Shared Components, REST Data Sources.

      The steps that follow differ depending upon the selected Data Source. This task assumes the Data Source is Local Database.

    3. Show Only Related Tables - Specify whether to restrict the list of detail tables to only those tables related to the master table.
    4. Table /View Owner - Select the owner of the table on which you are building the page.
    5. Table/View Name - Select the table or view on which the page will be based.
    6. Click Next.
  12. Detail Primary Key:
    • Primary Key Column 1 - Select primary key column.
    • Primary Key Column 2 - Select primary key column.
  13. Master Detail Foreign Key - Select the foreign key that relates between the master and detail tables.
  14. Click Create Page.
  15. To view the new master detail, click Save and Run Page.
    The rendered page appears.

Tip:

To learn more about external data sources, see Managing REST Enabled SQL References and Managing REST Data Sources.

9.5.4 Creating a Side by Side Master Detail Using the Create Page Wizard

Run the Create Page Wizard to add a new page with a Side by Side master detail.

A Side by Side master detail form contains a single page master detail utilizing a side by side layout and report regions with modal edit windows. The left side contains a master list to navigate to the master record. The right side contains the selected master record and the associated detail report(s).

To create a Side by Side master detail on a new page:

  1. On the Workspace home page, click the App Builder icon.
  2. Select an application.
  3. Click Create Page.

    Create a Page appears and features three tabs: Component, Feature, and Legacy Pages.

  4. Under Component, select Master Detail.
  5. Master Detail Style - Select Side by Side.
  6. Page Definition:
    1. Starting Page Number - Enter an unused starting page number. The wizard will create multiple pages starting with the number specified.The default is the first available page number within this application.
    2. Master Detail Page Name - Enter the name of the master detail page which contains side by side master detail regions. The left side contains master list to navigate to different master record. The right side contains selected master record and associated detail report.
  7. Navigation - Expand the region and enable or disable navigation. If either flag is enabled, additional attributes appear. To learn more about an attribute, see field-level Help.
    1. Breadcrumb - Enable to create a breadcrumb entry for this page. By default, the page name is used as breadcrumb entry name.
    2. Navigation - Enable to create a navigation menu entry for this page. By default, the page name is used as breadcrumb entry name.
    3. Click Next.
  8. Define the Master and Details tables:
    1. Table /View Owner - Select the owner of the table on which you are building the page.
    2. Master Table - Select the master table or view. When entering manually, note that the table name is case sensitive.
    3. Primary Display Column - Select the column to display as primary column in the report to navigate to a different master record.
    4. Secondary Display Column - Select the column to display as secondary column in the report to navigate to a different master record (optional).
    5. Detail Table - Select the detail table or view.
      Add additional detail tables as needed.
    6. Detail Table - Select the detail table or view.

    Tip:

    The previous steps assume the Data Source for this master detail is a Local Database. To create a master detail on an external database, such a REST Enabled SQL Service or REST Data Source, click Advanced and select the appropriate Data Source type.

  9. Click Create Page.
  10. To view the new master detail, click Save and Run Page.
    The rendered page appears.

Tip:

To learn more about external data sources, see Managing REST Enabled SQL References and Managing REST Data Sources.

9.5.5 Creating a Drill Down Master Detail Using Using the Create Page Wizard

Run the Create Page Wizard to add a new page with a Drill Down master detail.

A Drill Down master detail contains two pages based on two related tables or views. The first page contains an interactive report for the master table. The second page features a standard form for the master and interactive grids for the detail.

To create a two page Drill Down master detail on a new page:

  1. On the Workspace home page, click the App Builder icon.
  2. Select an application.
  3. Click Create Page.

    Create a Page appears and features three tabs: Component, Feature, and Legacy Pages.

  4. Under Component, select Drill Down.
  5. Master Page Definition:
    1. Page Number - Enter an unused starting page number. The wizard will create multiple pages starting with the number specified.The default is the first available page number within this application.
    2. Name - Specify a text name for this page.

      Tip:

      This text is also used for page Title. After page creation, you can modify the Title in Page Designer.

  6. Master Data Source:
    • Data Source - Select a Data Source for the page:

      • Local Database - Data is sourced from the local database.

      • REST Enabled SQL Service - Data is sourced from a remote database, where the connection is defined using REST Enabled SQL. To create or maintain REST Enabled SQL references, navigate to Shared Components, REST Enabled SQL.

      • REST Data Source - Data is sourced from a RESTful web service defined using REST Data Sources. To create or maintain REST Data Sources, navigate to Shared Components, REST Data Sources.

    • Table /View Owner - Select the owner of the table on which you are building the page.

    • Table/View Name - Select the table or view on which the page will be based.

    The steps that follow differ depending upon the selected Data Source. This task assumes the Data Source is Local Database.

  7. Navigation - Expand the region and enable or disable navigation. If either flag is enabled, additional attributes appear. To learn more about an attribute, see field-level Help.
    1. Breadcrumb - Enable to create a breadcrumb entry for this page. By default, the page name is used as breadcrumb entry name.
    2. Navigation - Enable to create a navigation menu entry for this page. By default, the page name is used as breadcrumb entry name.
    3. Click Next.
  8. Primary Key:
    • Primary Key Column 1 - Select a primary key column.
    • Primary Key Column 2 - Select primary key column (optional).
    • Form Navigation Order - Select the navigation order column used by the previous and next buttons on the Detail Page, which navigates to a different master record.
  9. Click Next.
  10. Detail Page Definition:
    1. Page Number - The page number is an integer value that identifies a page within an application.
    2. Name - Specify a text name for this page.

      Tip:

      This text is also used for page Title. After page creation, you can modify the Title in Page Designer.

  11. Detail Data Source:
    • Data Source - Select a Data Source:

      • Local Database - Data is sourced from the local database.

      • REST Enabled SQL Service - Data is sourced from a remote database, where the connection is defined using REST Enabled SQL. To create or maintain REST Enabled SQL references, navigate to Shared Components, REST Enabled SQL.

      • REST Data Source - Data is sourced from a RESTful web service defined using REST Data Sources. To create or maintain REST Data Sources, navigate to Shared Components, REST Data Sources.

    • Show Only Related Tables - Specify whether to restrict the list of detail tables to only those tables related to the master table.

    • Table /View Owner - Select the owner of the table on which you are building the page.

    • Table/View Name - Select the table or view on which the page will be based.

    The steps that follow differ depending upon the selected Data Source. This task assumes the Data Source is Local Database.

  12. Click Next.
  13. Detail Primary Key:
    • Primary Key Column 1 - Select a primary key column.
    • Primary Key Column 2 - Select a primary key column (optional).
  14. Master Detail Foreign Key - Select the foreign key that relates between the master and detail tables.
  15. Click Create Page.
  16. To view the new master detail, click Save and Run Page.
    The rendered page appears.

Tip:

To learn more about external data sources, see Managing REST Enabled SQL References and Managing REST Data Sources.