16.6.3 Creating a Standard Search

Learn how to create a Standard search.

You can create Standard search on a searchable data source which can be a table, a SQL query, or REST Data Source.

This topic demonstrates how to create a search page on two different tables available in the sample dataset, Project Data. This example assumes you have already created an application and two interactive reports built on EBA_PROJECTS and EBA_PROJECT_TASKS tables.

See Also:

Using Sample Datasets in Oracle APEX SQL Workshop Guide

16.6.3.1 Creating Standard Search Configurations

Create two Standard search configurations based on two separate tables.

A search configuration contains information about a searchable data source. In this task, you create two search configurations and then a search page using the Create Page Wizard. The first search configuration maps to the EBA_PROJECTS table. The second search configuration maps to the EBA_PROJECT_TASKS table. Both tables are available in the Project Data sample dataset.

Note:

This task assumes you have already created an application and two interactive reports built on EBA_PROJECTS and EBA_PROJECT_TASKS tables available in the sample dataset, Project Data.

To create two Standard search configurations:

  1. Create an application.
  2. Access the Search Configurations page:
    1. On the Workspace home page, click the App Builder icon.
    2. Select an application.
    3. On the Application home page, click Shared Components.
    4. Under Navigation and Search, click Search Configurations.
      The Search Configurations page appears.

Create the first search configuration that maps to the EBA_PROJECTS table:

  1. On the Search Configurations page, click Create.
    The Create Search Configuration Wizard appears.
  2. Detail:
    1. Name - Enter a name for the search configuration (for example, Search Projects).
    2. Search Type - Select a type of search. Options include:
      • Standard - Defines a searchable data source such as a table, SQL Query, or REST Data Source. Searches are executed by a SQL Query using LIKE expressions.
      • List - Search within a selected List from Shared Components.
      • Oracle TEXT - Define a searchable table or SQL Query which already has an Oracle TEXT index created. Search is executed by using Oracle TEXT functionality, which provides linguistic and fuzzy search capabilities.

      For this example, select Standard.

    3. Click Next.
  3. Source:
    1. Data Source - Select the Data Source for the search configuration. Options include:
      • Local Database - Data is sourced from a local database.
      • REST Enabled SQL Service - Data is sourced from a remote database, where the connection is defined using REST Enabled SQL. To create or maintain REST Enabled SQL references, navigate to Shared Components, REST Enabled SQL.
      • REST Data Source - Data is sourced from a RESTful web service defined using REST Data Sources. To create or maintain REST Data Sources, navigate to Shared Components, REST Data Sources.

      The UI changes depending upon the Data Source you select. For this example, select Local Database.

    2. Source Type - Specify the source type. UI changes depending on selected Source Type. For this example, select Table.
    3. Table / View Owner - Select the owner of the table on which you are building the search configuration.
    4. Table / View Name - Select the table or view on which the search configuration is based (for example, select EBA_PROJECTS).
    5. Click Next.
  4. Column Mapping:
    1. Primary Key Column - Select the primary key column for the search configuration data source (for example, ID).
    2. Title Column - Select the column to be used as title (for example, NAME).
    3. Description Column - Select the column to be used as the description (for example, DESCRIPTION).
    4. Icon Source - Configure the icon that displays in the header of the search result. Options include:
      • Initials - Use the Title column to display the icon as initials.
      • CSS Classes - Use the entered CSS classes to display the icon.
      • Class Column - Use the selected column containing the icon CSS class to display the icon.

      For this example, accept the default, Initials.

  5. Click Create Search Configuration.

    The search configuration is created and the Search Configuration, Edit page appears and displays the message Search configuration created.

Create a second search configuration that maps to the EBA_PROJECT_TASKS table:

  1. Click the Search Configurations breadcrumb to return to the Search Configurations page.
  2. Click Create on the Search Configurations page.
    The Create Search Configuration Wizard appears.
  3. Detail:
    1. Name - Enter a name for the search configuration (for example, Search Project Tasks). This name displays in the search result.
    2. Search Type - Select a type of search.

      Since this example is built on a table, select Standard.

    3. Click Next.
  4. Source:
    1. Data Source - Select a Data Source for the search configuration.

      The UI changes depending upon the Data Source you select. For this example, select Local Database.

    2. Source Type - Specify the source type. UI changes depending on selected Source Type. For this example, select Table.
    3. Table / View Owner - Select the owner of the table on which you are building a search configuration.
    4. Table / View Name - Select the table or view on which the search configuration is based. For this example, select the EBA_PROJECT_TASKS table.
    5. Click Next.
  5. Column Mapping:
    1. Primary Key Column - Select the primary key column for the search configuration Data Source (for example, ID).
    2. Title Column - Select the column to be used as title (for example, NAME).
    3. Description Column - Select the column to be used as the description (for example, DESCRIPTION).
    4. Icon Source - Select the type for the icon that is displayed in the header of the search result.

      For this example, accept the default, Initials.

  6. Click Create Search Configuration.

    The search configuration is created and the Search Configuration, Edit page appears.

  7. Click the Search Configurations breadcrumb to return to the Search Configurations page.

16.6.3.2 Editing Search Configurations to Include Links

Learn how to edit search configurations to include links to existing pages.

Note:

This example assumes you have previously created the search configurations described in Creating Standard Search Configurations.

To edit search configurations to include links:

  1. Access the Search Configurations page:
    1. On the Workspace home page, click the App Builder icon.
    2. Select an application.
    3. On the Application home page, click Shared Components.
    4. Under Navigation and Search, click Search Configuration.
      The Search Configurations page appears.
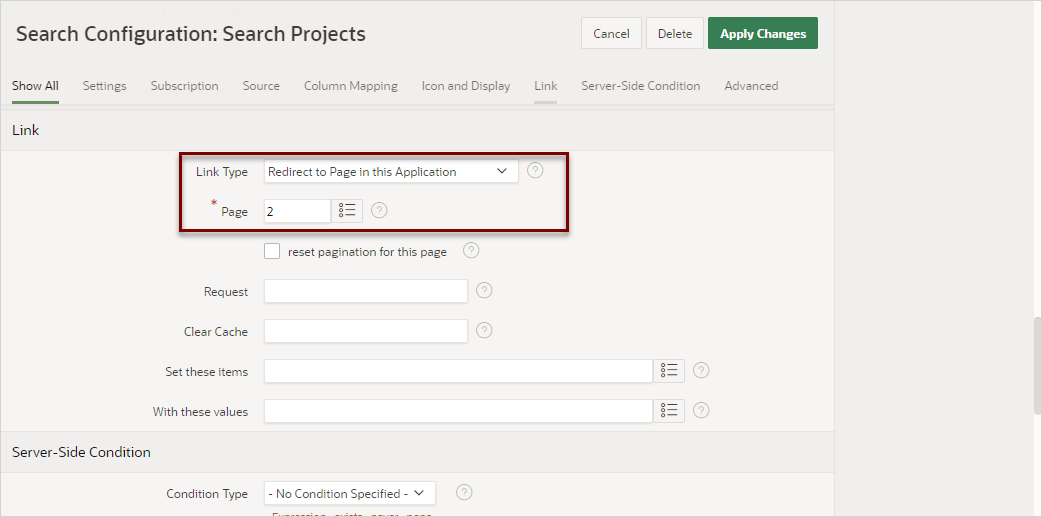
  2. Edit the Search Projects search configuration to link to a report on another page:
    1. Select the search configuration (for example, Search Projects).
    2. Link - Select the type of link. The UI changes depending upon the Link Type you select.
      For this example, select Redirect to Page in this Application.
    3. Page - Select or enter the page to redirect to (for example, 2).
    4. Configure the remaining attributes as needed. For example, you can use Set these items in conjunction with With these values to pass values from the search page to the target page.
      • reset pagination for this page - Select this option to reset the pagination that is linked to.
      • Request - Enter text that you would like to set the built-in application item REQUEST. This is also the item that is set with the name of a button that was clicked.
      • Clear Cache - Enter the page numbers, separated by commas, for which you would like the user's session state to be cleared (for example: 10,11,12). You can also reset a collection by passing including a collection name.
      • Set these items - Enter the list of application item names, separated by a comma, for which you would like to set the session state.
      • With these values - Enter a comma delimited list of values for the items specified in Set these items. You can specify static values or substitution syntax. Consider the following examples:
        • &APP_ITEM_NAME.
        • &COL_NAME.
        • &COL1_NAME.,&COL2_NAME.

        Item values passed to f?p= in the URL must never contain a colon (:). Item values may also not contain commas unless you enclose the entire value in backslash characters. This is useful when decimal values must be passed where the NLS decimal separator character is a comma. For example:

        \1234,56\
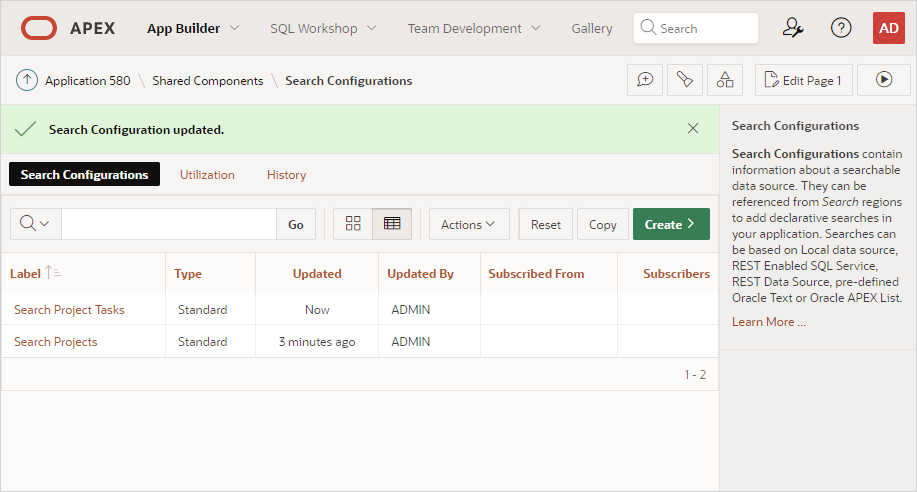
    5. Click Apply Changes.
      The Search Configurations page appears with the message Search Configuration updated.
  3. Edit the Search Project Tasks search configuration to link to a report on another page:
    1. Select the search configuration (for example, Search Project Tasks).
    2. Link - Select the type of link. The UI changes depending upon the Link Type you select.
      For this example, select Redirect to Page in this Application.
    3. Page - Select or enter the page to redirect to (for example, 4).
    4. Click Apply Changes.

      The Search Configurations page appears with the message Search Configuration updated.

  4. Click the Application ID breadcrumb to return to the Application home page.

16.6.3.3 Creating a Standard Search Page

Create a Search page by running the Create Page Wizard.

Whether you are creating a Standard search or Oracle TEXT search, creating a search page by running the Create Page Wizard involves the same steps. The Create Page Wizard creates a Search field for you and prompts you to select search configurations. Note that you can also add additional search configurations later in Page Designer.

A Search page features a Search field and a Search Results region. In Page Designer, the Search Results region contains Search Sources which map to the search configurations defined in Shared Components.

To create a search page by running the Create Page Wizard:

  1. Navigate to the Application home page:
    1. On the Workspace home page, click the App Builder icon.
    2. Select the application.
  2. On the Application home page, click Create Page.
    Create a Page appears and features three tabs: Component, Feature, and Legacy Pages.
  3. Under Component, select Search Page.
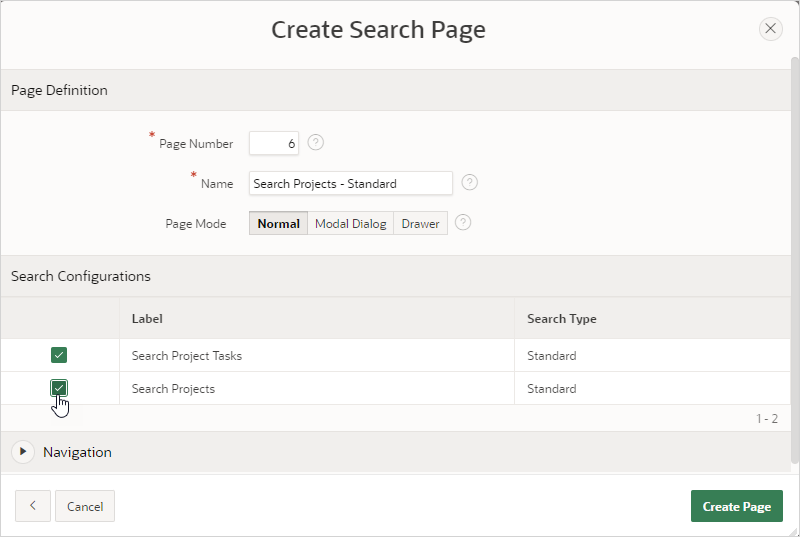
  4. Page Definition:
    1. Page Number - The page number is an integer value that identifies a page within an application.
    2. Name - Specify a text name for this page (for example, Search Projects - Standard).

      This text is also used for page Title. After page creation, you can modify the Title in Page Designer.

    3. Page Mode - Identify the page mode. Accept the default, Normal.
  5. Search Configurations - Select the search configurations to be used by this page (for example, Search Project Tasks and Search Projects).
  6. Navigation - Accept the default and enable Use Breadcrumb and Use Navigation.
  7. Click Create Page.

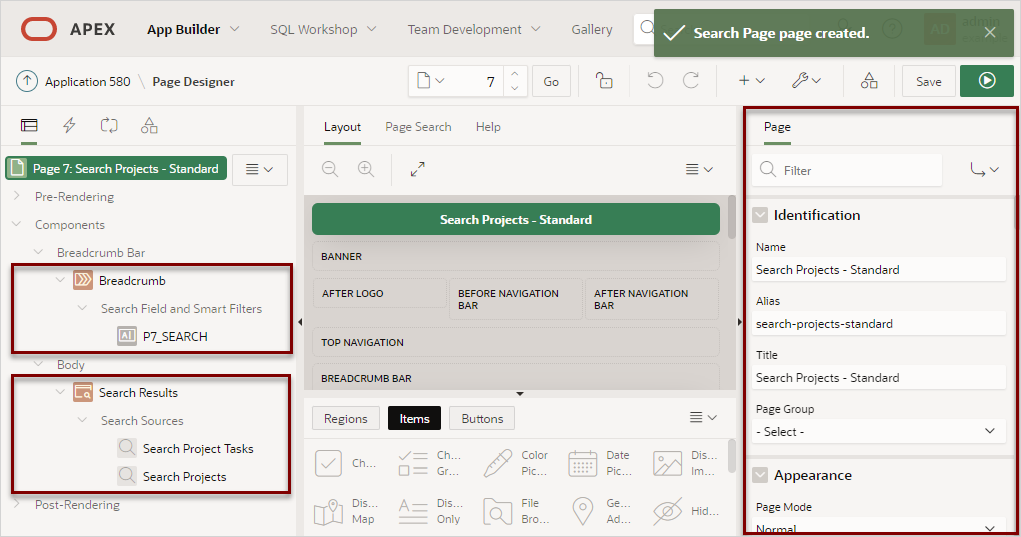
    Page Designer appears with the message, Search Page page created

    In the Rendering tab, notice the page item, P7_SEARCH and the Search Results region. P7_SEARCH is the search field which enables users to submit search terms. The Search Results region contains both the search results and two Search Sources which map to search configurations maintained in Shared Components. You can further refine and control the search display and behavior by editing attributes in the Property Editor.

    Also notice that if you select a search source, Search Source attributes display in the Property Editor.

  8. Run and test the page:
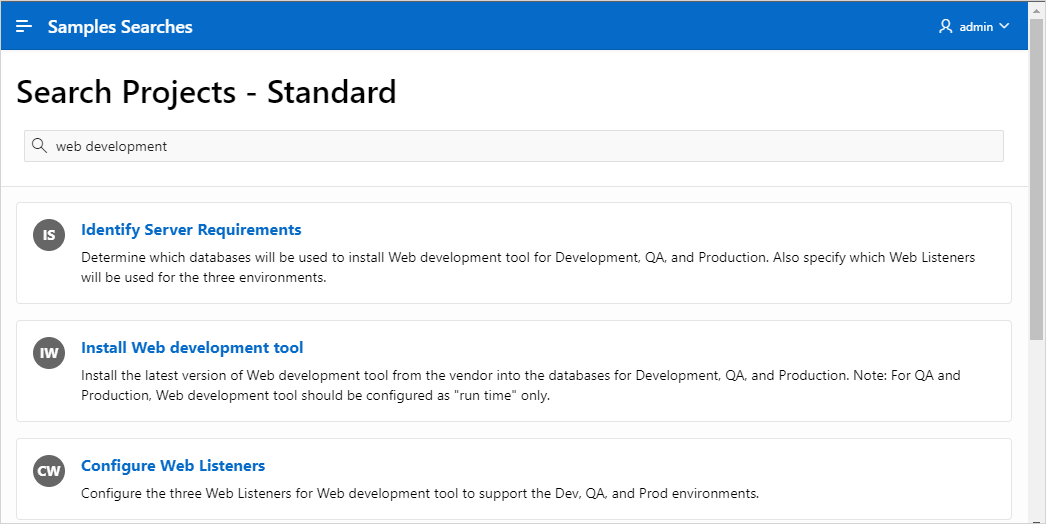
    1. Click Save and Run Page.
      The Search Projects page appears.
    2. In the search field, enter a search (for example, web development) and press Enter.