5 Developing the Projects Page

Use the Create Page Wizard and Page Designer to add a sophisticated form page for the Projects report.

About This Lesson

In this lesson, you are introduced to the two primary means of development: Page Designer and the Application Runtime ("runtime" for short).

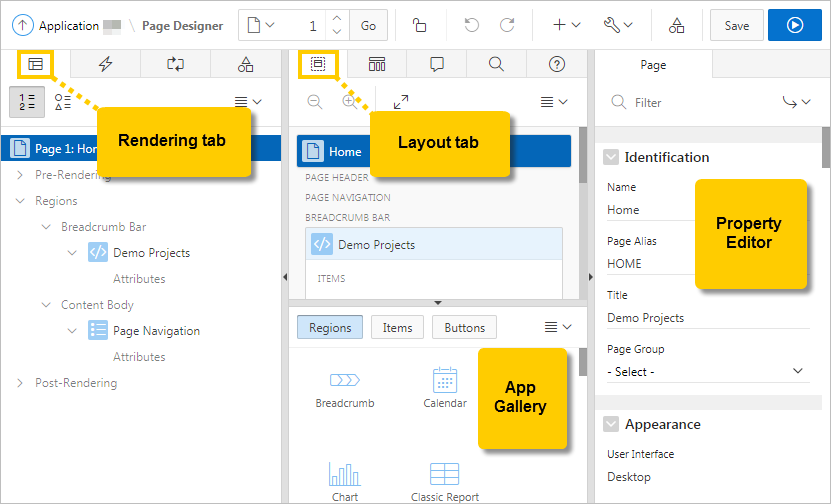
In Page Designer, use the Rendering tab and Layout tab to add new regions to the Projects page. Then, use the Property Editor to edit a wide array of attributes for region and page components, including SQL statements and appearance options.

In the runtime, you use the Runtime Developer toolbar to make changes on the page immediately and to quickly shift back to Page Designer.

Starting from here:

5 - Projects.sql

If you have not completed the previous lessons, you can use the appendix "Importing an Application into a Workspace" to import the above SQL script into your workspace and continue working from this lesson forward.

5.1 Navigating to Page Designer from the Application Runtime

At the end of the previous lesson, you ran the application from the Application home page in App Builder and opened the Home page of the application.

Running an application from App Builder also displays the Runtime Developer toolbar at the bottom of the window.

You can use the Runtime Developer toolbar to quickly edit the page (and some aspects of the entire application). This toolbar only displays for users with developer or administrator privileges.

To view the Home page in Page Designer using the Runtime Developer toolbar:

  1. In the top-left of the application runtime, do one of the following:
    • Click the name of the app Demo Projects.
    • Click the Home link in the sidebar. (Do not click Home on the Developer Toolbar.)
    The runtime Home page displays.
  2. On the Runtime Developer toolbar, click Edit Page 1.

    Note:

    The number in the Edit Page # button corresponds to its assigned page number in Page Designer.
    Page Designer displays page 1.

Tip:

Page Designer is the primary asset for Application Express developers. It's a powerful IDE (integrated development environment) with a robust array of tools for building, maintaining, and enhancing applications. Up to this point, you have mainly experienced the Create Application Wizard and SQL Workshop.


You rely primarily on Page Designer for the rest of this tutorial.

You can always learn more about Page Designer with the official Oracle Application Express App Builder User’s Guide.

5.2 Creating a Form Page Using the Create Page Wizard

Use the Create Page Wizard to add new pages to an app. It has a more robust interface for adding new pages than the Create Application Wizard.

Add a form to the Projects report to give your users a way to edit the information themselves.

To open the Create Page Wizard in Page Designer:

  1. Click the Create icon Create (top-right) and select Page.
    The Create Page Wizard appears.
  2. Select Form.
  3. Select Form (again).
  4. Enter the following:
    1. Page Number - enter 4
    2. Page Name - enter Maintain Project
    3. Page Mode - select Modal Dialog
    4. Click Next.
  5. For Navigation Preference, enter the following:
    1. Select Do not associate this page with a navigation menu entry.
    2. Click Next.
  6. For Data Source, enter the following:
    1. Table / View name - click the List of Values icon LOV icon and select SAMPLE$PROJECTS (table)
    2. Click Next.
  7. For Create Form - Columns and Primary Key, enter the following:
    1. Primary Key Type - select Managed by Database (ROWID)
    2. Click Create.

Page Designer reloads displaying Page 4: Maintain Project.

5.3 Linking Project Cards to Maintain Project Form

You can now update the SQL queries on the Projects report to call the Maintain Project form.

Reconfigure the cards on the Projects page to display Maintain Project form when clicked.

To navigate to the Projects page (page 3) in Page Designer:

  1. On the toolbar, locate the Page Finder area.
  2. Do one of the following:
    • Click the Page Finder icon Page Finder and select 3 from the list.
    • Change the page number to 3 and press Enter.
    • Click the Navigate to Previous Page icon (down arrow).
    Page Designer loads Page 3: Projects.

To update the SQL query for the Projects region:

  1. Do one of the following to select the Projects region:
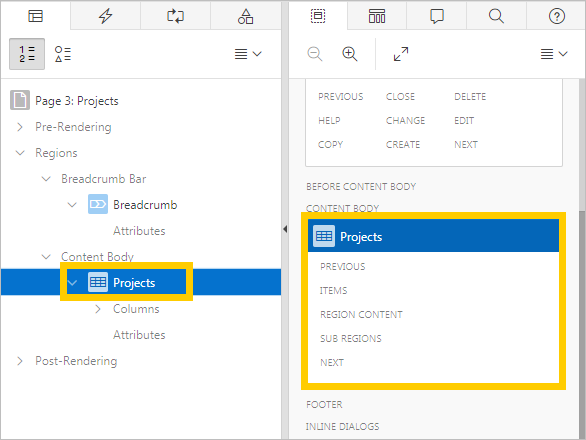
    • In the Rendering tab (left pane), under Regions - Content Body, select Projects.
    • In the Layout tab (center pane), scroll down and click the Projects region.
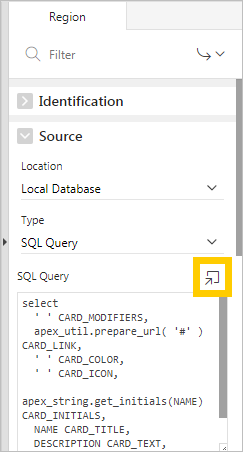
  2. In Property Editor (right pane), in the Source group, locate the SQL Query attribute.
  3. Click the Code Editor: SQL Query icon SQL Query to read the code more easily.

    Reviewing the SQL Query, you can see that the SQL uses alias names, such as CARD_MODIFIERS and CARD_LINK. These specific aliases are required by the Cards region to produce the correct output. The alias CARD_LINK can be updated to link to the new page you just created.

  4. In the SQL Query field, replace the contents with the following code:
    select ' ' card_modifiers
      , apex_util.prepare_url( 'f?p=&APP_ID.:4:&SESSION.:::4:P4_ROWID:'|| rowid ) card_link
      , ' ' card_color
      , ' ' card_icon
      , apex_string.get_initials(name) card_initials
      , name card_title
      , description card_text
      , 'Budget '|| to_char(budget,'L99G999') card_subtext
    from sample$projects
    Code Editor
    Description of the illustration code_editor_projects_sql.png
  5. Click the Validate icon Validate icon to verify.

    The message Validation successful displays at the top of the window.

  6. Click OK.
  7. Click Save and Run Page Save and Run Page.
    1. If you receive a warning dialog, click Try Again.

      Tip:

      You can also click the "Save" button and then "Save and Run Page" to avoid this warning.

    The Projects page loads in the runtime.
  8. Click a project to view the Maintain Project form for that project.

    You should hide several fields to restrict access. For example, if one had full access to project IDs or timestamps, one could easily compromise your database--by accident or otherwise.

To quickly return to Maintain Project form in Page Designer:

  1. On the Runtime Developer toolbar at the bottom of the screen, click Edit Page 4.

    Page Designer loads Page 4: Maintain Project.

5.4 Updating the Maintain Project Form in Page Designer

Use Page Designer to make the following updates to the Maintain Project form (page 4) to improve usability and security:

  • Hide a column by changing the type to hidden
  • Move an item within an existing region
  • Change an item to a select list
  • Change multiple items to text fields
  • Create a sub region to organize items into a read-only, expandable group

To rename a region:

  1. In the Rendering or Layout tab, click Create Form.
  2. In Property Editor:
    1. Identification: Title - enter Maintain Project

End users do not need to see the ID column in the form. Change P4_ID to a hidden column to keep it from rendering in the app at all.

To hide a column in Page Designer:

  1. In the Layout tab, click the P4_ID item.
  2. In Property Editor:
    1. Identification: Type - select Hidden.

To move an item in a region:

  1. In the Layout tab:
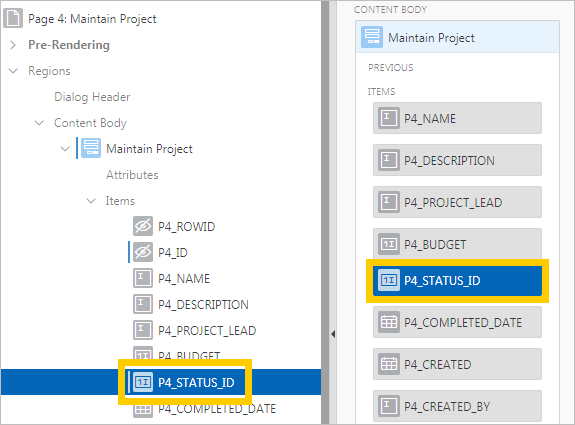
    1. Right-click the P4_STATUS_ID item.
    2. Select Move To, Maintain Project, Items, P4_BUDGET, and After.

      Tip:

      You can also use the mouse to drag and drop elements in the Rendering tab and Layout tab.
  2. Click Save Save.

To convert an item to a select list:

  1. Ensure P4_STATUS_ID is still selected.
  2. In the Property Editor:
    1. Identification: Type - select Select List.
    2. Label: Label - enter Status
    3. List of Values: Type - select SQL Query.
    4. List of Values: SQL Query - enter the following:
      select description d, id r
      from SAMPLE$PROJECT_STATUS
      order by display_order
    5. List of Values: Display Extra Values - select No.
    6. List of Values: Null Display Value - enter the following:
      - Select Status -


    Note:

    The above SQL uses the base table SAMPLE$PROJECT_STATUS which includes a column called display_order to ensure the records display in the correct order.
  3. Click Save.

To change multiple items simultaneously:

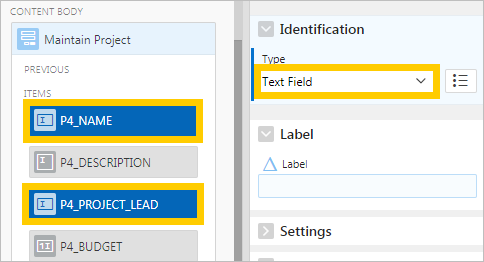
  1. Press and hold the Ctrl key and click the following items to select both of them:
    1. P4_NAME
    2. P4_PROJECT_LEAD
  2. In the Property Editor:
    1. Identification: Type - select Text Field.


    Note:

    When selecting multiple elements, the Property Editor only displays the attributes that all the selected elements have in common.

To create a collapsible sub region:

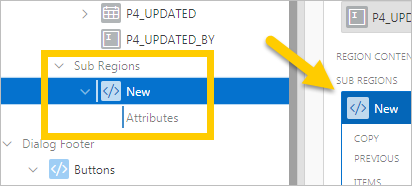
  1. In the Rendering tab, right-click the Maintain Project region and select Create Sub Region.

    The New sub region appears within the Sub Regions folder.


  2. In the Property Editor:
    1. Identification: Title - enter Audit Details
    2. Appearance: Template - select Collapsible.
    3. Server-side Condition: Type - select Item is NOT NULL.
    4. Server-side Condition: Item - enter P4_ROWID (you can also select the page from a pop-up list).

    Note:

    Setting the Server-side Condition checks that the Rowid is not null and only displays the region when a user updates the record.

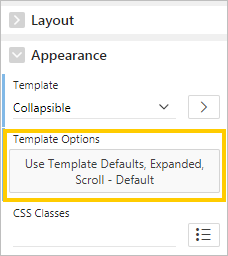
  3. Locate and click the Appearance: Template Options button (Use Template Defaults, Expanded, Scroll - Default).
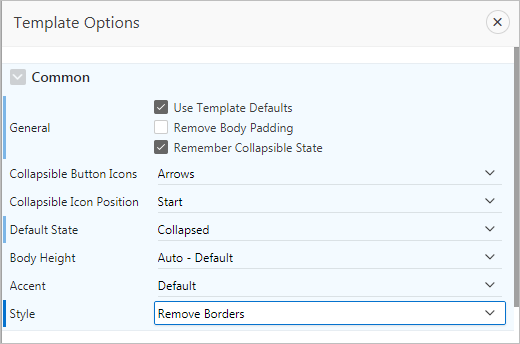
  4. In Template Options:
    1. General: Remember Collapsible State - select the check box
    2. Default State - select Collapsed
    3. Style - select Remove Borders
    4. Click OK.

    The Template Options button reflects the current configuration: "Use Template Defaults, Remember Collapsible State, Collapsed, Remove Borders, Scroll - Default".


    Template Options button

  5. Click Save.

Rather than using drag and drop, you can use Property Editor to move multiple items into the Audit Details sub region, convert them to Display Only, and switch their appearance template all at once.

To move items into a sub region with the Property Editor:

  1. Hold the Ctrl key and select the following items:
    • P4_CREATED

    • P4_CREATED_BY

    • P4_UPDATED

    • P4_UPDATED_BY

  2. In the Property Editor:
    1. Identification: Type - select Display Only
    2. Layout: Region - select ..Audit Details
    3. Appearance: Template - select Optional - Floating

      Note:

      The double periods are a shortening device for the names of sub regions in the interface. Think of it as actually reading "the sub region Audit Details."

    The items move into the sub region.
  3. Click Save.

The Maintain Project form is a modal page. You cannot run a modal page directly from Page Designer the way you can other pages. You must navigate to the associated non-modal page in the runtime (in this case, page 3 - Projects), then open the modal page from there.

To run the modal Maintain Project page:

  1. In the runtime, reload the Projects page. (Click your browser's refresh or reload button.)
  2. Click a project card.

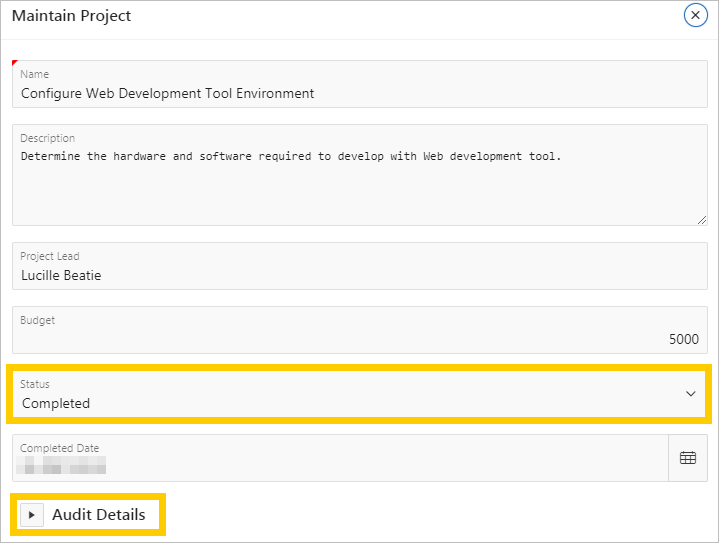
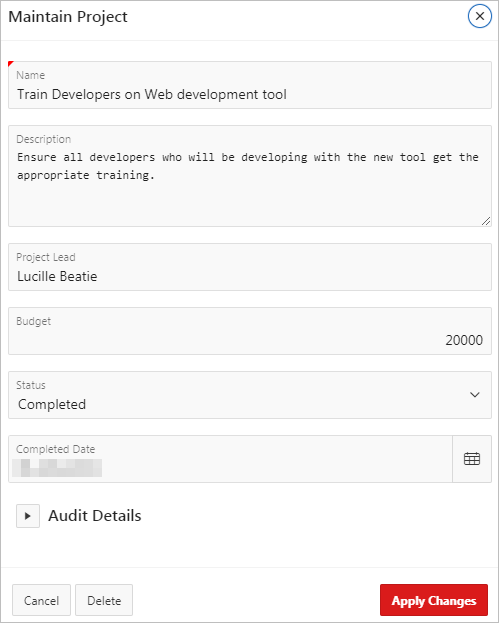
    Note the changed Status field and expandable Audit Details region. Trying clicking each and observe how the page responds.

  3. When finished, click Edit Page 4 on the toolbar to return to Maintain Project in Page Designer.

5.5 Creating a Dynamic Action

Add a Dynamic Action to the P4_STATUS_ID item select lists so that when the user changes the project Status to "Completed," the completion date displays.

Dynamic Actions within Application Express are used to declaratively define client-side behaviors without writing JavaScript or AJAX. Instead, the Application Express engine implements the necessary code based on your declaration.

To create a Dynamic Action:

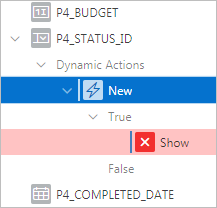
  1. In the Rendering tab, right-click the P4_STATUS_ID item and select Create Dynamic Action.

    A Dynamic Actions element populates as a child to P4_STATUS.


  2. In the Property Editor:
    1. Identification: Name - enter Show Completed Date
    2. Client-side Condition: Type - select Item = Value
    3. Client-side Condition: Value - enter 3

      Note:

      Entering 3 in the Value field (status_ID=3) targets the third item in the select list, which in this case is the "Completed" status.

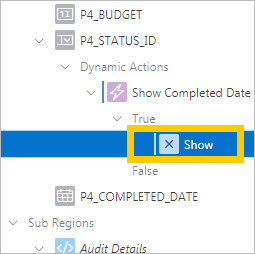
  3. In the Rendering tab, under the Show Completed Date dynamic action, select the Show element.
  4. In the Property Editor:
    1. Affected Elements: Items(s) - click the LOV icon and select P4_COMPLETED_DATE (you can also enter P4_COMPLETED_DATE).

For some types of Dynamic Actions (such as Show, Enable, and Expand Tree), you must also create the corresponding opposite action. With an opposite action, if the True When Condition affects elements one way, then the False When Condition affects elements the opposite way.

To add an opposite action:

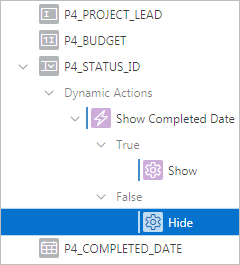
  1. In the Rendering tab, under Show Completed Date, right-click Show.
  2. Select Create Opposite Action.

    The Hide dynamic action populates (Hide is the opposite of Show).


    Here, the P4_COMPLETED_DATE item displays when P4_STATUS_ID equals Completed. When any other status is selected, P4_COMPLETED_DATE is hidden.

  3. Click Save.

5.6 Adding Validations to Completed Date

Page validations ensure the data entered by end users is correct. If a validation fails, then an error message is raised, and the values are not saved to the database.

Add two validations to the Completed Date item so that:

  • When a user changes the status to Completed, they must also add the date.
  • A user cannot enter a date in the future.

To create a new validation:

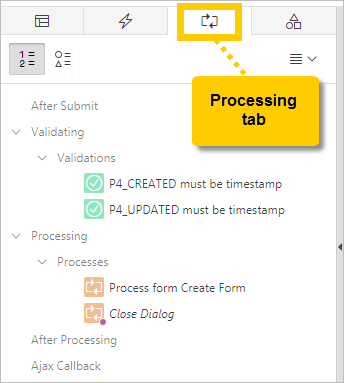
  1. On the Maintain Project page in Page Designer, click the Processing tab (rotating arrows) at the top of the Rendering tab.
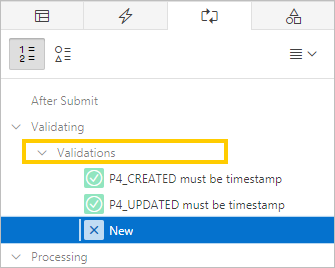
  2. Right-click the Validations element and select Create Validation.
  3. In the Property Editor:
    1. Identification: Name - enter Completed Date is Not Null
    2. Validation: Type - select Item is NOT NULL
    3. Validation: Item - enter P4_COMPLETED_DATE
    4. Error: Error Message - enter #LABEL# must have some value.
    5. Error: Associated Item - select P4_COMPLETED_DATE
    6. Server-side Condition: Type - select Item = Value
    7. Server-side Condition: Item - enter P4_STATUS_ID
    8. Server-side Condition: Value - enter 3

      This condition ensures that the validation only fires when the Status item is Completed.

      Note:

      The label from the associated item replaces the #LABEL# text within the Error Message. If you update the item label, the error message also updates automatically. This improves consistency and ensures that messages have current label references.

      Tip:

      When you click within an attribute in Property Editor, you can view examples of content (such as error messages) for that attribute by clicking the Help tab at the top of the Layout tab.
    9. Click Save.

To copy a validation:

  1. In the Processing tab, right-click Completed Date is NOT NULL and select Duplicate.

    The item "Completed Date is NOT NULL_1" appears, selected.

  2. In the Property Editor:
    1. Identification: Name - enter Completed Date is not Forward Dated
    2. Validation: Type - select PL/SQL Expression
    3. Validation: PL/SQL Expression - enter :P4_COMPLETED_DATE <= SYSDATE

      Tip:

      Ensure you include the colon ( : ). To reference a page item in PL/SQL, you use the :ITEM_NAME syntax. SYSDATE returns the current date from the Oracle Database.

    4. Error: Error Message - enter #LABEL# cannot be a future date
    5. Server-side Condition: Type - select Item is NOT NULL
    6. Server-side Condition: Item - enter P4_COMPLETED_DATE
  3. Click Save.
  4. In the runtime, reload the Projects page (reload the browser tab) and click a project card to display Maintain Project.

Try the following tasks to see how the application behaves:

  • Change the Status and see how the Completed Date displays or vanishes.
  • Find an In-Progress project, change the status to Completed but leave the Completion Date empty, and click Apply Changes. (An error message should display.)
  • Enter a Completion Date in the future and click Apply Changes. (An error message should display.)

When finished, click Application ##### on the Developer Toolbar to return to the Application home page.