7 Developing the Tasks Page

Use the Create Page Wizard to create a new Report with Form for end users to manage their project tasks.

About This Lesson

In this lesson, you add a new pair of pages to your app: Report with Form.

"Report with Form" (or "Report and Form") is the most common page construct within web applications. End users view the report and submit changes with a form page.

In your app, the Tasks report displays details for work to be done toward the associated project (based on the SAMPLE$PROJECT_TASKS table). The Update Task form enables users to update the task, such as changing the status or moving the due date.

Use the Create Page Wizard to generate the pair of pages. Begin with the Report page. Repeat some familiar tasks to develop the report (update Navigation Menu in Shared Components, hide extraneous columns, apply lookups to the report).

Apply a format mask for columns with set date and numbering formats.

Use the decode SQL statement to convert all instances of "Y" or "N" in a Yes/No column to display instead as Yes or No.

For the modal Form page, use Page Designer to refine the fields to mirror their counterparts in the Report. Many of the procedures for the Form are very similar to those for the Report.

Starting from here:

7 - Tasks.sql

If you have not completed the previous lessons, you can use the appendix "Importing an Application into a Workspace" to import the above SQL script into your workspace and continue working from this lesson forward. You can find this script in the /files subdirectory of where you unzipped the .zip file accompanying this tutorial.

7.1 Creating an Interactive Report Page

Use the Create Page Wizard to add a new interactive report with form page to your app. Base it on SAMPLE$PROJECTS_TASKS.

To add an interactive report with form to the application:

  1. In the Application home page, click Create Page.
  2. Click Report.
  3. Click Report with Form.
  4. For Page Attributes:
    1. Report Page Number - enter 6
    2. Report Page Name - enter Tasks
    3. Form Page Number - enter 7
    4. Form Page Name - enter Update Task
    5. Form Page Mode - select Modal Dialog
    6. Click Next.
  5. For Navigation Menu:
    1. Navigation Preference - select Create a new navigation menu entry
    2. Click Next.
  6. For Data Source:
    1. Table / View Name - click the LOV icon.
    2. Select SAMPLE$PROJECTS_TASKS
    3. In the list of Columns, double-click ID (Number) to move it to the left column (this removes it from display in the report).

      The ID column contains the numeric identifier for each row in the table. Users do not need to view or access this information at any time. Since you would hide the columns in both pages later anyway, this step saves you time.

    4. Click Next.
  7. For Form Page:
    1. Primary Key Column - select ID (Number)

      Note that the wizard removes ID to match the columns in the report in the previous screen.

    2. Click Create.

    The wizard creates the pages. Page Designer loads the interactive report page (page 6, Tasks).

The page contains the interactive report region Report 1.

To rename a report region:

  1. Click Report 1 in Layout tab or Rendering tab.
  2. In Property Editor:
    1. Identification: Title - enter Tasks
  3. Click Save and Run Page to view the interactive report in the runtime.

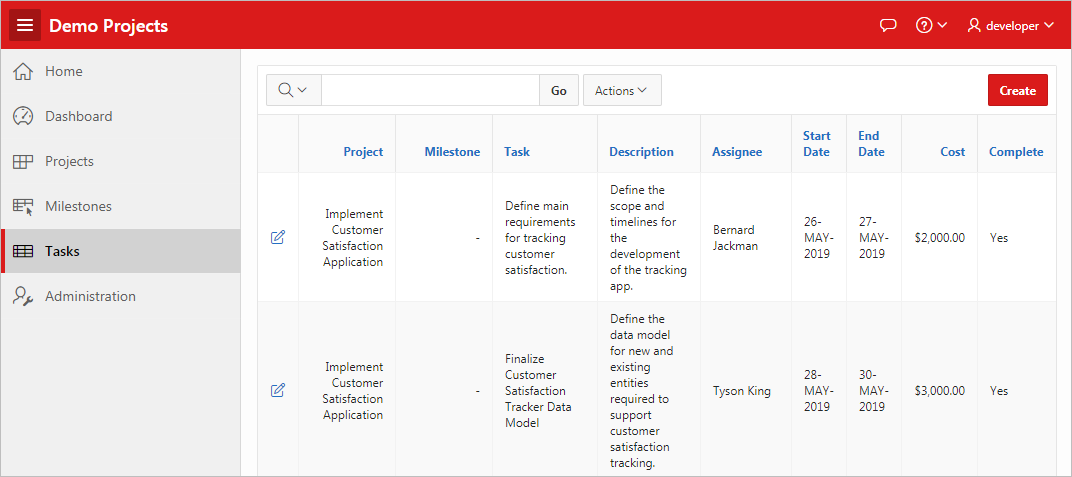
In the runtime, note that the Tasks item in the Navigation Menu (left side) displays last and has a blank icon. Note also that as you scroll right, the report displays numerical identifiers in several columns as well as audit detail columns.

Perform the same tasks as you did for Milestones to update the Tasks page.

7.2 Updating the Tasks Page in the Runtime

Complete some routine tasks in the runtime to perform an initial update to the Tasks page (similar to those that you performed for the Milestones page, except Tasks uses an interactive report instead of an interactive grid):

  • Update the Navigation Menu in Shared Components

  • Hide the audit columns from the default report in the runtime

To view the Navigation Menu in Shared Components:

  1. Click Edit Page 6 on the Runtime Developer toolbar to return to Page Designer.
  2. Near the Save button, click the Shared Components icon Shared Components.
  3. Under Navigation, click Navigation Menu.
  4. Click Desktop Navigation Menu.

To update the Tasks list entry:

  1. Click Tasks.
  2. For List Entry:
    1. Sequence - enter 60
    2. Image/Class - click the LOV icon and select fa-table
    3. Click Apply Changes.
  3. Click the Run icon (play button) in the top-right corner to run the app. Note the changes to the navigation sidebar.

Hide the audit columns from displaying in the default report in the runtime.

To hide multiple columns in an interactive report:

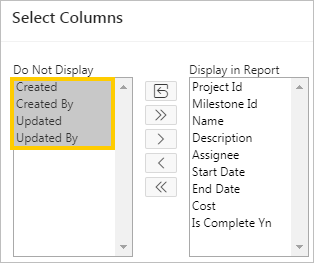
  1. Click the Actions menu and select Columns.
  2. In the list of columns under Display in Report, double-click the following items to move them to Do Not Display:
  3. Click Apply.

To save the report layout as the new default:

  1. Click the Actions menu, select Report, and click Save Report.
  2. In Save Report:
    1. Save - select As Default Report Settings
    2. Use the default setting (Primary) and click Apply.

7.3 Applying Lookups to the Tasks Interactive Report

The dynamic LOV you created earlier is also called a lookup (because the query "looks up" a value in another table).

First, copy the PROJECT NAME Dynamic LOV in Shared Components and configure it to query SAMPLE$PROJECT_MILESTONES.

Then apply the two lookups to the PROJECT_ID and MILESTONE_ID columns.

To copy an LOV:

  1. Click Edit Page 6 on the Runtime Developer toolbar to return to Page Designer.
  2. Click the Shared Components icon.
  3. Under Other Components, click List of Values.
  4. Click Copy.
  5. For Copy List of Values:
    1. Copy List of Values - select PROJECT NAME - Dynamic
    2. New List of Values Name - enter Milestone Name
    3. Click Copy.

    The Lists of Values screen redisplays with the MILESTONE NAME item.

  6. Click MILESTONE NAME.
  7. Under Query, delete the contents then copy and paste the following code:
    select NAME d, ID r
    from SAMPLE$PROJECT_MILESTONES
    order by NAME
  8. Click the Validate icon (checkmark) to confirm the query works.
  9. Click Apply Changes.
  10. Click the Edit Page 6 icon in the top-right to return to the Tasks page in Page Designer.

Apply the Project Name dynamic LOV to the PROJECT_ID column (similar to the process for the Milestones page). Then apply the Milestone Name dynamic LOV to MILESTONE_ID.

To apply the PROJECT NAME LOV to an interactive report:

  1. In the Rendering tab, under Tasks, expand Columns and select PROJECT_ID.
  2. In Property Editor:
    1. Identification: Type - select Plain Text (based on List of Values)
    2. List of Values: List of Values - select PROJECT NAME
    3. Heading: Heading - enter Project
    4. Click the Save button.

To apply the MILESTONE NAME LOV to an interactive report:

  1. In the Rendering tab, under Columns, select MILESTONE_ID.
  2. In Property Editor:
    1. Identification: Type - select Plain Text (based on List of Values)
    2. List of Values: List of Values - select MILESTONE NAME
    3. Heading: Heading - enter Milestone
  3. Click Save and Run Page.
  4. Scroll down the report to review the Project and Milestone columns in the Runtime. When finished, click Edit Page 6 to return to Page Designer.

7.4 Updating the Remaining Columns in the Tasks Report

Update the other remaining columns in the Tasks interactive report from their raw state generated by the Create Page Wizard:

  • NAME

  • START_DATE

  • END_DATE

  • COST

  • IS_COMPLETE_YN

To update a column heading in an interactive report:

  1. In the Rendering tab, under Tasks, expand Columns and select NAME.
  2. In Property Editor:
    1. Heading: Heading - enter Task

To apply a date format mask to multiple columns:

  1. In the Rendering tab, hold Ctrl and select the two following columns:
    1. START_DATE
    2. END_DATE
  2. In Property Editor:
    1. Appearance: Format Mask - click the LOV icon
    2. Select 12-JAN-2004.

      Tip:

      You can also enter DD-MON-YYYY in the field without opening the list.

    3. Click Save.

To apply a dollar amount format mask to a column:

  1. In the Rendering tab, select COST.
  2. In Property Editor:
    1. Appearance: Format Mask - click the LOV icon
    2. Select $5,234.10.
    3. Click Save.

To configure an interactive report with a _YN column to display "Yes" and "No" (instead of Y or N):

  1. In the Rendering tab, select IS_COMPLETE_YN.
  2. In Property Editor:
    1. Heading: Heading - enter Complete
    2. Click Save.
  3. Click the Tasks report region (under Content Body in the Rendering tab).
  4. In Property Editor:
    1. Source: Type - select SQL Query.
    2. Source: SQL Query - delete the contents then copy and paste the following code:
      select ID,
             PROJECT_ID,
             MILESTONE_ID,
             NAME,
             DESCRIPTION,
             ASSIGNEE,
             START_DATE,
             END_DATE,
             COST,
             decode(is_complete_yn, 'Y', 'Yes', 'No') IS_COMPLETE_YN,
             CREATED,
             CREATED_BY,
             UPDATED,
             UPDATED_BY
        from SAMPLE$PROJECT_TASKS

    The decode statement is used to compare the column value against the first value ("Y") and replace it with the next value ("Yes"), and otherwise replace it with the final value ("No").

  5. Click Save and Run Page.
  6. Review your changes to the report in the runtime. When finished, proceed to the next section.

7.5 Updating the Project and Milestone Fields in the Update Task Form

When you created the Tasks Report with Form in the Create Page Wizard, you chose to make the form modal. (If you had left the check box unselected, it would be a separate page in the runtime instead of a pop-up overlay.) To view a modal page in the runtime, you must open it from its associated report.

Open the Update Task form by clicking one of the Edit icons in the Tasks interactive report.

To view a modal form for an interactive report in the runtime:

  1. Click the Edit icon (pencil) for a row.

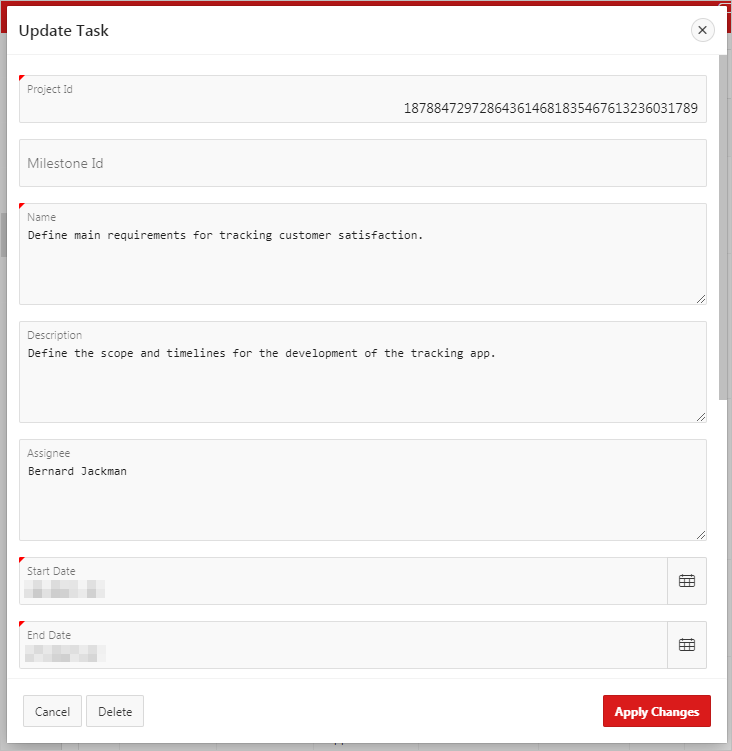
    The Update Task form displays.

    Note also that the page number on the Runtime Developer toolbar changed from the report (page 6) to the form (page 7).

The form is still in a raw state, but because it is based on SAMPLE$PROJECT_TASKS, the development process is very similar to what you did for the report:

  • The Milestone and Project name fields use numeric identifiers instead of names.

  • The names of some fields (such as "Project Id") should be user-friendly.

  • Some fields are editable text fields instead of restricted select lists or display only.

  • The audit columns do not need to display here (they are present in the report).

Start by applying the PROJECT NAME and MILESTONE NAME lookups to the appropriate fields.

To return to Page Designer using Quick Edit:

  1. On the Runtime Developer toolbar, click Quick Edit (Quick Edit).

    You enter Quick Edit mode. The screen darkens and when you mouse over different elements a wrench icon displays.

  2. In Quick Edit mode, click the Project Id field (do not click the wrench icon).

    Page Designer loads with P7_PROJECT_ID selected.

To apply lookups to the Project and Milestone fields:

  1. In Property Editor:
    1. Identification: Type - select Select List.
    2. Label: Label - enter Project
    3. List of Values: Type - select Shared Component.
    4. List of Values: List of Values - select PROJECT NAME
  2. Click P7_MILESTONE_ID.
  3. In Property Editor:
    1. Identification: Type - select Select List.
    2. Label: Label - enter Milestone
    3. List of Values: Type - select Shared Component.
    4. List of Values: List of Values - select MILESTONE NAME
  4. Click Save.

    Remember that you cannot run a modal page straight from Page Designer.

  5. Return to the runtime and refresh the page, then click an Edit icon (pencil) to redisplay the form.

    (Remember that you cannot run a modal page directly from Page Designer. You must run the non-modal page associated with it, then reopen it.)

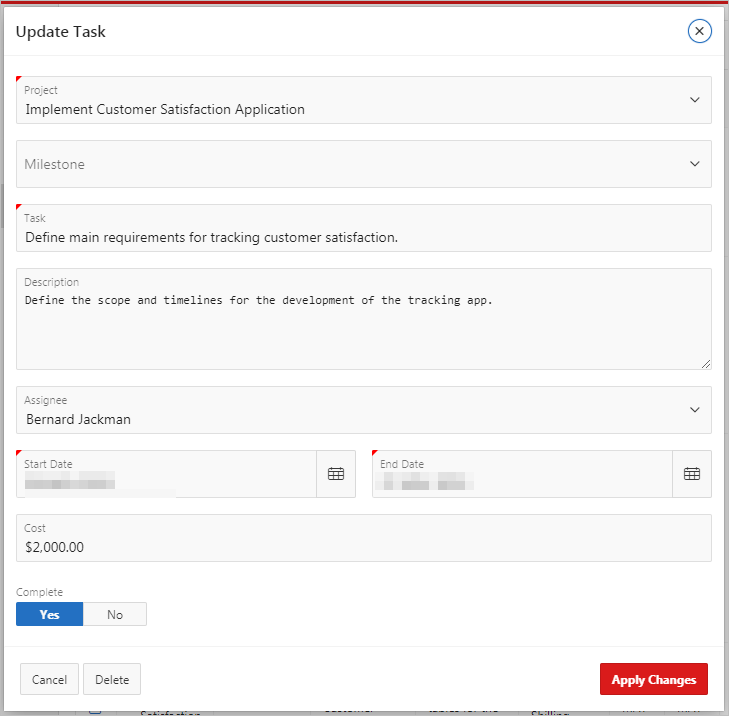
  6. Note the changed Project and Milestone fields. Click each to see how they behave.
  7. When finished, click Edit Page 7 on the Runtime Developer toolbar.

7.6 Updating the Remaining Fields in the Update Task Form

Finally, perform a series of small tasks to update the Update Task form's presentation:
  • Name - change the Name field to a text field and change the label to Task.
  • Assignee - change to a select list based on SQL query.
  • Start Date and End Date - change the format mask to DD-MM-YYYY.
  • Cost - change the alignment and format mask ($5,234.10).
  • Is Complete Yn - change the label and type to a switch.
  • Hide the audit columns (Created, Created By, Updated, Updated By).

To update the P7_NAME field:

  1. Click P7_NAME.
  2. In Property Editor:
    1. Identification: Type - select Text Field.
    2. Label: Label - enter Task

To update the P7_ASSIGNEE field:

  1. Click P7_ASSIGNEE.
  2. In Property Editor:
    1. Identification: Type - select Select List.
    2. List of Values: Type - select SQL Query.
    3. List of Values: SQL Query - copy and paste the following code:
      select distinct ASSIGNEE as d, 
             ASSIGNEE as r
        from SAMPLE$PROJECT_TASKS
       order by 1
    4. Click Save.

To update the P7_START_DATE and P7_END_DATE fields:

  1. Hold Shift or Ctrl and click P7_START_DATE and P7_END_DATE to select them both.
  2. In Property Editor:
    1. Appearance: Format Mask - click the LOV icon.
    2. Select 12-JAN-2004.
    3. Settings: Show - select Both.
  3. Click P7_END_DATE to only select it.
  4. In Property Editor:
    1. Layout: Start New Row - select No.
    2. Click Save.

To update the P7_COST field:

  1. Click P7_COST.
  2. In Property Editor:
    1. Settings: Number Alignment - select Left.
    2. Appearance: Format Mask - click the LOV icon.
    3. Select $5,234.10.
    4. Click Save.

To update the P7_IS_COMPLETE_YN field:

  1. Click P7_IS_COMPLETE_YN.
  2. In Property Editor:
    1. Identification: Type - select Switch.
    2. Label: Label - enter Complete

To hide the audit column fields:

  1. Hold Ctrl or Shift and select the four following items:
    • P7_CREATED

    • P7_CREATED_BY

    • P7_UPDATED

    • P7_UPDATED_BY

  2. In Property Editor:
    1. Identification: Type - select Hidden.
    2. Click Save.
  3. Return to the runtime and refresh the page.
  4. Click an Edit icon (pencil) to redisplay the form.
  5. Review your changes. Try clicking around the form to explore the new interface. When finished, click Application ##### on the Runtime Developer toolbar to return to the Application home page.

The Tasks report with form is complete. Proceed to the next lesson.