Setting Up Oracle Backend with Firebase APIs Projects
This chapter provides an overview of an Oracle Backend with Firebase APIs project and its key components. It defines the vocabulary, shows how projects organize applications and services, and then covers how the Console and CLI are used to manage those projects after the foundational concepts are in place.
Introduction to Projects
An Oracle Backend with Firebase APIs project is a workspace that gathers together the backend services your applications consume. When you create a project, you create the trust boundary that holds authentication providers, a database schema, storage configuration, and security rules. Everything that your connected applications need to interact with the backend is configured through that project, which makes it the single place to manage shared services.
Why Projects Matter
Projects matter because they reduce repeated work and keep backend behavior predictable:
-
Single source of truth: Authentication, database collections, and storage policies are defined once at the project level, and then inherited by all applications registered in the project.
-
Consistency across apps: Two or more applications under the same project use the same lifecycle rules, roles, and metadata, which keeps behavior aligned during development, testing, and production releases.
-
Lifecycle control: The project authorizes when services are created, modified, or retired, so every backend change flows through a controlled project configuration.
-
Developer productivity: With services grouped inside a project, developers can focus on building features instead of wiring separate backend environments for each app.
Working with a Project (Console or CLI)
Once a project is created, developers can manage it using either the Console UI or the Command Line Interface (CLI). Both options provide full access to project lifecycle operations, but they serve different needs: the Console is ideal for interactive management, while the CLI is better suited for automation and scripting.
Using the Console UI
The Oracle Backend with Firebase APIs Console offers an intuitive, web-based interface for creating and managing your projects and apps.
Figure 5-1 Console UI
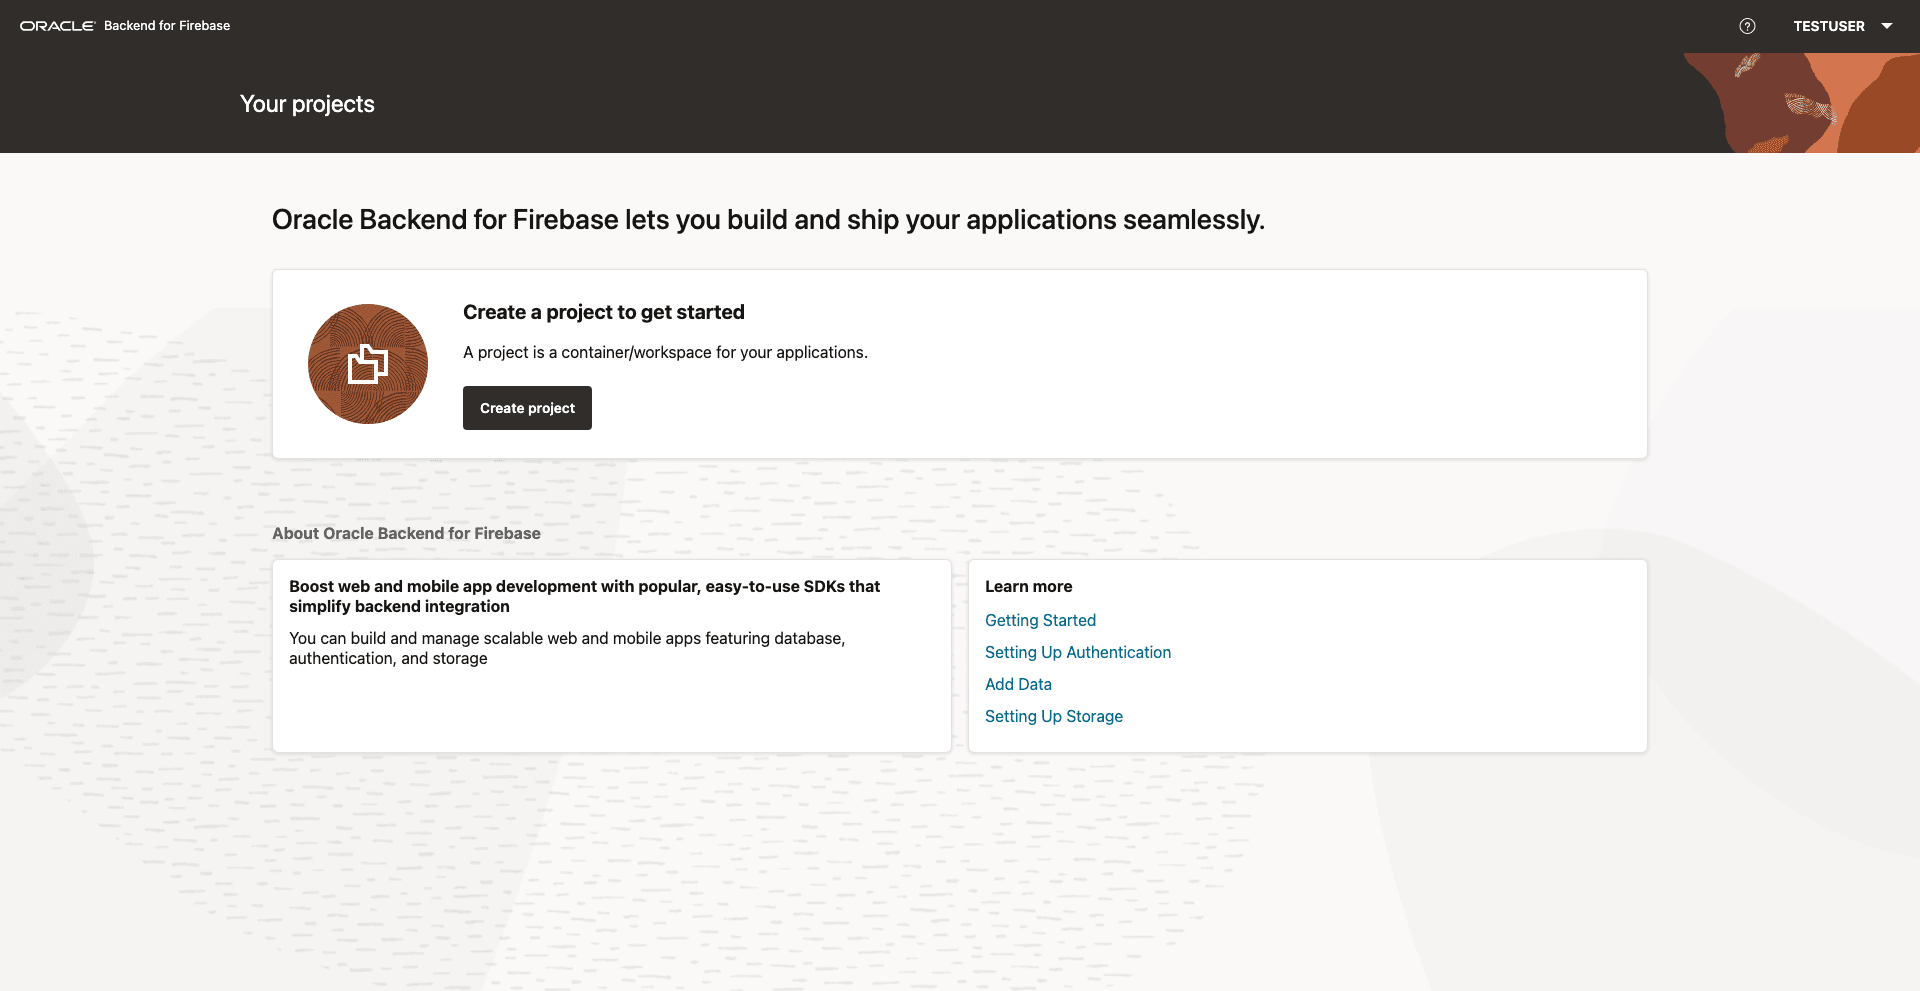
Overview of the Console
When you log in to the Oracle Backend with Firebase APIs Console, you’ll see a navigation panel on the left with quick links to your core backend resources:
-
Overview: See a high-level summary of your project and recent activity.
-
Project settings: Manage fundamental project details, access keys, and permissions.
-
Authentication: Add and configure sign-in methods.
-
Database: Set up and manage your data collections or tables.
-
Storage: Manage the object storage for your files.
Project Settings
The Project settings page (pictured in the preceding figure) is where you configure the essential details for your project:
-
Project name: The display name for your project.
-
Project ID: A unique identifier generated for your project.
-
Project owner: The primary user or admin responsible for the project.
-
Project tag: Used to group or describe the environment (for example, “In development”).
-
Web API Key: (if applicable) Used by client apps to securely identify themselves.
You can switch between tabs at the top for further configuration:
-
Applications: Register and manage the apps connected to your project.
-
Project members and permissions: Invite teammates and control their access levels.
-
SMTP settings: Set up email for authentication features like sign-up confirmation or password reset.
-
Authorized domains: Manage which domains or origins can interact with your project.
Using the CLI
You can also use the Oracle Backend with Firebase APIs CLI to create and manage projects from your terminal or command prompt.
The CLI provides command-line tools for initializing new projects, registering apps, and configuring authentication, database, and storage.
After installing the CLI, you can use it to automate setup steps, manage project settings, and retrieve configuration files for different app platforms.
This method is ideal if you prefer working from the terminal or want to script and automate your project setup process.
To learn more about the CLI, see CLI Overview.
How Projects Relate to Applications and Services
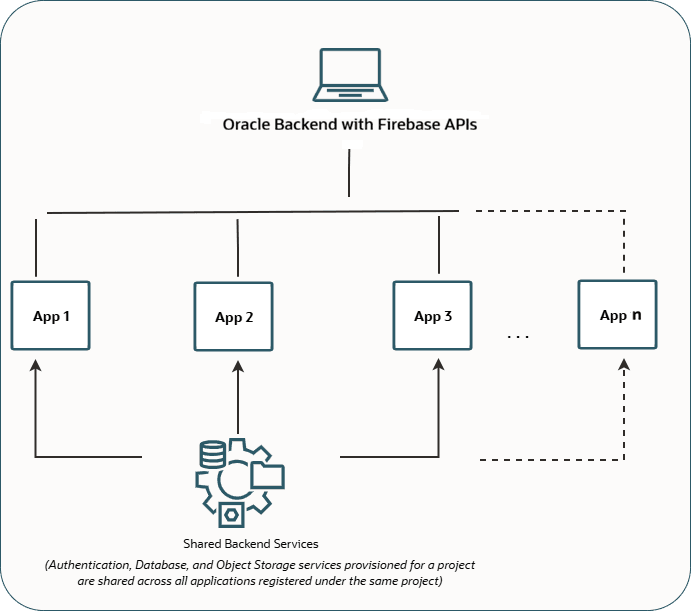
Projects are the top-level entity; applications and services live inside them.
Figure 5-2 Project Hierarchy Diagram
-
Projects define backend services, track metadata, and are owned by a single database user that acts as the project owner.
-
Applications are clients (web, Android, iOS, admin portals) that register with a project so they can consume the services, which the project exposes.
-
Services such as authentication providers, the database schema, and object storage buckets are bound to the project, not individual applications, which ensures every app wired to the project sees the same service surface.
Understanding this hierarchy informs scalability: add or remove apps without reconfiguring services, and keep service state centralized so team members know where to look when a backend change is needed.
What a Project Contains
A project consists of these components:
-
Authentication services: The identity providers and user lifecycle settings the applications use to sign users in.
-
Database schema and collections: The Oracle schema that stores your collections and documents plus security and indexing rules.
-
Object storage configuration: If the project uses DBFS-backed storage, the buckets and access policies live here.
-
Security rules and access policies: Permissions that define what authenticated users can read, write, or delete.
-
Project metadata: IDs, tags, display names, ORDS endpoints, and other configuration stored in the
BAASSYSschema that tracks every project. -
Project roles and permissions: Owner, developer, and viewer roles that team members can assume inside the project.
Because all of these elements live inside the project, the project becomes the central inventory that developers use to understand how their applications will behave.
Ownership, Access, and Boundaries
Every project is owned by one database user (or schema), and that ownership defines the boundaries of what can be configured. Each database user can own only one project, which prevents overlapping configurations and keeps the ownership model clean. The owner configures services and controls project-level roles. The same schema also stores the data you operate on, so its privileges, limits, and audit characteristics are tied directly to the project.
If you need multiple projects, create a separate schema for each one. That schema is the project owner, carries the BAAS_ROLE privilege, and is the only place you can store that project’s backend resources, while the BAASSYS schema continues to track the project metadata for every project in the system. This approach clarifies where each project’s data lives and what database-level permissions are required for administration.
Database Roles and Project Roles
Signing in to the Console is not the same as being able to create or manage a project. The difference lies in the database user behind the Console account.
-
Database roles such as
DBAorBAAS_ROLEdetermine whether a user can prepare a schema and enable Oracle Backend with Firebase APIs in the first place. -
Project roles (owner, developer, viewer) control what actions someone can take inside a specific project after it exists.
If a user can authenticate but still cannot create a project, missing schema enablement or a lack of the toolkit role are common causes, though other configuration or environment issues may also block project creation.
Table 5-1 User Roles
| User Role | Description |
|---|---|
Database Administrator (DBA) |
This role is used by environment administrators to prepare other database users for Oracle Backend with Firebase APIs; requires the authority to grant toolkit roles and call schema-enabling procedures. This is not the role for every developer, only for those who manage user provisioning. |
Toolkit Developer (BAAS_ROLE) |
The standard role for a schema that owns a project. A user with BAAS_ROLE can create projects, work with collections and storage, and use the SDKs, but cannot grant toolkit access to other users. |
The documentation recognizes three categories of people:
-
Database administrators prepare schemas, grant toolkit roles, and run enabling procedures.
-
Toolkit developers own projects, configure services, and build the applications that consume them.
-
Application users are end users who sign in through the configured authentication providers and are users of the apps you build.
After the database administrator enables a schema, the project owner can use project roles to invite other developers or viewers into the project without changing the database privileges. That keeps administrative access separate from everyday project work.
Administrative Preparation Before Project Creation
Enabling a schema for Oracle Backend with Firebase APIs is typically handled by a database administrator before a developer can create the project. The administrator does the following:
-
Creates the database user (schema) that will own the project.
-
Grants session and resource privileges:
GRANT CREATE SESSION TO <username>; GRANT RESOURCE TO <username>; -
Optionally grants storage support if DBFS-backed storage is required:
GRANT DBFS_ROLE TO <username>; -
Calls the toolkit schema-enablement procedure using a user with the
DBArole. Do not run this procedure asSYSorSYSTEM; use anotherDBAuser in the target PDB:BEGIN OBAAS_ADMIN.OBAAS_ENABLE_SCHEMA('USER1', 'BASE_PATH', 'user1', FALSE); END; /
-
'USER1'is the schema being enabled. -
'BASE_PATH'is the ORDS URL mapping type, equivalent top_url_mapping_typeinORDS.ENABLE_SCHEMA. -
'user1'is the ORDS path mapping pattern, equivalent top_url_mapping_pattern; it becomes the path segment ORDS uses when exposing the enabled schema. -
FALSEindicates that automatic REST authorization is not turned on for the metadata catalog.
When this procedure succeeds, the schema receives the BAAS_ROLE privilege and is ready for project creation. The p_url_mapping_type, p_url_mapping_pattern, and p_auto_rest_auth parameters follow the same behavior as ORDS.ENABLE_SCHEMA.
Application Registration Within a Project
Registering an application tells the toolkit which clients (web, mobile, or admin apps) should connect to the project. The application itself does not redefine services; it simply references the configuration that the project already holds. Because the project manages authentication providers, database collections, and storage, adding a new app lets that client immediately reuse those services without duplicating backend work.
Think of the project as the backend container and each application as an entry point into that container. The developer adds one or more applications after the project is created so that the shared backend configuration can power multiple clients.
See Also:
For detailed steps on wiring this configuration into a specific app type, see:
App Configuration and Project Configuration
After registering an application, the toolkit generates a configuration object that the SDK uses to connect the application to the project. This configuration identifies the app, the project ID, the ORDS host, and which services (authentication, storage) are currently enabled. It is not a secret; it is usually distributed with the client so the SDK can find the right project.
If the project enables a new service after the configuration is generated, you do not need to re-create the application. Instead, request the configuration again so the client reflects the updated service set. Because the configuration mirrors the current project state, it always shows what the application will consume at runtime. The configuration is not the same as admin credentials.
App Configuration
Common configuration fields include:
-
The project and application identifiers
-
The schema name
-
The ORDS host and service endpoints
-
The enabled authentication provider and storage bucket names
Example 5-1 Web Application Configuration
const fusabaseConfig = {
  "schema": "<SCHEMA_NAME>",
  "app_name": "<APP_NAME>",
  "app_type": "WEB",
  "app_id": "<APP_ID>",
  "objs_type": "<OBJS_TYPE_OR_NONE>",
  "project_id": "<PROJECT_ID>",
  "storage_bucket": "<STORAGE_BUCKET_OR_NONE>",
  "auth_type": "<AUTH_TYPE_OR_NONE>",
  "auth_id": "<AUTH_ID_OR_NONE>",
  "ords_host": "http://<ORDS_HOST>/ords/<SCHEMA_NAME>/"
};
Example 5-2 Android or iOS Configuration File
{
  "schema": "<SCHEMA_NAME>",
  "app_name": "<APP_NAME>",
  "app_type": "<ANDROID_OR_IOS>",
  "app_id": "<APP_ID>",
  "objs_type": "<OBJS_TYPE_OR_NONE>",
  "project_id": "<PROJECT_ID>",
  "storage_bucket": "<STORAGE_BUCKET_OR_NONE>",
  "auth_type": "<AUTH_TYPE_OR_NONE>",
  "auth_id": "<AUTH_ID_OR_NONE>",
  "ords_host": "http://<ORDS_HOST>/ords/<SCHEMA_NAME>/"
}
Example 5-3 Flutter or Dart Configuration
Map<String, dynamic> options = {
  "schema": "<SCHEMA_NAME>",
  "app_name": "<APP_NAME>",
  "app_type": "DART",
  "app_id": "<APP_ID>",
  "objs_type": "<OBJS_TYPE_OR_NONE>",
  "project_id": "<PROJECT_ID>",
  "storage_bucket": "<STORAGE_BUCKET_OR_NONE>",
  "auth_type": "<AUTH_TYPE_OR_NONE>",
  "auth_id": "<AUTH_ID_OR_NONE>",
  "ords_host": "http://<ORDS_HOST>/ords/<SCHEMA_NAME>/"
};
These examples show the configuration that the SDK reads. They are regenerated whenever you need to refresh the application’s view of the project.
Managing a Project in Practice
The following sections describe the main operational tasks used to manage a project after you understand the project model.
Creating a Project
Once the schema is prepared, the project owner creates a project inside the Console.
See Also: Administrative Preparation Before Project Creation
Once a project is initialized, applications can be added to it and they can immediately begin consuming the backend services defined at the project level.
-
Log in to the Oracle Backend with Firebase APIs Console.
-
Navigate to the Projects section.
-
Click Create Project and provide the project name.
-
Choose either to set everything up yourself or use the quick start, which will set up authentication and file storage for you.
-
Click Create to initialize the project.
Each project is assigned a unique project_id. After creation, you are shown which projects you have access to and you can begin adding Oracle Backend with Firebase APIs to your apps.
Managing Projects Using the Console and CLI
The Console UI is the interactive surface for project definitions. When you open a project, you see navigation links to Overview, Project settings, Authentication, Database, and Storage. The Project settings page covers:
-
The project name, ID, owner, and tags.
-
Web API keys (if your apps need them).
-
Tabs for Applications, Project members and permissions, SMTP settings, and Authorized domains.
Use the Console for visual management, service configuration, and reviewing project activity. Switch tabs to invite members, add authentication providers, or tune security rules.
The CLI complements the Console by letting you automate project initialization, register applications, and fetch configuration files from scripts. After installing the CLI, use it to create and manage projects, retrieve generated configuration for different platforms, and orchestrate deployments.
Prerequisite for Using the CLI
Set up the CLI for Oracle Backend with Firebase APIs.
See Also: Configure the CLI for more information about installing and configuring the CLI.
Assigning Project Roles to Other Users
Project owners grant other toolkit users access by adding them on the Project members and permissions tab inside Project settings.
-
Open the project in the Console.
-
Select Project settings > Project members and permissions.
-
Click Add project member and choose the user.
-
Assign a role:
-
Viewer for read-only access
-
Developer for interactive read/write access
-
-
Click Add project member to save.
Figure 5-3 Add a Project Member
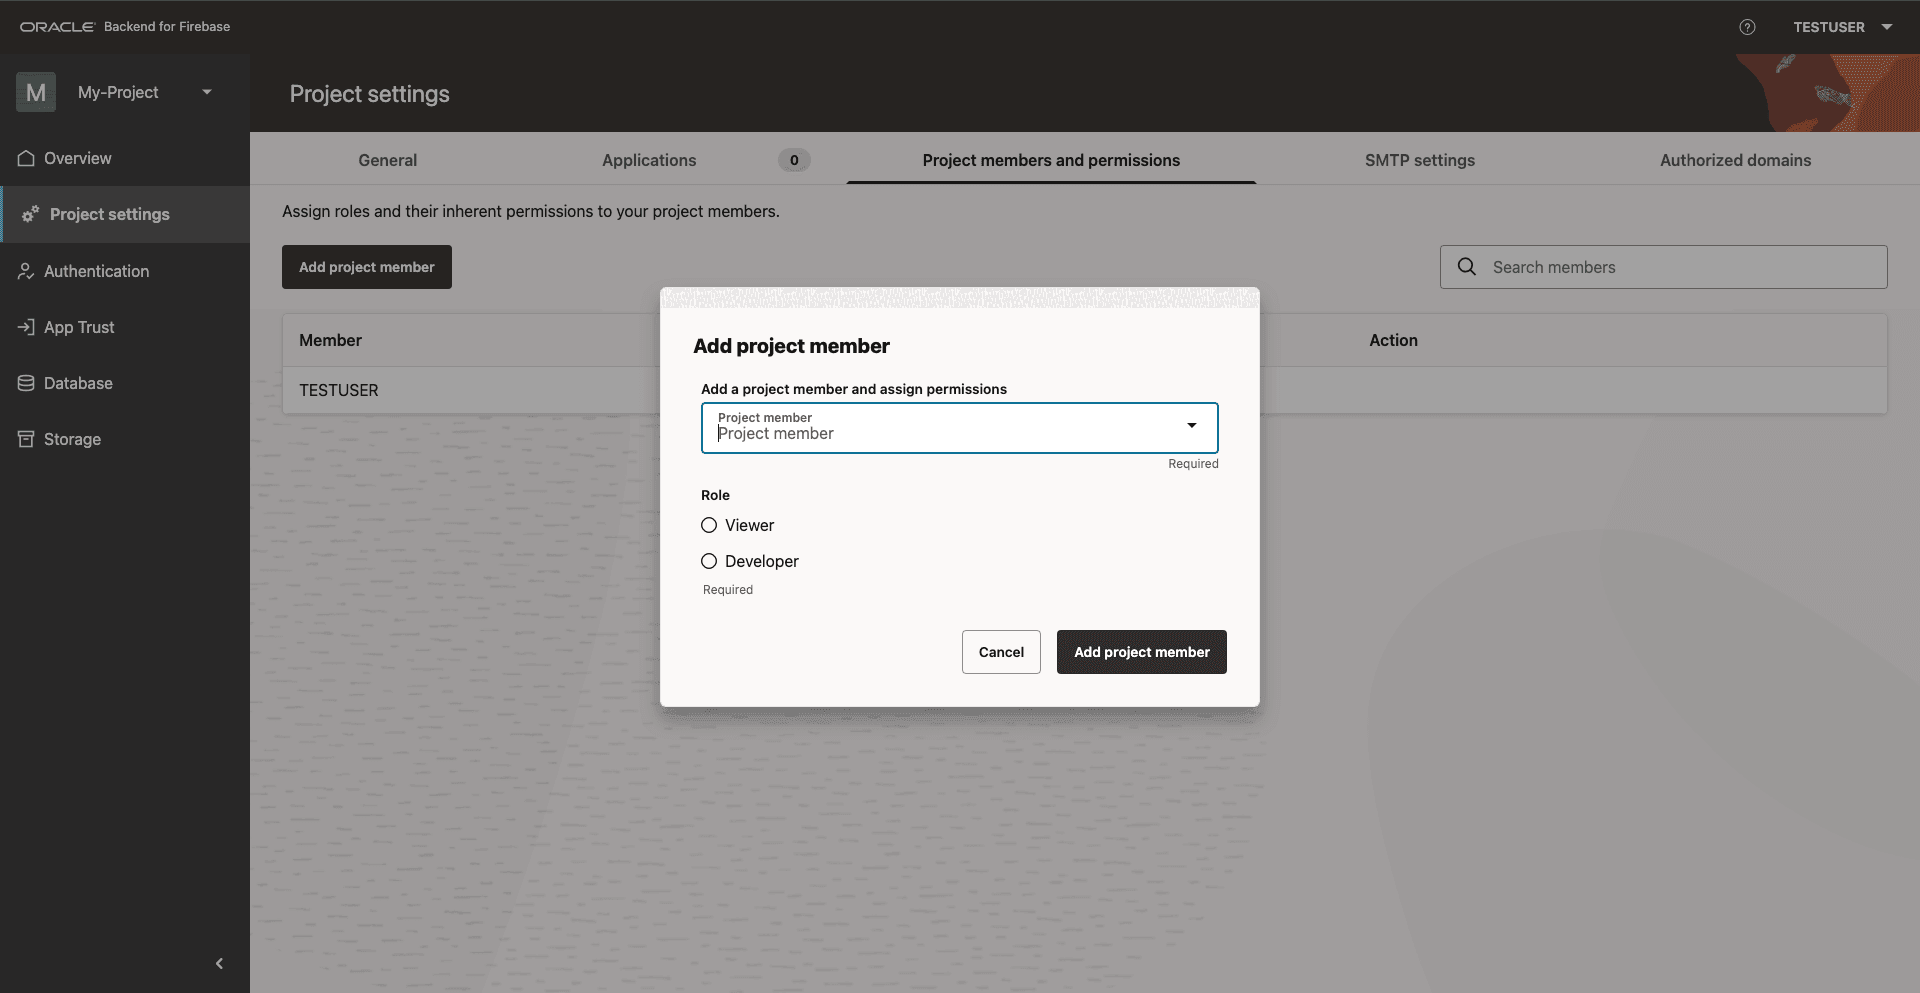
Use this interface whenever you want a teammate to work inside the project without changing the database-level privileges.
Syncing Project Data
Use Sync when a project member cannot yet see newly created collections or database updates.
-
Open the project in the Console.
-
Go to Database, and stay on the Data tab.
-
Click Sync to refresh the shared view.
Figure 5-4 Sync Data on the Database Page
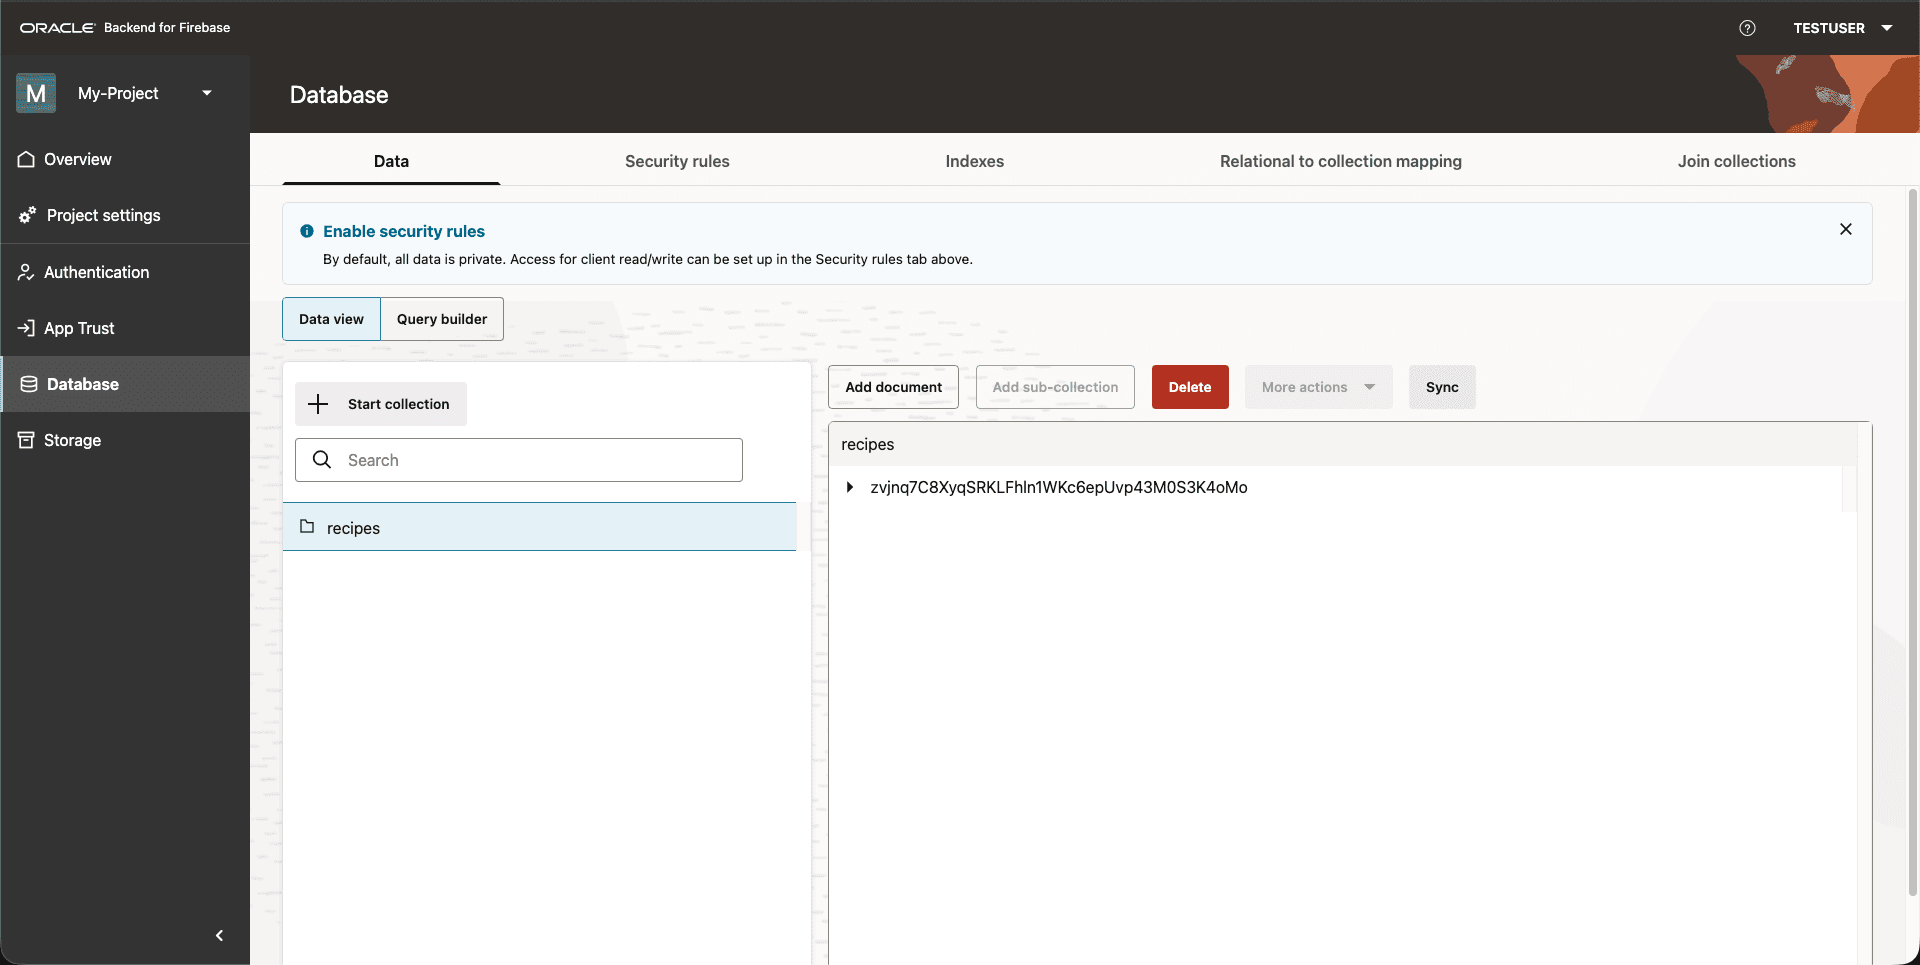
Sync ensures everyone sees the current database schema after updates or after new members are added.
Revoking Project Access
To remove someone from a project:
-
Open the project in the Console.
-
Go to Project settings > Project members and permissions.
-
Find the user, open their action menu, and click Remove member.
-
Alternatively, choose Edit permissions if you just need to change their role.
Figure 5-5 Action Menu with Edit Permissions and Remove Member Options
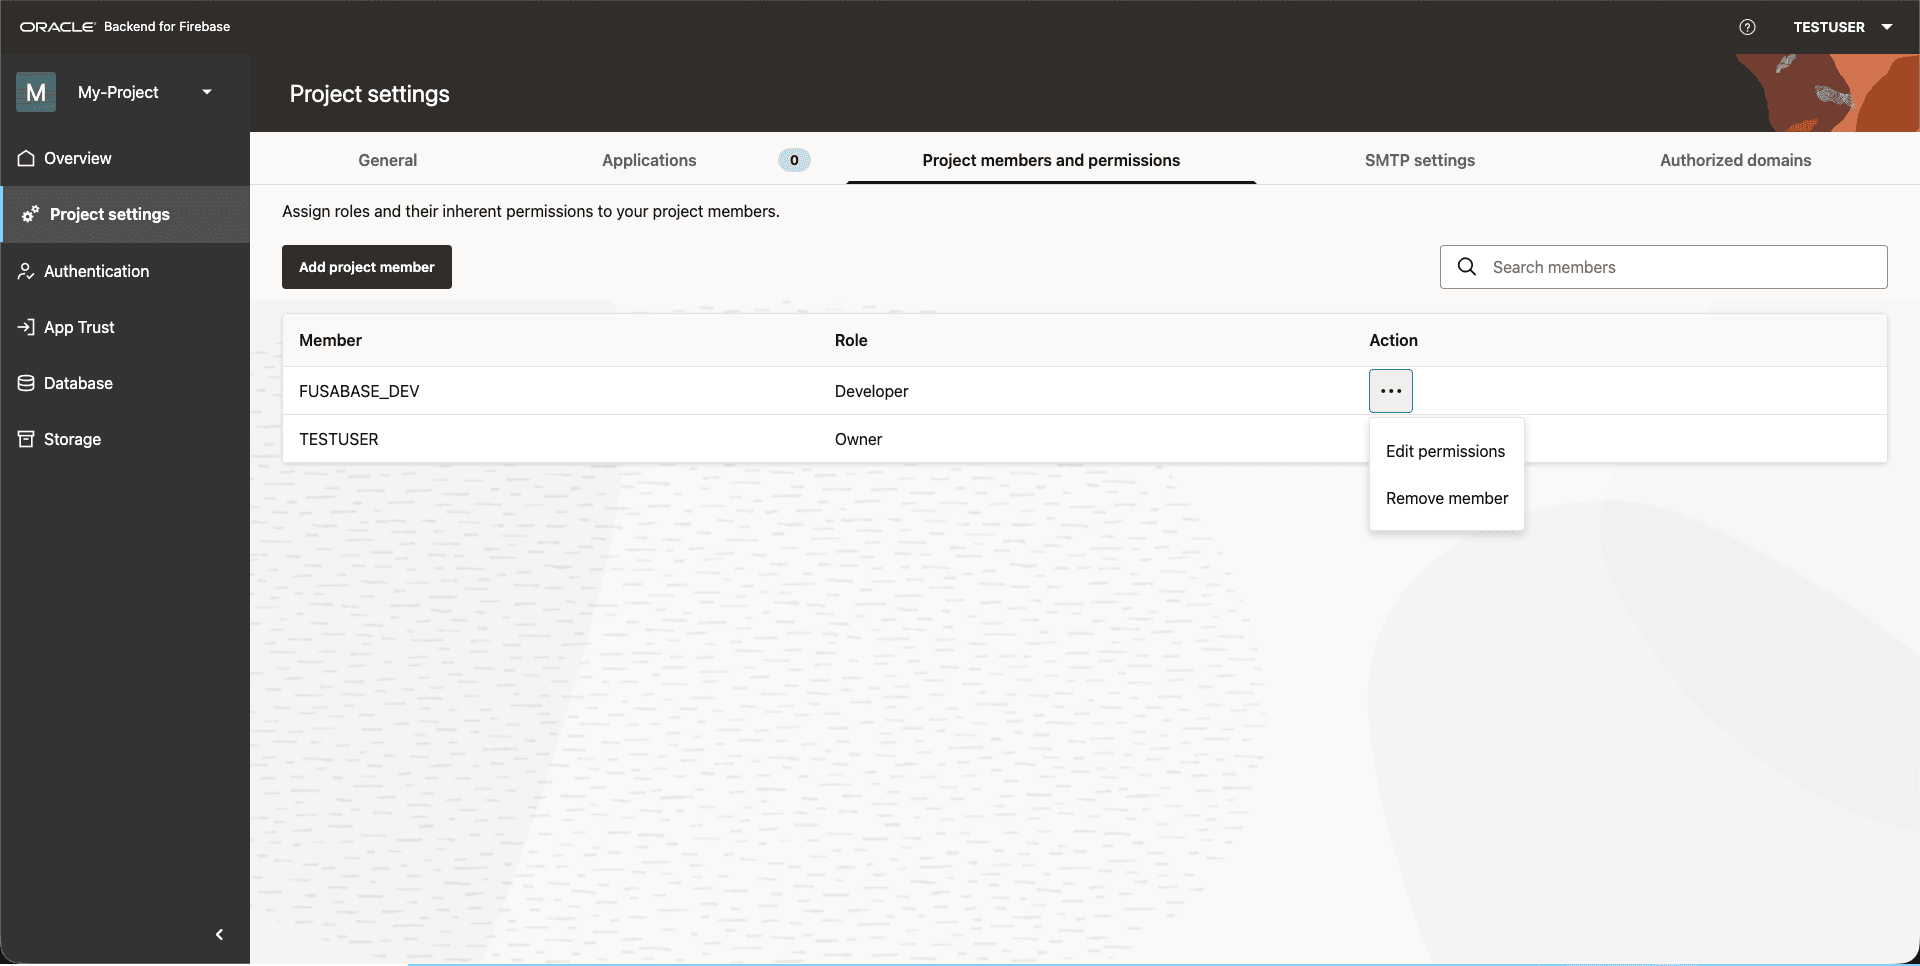
After removal, the user no longer has project-level access, even if they can still sign in to the Console.
Deleting a Project
Project deletion removes the metadata and all associated services (authentication, database collections, object storage, and security rules).
Note: The delete action is irreversible.
-
Open the project in the Console.
-
Go to Project settings > General.
-
Start the delete action, enter the Project ID exactly, select the confirmation checkbox, and click Delete project.
Figure 5-6 Delete Project Dialog
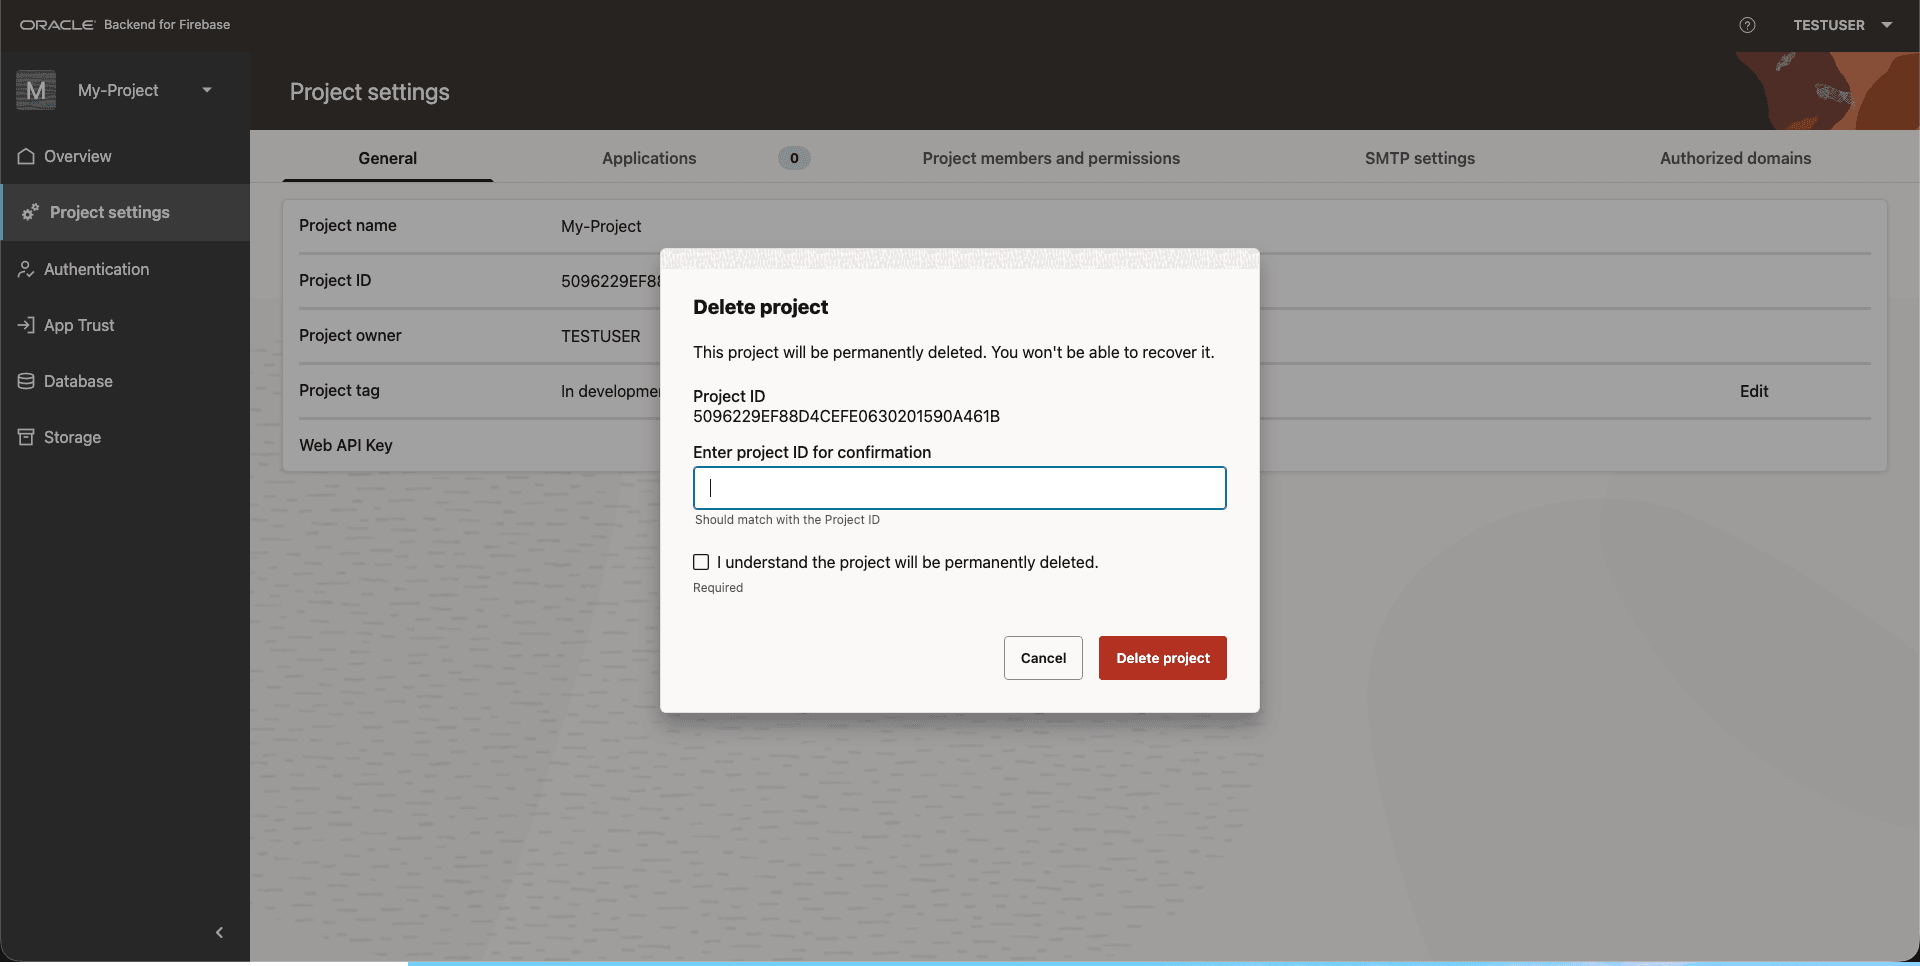
Note: Only delete a project when you are certain that the backend services and data are no longer needed.
Project Limitations and Operational Considerations
-
One project per schema: Each database user can own exactly one project, which keeps metadata and data ownership aligned.
-
Deletion is permanent: Removing a project also removes its ORDS endpoints and service configuration; nothing in that project can be recovered.
-
Shared services: All apps tied to a project inherit the same project-level services, so enabling or disabling a service affects every registered application.
-
Preparation dependency: Project creation cannot begin until the database administrator grants the required roles and enables the schema.
See Also: Administrative Preparation Before Project Creation
Understanding these constraints keeps developers from accidentally overlapping projects, recreating services, or assuming that deletion is reversible.