Configuring and Using Database Response Monitoring
Learn about configuring and using database response monitoring.
About Database Response Monitoring
Learn about database response monitoring.
Enabling the Database Response Monitoring feature enables Oracle Database Firewall to record responses that the target database makes to login requests, logout requests and SQL statements sent from database clients, as shown in Figure 7-1. This feature allows you to determine whether the database executed logins, logouts and statements successfully, and can provide useful information for audit and forensic purposes. Figure 7-1 illustrates the process flow of database response monitoring.
Figure 1: Database Response Monitoring
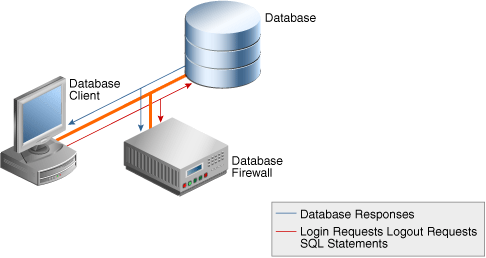
The Oracle Database Security Central auditor can view database responses in audit reports.
Database Response Monitoring records database responses for all SQL statements, logins, and logouts that are logged by the Database Firewall policy.
The information recorded includes the response interpreted by Oracle Database Security Central (such as “statement fail”), the detailed status information from the database, and the database response text (which may be displayed in the database client).
Note: The Event Status value in the reports is displayed only if Database Response Monitoring is enabled for the respective monitoring point.
Enabling Database Response Monitoring
Learn about enabling database response monitoring.
To enable database response monitoring for a target:
-
Log in to the Oracle Database Security Central console as an administrator.
-
Select Targets. The Targets in the left navigation menu is selected.
-
Select specific target. The details of the target are displayed on the main page.
-
Under Database Firewall Monitoring section, select the monitoring point for which native network encrypted traffic monitoring needs to be enabled.
-
In the Database Firewall Monitor dialog, select Advanced.
-
Select the checkbox against Capture Database Response field.
After this field is checked, the Full error message checkbox is displayed. If this field is checked, any detailed error message text generated by the database is logged along with the error code.
-
Select Save.
See Also:
-
Working with Lists of Objects in the Oracle Database Security Central Console to sort or filter the monitoring points list.
-
Oracle Database Security Central Auditor’s Guide for more information on configuring Firewall policies.
-