Reports
provides a set of reports that you can generate and customize.
About the Reports in Database Security Central
The reports are automatically generated reports on collected audit and network event data from targets and from Database Firewall data.
You can save or schedule reports in either PDF or Excel format. You can also view reports online and interactively adjust the online report view by filtering data. You can save these interactive views to see them online later.
The reports are organized into various categories, such as activity reports, summary reports, compliance reports, assessment reports, alert reports, and user-defined reports. An alerts report allows you to view and respond to alerts. You can also create user-defined reports that focus on specific audit events or firewall data.
You can also produce Sarbanes-Oxley (SOX), Payment Card Industry (PCI), Data Protection Act (DPA), Gramm-Leach-Bliley Act (GLBA), and Health Insurance Portability and Accountability Act (HIPAA) reports. To specify which of these reports are required for a target database, you can add the target to the appropriate group (such as the SOX group) from the Targets tab.
Only super auditors can view and customize reports generated by a super auditor.
However, an auditor can send a report to other auditors for attestation regardless of the access rights of the other auditors.
You can specify email recipients for scheduled reports once they are generated, as well as create email templates for report notifications.
Note: Reports run faster if the audit data is in memory on the Audit Vault Server. If your administrator has enabled Oracle Database In-Memory, you will see a date range in the top right corner of the Home Reports for the specified date range run faster. See how to enable in memory at Enabling Oracle Database In-Memory for the Audit Vault Server.
See Also:
Activity Reports
Activity reports capture information such as alerts or changes to stored procedures.
About the Activity Reports
Activity reports cover entitlement data, operating system correlation data, alerts, and other information.
You can access Activity Reports from the Reports tab by clicking Activity Reports. There are six groups of Activity Reports:
-
Activity Reports
-
Entitlement Reports
-
OS Correlation Reports
-
Database Firewall Reports
-
Stored Procedure Changes Reports
-
DB Vault Activity
-
SQL Firewall Violations Report
See Also: Getting Started with User Assessment
Activity Reports
Learn about activity reports.
Note: The maximum limit for the ROW_LIMIT parameter is 20000. Use additional filters available to view specific audit events in the report.
About the Activity Reports
Any auditor can access the activity reports.
You can access Activity Reports from the Reports and then by clicking Activity Reports tab in the left navigation menu. In the main page expand the Activity Reports section.
The default activity reports track general database access activities such as all activity, data access activities, user login/logout activities, and entitlements.
Note:
-
The Client Host (host name of the client) value is displayed in the reports only if the DNS is configured for the Audit Vault Server.
-
The Event Status value in the reports is displayed only if Database Response Monitoring is enabled for the respective monitoring point.
All Activity Report
The All Activity report displays details of all captured audit events for a specified period of time.
Users can add filters in the UI interactive report and copy them to the alert condition.
-
Navigate to the Activity Reports - All Activity page.
-
Filter the report as desired.
-
Select Create as alert policy.
The Create Alert page will appear with the Condition field automatically filled with the filters you created on the report. See Creating or Modifying an Alert for more information.
Related Topics
All Activity by Privileged Users
The All Activity by Privileged Users report displays details of observed activity of privileged users targeting audit policy for a specified period of time.
Data Access Report
The Data Access report displays details of read access events.
For example: SELECT, read access to data events.
See Also: Related Event Data Appendices for related data access audit events in a specific target type
Audit Policy Activity Report
The Audit Policy Activity report is available under the Database Settings category.
It displays details of observed user activity targeting audit settings for a specified period of time.
Data Modification Report
The Data Modification report displays events that lead to data modification.
For example: DML activities (insert, update, and delete).
Data Modification Before-After Values Report
The Data Modification Before-After Values report displays before and after values of modified data in Oracle Database or Microsoft SQL Server.
Data for this report comes from the TRANSACTION LOG audit trails that are written by databases. An administrator must configure and start a TRANSACTION LOG audit trail for the target to be monitored. The location for the TRANSACTION LOG audit trail should be the Oracle Golden Gate Integrated Extract directory. See Transaction Log Audit Data Collection Reference for more information.
The Data Modification Before-After Values report also displays the key columns for an update operation, along with the modified column and its old and new values. The Primary Key-Value(s) column contains the values of the table’s key columns. You can use these values to uniquely identify a modified record in the table. By default, key columns contain the values of the primary keys. If needed, you can configure any column as a key column in the Golden Gate parameter file.
You can filter the Data Modification Before-After Values report. To apply the filter on a Column Name, Before Value, and After Value, select Like as the Operator.
Note:
-
The Transaction Log collector can read the Golden Gate Integrated Extract files that contain the before and after records. Oracle GoldenGate must be configured to generate the Integrated Extract in the
XML_AUDIT_VAULTXML format. -
To check the change in a column value of a particular table, add filter on Target Object. The filter can be something like Target Object Equal to (=) table name and
Column Namein the Column field. For example, if the Address column of the employee table is changed, the filter should be Target Object = EMPLOYEE and Column Name like %ADDRESS%. -
The session information (Program Name, OS User Name, Client Host Name, OS Terminal, Process ID, Client ID) will always be empty for Microsoft SQL Server and MySQL target, because these targets do not provide the session information to the GoldenGate Extract.
-
The Command Text field will be populated by Transaction Log audit trail only for DDL operations but will always be empty for DML operations. You have to configure
UNIFIED_AUDIT_TRAIL TABLEtrail for Oracle target orsqlaudit DIRECTORYtrail for Microsoft SQL Server target to get the Command Text for DML operations.
Database Schema Activity Report
The Database Schema Activity is available under Database Settings category.
It displays information about changes in the database schema. For example: DDL commands (alter session).
Entitlement Activity Report
The Entitlement Activity report is available under Entitlement Reports category.
It displays information about changes in grants of database privileges and roles. For example: DCL commands (GRANT access, revoke).
Failed Login Events Report
The Failed Login Events report displays information about failed authentication attempts.
Login and Logout Report
The Login and Logout report displays information about all successful login and logout events.
Startup and Shutdown Report
The Startup and Shutdown report displays details of observed targets startup and shutdown events for a specified period of time.
Entitlement Reports
The Entitlement Reports capture information such as a user’s roles, object privileges, system privileges, and so on.
See Also: User Assessment Reports
OS Correlation Reports
The OS Correlation Reports provide useful information about operating system related activities that users perform.
The Linux SU SUDO Transition report provides details of database events that are correlated with the Linux operating system user before su or sudo transition. It is specific to Oracle Database targets running on Linux. This report uses the OS and Database audit trails to correlate su and sudo activity on the Linux OS with Oracle Database audit events. This lets auditors see the original OS user in cases where this user runs a shell or executes a command as another user by using su or sudo.
For example, suppose the Linux OS user, user_01, logs in to a Linux terminal, and then performs su or sudo activity to another Linux user, user_02. Then user_01 connects as the Oracle Database user user_db locally and then remotely, and performs some database activities.The Linux SU SUDO Transition report displays the Oracle Database audit events with the additional columns OS User Transition, Transition Type, and Database Connection Type. These columns provide information about the correlation that occurred before the Oracle Database operations. For example:
| Column Name | Data |
|---|---|
| OS User Transition | user_01 > user_02 |
| Transition Type | su (for a sudo operation, it would list sudo) |
| Database Connection Type | Local (for a remote database connection, it would be remote) |
| Database User Name | user_db |
Similarly, the Linux SU SUDO Transition Report displays data for local and remote database connections and for SYS and non-SYS users.
In order to generate information for this report, you must have audit trails configured and running for both the Oracle Database and for the Linux OS on which the database runs. The Linux OS audit trail must be registered with a host name, and not an IP address. See * Administrator’s Guide* for instructions on how to configure audit trails in Oracle .
Be aware that if there is a slippage in Linux events, then the report does not show the correct correlation data. Table 1 shows the currently available correlation reports.
Table 1 su/sudo Correlation Reports
| Report | Description |
|---|---|
| Linux SU SUDO Transition | Details of database events correlated with the Linux operating system user before su or sudo transition |
Database Firewall Reports
The Database Firewall Reports contain data that is collected if a target is monitored by the Database Firewall (using a firewall policy).
Data displayed as part of the reports include:
-
Threat Severity
-
Target
-
User
-
OS User (Only in the Monitored Activity by OS User report)
-
Client Host
-
Client Program
-
Event
-
Object
-
Event Status
-
Event Time
Note:
-
The Client Host (host name of the client) value is displayed in the reports only if the DNS is configured for the Audit Vault Server.
-
The Event Status value in the reports is displayed only if Database Response Monitoring is enabled for the respective monitoring point.
Table 2 lists the Database Firewall reports.
Table 2 Database Firewall Reports
| Report Name | Description |
|---|---|
| Monitored Activity | SQL activity monitored by Database Firewall. |
| Blocked Activity | SQL activity blocked by Database Firewall. |
| Monitored Activity by OS User | SQL activity monitored by Database Firewall grouped by OS user. |
| Invalid Activity | SQL activity not recognized by Database Firewall. |
| Alert Activity | SQL activity marked as warning by Database Firewall. |
Stored Procedure Changes
The Stored Procedure Changes auditing reports allow you to audit changes to stored procedures on target databases.
You can access Stored Procedure Changes reports from the Reports and then by clicking Activity Reports in the left navigation menu. The Stored Procedure Changes reports is displayed in the list of reports on the main page.
connects to the target database at scheduled intervals and discovers any changes or additions that have been made to stored procedures. Table 3 lists the Stored Procedure Auditing reports.
Table 3 Stored Procedure Changes Report
| Report | Description |
|---|---|
| Created Stored Procedures | Creation history of stored procedures |
| Stored Procedure Modification History | Modifications of stored procedures |
| Deleted Stored Procedures | Deletion history of stored procedures |
DB Vault Activity
If your Oracle Database targets have Database Vault enabled, then the Database Vault Activity report shows the details of Oracle Database Vault activity.
This report captures activities such as Database Vault events that capture policy or rule violations, unauthorized access attempts, and so on.
Oracle Database Vault may be enabled in an Oracle Database target to provide greater security by restricting access to sensitive areas of the database. For example, you can restrict administrative access to employee salaries, customer medical records, or other sensitive information.
You can check if Oracle Database Vault is enabled in a target by running the following SQL query in SQL\*Plus:
SELECT PARAMETER, VALUE FROM V$OPTION WHERE PARAMETER = 'Oracle Database Vault';Remember that the PARAMETER column value is case sensitive.
If Oracle Database Vault is enabled, the following output appears:
PARAMETER                     VALUE
----------------------------- -----------------------
Oracle Database Vault         TRUE
SQL Firewall Violations Report
The SQL Firewall Violations Report displays information about SQL statements or session contexts that violate configured SQL Firewall policies. The report is based on audit data collected from SYS.DBA_SQL_FIREWALL_VIOLATIONS.
Data displayed as part of the reports include:
-
Target
-
User
-
Client Program
-
Event
-
Object
-
Event Time
Related Topics
Alert Reports
The alert reports track critical and warning alerts. The alerts report will only show alerts from the past three months, as alerts have a retention policy of three months online and zero months in archive.
Alert reports can be accessed from the Alerts and then the Alerts tab in the left navigation menu.
Alternatively, you can view the All Alerts report from the Reports tab and the Generated Reports tab on the left navigation menu. Enable the filter for the All Alerts report name above the table. Select All Alerts name to download the report.
An alert is raised when data in audit records matches a predefined alert rule condition. Alerts are grouped by associated target, by event category, and by the severity level of the alert (either warning or critical).
There are two alert severities:
-
Critical Alerts - This report shows critical alerts that were raised by Audit Vault Server.
-
Warning Alerts - This report shows warning alerts that were raised by Audit Vault Server.
Related Topics
Summary Reports
Learn about Summary Reports.
Trend Charts Report
The Trend Charts Report shows the event trends (total events) in the last n days. Table 4 shows the available event trend reports.
Table 4 Trend Charts
| Report | Description |
|---|---|
| Event Trend | Trend of all events |
| Event Trend By Target | Trend of events by target |
| Event Trend By Client IP | Trend of events by client IP |
| Event Trend By OS User | Trend of events by OS user |
Anomaly Reports
Anomaly reports show new and dormant user and client IP anomalies (total anomalies) in the last n days.
Anomaly reports don’t require any configuration to display data in the reports. Table 5 shows the available anomaly reports.
Table 5 Anomaly Reports
| Report | Description |
|---|---|
| New or Dormant User Activity | Activity by newly created or dormant users |
| New or Dormant Client IP Activity | Activity from newly seen or dormant client IP addresses |
All Activity Reports
The All Activity Reports report shows summaries of client and operating system user activities, DDL and DML activities, and failed logins. Table 6 shows the available summary reports.
Table 6 All Activity Reports
| Report | Description |
|---|---|
| Activity Summary by Client IP and OS User | Events grouped by user and client IP |
| Activity Summary by Target | Events grouped by target |
| DDL Activity Summary by Target | Schema changes grouped by target |
| DML Activity Summary by Target | Data modifications grouped by target |
| Failed Logins Summary by Target | Failed authentication attempts grouped by target |
Compliance Reports
The Compliance Reports capture information to ensure that your system is meeting regulatory compliance standards.
About the Compliance Reports
The compliance reports help you meet regulations associated with credit card, financial, data protection, and health care related data.
They track activities that are typically required to meet standard compliance regulations, such as changes to the database structure or its objects, failed logins, administrator activities, system events, and user logins or logoffs.
The following compliance report categories are available:
-
Data Privacy Reports (GDPR)
-
Payment Card Industry (PCI)
-
UK Data Protection Act (DPA)
-
USA Gramm-Leach-Bliley Act (GLBA)
-
USA Health Insurance Portability and Accountability Act (HIPAA)
-
USA Reports based on IRS Publication 1075
-
USA Sarbanes-Oxley Act (SOX)
To access the compliance reports, select the Reports and then select Compliance Reports tab in the left navigation menu.
Configuring Compliance Reports
To configure compliance reports, you need to associate one or more targets to the compliance category, such as Data Privacy Report (GDPR).
-
Ensure that the appropriate entitlement data is available for the target.
SeeRetrieving User Assessment Data for Oracle Database Targets for complete information.
-
Log in to the console as an auditor.
-
Select Reports.
-
Select Compliance Reports in the left navigation menu.
-
Select a category from the Compliance Reports Category drop-down list.
The list of reports on this page changes depending on which category you select.
-
Select Go to associate targets with the selected compliance reports category.
-
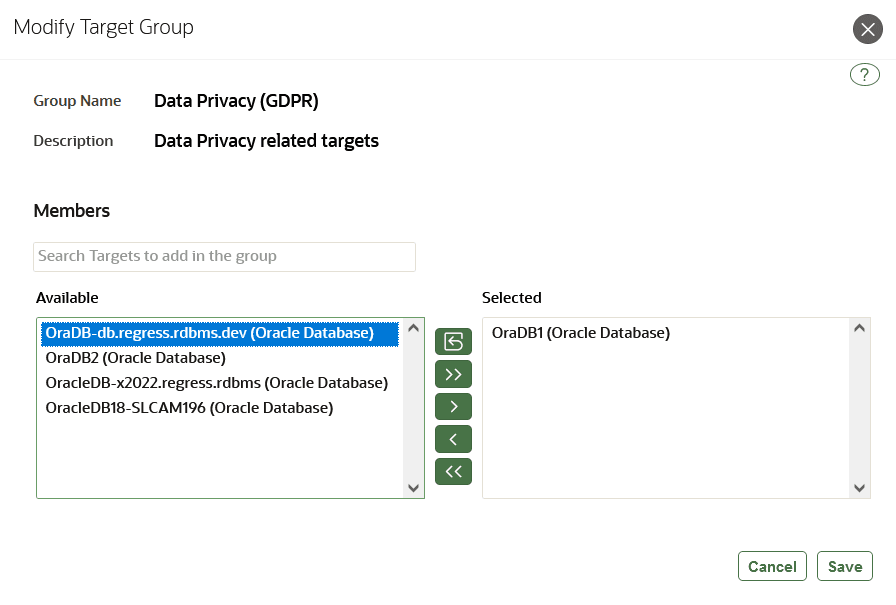
In the Modify Target Group dialog box, move the targets that you want to associate with the compliance category from the Available column to the Selected column.
To select multiple targets, press and hold the Ctrl key as you select each target.
To move the selected targets, select the Move (>) or Move All (») button.
The following screen shot shows an example of the Modify Target Group dialog box. There are five total targets. One target has been moved to the Selected column and the Available column lists the remaining four targets.
-
Select Save.
-
On the Compliance Reports page, select the category from the Compliance Reports Category drop-down list again.
-
Schedule or generate the necessary reports.
Related Topics
Data Privacy Reports
Learn about the Data Privacy Reports.
About Data Privacy Reports
Data privacy is also known as information privacy or data protection.
It is concerned with the relationship between collection and dissemination of data and technology, the public perception, expectation of privacy, the legal regulation, and political issues surrounding that data. The details and implementation of data protection vary depending on the region, the context, the methods, and the extent to which it is regulated.
GDPR (General Data Protection Regulation) is a regulation in European Union (EU) law on data protection and privacy for all individuals within the European Union. It addresses the export of personal data outside the EU. GDPR is an overhaul of the existing European Commission data protection legislation. It harmonizes data privacy laws, aims to strengthen, and unify these laws for EU citizens. GDPR is about individuals having autonomy and control over their data. It primarily aims to give control back to citizens and residents over their personal data and to simplify the regulatory environment for international business by unifying the regulation within the EU. It is important for organizations to protect information they possess about individuals to prevent others from accessing or misusing their personal information.
GDPR is applicable in case the following are based in the European Union:
-
Data controller
-
Data processor
-
Data subject or the person
-
Data recipient
-
Authority supervising and auditing data
-
An organization that collects data from EU residents
-
An organization that processes data on behalf of data controller like the service providers
-
An organization based outside the EU that collects or processes personal data of individuals located inside the EU
According to the European Commission, personal data is any information relating to an individual. This information can be private, professional, or public life of the individual. It includes, but is not limited to, a name, a home address, a photo, an email address, bank details, posts on social networking websites, medical information, or an IP address.
In order to comply with GDPR, the data controller must implement measures, which meet the principles of data protection by design, and data protection by default. It is the responsibility and the liability of the data controller to implement effective measures and to demonstrate the compliance of processing activities. This includes if the processing is performed by an external data processor on behalf of the controller.
GDPR considers encryption as one of the components in the security strategy, and mandates that organizations need to consider assessment, preventive, and detective controls based upon the sensitivity of the personal data in their possession.
Articles 30 and 33 of GDPR, mandate that organizations must maintain a record of its processing activities. This can only be achieved by constantly monitoring and auditing activities on personal data. This data can be used to timely notify authorities in case of a breach. In addition to mandating auditing and timely alerts, GDPR also requires that organizations must keep the audit records under their control. A centralized control of audit records prevents attackers or malicious users to cover the tracks of their suspicious activity by deleting the local audit records. There are four reports under Data Protection. They primarily focus on access to sensitive data by regular or privileged users and also privilege settings on objects.
Importing Sensitive Data Into Repository
Information about sensitive data is imported and stored in the Oracle repository.
You can import a data file in .csv and .xml format. These data files are sourced from Oracle Enterprise Manager and Oracle Database Security Assessment Tool by running data discovery job to search for sensitive data in specific Oracle Database targets.
Oracle Database Security Assessment Tool generates the file in .csv format and Oracle Enterprise Manager generates the file in .xml format. The data file extracted contains a list of sensitive columns that is imported into the repository. It is viewed in the Audit Vault Server GUI using Data Privacy Reports.
Note: Oracle AVDF 20 supports Oracle Enterprise Manager Cloud Control versions 13.4 and later.
See Also:
-
Oracle Enterprise Manager Lifecycle Management Administrator’s Guide to run data discovery job and search for sensitive data for specific targets using Oracle Enterprise Manager.
-
Oracle Database Security Assessment Tool User Guide to run a discovery job using Oracle Database Security Assessment Tool.
-
Oracle Data Masking and Subsetting Guide for more information on Application Data Modeling that stores the list of applications, tables, and relationships between table columns and maintains sensitive data types.
-
Ensure you have the sensitive data report in
.csvor.xmlformat by running data discovery job through Oracle Database Security Assessment Tool or Oracle Enterprise Manager respectively. -
Save the file in your local drive.
-
Log in to the Audit Vault Server terminal as root user.
-
Switch to oracle user, by running the following command:
su - oracle -
Run the following commands to grant (or revoke) av_sensitive role to the admin user, or list of admin users.
Action Command To grant av_sensitive role to the admin user. /usr/local/dbfw/bin/av_sensitive_role.py grantTo revoke av_sensitive role from the admin user. /usr/local/dbfw/bin/av_sensitive_role.py revoke -
Log in to the console as admin user.
-
Select Targets. The Targets sub tab in the left navigation menu is selected by default. The main page lists the configured targets to which you have access. You can sort or filter the list of targets.
-
Select the name of a specific target.
The specific target page is displayed.
-
Select Sensitive Objects button in the top right corner.
-
Select Browse against the Import From (.xml / .csv) field. Choose the sensitive data file saved in your local drive.
See Also:
-
Select Upload.
Result:
A pop up message
File loaded successfullyis displayed on the screen. The recent target file upload information is displayed on the GUI. The previous one is overwritten. -
Select Save.
Note:
-
In case the user does not have the required role to import the sensitive data, or if the uploaded file is in incorrect format, then appropriate error message is displayed.
-
The report contains sensitive data generated from the recent
.csvor.xmlfile uploaded. The earlier imported sensitive data is overwritten and the history is not maintained.
-
Accessing Data Privacy Reports
After the sensitive data file is imported into the repository, you need to associate one or more targets with the data privacy reports before you can schedule or generate the reports.
Use the console to configure and view the data privacy reports.
-
Associate at least one target with the data privacy reports.
SeeConfiguring Compliance Reports for instructions.
-
Schedule or generate the data privacy reports.
You can view the following data privacy reports:
| Report | Description |
|---|---|
| Sensitive Data | Displays details about sensitive data like the schema name, target, column name, sensitive type, object, and sensitive objects set. |
| Access Rights to Sensitive Data | Displays details about users' access rights to sensitive data. Use this report to view the privileges that are granted to users on sensitive data. See the example report that appears after this table. The user may have one or more of the privileges that are listed in the Privileges column for the respective sensitive data. The user can have these privileges assigned directly or through roles that have been granted. Privileges that have been granted to sensitive data that is assigned to a role are displayed only when the role is assigned to any user. Privileges on sensitive data may be granted to the user group |
| Activity on Sensitive Data | Displays details about activity on sensitive data by all users. |
| Activity on Sensitive Data by Privileged Users | Displays details about activity on sensitive data by privileged users. |
Example 7-1 Access Rights to Sensitive Data Report
Target Name : <Target Name 1>
| Sensitive Object | User Name | Privileges |
|---|---|---|
Table_1 |
User X | DELETE,INSERT,SELECT,UPDATE |
Table_2 |
User Y | DELETE,INSERT,SELECT,UPDATE |
Table_3 |
User Z | DELETE,INSERT,SELECT,UPDATE |
Implementation In
complies with data protection directives and regulations by offering special services.
These services include centralized auditing, monitoring, reporting, and alerting of anomalous activity on the database. It reports any access to sensitive data stored in the database.
The report relates to sensitive data, as identified and received from the sensitive data discovery processes. It contains information regarding activity on sensitive data by all users including privileged users.
complies with data protection at source by centralizing control and administration. It stores and manages the data for processing in a centralized location. It monitors and sends timely alerts of suspicious behavior. It can centrally manage millions of audit records, or different types of security policies, by simplifying the administration related tasks. This is managed using Oracle Enterprise Manager that has a unified web based GUI.
centrally collects and manages audit records. It monitors, alerts, reports, and blocks suspicious behavior.
Note: helps in complying with data privacy regulations such as GDPR.
Assessment Reports
The assessment reports capture security assessment and user assessment data from Oracle Databases that are configured as targets.
Security Assessment
Learn about the available Security Assessment reports.
About Security Assessment Reports
Security Assessment reports provide information and recommendations that are helpful in securing your Oracle Database system.
These recommendations reflect best practices for database security and should be part of any strategy for Data Protection by Design and by Default. Technical controls alone are not sufficient for compliance. Passing all findings does not guarantee compliance.
does not check all controls covered by the DISA STIG. Findings mapping to DISA STIG focus on technical controls. Process-related controls require manual evaluation.
The report provides a view of the current status. The results shown are provided for informational purposes only and should not be used as a substitute for a thorough analysis or interpreted to contain any legal or regulatory advice or guidance.
You are solely responsible for your system and the data and information gathered during the production of this report. You are also solely responsible for the execution of software to produce this report and for the effect and results of the execution of any mitigating actions identified herein.
Oracle provides this analysis on an “as is” basis without warranty of any kind and Oracle hereby disclaims all warranties and conditions whether express, implied, or statutory.
Note: Security Assessment reports will be purged after 6 months from the time of data retrieval.
Setting a Baseline for Security Assessment Reports
You can view security assessment drift reports that compare the latest assessment to either the baseline or a previous assessment. The baseline is a user-designated security assessment report that represents a good security posture for your database(s).
-
Select Reports.
-
Select Assessment Reports in the left navigation.
-
Select Security Assessment.
-
Select Detailed Report.
-
Select either all targets or a specific target from the Target drop down.
-
Select a security assessment based on the time it was run from the assessed time drop down.
-
Select Set As Baseline.
Viewing Security Assessment Reports
To access the assessment reports, select the Reports select Assessment Reports in the left navigation menu, and then select Security Assessment.
Select the type of report that you want to view. Within each report, you can drill down to detailed reports that list all targets and assessments that are filtered to meet the criteria for the report. From there, select the Report View icon to see the details for each finding.
You can also perform all standard Oracle report operations, such as scheduling reports, viewing previously generated reports, filtering, and downloading reports.
For descriptions of the severity levels, see Severity Levels.
For a list of the categories and assessments, see Categories and Assessments.
For details about using each report, see the following tables.
Security Assessment Reports
| Report Name | Usage |
|---|---|
| Summary by Target | Use this report to see the number of assessment within each severity for each target. For example, for each target, it gives the number of assessments that are high risk, medium risk, and so on. Select a target in the report to see the results of all assessments for that target, including assessments that passed. You can also see if a target has not been assessed. In this case, select the target name link to go to the Schedule Retrieval Jobs page, where you can submit the security assessment retrieval job. See Retrieving Security Assessment Data for Oracle Database Targets. |
| Summary by Severity | Use this report to see the number of targets and assessments within each category for each severity. For example, for the high risk severity level you can see the number of targets and the number of assessments within the User Accounts category. Select a severity level in the report to see a detailed list of all targets and assessments that have that severity. |
| Summary by Category | Use this report to see the number of targets with assessments within each category and assessment description. For example, for the User Accounts category you can see the number of targets with the Inactive Users assessment description. Select the number in the Number of Targets column to see a detailed list of targets and findings for the corresponding assessment. The detailed list is automatically filtered to hide assessments that passed, but you can remove that filter to see all assessment findings. |
| Summary by Feature Utilization | Use this report to see the number of targets that are using each security feature within each category. For example, 1 in the Unified Auditing feature of the Auditing category means that one target is using that feature. You can also see the number of targets that don't use a security feature and the number of targets for which the feature isn't available. Select the number in the Utilized, Not Utilized, or Not Available column to see a detailed list of targets that fit that description and the findings for the corresponding category of security features. |
| Detailed Report | See all findings for all targets, categories, and severity risk levels. You can filter the list to show specific criteria.<p></p> <p>Note: There will be only the first 32,767 characters will be shown in the Excel report.</p> |
| Exception Report | Shows the exceptions added for security assessment reports of all Oracle Database targets. |
Security Assessment Compliance Reports
These reports display the Security Assessment Detailed Report with filters applied for the selected compliance type.
| Report Name | Usage |
|---|---|
| Oracle Best Practices Report | For all targets, see the results of all assessments that relate to Oracle best practices. |
| STIG Report | For all targets, see the results of all assessments that relate to Security Technical Implementation Guide (STIG) guidelines from the Defense Information Systems Agency (DISA). Select Report View icon to find references to the specific STIG guidelines. Note: There will be only the first 32,767 characters will be shown in the Excel report. |
| CIS Report | For all targets, see the results of all assessments that relate to Center for Internet Security (CIS) benchmark recommendations. Select Report View icon to find references to the specific CIS recommendations. |
| GDPR Report | For all targets, see the results of all assessments that relate to European Union General Data Protection Regulation (EU GDPR) guidelines. Select Report View icon to find references to the specific GDPR guidelines. Note: Only the first 32,767 characters are displayed in the Excel report. |
Security Assessment Drift Reports
These reports show how a selected assessment report differs from the baseline or from a previous assessment report.
Users can monitor drift report details directly on the console Home page. If no baseline has been established, the graph will appear empty. Once a baseline is set, hovering over the drift graph will show additional information. Users can also select the graph to access the complete report. To analyze findings based on security risk levels, it is essential to establish a baseline for the specified targets. This ensures accurate calculation of drift between the baseline and the latest data.
To compare the latest assessment to the baseline, select the baseline option and select Go.
To compare the latest assessment to a previous assessment, select the selected timeline option, type in an integer for how many days, weeks, months, or years prior the assessment was, select the appropriate unit of time, and select Go. The oldest security assessment from the designated amount of time will be used in the comparison.
| Drift Summary by Target | Use this report to see how the drift, the number of risks added, modified, or removed, within each severity in the latest assessment changed from the baseline or a previous assessment for each target. For example, for the Database1 target you could see that two risks were modified for the high risk severity and that three risks were added for the evaluate severity. Select a target in the report to see a detailed comparison of the latest assessment to the baseline or a previous assessment. From the detailed comparison report you can also see more details about the changes for each row by clicking the Single Row View icon on the left. |
| Drift Summary by Severity | Use this report to see how the drift, the number of risks added, modified, or removed within each category in the latest assessment changed for each severity from the baseline or a previous assessment. For example, you can see that since the latest assessment one low risk assessment was added in the Auditing category. Select a category in the report to see a detailed comparison of the latest assessment to the baseline or a previous assessment. You can also see more details about the changes for each row by clicking the Single Row View icon on the left. |
| Drift Summary by Feature Utilization | Use this report to see how the number of targets that are using each security feature within each category changed in the latest assessment from the baseline or a previous assessment. For example, 1(+1) in the Unified Auditing feature of the Auditing category means that one target is using that feature and that this has increased by one from the assessment you are comparing to. Similarly, 1(-1) would indicate that one target is using a feature but that this has decreased by one from the assessment you are comparing to.1(-) indicates that there was no change in the number of targets using that feature. Select the number in the Utilized column to see a detailed list of the changes that fit that description and the findings for the corresponding category of security features. |
| Detailed Drift Report | See a comparison report how all findings in the latest assessment changed from the baseline or a previous assessment for all targets, categories, and severity risk levels. You can filter the list to show specific criteria. You can also see more details about the changes for each row by clicking the Single Row View icon on the left. |
Adding Exception for Security Assessment Reports
You have the ability to customize how assessments are treated by either updating their severity level or deferring them for a certain period. This feature allows administrators to better align the security posture with specific needs or risk tolerance. Below are the steps and detailed explanations for both actions.
Updating the Severity of an Assessment
You can modify the severity of an assessment. This allows administrators to lower or raise the priority of certain findings depending on how critical they are to their environment. By updating the severity of an assessment, future reports will reflect the modified risk level. This helps prioritize remediation efforts based on the actual perceived risk without ignoring critical security assessments. It also ensures that any changes made will automatically revert after the expiration date unless extended.
To update the severity of an assessment:
-
Select Reports.
-
Select Assessment Reports in the left navigation.
-
Select Security Assessment.
-
Choose the assessment you want to update. You can select an assessment across different targets. For instance, to update the severity of “
Database Backup” for targets tgt1, tgt2, and tgt3, use the multi-select feature. -
Select Add Exception.
-
In the dialog box that appears, choose the new severity from the available options.
Note: Severity cannot be changed to “Advisory”.
-
Optionally, you can enter a justification explaining why the severity is being updated, and provide an expiration date for the update. This expiration date determines how long the customized severity will remain in effect. If expiration date is not mentioned then the severity will be updated until it is reverted manually.
-
Select Save to apply the severity update.
Deferring an Assessment
You can defer an assessment, temporarily excluding it from regular security reports. This is useful when an issue is known but not immediately actionable, or when remediation is planned for a later date. By deferring an assessment, administrators can focus on other priorities without having the issue flagged repeatedly in ongoing reports.
To defer an assessment:
-
Select Reports.
-
Select Assessment Reports in the left navigation.
-
Select Security Assessment.
-
Select Detailed Report to access more specific assessment details.
-
Select the assessment you wish to defer. As with updating severity, you can choose multiple targets at once. For example, to defer “
Database Backup” assessment for targets tgt1, tgt2, and tgt3, you can use multi-select feature. -
Select Add Exception button.
-
In the dialog box, switch the radio button to Defer Assessment.
-
Optionally, you can provide justification for the deferral and an expiration date which specify how long the deferral should remain in effect.
-
Select Save to defer the assessment.
Note: Deferred assessments will not appear in any reports (other than the exception report) until the expiration date. However, if you choose not to specify the expiration date, the assessments will be completely deferred.
Revert Exception for Security Assessment Reports
You can revert the exception that was added for an assessment
-
Select Reports.
-
Select Assessment Reports in the left navigation.
-
Select Security Assessment.
-
Select Exception Report.
-
Select all the exceptions that need to be reverted.
Note: The assessments for which severity was updated will be reverted back to the original as defined by Oracle when assessment was done.
-
Select Revert.
Severity Levels
The assessment reports include the following severity levels:
-
High Risk: Needs immediate attention.
-
Medium Risk: Plan to address this in the short term.
-
Low Risk: Might be fixed during a scheduled downtime or bundled together with other maintenance activities.
-
Advisory: Improve security posture by enabling more security features and technology.
-
Evaluate: Needs manual analysis.
-
Pass: No risks found.
Categories and Assessments
Security Assessment uses the Oracle Database Security Assessment Tool (DBSAT) report to assess the security posture of your database. Security Central currently uses DBSAT 4.2 for Security Assessment.
Security Assessment retrieves the following assessment categories from the DBSAT report:
-
User Accounts
-
Privileges and Roles
-
Auditing
-
Encryption
-
Authorization Control
-
Fine-Grained Access Control
-
Database Configuration
For more information about each category, see the corresponding sections in the Oracle Database Security Assessment Tool User Guide.
User Assessment
User Assessment focuses on evaluating database accounts (users) and their access characteristics to highlight risk and hardening opportunities.
For example, it displays how users are authenticated, the password policies assigned to each user, and how long it has been since each user has changed their password. With this information, you can decide whether to implement more restrictive password policies, use Oracle Database Vault, or add other security controls to further limit user access, if needed.
After you register a target database, Oracle automatically runs a user assessment for that target database. The User Assessment feature is supported for all Oracle database types and versions currently supported by .
If user assessment needs to be done in a periodic manner then you will need to set and modify the schedule. For more information see Retrieving User Assessment Data for Oracle Database Targets.
The more recent assessment report is referred to as the “latest” assessment.
User Assessment lets you refresh the latest assessment at any time by using the Assess Immediately option in Schedule Retrieval Jobs for a target database. To determine drift in user privileges on your target database, you can compare two assessments. You can define a baseline assessment and compare other assessments to it, or, you can compare two selected assessments.
Note: All the user assessments will be purged after 18 months from the time of retrieval.
The following are use cases for the User Assessment feature:
User Account Inventory & Status
-
Quickly assess your databases to learn about the existing user accounts, their privilege and role grants, and the potential risk a compromised or misused account would pose.
-
Identify highly privileged users.
-
Identify dormant accounts.
-
Identify users with stale passwords.
Privilege and Role Analysis
-
Identify system privileges and role grants.
-
Compare the privileges of two different users.
-
Monitor privilege drift by comparing an assessment against a baseline.
Password and Profile Management
-
Review existing user profiles, their password parameters including their password complexity verification function.
-
Identify users and profiles without password governance policies.
-
Identify which profiles are assigned to which users.
-
Identify discrepancies in user profiles password attributes across multiple targets.
Related Topics
Getting Started with User Assessment
Find out how to enable User Assessment in , the key terms for User Assessment, and what insights can be gained from the User Assessment report dashboard.
Scheduling User Assessment
After the initial automatic run of User Assessment, additional jobs need to be scheduled on the Oracle Database. This must be done by an auditor.
See Retrieving User Assessment Data for Oracle Database Targets for more information.
Key Terms in User Assessment
Understand the key terms in User Assessment.
User Assessment Terms
-
Database admin:
SYSDBA,SYSOPER,SYSASM,SYSDG,SYSBACKUP,SYSKM,DBA,PDB_DBA, andCDB_DBA roleusers -
Security admin: Database Vault, Audit, and SQL Firewall administrators
-
Baseline: An assessment that you can designate as the benchmark for a target database. When an assessment runs, in addition to finding potential risks the job tells you whether or not there is any deviation (user privilege drift) from the findings in the baseline. There is a Set as Baseline option in the assessment details report.
-
Drift: Measures the changes in user privileges, categorized by privilege level ( low, medium, high, or critical), against a baseline report or between two selected reports. This allows you to track how user privilege assignments have evolved over time or in response to specific events.
Privilege Categories
| Privilege Categories | Description |
|---|---|
| Critical |
|
| High |
|
| Medium |
|
| Low |
|
Understanding the User Assessment Dashboard
Learn the meaning of the graphs used in User Assessment.
User Assessment Dashboard
The User Assessment dashboard charts on the home page indicate the number of registered Oracle databases that have been assessed for User Assessment versus not accessed. Additionally it shows the Privilege categories and Admin users charts.
The Privilege categories chart shows the total number of privileged users in each privilege category across your entire fleet of assessed Oracle databases.
The Admin users charts shows the total number of admin users and how many are database admins and security admins across your entire fleet of assessed Oracle databases.
Together, these charts give you insight into the overall security of your users across your registered Oracle databases. Navigate to User Assessment, which can be found under the Reports for more detailed information.
Reports User Assessment Dashboard
The User Assessment dashboard can be found in Assessment Reports under the Reports
The dashboard can be filtered by specific target database and categories of users, but by default it will show you a summary of your fleet of assessed Oracle databases.
The Summary table shows the total number of targets assessed, targets not assessed, database admins, security admins, and users in each privilege category.
The Dormant Users charts shows the total number of dormant users, i.e. users that either rarely login or have never logged into a database, across your entire fleet of assessed Oracle databases. This chart also categorizes the time since last login for the users.
The Stale password charts shows the total number of stale passwords, i.e. passwords that have not been changed, across your entire fleet of assessed Oracle databases. This chart also categorizes the time since the password has changed.
The Privilege categories drift chart shows the total number of privilege category changes per category from the most recent assessment in comparison to the respective database’s baseline assessment across your entire fleet of assessed Oracle database.
Together, these charts give you a high level overview of the risk associated with your privileged users across your fleet of Oracle databases. Use the various reports provided to gain more insights on the potential risks associated with your users.
Setting a Baseline for User Assessment Reports
You can view user assessment drift reports that compare the latest assessment to either the baseline or a previous assessment. The baseline is a user-designated user assessment report that represents a low risk user summary for your database(s).
-
Select Reports.
-
Select Assessment Reports in the left navigation.
-
Select User Assessment.
-
Select User Assessment details in the Detailed reports section.
-
Select either all targets or a specific target from the Target drop down.
-
Select a user assessment based on the time it was run from the assessment time drop down.
-
Select Set as baseline.
User Assessment Reports
There are a number of reports available in User Assessment that provide information regarding the privileges of database users and how those privileges change over time.
Reports provides information about the user, role, profile, and privileges used in the Oracle database.
For example, the reports capture information such as access privileges to key data or privileges assigned to a particular user. These reports are useful for tracking unnecessary access to data, finding duplicate privileges, and simplifying privilege grants.
After viewing a User assessment details report, you can set it as a baseline for the associated databases. This enables you to use the drift reports which how the most recent assessment has changed in comparison to the baseline. You can alternatively, compare two assessment reports taken at different times as well to find how the privileged user information has changed over time.
Viewing a User Assessment Report
-
Log in to Console as an
auditor. -
Select Reports.
-
Select Assessment Reports in the left navigation menu.
-
Select User Assessment.
-
Select the type of report that you want to view. Within each report, you can drill down to detailed reports that list all targets and assessments that are filtered to meet the criteria for the report.
Depending on the report type, you may be able to select a role to find further information regarding the users, roles, and system and object privileges.
-
You can also perform all standard Oracle report operations, such as scheduling reports, viewing previously generated reports, filtering, and downloading reports.
For descriptions of the privilege categories, see Key Terms in User Assessment.
For information on how to set the baseline, see Setting a Baseline for User Assessment Reports.
User Assessment Reports
Table 7 Overview reports
| Report Name | Usage |
|---|---|
| Target Summary | Use this report to see the number of users per privilege category and the number of database admin and security admin roles for each target database. For example, for each target, it gives the number of users with critical, high, medium, and low privilege category. Select a target in the report to see the results of all assessments for that target, including assessments that passed. You can also see if a target has not been assessed. In this case, select the target name link to go to the Schedule Retrieval Jobs page, where you can submit the user assessment retrieval job. See Retrieving User Assessment Data for Oracle Database Targets. |
| Privilege category summary | Use this report to see the number of targets, users, database admin, and security admin within each privilege category. For example, you can see the number of targets, users, database admins, and security admins classified as high privilege. Select a privilege category in the report to see a detailed list of all targets and users that have that privilege category. |
| User profile summary | Use this report to see the number of targets and the number of database users per user profile. For example, for the default database user profile you can see the number of targets that have a default user profile and the total number of users in the profile across all your target databases. Select profile in the Profile column to see a detailed list of targets and settings in the user profile. These settings include allowed failed login attempts, password requirements, allowed inactivity period in days, account lockout period in days, and sessions per user. |
Table 8 Detailed reports
| Report Name | Usage |
|---|---|
| Privileged user | Use this report to see the list of users that are in the critical and high privilege categories. For each user with critical or high risk privileges, it shows their roles and system and object privileges, the privilege category, their status, what profile they belong to, when they last logged in, and a link to their activity audit records. |
| User assessment details | Use this report to see details for each of your database users and to set the baseline for a target database. For each user, it shows their roles and system and object privileges, the database, the privilege category, if they're a database admin, if they're a security admin, their status, what profile they belong to, when they last logged in, and a link to their activity audit records. |
| User privileges | Use this report to see the privileges and roles each of your database users has. For each user, it shows the database, the privilege category, the privilege/role, the schema for that privilege (if applicable), and the object for that privilege (if applicable). |
| User profiles | Use this report to see the details for your user profiles.<p>For each user profile, it shows the database, the resource name, and the associated limit for the resource.</p> |
| Role privileges | Use this report to see the details for your role privileges.<p>For each role, it shows the system privilege, object privilege, the schema and object for that privilege, and the role assigned to that privilege.</p> |
| System privileges | Use this report to see the details for your system privileges.<p>For each system privilege, it shows the database and the users/roles that have that privilege.</p> |
| Object privileges | Use this report to see the details for your object privileges.<p>For each object, it shows the database, the schema owner, the privilege, and the user/role with that object privilege.</p> |
Table 9 Comparison reports
| Report Name | Usage |
|---|---|
| Compare user privileges | Use this report to compare any two users in a user assessment reports. Select the associated targets, assessment time, and users that you want to compare. The report will show the number of privileges the users do and do not share. Select a specific privilege/role to see further details. |
User assessment drift reports
| Report Name | Usage |
|---|---|
| Privilege drift by target | Use this report to see if the latest assessment for your database differs from it's baseline or from a specific assessment. Select a target in the report to see the Privilege drift details report which is described below. You may alternatively compare the latest assessment to the oldest assessment in a designated time period. For example, if your selected timeline is 3 months, then the latest assessment will be compared to the oldest assessment that is no older than 3 months from the current date. For more information on setting a baseline see Setting a Baseline for User Assessment Reports. |
| Privilege drift details | Use this report to see how the latest assessment for a target differs from it's associated baseline assessment. The report shows the specifics for the drift including what changes occurred to cause the drift and the privilege category of the latest and baseline assessments. Such changes can include dropping a user, creating a user, or modifying their privileges. You may alternatively compare the latest assessment to the oldest assessment in a designated time period. For example, if your selected timeline is 3 months, then the latest assessment will be compared to the oldest assessment that is no older than 3 months from the current date. For more information on setting a baseline see Setting a Baseline for User Assessment Reports. |
System Reports
The results of application auditing can be viewed by a super auditor on the ** System Report** page.
-
Log in to Console as a
super auditor. -
Select Reports.
-
Select ** System Reports**.
You will see the following reports:
-
All Activity - The All Activity report includes all the audited activities of the appliance's application, embedded repository, and operating system.
-
Application Auditing - The Application Auditing report includes all the audited activities of the appliance's application.
-
Database Auditing - The Database Auditing report includes all the audited activities of the appliance's embedded repository.
-
OS Auditing - The OS Auditing report includes all the audited activities of the appliance's embedded operating system.
-
Customizing Reports
You can customize existing reports by using built-in tools to filter, group, and highlight data and define columns. These customized reports can be saved as new report formats and accessed from the Saved Reports Saved custom formats of existing reports can only be viewed online as they can’t be scheduled or printed in PDF format.
Filtering Data in a Report
You can filter the report to show data based on a search, a particular value, or an expression. You can also filter the All Activity Report based on a Global Set, as well as filter Compliance GDPR Reports (including Sensitive Data, Access Rights to Sensitive Data, Activity on Sensitive Data, and Activity on Sensitive Data by Privileged Users) based on a Sensitive Objects Set.
You can control the display of data in a report to focus on a particular set of data. automatically saves the report settings so that if you leave the page, the report settings are still in place when you return. Optionally, you can save the report as a custom report.
See Also: Saving your Customized Reports
Filtering by Search
Learn about filtering rows and columns using the search bar.
You can use the Search bar to search for row data in one or all columns in the report (for example, all rows that contain the letters SYS, such as SYS and SYSTEM, in all columns).
To search for row data in one or all columns:
-
Log in to the Audit Vault Server as an auditor.
-
Select Reports, and then access the report that you want.
-
If you want to focus the search on a specific column, in the Search bar, use the Search icon to select from the drop-down list of available columns.
By default, the search applies to all columns.
-
In the Search bar text area, enter all or part of the row text you want to search for.
-
Select Go.
See Also: Logging in to the Console
Filtering by a Data Value
Learn about filtering all the rows based on selected data in a column.
This filtering method lets you filter data in all rows based on a selected column (for example, all rows that contain SYS in the User column).
To filter all rows based on data from a selected column:
-
Log in to the Audit Vault Server as an auditor.
-
Select Reports, and then access the report that you want.
-
Select Actions, and select Filter.
The Filter dialog box appears. The existing filter definitions for the current user session are shown below the Filter dialog box.
-
For Filter Type, select Column.
-
In the Column drop-down list, select the column on which you want to base the filter.
You can select from columns that are displayed in the report or other columns.
-
Select the Operator and Expression that you want to use, to further filter the data.
-
Select Apply.
The existing filter definitions for the current user session are shown above the report columns.
-
To enable or disable the display of the filtered data, select its corresponding checkbox. To remove a filter, select its Remove Filter icon.
See Also: Logging in to the Console
Filtering by an Expression
Learn about filtering data in rows using an expression.
This method lets you select all rows that meet a WHERE condition, such as all users who are not user SYS. You can create the expression for all columns, even those that are not shown in the current report.
To filter row data using an expression:
-
Log in to the Audit Vault Server as an auditor.
-
Select Reports and then access the report that you want.
-
From the Actions menu, select Filter.
The Filter dialog box appears. The existing filter definitions for the current user session are shown below the Filter dialog box.
-
For Filter Type, select Row.
-
Enter a Name for the filter.
-
Use the Columns, Function/Operators, and Filter Expression fields to build your filter expression:
-
Columns: Select the name(s) of the column(s) from the list to use them in the expression. When you select a column, its abbreviation appears in the Filter Expression field.
-
Functions/Operators: Select function(s) and/or operator(s) from the list to build your expression.
-
Filter Expression: If you have built an expression from the available columns, functions and operators, enter any parameters needed to complete your expression. If you type the expression, remember that it is case-sensitive. In most cases, use uppercase letters.
For example: To view login failure events in the report, use the following filter condition:
event_name IN ('LOGIN','LOGON') and event_Status = 'FAILURE'As you build the expression, the Filter Expression field is populated with the expression.
-
-
Select Apply.
filters the display of row data based on the expression you created, and adds the filter definition above the report columns.
-
To enable or disable the display of the filtered data, select its corresponding checkbox. To remove a filter, select its Remove Filter icon.
See Also: Logging in to the Console
Filtering by a Global Set in an All Activity Report
Learn about applying a Global Set filter on an All Activity Report.
This method filters relevant data to a selected Global Set in an All Activity Report. The user may choose one or more of the following Global Set types:
-
IP Address Set
-
OS User Set
-
Client Program Set
-
Database User Set
-
Privileged User Set
-
Sensitive Object Set
To apply a Global Set filter on an All Activity Report:
-
Log in to Console as an
auditor. -
Select Reports.
-
Select the All Activity report.
-
Select Actions.
-
Select Filter.
-
Select a column that corresponds for use with a global set:
Column Global Set Client IP IP Address Set OS User OS User Set Client Program Client Program Set User Database User Set Privileged User Set Object Sensitive Object Set -
Select an operator: only
=,!=,in, andnot inare supported operators for Global Sets. -
Enter the global set name as the Expression.
-
Select Apply.
Related Topics
Filtering on Sensitive Objects in Compliance GDPR Reports
Learn about filtering the content of a Compliance GDPR Report (including Sensitive Data, Access Rights to Sensitive Data, Activity on Sensitive Data, and Activity on Sensitive Data by Privileged Users) using a filter based on Sensitive Objects Set.
Users can filter the content of a Compliance GDPR Report using a filter based on Sensitive Objects Set.
To apply a Sensitive Objects Set filter on a Compliance GDPR Report:
-
Log in to the Audit Vault Server as an auditor.
-
Select Reports.
-
Select Compliance Reports.
-
Select Sensitive Objects report
-
Select Actions, then select Select Columns.
-
Select Sensitive Objects Set column header.
-
Choose the Sensitive Objects Set to apply the filter.
-
Select Apply.
See Also:
Formatting Data in a Report
Learn how to format data viewed in a report.
Sorting Row Data for All Columns
Learn to sort data in rows for all the columns.
To sort row data for all columns:
-
Log in to the Audit Vault Server as an auditor.
-
Select Reports, and then access the report that you want.
-
From the Actions menu, select Format, then select Sort.
The Sort dialog box appears.
-
Enter the following information:
-
Column: For up to six columns, select the columns to sort. By default, the first sort column is Event Time, which is sorted in descending order.
-
Direction: Select either Ascending or Descending.
-
Null Sorting: Select the Null sorting rule for each column (Default, Nulls Always Last, or Nulls Always First). The default is to not sort nulls.
-
-
Select Apply.
See Also: Logging in to the Console
Highlighting Rows in a Report
Learn how to highlight rows in a report.
You can highlight specific rows in a report by assigning them colors. This enables anyone viewing the report to quickly find areas that are of particular interest.
To highlight rows in the report:
-
Log in to the Audit Vault Server as an auditor.
-
Select Reports, and then access the report that you want.
-
From the Actions menu, select Format, then Highlight.
The Highlight dialog box appears.
-
Enter the following information:
-
Name: Optionally enter a name for this highlight instance.
-
Sequence: Enter a sequence number to determine the order in which the highlight filter rules are to be applied when two or more highlight filter rules are in effect. The default value is 10.
-
Enabled: Select Yes to enable the highlight or select No to disable it.
-
Highlight Type: Select Row to highlight a row or select Cell to highlight a cell.
-
Background Color: Select a background color for the row or cell. Select a color to display color options, or select the colored icon to the right of the color selection field to display a color selection box from which to choose a different color. Alternatively, you can manually enter the HTML code for a color. Select outside of the color selection dialog once done.
-
Text Color: Select a text color for the row or cell using the same method you used for the background color. Select outside of the color selection dialog once done.
-
Highlight Condition: Edit the highlight filter rule expression by identifying the column, the operator, and the expression for each of the three fields in the highlight condition.
-
Column: Select any column name, including hidden columns.
-
Operator: Select an operator from a list of standard Oracle Database operators, such as
=,!=,NOT IN, andBETWEEN. -
Expression: Enter the comparison expression (without quotation marks) based on a known value for that column name to complete the filter expression.
For example, entering the filter expression
EVENT=SUPER USER LOGONfilters for all values in the Event column that contain the valueSUPER USER LOGON.
-
-
-
Select Apply.
See Also: Logging in to the Console
Creating a Chart from Report Data
Learn how to chart data in a report.
You can select from four chart styles to chart data in a report. After you create the chart, you can access it whenever you access the report.
To chart data in a report:
-
Log in to the Audit Vault Server as an auditor.
-
Select Reports, and then access the report that you want.
-
From the Actions menu, select Format, then Chart.
The Chart dialog box appears.
-
Enter the following information:
-
Chart Type: Select from one of the four chart styles: Bar, Line with Area, Pie, and Line.
-
Label: Select from the list of columns for this report. You can include hidden columns as well as displayed columns.
-
Value: Select from the list of columns for this report, including hidden columns. If you select Count from the Function list, then you do not need to select a value.
-
Function: Select an aggregate function (Sum, Average, Minimum, Maximum, or Count) on which to aggregate the data values.
-
Sort: Select ascending or descending sorting for values and labels.
-
Axis Title for Label: Enter a name for the axis title.
-
Axis Title for Value: Enter a name for the axis value.
-
Orientation: Choose Landscape or Portrait.
-
-
Select Apply: Select vertical or horizontal.
The chart appears, with the Edit Chart and View Report links under the search bar.
See Also: Logging in to the Console
Adding Control Breaks to a Report
Learn to add control breaks to selected columns in a report.
You can create a break group based on selected columns. This pulls the column out of the report as a main record and groups all rows with the same value for the selected column under that main record. This is useful for filtering by multiple column values.
For example, you may have an Activity Overview report that displays several columns of data. If you want to see that data broken up by the Client IP Address and Target Name columns, you would add control breaks for those columns. The resulting report would have data broken up into smaller tables for each unique combination of Client IP Address and Target Name.
To add a control break in a column:
-
Log in to the Audit Vault Server as an auditor.
-
Select Reports, and then access the report that you want.
-
From the Actions menu, select Format, then Control Break.
-
Select the columns to which you want to add a control break.
You can select up to six columns in the order that you want the data to be broken up. Selecting Enabled adds a control break; selecting Disabled removes the control break.
-
Select Apply.
See Also: Logging in to the Console
Using the Group By Feature to Format a Report
Learn to format a report using the Group By option.
The Group By dialog lets you group data by up to three columns in a report, and specify up to three functions to perform on any column, and display the resulting values as additional columns in the custom report.
For example, suppose you want to create a custom report to show the number of events of a certain status (for example SUCCESS or FAILURE) for each target and client IP address combination. Using Group By, you can create a custom report to group unique targets together in the first column, client IP addresses for each target together in the second column, and display Event Status in the third column. You then specify a function to count distinct values in the Event Status column for each target and client IP address combination.
The resulting custom report will contain four columns: Target, Client IP, Event Status, and the final column will show the results of the function, for example, the number of events with SUCCESS status for that target and IP address.
To use the Group By feature:
-
Log in to the Audit Vault Server as an auditor.
-
Select Reports, and then access the report that you want.
-
From the Actions menu, select Format, then Group By.
The Group By dialog is displayed.
-
In the Group By Column field, from the first drop-down list, select a data column for grouping data in column 1 of your custom report.
For example, if you select Target Name, column 1 of your report will have targets grouped together. Optionally, select data groupings for columns 2 and 3 of your report.
-
Optionally, in the Functions field, specify up to three functions to operate on specific data columns. For example, Count Distinct.
-
Under Column, select any data column in the default report.
-
Optionally, under Label enter a column heading for the new column created by the result of this function.
-
Optionally, under Format Mask select the format of the data in the new column created by the result of this function.
-
Optionally, select the Sum checkbox if you want to add a Sum row to the bottom of your custom report to add the values in the new column.
-
Select Apply. See Also: Logging in to the Console
Hiding or Showing Columns in a Report
Learn to hide or show columns in reports.
When you hide or show columns in a report, you still can perform operations on hidden columns, such as filtering data based on a column that you have hidden.
To hide or show columns in a report:
-
Log in to the Audit Vault Server as an auditor.
-
Select Reports, and then access the report that you want.
-
From the Actions menu, select Select Columns.
The Select Columns dialog field appears.
-
Move column names under the Do Not Display or Display in Report boxes:
-
Select the column names to move and then select the left or right arrow between the column name boxes.
-
Move all columns left or right by using the » and << buttons.
-
Use the top button (the arrows in a circle) to reset the columns to their original locations in the two boxes.
-
-
To set the order of displayed columns, in the Display in Report box, select the column name, then select the up or down arrow on the right side of the box to reorder the column's position in the list.
-
Select Apply.
See Also: Logging in to the Console
Customized Reports
Saving your Customized Reports
Learn how to save customized reports.
When you customize a built-in report with your specified filters and display settings, you can save this customized report. Such reports are listed in the Saved Reports tab in the Reports The saved reports cannot be printed in PDF format, and therefore must be viewed online.
When you save a custom report, you can save it under a specific category that you select or create as you save the report. You can also make the custom report private or share it with other users as a public report.
To create and save a custom report starting from a built-in report:
-
Log in to the Audit Vault Server as an auditor.
-
Select Reports, and then access the report that you want.
-
Filter and design the display as needed.
-
From the Actions menu, select Save Report.
-
Enter the following information in the Save Report dialog box:
-
Name: Enter a name for the report.
-
Description: Enter a brief description of the report.
-
Public: Select this checkbox to make the report accessible to all users.
-
-
Select Apply.
The custom report is listed on the Saved Reports
See Also:
Accessing Your Saved Custom Reports
Learn how to access saved custom reports.
To access a saved custom report:
-
Log in to the Audit Vault Server as an auditor.
-
Select Reports.
-
Select Saved Reports tab in the left navigation menu.
The Saved Reports page appears.
-
In the Name column, select the link for the specific report.
The report page is displayed. From here, you can:
-
Select the saved report name above the filter to edit it.
-
Select a filter to modify it. Alternately, you can select Actions menu, and then select Filter.
-
Remove a filter by clicking the Remove Filter icon (an “X”)
-
Enable or disable a control break by selecting or deselecting its checkbox
-
Remove a control break by clicking the Remove Breaks icon (an “x”) Note: Saved reports can’t be scheduled.
-
Related Topics
Creating and Scheduling a Custom Report
Learn how to create and schedule a custom report.
While a customized view of an existing report can be accessed from the Saved Reports a custom report can be created and scheduled from the Report Templates Scheduling a custom report is not available by default. Follow these steps to schedule a custom report:
-
Log in to the Audit Vault Server as an auditor.
-
Select Reports.
-
Select Report Templates in the left navigation menu.
-
In the Built-in Reports section, select the icons under Download Report Template and Download Report Definition columns.
-
Save the files to your local machine.
-
Modify the template and definition similar to any custom report.
-
Select Upload button.
-
Choose the template file and definition file in the dialog.
-
Optionally enter the Description.
-
Select Save.
-
The newly uploaded report template and definition is visible in the Report Templates section.
-
Select the icon under Schedule Report column.
-
Configure the report schedule details.
-
After the report is generated, it is accessible in the Generated Reports
-
The report can be downloaded.
Resetting the Report Display Values to Their Default Settings
Learn how to reset display of values in reports.
You can reset the report display values to their original default settings.
To reset the display settings to their defaults:
-
Log in to the Audit Vault Server as an auditor.
-
Select Reports, and then access the report that you want.
-
From the Actions menu, select Reset.
The Reset dialog appears with the following message:
Restore report to the default settings. -
Select Apply.
See Also: Logging in to the Console
Creating Non-Interactive Report Templates
You can create, modify, and use existing PDF or XLS report templates.
Prerequisites
-
BI Publisher Desktop is installed on Microsoft Windows host.
BI Publisher can be downloaded from Oracle Technical Resources.
-
User is able to log in to Audit Vault Server through console.
-
Information pertaining to the AVSYS schema holding audit data is available.
Creating Non-Interactive Report Template
You can create a new non-interactive or PDF/ XLS report, using an existing RTF or an XML report.
-
Log in to the console as auditor.
-
Select Reports tab and then select Report Templates in the left navigation menu.
Result:
The page displays all the configured reports in two sections Report Templates and Built-in Reports.
-
Select icon against any of the existing reports under the Download Report Template column.
-
Save the report to your local drive with a new name.
-
To preview changes in the RTF file requires sample data. Write a new Report SQL Query referring to the existing SQL in sample report XML file.
-
The above SQL Query output is generated from SQL Developer and is exported into XML format. It is not compatible with RTF files. To generate data in RTF required XML format, use the
DBMS_XMLGEN.GETXML ()function. This is a built in function of Oracle Database. -
To generate XML data, use the SQL query string as a parameter to
dbms_xmlgen.getxml()function.Result:
It returns XML data as output.
The below SQL example is for reference only.
SELECT DBMS_XMLGEN.GETXML ('YOUR REPORT SQL QUERY WITH PARAMETERS') xml_data FROM dual;Example:
SELECT DBMS_XMLGEN.GETXML('SELECT TO_CHAR(event_time, ''DS TS'') AS event_time,
event_name,
target_object,
event_status,
user_name,
client_ip,
client_program,
secured_target_name,
COUNT(*) OVER () AS totalrowcount,
COUNT(secured_target_name) OVER(PARTITION BY secured_target_name) AS securerowcount
FROM avsys.event_log elog
WHERE ROWNUM <= 3000
AND ( event_time BETWEEN ''19-DEC-13 09.35.02.570000000 AM'' AND ''20-DEC-13 09.35.02.570000000 AM'' )
AND secured_target_id IN(SELECT secured_target_id FROM avsys.secured_target
                        WHERE (
                                (secured_target_name_vc=UPPER(''MSSQLKVM5'')
                                  OR
                                  secured_target_name_vc LIKE UPPER(''MSSQLKVM5''\|\|''_DELETED%'')
                                )
                                  OR
                                  UPPER(''MSSQLKVM5'')=''ALL''
                              )
                            )
ORDER BY secured_target_name, elog.event_time') xml
from dual;
Note:
To generate SQL query string, use additional single quote inside this function for character identifier as escape character.
For example:
-
For
DS TSdate and timestamp formatting, apply single quote (') as escape character. -
For event_time timestamp parameter provide value as
''19-DEC-13 09.35.02.570000000 AM''.
Note:
Insert two single quotation marks for defining parameters.
-
For database_name parameter provide value as
''MSSQL_ST''. -
Numeric values can be provided as is. Provide value for ROW_LIMIT parameter as
3000or20000(any numerical value). Similarly make changes to other strings and parameters in the SQL query using single quotes.
-
-
Copy the query output from SQL Developer tool (or any other tool).
-
Paste it into notepad and save this file as XML.
-
There is another option to use SPOOL command to generate XML file. See Generating XML Data File Using SPOOL Command for complete information. Load the generated XML file.
-
Open the RTF template or sample report downloaded earlier using Microsoft Word.
-
Select BI Publisher.
-
Select Load XML and navigate to the generated XML and load it.
Result:
The following message is displayed:
Data loaded successfully. -
Make the necessary changes to the report.
-
If the file is in RTF format, then continue with the next step. Else, skip the remaining steps as they are relevant only for RTF files. Use Microsoft Word to edit the RTF file.
-
Change the existing report name.
-
Change report parameters like
REPORT PERIOD,RUN BY, andREPORT RECORD LIMITif required. -
Change the report parameter label if required.
For example:
Change the label
RUN BY, you can change it directly toRUN BY USER. -
Change the report parameter value if required. This is the SQL query column name.
For example:
To change the
TIME_FROMvalue double select TIME_FROM. Or right select it to access BI Publisher, then select Properties, and Advanced To change<?TIME_FROM?>to data XML column name and the XML tag name for this column isTIME1, so your tag will be<?TIME1?>. -
To change existing chart double select it and change
VALUES,AGGREEGATION,LABELS,TYPE, andSTYLEparameters. In case the chart is not required, then delete it. -
Change data table labels in the report if required. If the data table columns are different, the change the label and values as mentioned in earlier steps. To add additional columns, right select the table, select Insert, and then select Insert columns to the Right. Similarly the columns can be merged and deleted.
-
Change report header name if required.
-
Choose to display target level count and level count.
-
Retain the Time Zone and Date in footer section as they are common to all the reports.
-
Select PDF or Excel to verify the changes.
-
In case all the changes meet the requirements, then save the RTF file.
Note: In the generated PDF report, data for parameters is not be displayed in header section. The parameters data is sourced from application runtime.
-
This RTF report file can be uploaded along with XML report file for verification.
-
Create the XML file.
The following are the different tags in XML report file:
-
Parameter: Add or change input report parameters in this tag if new report parameters are different.
-
DATA: Contains the following tags or headers:
-
Column 1:Data Tag -
Column 2:Description -
AUDIT_SUBREPORT:Displays parameter values on RTF files in the header section. These change as per the new report parameters. -
Time zone:Displays time zone information and is common for all the reports. This need not be changed. -
TLQR:Contains report SQL and column mappings which should map with RTF column values. In this section, you need to paste your new report SQL query and column alias name mapping in XML column and values tags.
-
-
-
This XML report file can be uploaded along with the RTF file generated earlier.
Note: RTF and XML file names must be same.
-
Navigate to the uploaded reports section in console and select Upload.
-
Provide updated RTF and unchanged report definition taken from earlier steps.
-
Verify the report in the Generated Report section under the Reports tab of the Audit Vault application.
-
In case the report is not generated, then check the status of the report in Settings and then select Jobs in the left navigation menu.
Modifying Non-Interactive Report Template
You can modify or make cosmetic changes to Audit Vault reports.
-
Log in to the console as auditor.
-
Select Reports
Result:
The page displays the following reports in multiple sections:
-
Activity Reports
-
Summary
-
Data Access & Modification
-
Login & Logout Events
-
Database Settings
-
-
Entitlement Reports
-
OS Correlation Reports
-
Database Firewall Reports
-
Stored Procedure Changes
-
DB Vault Activity
-
-
Select PDF/XLS sub tab in the left navigation menu.
-
Select the download icon under
Download Report TemplateandDownload Report Definitionfile for the specific report. -
Previewing changes in the RTF file format, requires sample data. Copy the query data from the XML file which is similar to the following. Select the text mentioned below:
to_char(event_time, 'DS TS') as event_time client_ip, user_name, osuser_name, client_program, secured_target_name, error_code, error_message, decode { audit_trail_id, null, 'Network', 'Audit Trail' } as event_source from avsys.event.log -
The query output generated from SQL Developer and exported into XML format is not compatible with RTF files.
-
To generate XML data, use the
dbms_xmlgen.getxml()function. This is a built in function of Oracle Database. -
Pass SQL query string as a parameter to
dbms_xmlgen.getxml()function.Result:
It returns XML data with sample output mentioned below.
SELECT DBMS_XMLGEN.GETXML('SELECT TO_CHAR(event_time, ''DS TS'') AS event_time,
event_name,
target_object,
event_status,
user_name,
client_ip,
client_program,
secured_target_name,
COUNT(*) OVER () AS totalrowcount,
COUNT(secured_target_name) OVER(PARTITION BY secured_target_name) AS securerowcount
FROM avsys.event_log elog
WHERE ROWNUM <= 3000
AND ( event_time BETWEEN ''19-DEC-13 09.35.02.570000000 AM'' AND ''20-DEC-13 09.35.02.570000000 AM'' )
AND secured_target_id IN(SELECT secured_target_id FROM avsys.secured_target
                        WHERE (
                                (secured_target_name_vc=UPPER(''MSSQLKVM5'')
                                  OR
                                  secured_target_name_vc LIKE UPPER(''MSSQLKVM5''\|\|''_DELETED%'')
                                )
                                  OR

                                  UPPER(''MSSQLKVM5'')=''ALL''
                              )
                            )
ORDER BY secured_target_name, elog.event_time') xml
from dual;
Note:
To generate SQL query string, use additional single quote inside this function for character identifier as escape character.
For example:
-
For
''DS TS''date and timestamp formatting, apply single quote (') as escape character. -
For event_time timestamp parameter provide value as
''19-DEC-13 09.35.02.570000000 AM''.
Note:
Insert two single quotation marks for defining parameters.
- For database_name parameter provide value as
''MSSQL_ST''.
-
-
The above SQL query generates data in XML format, which can be uploaded in BI publisher template (RTF).
-
Copy the query output from SQL Developer tool (or any other tool).
-
Paste it into notepad and save this file as XML.
Note: There is another option to use SPOOL command to generate XML file. See Generating XML Data File Using SPOOL Command for complete information. Load the generated XML file.
Generating XML Data File Using SPOOL Command
You generate XML from SQL\*Plus using the SPOOL command.
-
Take the SQL query used to generate data in XML format.
For example:
SELECT DBMS_XMLGEN.GETXML('SELECT TO_CHAR(event_time, ''DS TS'') AS event_time, event_name, target_object, event_status, user_name, client_ip, client_program, secured_target_name, COUNT(*) OVER () AS totalrowcount, COUNT(secured_target_name) OVER(PARTITION BY secured_target_name) AS securerowcount FROM avsys.event_log elog WHERE ROWNUM <= 3000 AND ( event_time BETWEEN ''19-DEC-13 09.35.02.570000000 AM'' AND ''20-DEC-13 09.35.02.570000000 AM'' ) AND secured_target_id IN(SELECT secured_target_id FROM avsys.secured_target WHERE ( (secured_target_name_vc=UPPER(''MSSQLKVM5'') OR secured_target_name_vc LIKE UPPER(''MSSQLKVM5''\|\|''_DELETED%'') ) OR UPPER(''MSSQLKVM5'')=''ALL'' ) ) ORDER BY secured_target_name, elog.event_time') xml from dual; -
Unlock the
avsysuser on the Audit Vault Server Database:ssh support@<AuditVaultServer_IP> su root su dvaccountmgr sqlplus / alter user avsys identified by <password> account unlock; exit; -
Connect to the
avsysuser on the Audit Vault Server Database:ssh support@<AuditVaultServer_IP> su root su oracle sqlplus avsys <password> -
Run the command:
spool <path of the xml file>/<name of the xml file>.xml -
Run the SQL query from the earlier step.
-
Run the following command to turn off generating the XML data file further:
spool off -
Check the XML file generated in the location defined earlier. Remove unwanted strings and retain only the data.
-
Save it.
-
Open the RTF template downloaded earlier.
-
Select BI Publisher.
-
Select Load XML.
-
Navigate to the location of the generated XML file.
-
Load it.
Result:
The following message is displayed:
Data loaded successfully. -
Make the necessary changes.
-
To verify the change, select the PDF or Excel icon in the
-
If all the changes are complete as expected, save the RTF file.
Note: In the generated PDF report, data for parameters is not displayed in the Header. These parameters and data is captured during application runtime.
-
Navigate to the uploaded reports section in console and select Upload.
Note: RTF and XML file names must be same.
-
Provide updated RTF and unchanged report definition taken from earlier steps.
-
Verify the report on the server.
Generating Reports Using RTF And XML Sample Templates
You can generate reports using RTF and XML sample templates.
-
Use the existing XML and RTF report files.
-
Save them with a new report name.
-
To preview changes to the RTF file, sample data is required. Write a new Report SQL Query.
-
The above SQL Query output is generated from SQL Developer and is exported into XML format. It is not compatible with RTF files. To generate data in required RTF XML format, use the
DBMS_XMLGEN.GETXML ()function. This is a built in function of Oracle Database. -
Provide SQL query string as a parameter to
dbms_xmlgen.getxml()function. Execute:SELECT DBMS_XMLGEN.GETXML ('YOUR REPORT SQL QUERY WITH PARAMETERS') xml_dataFROM dual;Result:
It returns the following example XML data as output:
SELECT DBMS_XMLGEN.GETXML('SELECT TO_CHAR(event_time, ''DS TS'') AS event_time,
event_name,
target_object,
event_status,
user_name,
client_ip,
client_program,
secured_target_name,
COUNT(*) OVER () AS totalrowcount,
COUNT(secured_target_name) OVER(PARTITION BY secured_target_name) AS securerowcount
FROM avsys.event_log elog
WHERE ROWNUM <= 3000
AND ( event_time BETWEEN ''19-DEC-13 09.35.02.570000000 AM'' AND ''20-DEC-13 09.35.02.570000000 AM'' )
AND secured_target_id IN(SELECT secured_target_id FROM avsys.secured_target
                        WHERE (
                                (secured_target_name_vc=UPPER(''MSSQLKVM5'')
                                  OR
                                  secured_target_name_vc LIKE UPPER(''MSSQLKVM5''\|\|''_DELETED%'')
                                )
                                  OR
                                  UPPER(''MSSQLKVM5'')=''ALL''

                              )
                            )
ORDER BY secured_target_name, elog.event_time') xml
from dual;
Note:
To generate SQL query string, use additional single quote inside this function for character identifier as escape character.
For example:
-
For
''DS TS''date and timestamp formatting, apply single quote (') as escape character. -
For event_time timestamp parameter provide value as
''19-DEC-13 09.35.02.570000000 AM''.
Note:
Insert two single quotation marks for defining parameters.
-
For database_name parameter provide value as
''MSSQL_ST''. -
Numeric values can be provided as is. Provide value for ROW_LIMIT parameter as
3000or20000(any numerical value). -
Apply additional single quote (') for string and date parameters, if they are present in SQL query.
-
-
Copy the query output from SQL Developer tool (or any other tool).
-
Paste it into notepad and save this file as XML.
-
There is another option to use SPOOL command to generate XML file. See Generating XML Data File Using SPOOL Command for complete information. Load the XML data file.
Result:
The following message is displayed:
Data loaded successfully. -
Make the changes to the RTF file as required. Change the report header name.
-
Change the report parameters like
LabelandValuesif required.For example:
To change the label use option like
RUN BY. -
To change the TIME value double select one of the TIME fields. Or right select it to access BI Publisher, then select Properties, and then Advanced In the Advanced add column reference value in
<?ColumnName?>format. This column name is a reference of SQL Query output column name. -
To change the Report Chart go to BI Publisher and select CHART. Add chart as per your requirement by providing uploaded XML data as parameters.
-
In the Report Data Table, go to BI Publisher and select TABLE WIZARD. Select the columns to be displayed in the table.
-
Change the report header of the second page.
-
In the target group level and total, choose aggregation at target level and total count at report level. Execute:
count(*) over () as totalrowcount,count(secured_target_name) over(partition by secured_target_name) as securerowcount -
Keep same columns alias so that they can be referred in the report.
-
Retain the Time Zone and Date in footer section as they are common to all the reports.
-
Select PDF or Excel to verify the changes.
-
In case all the changes meet the requirements, then save the RTF file.
Note: In the generated PDF report, data for parameters is not be displayed in header section. The parameters data is sourced from application runtime.
-
This RTF report file can be uploaded along with XML report file for verification.
-
Create report XML using an existing template. Follow and use the comments existing in the template and modify accordingly. This is the report XML which is used to upload along with RTF file generated earlier.
-
Log in to the console as auditor.
-
Select Reports.
-
Select Report Templates in the left navigation menu.
-
Select Upload button in the top right corner.
The Upload Custom Report dialog is displayed. Select the files save in your local machine.
Note: The RTF and XML file names must be same.
-
Optionally enter the Description and select Save.
-
Verify the report in the Generated Reports
-
In case the report is not generated, then check the status in the Settings and then select the Jobs tab in the left navigation menu.
Creating and Uploading Your Own Custom Reports
You can add your own custom reports by using Oracle BI Publisher, or another report authoring tool from a third party.
You will need a report definition file (XML format) and a report template (RTF format), which you can download from . This section describes how to download these files from an existing report and use them for your own report. The audit event appendices in this guide contain data that may help you in creating your own reports.
-
Log in to the console as an auditor.
-
Select Reports.
-
Select Report Templates in the left navigation menu.
The Report Templates page is displayed. It lists previously uploaded custom reports. The built-in reports are listed under the Built-in Reports section.
-
Find a built-in report to use as a starting point for your new custom report.
-
Select the Download Report Template icon and save the RTF file.
-
Select the Download Report Definition icon and save the XML file.
-
Customize the report definition and template files using either Oracle BI Publisher or another tool, as necessary.
-
Select Upload button located in the top right corner.
The Upload Custom Report dialog is displayed.
-
In the Report Template file field, enter the name or browse for your customized report template (RTF) file.
-
In the Report Definition file field, enter the name or browse for your customized report definition (XML) file.
-
Optionally enter the Description.
-
Select Save.
The new report is listed under Report Templates
See Also:
Scheduling and Generating PDF or XLS Reports
Auditors can schedule and generate PDF or XLS reports.
About Scheduling and Creating PDF or XLS Reports
Auditors can schedule reports to be sent to other users in PDF or XLS format.
You can run the report immediately, or you can create or select a schedule to run the report at a later time. You can specify a list of users who receive notifications of the report, or who need to attest to the report.
The timestamp shown in scheduled reports is based on the Timezone Offset setting specified by an auditor in the Report Schedules tab or the Schedule icon in reports. This offset will only apply to report schedules and is independent of the console’s timezone offset.
To schedule a saved interactive report, refer to Creating and Scheduling a Custom Report.
Creating a Report Schedule
When you create a report schedule, you can add filters such as a limit to the number of rows generated.
-
Log in to the Audit Vault Server as an auditor.
-
Select Reports.
-
Find the report you want to schedule, and select the icon under Schedule.
-
In the page displayed, under the Schedule Report section, select the Report Format. You can choose PDF or XLS.
You can optionally change the Report Name. The Category Name field is already filled in and cannot be changed.
-
In the Report Filters section, enter or select:
-
Target - This appears if applicable to the report.
-
Row Limit - The maximum limit for this parameter (
ROW_LIMIT) is999999. -
Event Time
-
-
In the Schedule section, select how you want to schedule the report:
-
Immediately - Runs the report immediately.
-
Specify Schedule - Specify the time and date the report will begin to run and the repeat frequency.
-
Select Schedule - Select an existing schedule for the report by selecting a Schema where the schedule is stored, and the name of the Schedule from the drop-down lists.
Note: These options only appears if a database administrator creates these schedules in the embedded Oracle Database using the
DBMS_SCHEDULERPL/SQL package. The Schema list displays schemas that containDBMS_SCHEDULERschedules. The Schedule list displays all theDBMS_SCHEDULERschedules in that schema. By default, the Schema drop-down list contains theSYSschema, which owns theDBMS_SCHEDULERpackage. -
-
In the Retention Policy section, if necessary, select the edit icon to change the default archiving policy, and then select the check mark.
The archiving (or retention) policy is created by an administrator, and determines how long the generated PDF or XLS report is retained in the Audit Vault Server before it is archived. If you do not select one, the default retention policy will be used (12 months retention online and 12 months in archives before purging).
-
In the Notification section, optionally select users to notify about this report:
-
For the Send field, select either URL to send an email with a link to the report, or Attachment to send an email with the report attached as an XLS or PDF file.
-
From the Template drop-down list, select a report notification template.
-
From the Distribution List drop-down list, if applicable, select a distribution list.
-
If you want to send the report to additional recipients, enter their email addresses in the To e-mail and Cc fields. Enter full email addresses separated by commas.
-
Select Add to List.
-
-
Under Attestation section, select one or more auditors who should attest to the report.
Optionally, you can set the order in which the auditors are listed in the Attestation area.
-
Select Schedule.
The PDF or XLS is stored in the database, and the report appears in the Report Schedules tab under the main Reports
You can check the Jobs tab under Settings tab to see the status of report generation.
Note: Avoid triggering or scheduling concurrent long running reports at the same time, as they may be left in a hung state forever. The reports must be scheduled with staggered intervals in between. For example, a gap of
5,10, or20minutes.
See Also:
-
* Administrator’s Guide* for more information on archiving policies.
Viewing or Modifying Report Schedules
An auditor can view and modify scheduled reports.
To view or modify report schedules, navigate to the Reports and then select Report Schedules on the left navigation.
See Also: Creating a Report Schedule for details on report schedule fields.
View and Edit All Scheduled Reports
You can view all scheduled reports and adjust the time zone offset for all scheduled reports on the Report Schedules page.
-
Log in to Console as an
auditor. -
Clicks the Reports
-
Select Report Schedules.
-
Select Change to adjust the time zone offset for all scheduled reports.
-
View the Report Schedules for all reports.
Downloading Generated Reports in PDF or XLS Format
When scheduled reports are generated you can download them to your computer in PDF or XLS format.
The format in which you can download the report depends on the format you selected in your report schedule. You can also notify other users by sending a link to the report, or attaching the report in an email. You can download an unscheduled report in HTML or CSV format, while browsing it online.
-
Log in to the Audit Vault Server as an auditor.
-
Select Reports.
-
Select Generated Reports in the left navigation menu.
A list of generated reports appear.
-
From here, you can do the following:
-
To see a list of pending reports, click Show Pending Reports.
-
To save the report to your computer, select the report name, and then save the file.
-
To notify another user of the report, select the checkbox against the specific report, and then click Notify.
-
To attest and annotate the report, select the Details icon in the second column.
See Also:
-
Notifying Users About Generated PDF or XML Reports
You can send notifications to other users or distribution lists about a scheduled and generated report.
-
Log in to the Audit Vault Server as an auditor.
-
Select Reports.
-
Select Generated Reports in the left navigation menu.
A list of generated reports appear.
-
Select the checkbox for the specific report and then select the Notify button.
-
In the Notification section, perform the following:
-
For the Send field, select either URL to send an email with a link to the report, or Attachment to send an email with the report attached as an XLS or PDF file.
-
From the Template drop-down list, select a report notification template.
-
From the Distribution List drop-down list, if applicable, select a distribution list.
-
If you want to send the report to additional recipients, enter their email addresses in the To e-mail and Cc fields. Enter full email addresses separated by commas.
-
-
Select Notify.
See Also: Logging in to the Console
Annotating and Attesting Reports
After a report has been generated, auditors can annotate and attest to the report.
This enables you to create a record of all notes and attestations for the report in one place, with the most recent note and attestation listed first. If you delete the report, its associated annotation and attestations are removed as well.
-
Log in to the Audit Vault Server as an auditor.
-
Select Reports.
-
Select Generated Reports in the left navigation menu.
-
Select the Details icon of the specific report.
-
Scroll down to the Attestations section.
-
In the Notes field, enter a note for the report.
-
Perform one of the following actions:
-
To save the note only, select the Save button. The note appears in the Previous Notes area.
-
To save the note and attest to the report, select the Save & Attest button. The note appears in the Previous Notes area and the Attestation area is updated with your user name and the time that you attested to the report.
-
To download the report, select the Download Report button.
-
-
To return to the Generated Reports page, select the Cancel button.
The Generated Reports page appears.
Related Topics
Downloading a Report in HTML or CSV Format
You can download reports in .csv (for use in an Excel spreadsheet) or html format.
-
Log in to the console as an auditor.
-
Select Reports.
-
All the report categories are listed in the left navigation menu. Select the specific report category. For example, select Activity Reports sub
-
Select the specific report.
-
Use the filter options using the search field or by clicking on the column names. From the Actions menu, select Download.
-
Select CSV or HTML in the dialog.
-
In the opening dialog box, select Save File and then select OK.
-
Select a location and enter a name for the file.
-
Select Save.
See Also: Logging in to the Console
Related Event Data Appendices
For audit data, reports track audit events from a variety of sources, such as Oracle Database audit events, and so on.
See the following appendices for more information: