Visual Studio Entity Designer
The Visual Studio Entity Designer (Entity Designer) allows you to create or modify the entity model. With Oracle Developer Tools for Visual Studio installed, this designer can connect to the Oracle Database to create entities based on existing Oracle schema objects.
Alternately, you can design the entities in the designer. Then, you can have the designer generate a SQL script that creates Oracle schema objects based on this design.
Oracle Stored procedures or functions can also be mapped to Entity Functions for explicit calls from the code, or they can be mapped (and automatically called) on INSERT, UPDATE, and DELETE operations on entities.
This section covers these topics:
Generating an Entity Model from an Oracle Database
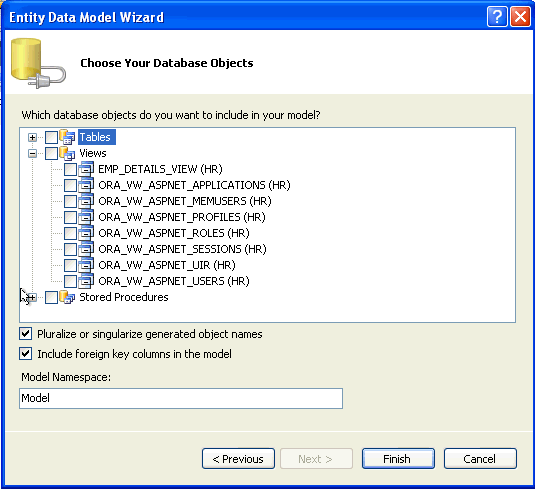
To generate an Entity Model from an Oracle Database, follow these steps:
Updating an Entity Data Model from an Oracle Database
You can update an entity data model from an Oracle database.
To update an existing Entity Data Model from an Oracle Database, do the following:
Generating an Oracle Database Create Script from an Entity Model
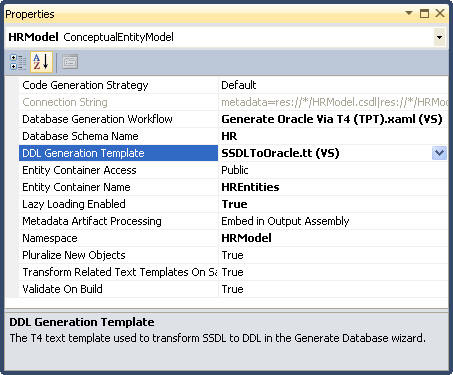
You can generate an Oracle database create script from an entity data model using one of two strategies each of which determines how entities are mapped to database tables:
-
Table-per-type: Using table-per-type, each entity is mapped to its own database table.
-
Table-per-hierarchy: Using table-per-hierarchy, an entity and its derived types are mapped to a single database table. This database table includes columns for all possible properties of an entity and its derived types. The database table also includes a discriminator column that indicates for each row, what type of entity it is.
To generate an Oracle database create script, do the following:
Note:
With Oracle Database Release 12.1 or later, on the Entity Designer Settings Options page, you can enable the Set maximum size for extended datatype columns to 32767 option. The generated DDL then uses a maximum size of 32767 for extended types. You can also enable the Generate IDENTITY column(s) option, which will cause the generated DDL to use IDENTITY columns rather than a sequence and trigger combination.
Using Add Import Function Dialog to Import an Oracle Stored Procedure
You can map an Entity Function to an Oracle Stored Procedure by using the Add Function Import Dialog.
To map an Oracle stored procedure to the Entity Model, perform the following steps:
-
Generate or update an Entity Model from an Oracle Database.
-
If you have not done so previously, choose a connection to an Oracle database.
-
In the window to Choose Your Database Objects, select some stored procedures or functions or both.
Note:
To add entity function imports that have return values, such as scalars, complex types, or entities, you must select Oracle stored procedures that include a
REFCURSOROUTorINOUTparameter. TheREFCURSORis then mapped to the Entity Function return value. If an Oracle stored procedure or function returns multipleREFCURSORs, only the one is used as the return value for an import function.It is also possible to import Oracle Stored procedures or functions that do not include a
REFCURSOR, but may haveOUTorINOUTparameters. In that case, the imported entity function has no return value, and you can bind to the output parameters to retrieve data. -
To add function imports that have a return value (such as an Oracle Stored procedure that contains a
REFCURSOR), configure theREFCURSORmetadata information in theapp.configorweb.configfile in your Visual Studio project.You can automatically generate this metadata information as follows:
-
Connect in Server Explorer to the Oracle Database containing the stored procedure or function. Be sure to connect as the data source of the type of ODP.NET that your Entity Framework application uses, as described in Connection Dialog Box, either Managed ODP.NET or Unmanaged ODP.NET. This is required because automatically generated metadata information has different formats for the two types of ODP.NET.
-
Navigate the Server Explorer tree control to the stored procedure or function node that you wish to generate the metadata information for.
-
Right-click on the stored procedure or function node and select Run from the menu.
-
If there are input parameters, enter a value or a set of values into the Stored Procedure Run Dialog Box.
The results window appear in the Stored Procedure Run Dialog Box.
-
If you intend to use the Add Import Function Dialog to create an Import Function that returns a collection of complex types, select all of the Select for Config check boxes. For Import Functions that return a collection of entities or scalars, this is not required.
-
Click the Add Config to Project button to add the metadata information to your
app.configorweb.config.
Note: For more information on configuring
REF CURSORmetadata information, see Implicit REF CURSOR Binding Support in Oracle Data Provider for .NET Developer's Guide. -
-
In the Model Browser, under Store, click the Stored Procedures node, and then right-click the name of the Oracle Stored Procedure. From the menu, select Add, then Function Import.
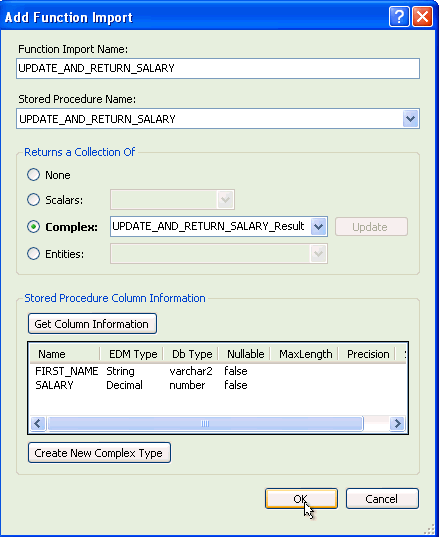
The Add Function Import dialog appears.
-
Select one of the Returns a Collection of options. If you select Complex, you can then select Get Column Information. This will read your
app.configor yourweb.configto get metadata information about theREFCURSORthat contains the return values.Note:
A return value mapped to a Complex Type is not supported with Oracle Stored Functions. The error
FunctionImportscannotbecreatedforcomposablefunctionswill result. Consider creating a wrapper Oracle Stored Procedure to work around this.If the
app.configorweb.configmetadata information is incorrect, no column information appears when Get Column Information is selected. You must correct theconfigfile. -
After column information appears, select Create New Complex Type.
-
Select OK to add the function import to the conceptual model.


