Starting the Queue Designer
Start the Queue Designer from the Server Explorer by right-clicking the Advanced Queues node and selecting the Queues node, then select New Queue from the menu.
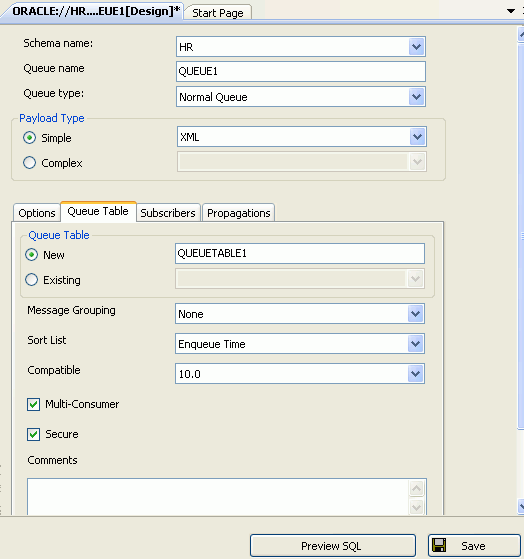
The Queue Designer appears as follows:
Main Window
The main window for the Queue Designer is as follows:
| Control | Description |
|---|---|
|
Schema |
Select from the list of available schemas for the current connection. Your current schema is the default. This control is disabled when updating existing Queue Tables. |
|
Name |
Enter the name for the queue. Name cannot be null and is read-only when updating an existing Queue. When you create new Queue, a unique name is automatically generated, such as, Queue1. |
|
Queue Type |
Select the queue type from these values: Normal (default) or Exception. This control is read-only when updating an existing control. |
|
Payload Type |
Select the Payload Type. Choosing Simple results in a selection list containing XML and RAW. Choosing Complex results in a selection list containing all object type UDTs in the your schema and other included schemas for this connection. Also, you can enter the name of a UDT from another schema. When updating an existing queue, these controls are read-only. |
|
Save |
Creates or updates the queue in the database. |
|
Preview SQL |
Displays the SQL that creates or updates the Queue, Queue Table, Subscribers and Propagations when you save. |
Options Tab
| Control | Description |
|---|---|
|
Max Retires |
Enter the number of retries for this queue. There is a maximum value of 2147483647 and a minimum value of 0. This field can be null. Default value is empty/null. This field is disabled for 8.0 compatible queues. |
|
Retention Time |
Enter the number of seconds a message is retained in the Queue. The default value is 0, meaning no retention and a value of -1 meaning infinite retention. |
|
Retry Delay |
Specify the number of seconds before message is scheduled for processing again after an application rollback. Default is 0. Note that this control is disabled for multiconsumer queues with 8.0 compatibility. |
|
Comments |
Enter any comments you wish about the Queue. |
Queue Table Tab
The Queue Table tab lets you create or edit a Queue Table associated with this queue. However, you must use the Queue Table designer for setting storage options on this Queue Table.
This tab displays Queue Table Designer options.
These controls, except for Comments, are read-only when updating an existing queue.
| Control | Description |
|---|---|
|
Queue Table |
Select a new or existing queue table. Choosing New enables you to enter the name of the queue table to be created as part of the queue. Choosing Existing enables you to enter a queue table name or select one from a list containing the existing queue tables in your schema and included schemas. The values of the Queue Table controls change relative to the Queue Table selected. |
|
Message Grouping |
Select from the following values: None (default), Transactional. |
|
Sort List |
Select one of the following:
If you used one of the paired options, then the first option of the pair defines the most significant order. |
|
Compatible |
Select from the following values: 8.0, 8.1, 10.0. If the database is in 10.1-compatible mode, the default value is 10.0. If the database is in 8.1-compatible or 9.2-compatible mode, the default value is 8.1. If the database is in 8.0 compatible mode, the default value is 8.0. |
|
Secure |
Specify whether or not this queue table is secure. See chapter 10 in Oracle Streams Advanced Queuing User's Guide for further information on creating secure Queue Tables. |
|
Multiple Consumers |
Specify whether the queue is multiconsumer or not. The default value is checked. |
|
Comments |
Enter any comments you wish about the Queue Table. |
Subscribers Tab
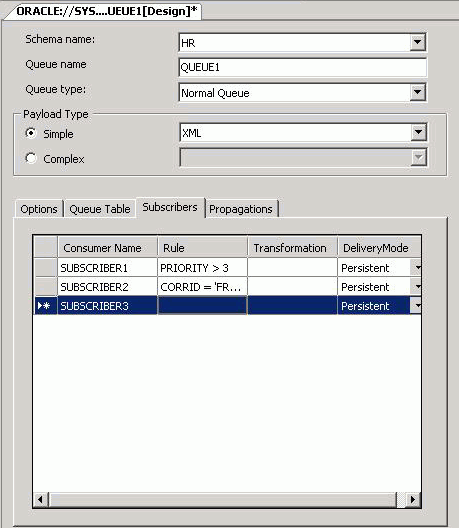
The Subscribers tab allows you to add, delete and modify the Queue subscribers.
The tab contains a grid that lists all the current subscribers of the queue and may be used to add, update or delete the subscribers.
To add a new subscriber, click in the new record row (marked by a * in the row-header column). To delete a subscriber, select the row and press delete. To update a subscriber, click in the field and edit its value.
Only the transformation and rule fields can be modified when you update an existing queue subscriber.
This tab displays the following controls:
| Control | Description |
|---|---|
|
Consumer Name |
Enter the name of the subscriber. This control cannot be null and is read-only when updating a subscriber. |
|
Rule |
Enter a rule for the subscriber. This should be a column that is similar to the |
|
Transformation |
Enter or select a transformation to be applied when this subscriber dequeues the message. This field is empty by default. Transformation is disabled for non-DBA connections. |
|
DeliveryMode |
Select from the following values:
This control is read-only when updating an existing subscriber. This control/column is only visible for Oracle Database 10g Release 10.2 or higher. |
Propagation Tab
The Propagation tab lets you control Queue Scheduling, also known as Queue Propagation. This tab is only visible to DBA users except during queue creation. A non-DBA user can create a queue, populate this tab and press the save button. However, when the same user attempts to edit the queue, the propagation tab is no longer available.
The tab contains a grid that lists all the current propagations and supports adding, updating, or deleting propagations.
To add a new propagation, click in the new record row (marked by a * in the row-header column). To delete a propagation, select the row and press delete. To update a propagation, click in the field and edit its value.
The Propagation tab displays the following controls:
| Control | Description |
|---|---|
|
Dest. Queue |
Select from the list or enter a destination queue. The available list contains all queues with matching payload types that you have access to, but only in the current database. Queue names from the destination database link are not fetched. This field will be empty by default and cannot be null. This field is read-only when updating an existing propagation. This control/column is only visible for Oracle Database 10g Release 10.2 or higher |
|
Dest. Dababase |
Select or enter a destination database link name. The available list contains all the database links defined in the database (see database view |
|
Start Time |
Specify a Date Time for the initial start time of the propagation. The field shows the current date by default and can be null. A null value means |
|
Duration |
Enter the duration of the propagation window in seconds. Duration is empty by default, meaning that the duration of the propagation window is infinite. |
|
Next Time |
Enter a date function to compute the start of next propagation window, for example, |
|
Latency |
Enter a number to specify the latency of the propagation in seconds. The default value is 60 and is used if no value is specified. |


