12 Oracle Database Instances in Oracle Cloud Infrastructure
Oracle Key Vault deployed on-premises can manage the TDE master encryption keys for Oracle Database instances running in Oracle Cloud Infrastructure (OCI).
- About Managing Oracle Cloud Infrastructure Database Instance Endpoints
This type of Oracle Key Vault server deployment meets compliance standards for the management of encryption keys. - Preparing a Database Instance on OCI to be an Oracle Key Vault Endpoint
Oracle Key Vault supports the use of Oracle database instances on Oracle Cloud Infrastructure (OCI). - Using an SSH Tunnel Between Oracle Key Vault and Database as a Service
An on-premises Oracle Key Vault communicates with an Oracle Cloud Database as a Service instance using a secure SSH tunnel. - Registering and Enrolling a Database as a Service Instance as an Oracle Key Vault Endpoint
You can use the command line and the Oracle Key Vault management console to complete this task. - Suspending Database Cloud Service Access to Oracle Key Vault
You can suspend one or more enrolled Database as a Service endpoints from access to Oracle Key Vault. - Resuming Database Cloud Service Access to Oracle Key Vault
You can reinstate the connection between suspended Database Cloud Service endpoints and Oracle Key Vault. - Resuming a Database Endpoint Configured with a Password-Based Keystore
Depending on the configuration, a Database as a Service endpoint can resume either automatically or must be manually resumed.
12.1 About Managing Oracle Cloud Infrastructure Database Instance Endpoints
This type of Oracle Key Vault server deployment meets compliance standards for the management of encryption keys.
The Oracle Database instances running in Oracle Cloud Infrastructure (OCI) can be deployed on VMshape, bare metal, or Exadata. This type of deployment provides physical separation of keys from the encrypted data, and gives on-premises administrators control and visibility of how encryption keys are used to access encrypted data in the cloud. This also meets compliance requirements where encryption keys must be managed on-premises or separate from systems containing encrypted data.
Related Topics
Parent topic: Oracle Database Instances in Oracle Cloud Infrastructure
12.2 Preparing a Database Instance on OCI to be an Oracle Key Vault Endpoint
Oracle Key Vault supports the use of Oracle database instances on Oracle Cloud Infrastructure (OCI).
- About Preparing a Database Instance on OCI to be an Oracle Key Vault Endpoint
To prepare an Oracle database instance on OCI to be an Oracle Key Vault endpoint, you must first configure the instance, and then create a low-privileged user. - Configuring a Database Cloud Service Instance
An Database as a Service (DBaaS) instance must have the correct network configuration. - Creating a Low Privileged Operating System User on Database as a Service
The low privileged user account,okv, will be responsible for configuring an SSH tunnel and communicating with the DBaaS instances.
Parent topic: Oracle Database Instances in Oracle Cloud Infrastructure
12.2.1 About Preparing a Database Instance on OCI to be an Oracle Key Vault Endpoint
To prepare an Oracle database instance on OCI to be an Oracle Key Vault endpoint, you must first configure the instance, and then create a low-privileged user.
Oracle databases on Oracle Cloud Infrastructure (OCI) provide fully functional Oracle database instances that use computing and storage resources provided by Oracle Compute Cloud Service. It eliminates the need to purchase, build, and manage silos of server and storage systems. It also makes database resources and capabilities available online so users can consume them whenever and wherever they are needed.
12.2.2 Configuring a Database Cloud Service Instance
An Database as a Service (DBaaS) instance must have the correct network configuration.
You can find instructions for configuring a Database as a Service (DBaaS) instance in the Oracle Database Cloud Service (Database as a Service) documentation.
After you have configured the DBaaS instance, it should have the following default values:
-
A public IP address
-
Two users:
oracleandopc(Oracle Public Cloud) -
SSH access to the
oracleandopcusers
12.2.3 Creating a Low Privileged Operating System User on Database as a Service
The low privileged user account, okv, will be responsible for configuring an SSH tunnel and communicating with the DBaaS instances.
oracle and opc users. These users have more privileges than necessary to create the SSH tunnel, so Oracle recommends that you create another low privileged operating system user named okv on the Database as a Service instance. Oracle Key Vault will use user okv to configure an SSH tunnel and communicate with the Database as a Service instances.
12.3 Using an SSH Tunnel Between Oracle Key Vault and Database as a Service
An on-premises Oracle Key Vault communicates with an Oracle Cloud Database as a Service instance using a secure SSH tunnel.
- Creating an SSH Tunnel Between Oracle Key Vault and a DBaaS Instance
You can create a connection between Oracle Key Vault and a Database as a Service (DBaaS) instance by configuring an SSH tunnel. - Managing a Reverse SSH Tunnel in a Multi-Master Cluster
You can reverse an SSH tunnel in a multi-master cluster from more than one node to the cloud-based endpoint for redundancy. - Managing a Reverse SSH Tunnel in a Primary-Standby Configuration
A reverse SSH tunnel in a primary-standby configuration is similar to a reverse SSH tunnel on a standalone Oracle Key Vault server. - Viewing SSH Tunnel Configuration Details
The Oracle Key Vault management console provides information about SSH tunnels that have been configured for Oracle Key Vault. - Disabling an SSH Tunnel Connection
You can use the Oracle Key Vault management console to disable the Oracle Key Vault and Database as a Service instance connection. - How the Connection Works if the SSH Tunnel Is Not Active
The SSH tunnel is kept alive even if there is no activity between Oracle Key Vault and the Database as a Service instance. - Deleting an SSH Tunnel Configuration
You can use the Oracle Key Vault management console to delete the connection between Key Vault and a Database as a Service instance.
Parent topic: Oracle Database Instances in Oracle Cloud Infrastructure
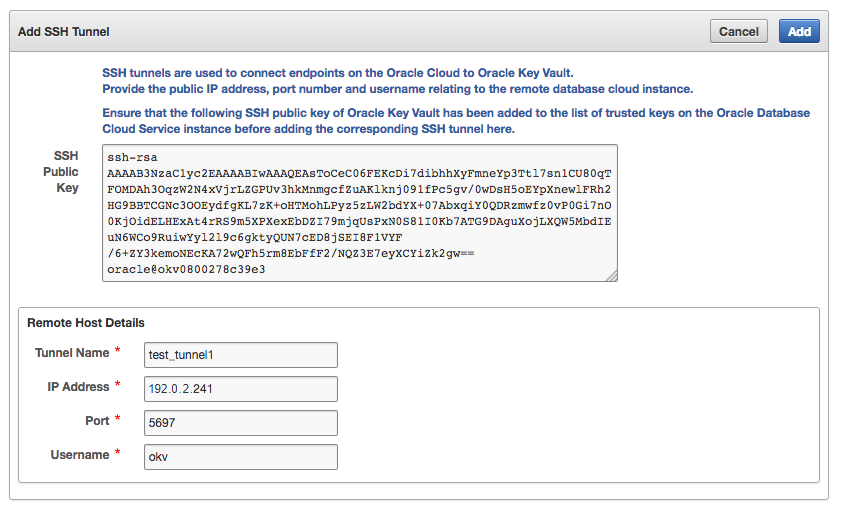
12.3.1 Creating an SSH Tunnel Between Oracle Key Vault and a DBaaS Instance
You can create a connection between Oracle Key Vault and a Database as a Service (DBaaS) instance by configuring an SSH tunnel.
12.3.2 Managing a Reverse SSH Tunnel in a Multi-Master Cluster
You can reverse an SSH tunnel in a multi-master cluster from more than one node to the cloud-based endpoint for redundancy.
Oracle recommends that you configure three tunnels. Ideally, the cloud-based reverse SSH tunnels should be from different read-write pairs. Multiple SSH tunnels to the same endpoint are distinguished by the port number used. Oracle Key Vault suggests unique port numbers based on node ID. If you want to specify different port numbers, make port numbers for SSH tunnels from different nodes to the same endpoint unique.
In a multi-master cluster, multiple SSH tunnels are created from multiple nodes to the same endpoint. However, when you register and enroll endpoints, you will only see the tunnel from that node.
Be aware of the following:
- You should register and enroll the endpoint where there is a SSH tunnel created to that endpoint.
- You only see the tunnel from that node to endpoint in the following places:
- During the registration, the option to select the SSH tunnel.
- After registration, when you view endpoint details, only that tunnel is displayed.
- When you submit the enrollment token and download the endpoint software, only that tunnel is displayed. However, the endpoint software downloaded has information about all tunnels to the endpoint. This means that the endpoint is able to use all the tunnels that were created before the endpoint is created.
All nodes which have an SSH tunnel created display their tunnel to the endpoint on the Endpoint Details page. They also list all tunnels that were created from that node on the SSH Tunnels page in the Oracle Key Vault management console.
12.3.3 Managing a Reverse SSH Tunnel in a Primary-Standby Configuration
A reverse SSH tunnel in a primary-standby configuration is similar to a reverse SSH tunnel on a standalone Oracle Key Vault server.
The SSH key of the primary and standby servers are the same after pairing. Tunnels created on an Oracle Key Vault server before primary-standby pairing as well as tunnels created on the primary after the primary-standby pairing are valid after primary-standby operations such as switchover, and failover, although the tunnels may be unavailable during the execution of these operations.
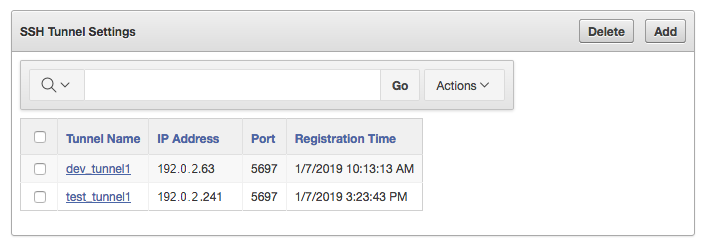
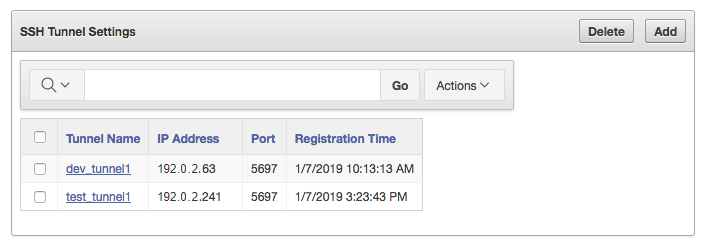
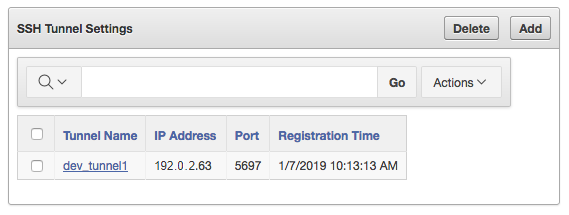
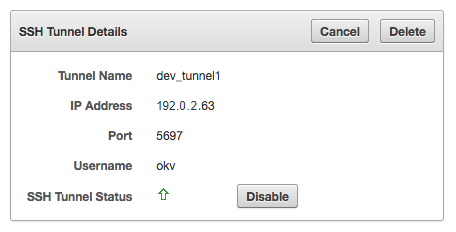
12.3.4 Viewing SSH Tunnel Configuration Details
The Oracle Key Vault management console provides information about SSH tunnels that have been configured for Oracle Key Vault.
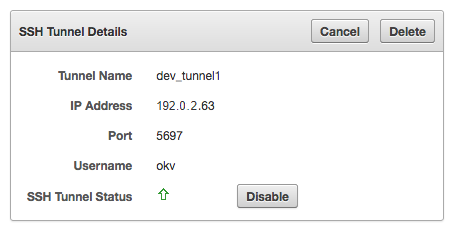
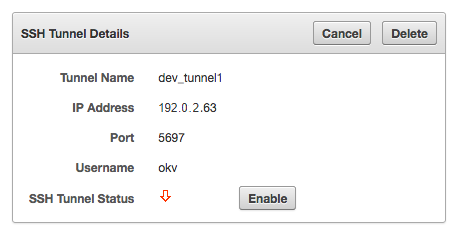
12.3.5 Disabling an SSH Tunnel Connection
You can use the Oracle Key Vault management console to disable the Oracle Key Vault and Database as a Service instance connection.
12.3.6 How the Connection Works if the SSH Tunnel Is Not Active
The SSH tunnel is kept alive even if there is no activity between Oracle Key Vault and the Database as a Service instance.
If the tunnel stops, then it is automatically restarted. An alert will be sent if the tunnel is not available for any reason. An administrative user may elect to receive these alerts by email by configuring SMTP settings on Oracle Key Vault.
Related Topics
12.4 Registering and Enrolling a Database as a Service Instance as an Oracle Key Vault Endpoint
You can use the command line and the Oracle Key Vault management console to complete this task.
- About Registering and Enrolling a Database as a Service Instance as an Oracle Key Vault Endpoint
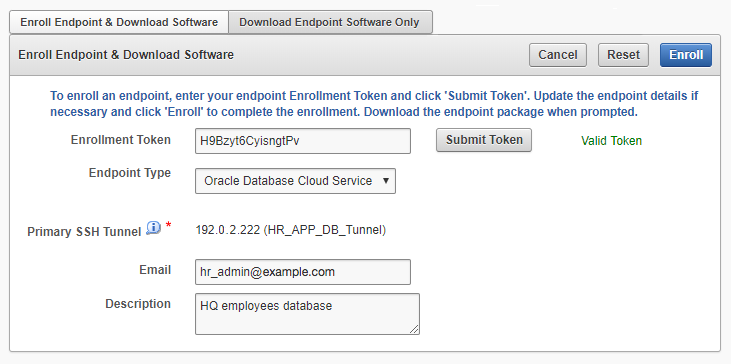
You must enroll the Oracle Database as a Service instance before it can communicate with an Oracle Key Vault server. - Step 1: Register the Endpoint in the Oracle Key Vault Management Console
The endpoint registration process downloads anokvclient.jarfile, which contains the Oracle Key Vault software that the endpoint needs, to the local system. - Step 2: Prepare the Endpoint Environment
The endpoint must have a compatible version of the Java Development Toolkit (JDK) and the Oracle Database environment variables must be set. - Step 3: Install the Oracle Key Vault Software onto the Endpoint
To install the Oracle Key Vault software installation, you run theokvclient.jarfile on the endpoint. - Step 4: Perform Post-Installation Tasks
Post-installation tasks are important for a fully functioning Oracle Key Vault installation.
Parent topic: Oracle Database Instances in Oracle Cloud Infrastructure
12.4.1 About Registering and Enrolling a Database as a Service Instance as an Oracle Key Vault Endpoint
You must enroll the Oracle Database as a Service instance before it can communicate with an Oracle Key Vault server.
The enrollment of Database as a Service endpoints is similar to the enrollment of on-premises endpoints with the following exceptions:
-
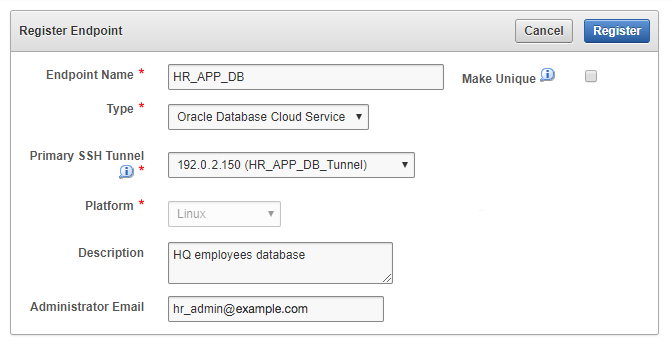
Database as a Service endpoints should be registered with an endpoint type of “Oracle Database Cloud Service".
-
Database as a Service endpoints have a primary tunnel IP associated with them. You must select the SSH tunnel with the same public IP address of the Database as a Service instance.
-
The platform must be Linux. This is automatically selected and cannot be modified.
-
You must download the jar file on-premises and transfer it to the Database as a Service instance using an out-of-band method like SCP or FTP.
12.4.2 Step 1: Register the Endpoint in the Oracle Key Vault Management Console
The endpoint registration process downloads an okvclient.jar file, which contains the Oracle Key Vault software that the endpoint needs, to the local system.
12.4.3 Step 2: Prepare the Endpoint Environment
The endpoint must have a compatible version of the Java Development Toolkit (JDK) and the Oracle Database environment variables must be set.
12.4.4 Step 3: Install the Oracle Key Vault Software onto the Endpoint
To install the Oracle Key Vault software installation, you run the okvclient.jar file on the endpoint.
12.4.5 Step 4: Perform Post-Installation Tasks
Post-installation tasks are important for a fully functioning Oracle Key Vault installation.
okvclient.jar file.
12.5 Suspending Database Cloud Service Access to Oracle Key Vault
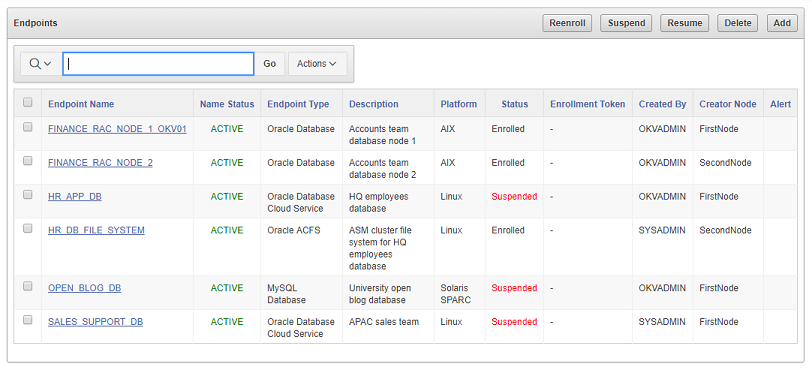
You can suspend one or more enrolled Database as a Service endpoints from access to Oracle Key Vault.
- About Suspending Database Cloud Service Access to Oracle Key Vault
When the DBaaS service is suspended, the Oracle Key Vault Server rejects all requests from the suspended endpoints. - Suspending Access for a Database Cloud Service to Oracle Key Vault
After you suspend the Database as a Service access to Oracle Key Vault, you can resume the access when needed.
Parent topic: Oracle Database Instances in Oracle Cloud Infrastructure
12.5.1 About Suspending Database Cloud Service Access to Oracle Key Vault
When the DBaaS service is suspended, the Oracle Key Vault Server rejects all requests from the suspended endpoints.
When you use an on-premises Oracle Key Vault to manage the online master keys for Database as a Service endpoints, the master encryption keys are never stored persistently in Oracle Cloud. This way, the on-premises Oracle Key Vault administrator can control access to the encrypted data in the cloud.
An on-premises Oracle Key Vault administrator can suspend Database as a Service endpoints with a single click. This means that the Oracle Key Vault Server rejects all requests from the suspended endpoints. Because the endpoint cannot request keys from the Oracle Key Vault server, its ability to access encrypted data is lost after the key cached in memory times out. For Oracle Database Cloud Service endpoints, this time out is 5 minutes by default.
The on-premises Oracle Key Vault administrator can resume a suspended endpoint. This means that the Oracle Key Vault server can start servicing requests from the reinstated endpoint. The reinstated endpoint can now retrieve keys from the Oracle Key Vault server and access sensitive data.
In a multi-master cluster, when a node is being enabled or disabled, the information may not yet have reached all nodes in the cluster. If an endpoint attempts to contact a node whose information has not yet propagated throughout the cluster, an error may be returned.
Caution:
The suspend operation is a disruptive operation as it results in operational discontinuity. Therefore, you should use it with care. Usually, you should suspend the database only if there is a strong indication of abnormal activity in the Database as a Service instance.
You can only suspend enrolled endpoints. You cannot suspend endpoints that are in the Registered state. If you try to suspend endpoints that are already suspended, no operation will be performed. The endpoints will continue to be in suspended state.
12.6 Resuming Database Cloud Service Access to Oracle Key Vault
You can reinstate the connection between suspended Database Cloud Service endpoints and Oracle Key Vault.
Parent topic: Oracle Database Instances in Oracle Cloud Infrastructure
12.7 Resuming a Database Endpoint Configured with a Password-Based Keystore
Depending on the configuration, a Database as a Service endpoint can resume either automatically or must be manually resumed.
A Database as a Service endpoint that is configured with auto-login keystore support will begin operations as soon as one of the nodes configured with reverse SSH access restores connectivity to the DBCS endpoint. On the other hand, the Database as a Service endpoint configured with password keystore will not resume operations after the endpoint is resumed on the Oracle Key Vault server. The keystore on the Database as a Service instance was closed because Oracle Key Vault suspended the endpoint. You should open the password-based keystore on the Database as a Service instance to resume operations.
Parent topic: Oracle Database Instances in Oracle Cloud Infrastructure
