6 Get Started with AutoML UI

AutoML User Interface (AutoML UI) is an Oracle Machine Learning interface that provides you no-code automated machine learning modeling. When you create and run an experiment in AutoML UI, it performs automated algorithm selection, feature selection, and model tuning, thereby enhancing productivity as well as potentially increasing model accuracy and performance.

The following steps comprise a machine learning modeling workflow and are automated by the AutoML user interface:

  1. Algorithm Selection: Ranks algorithms likely to produce a more accurate model based on the dataset and its characteristics, and some predictive features of the dataset for each algorithm.
  2. Adaptive Sampling: Finds an appropriate data sample. The goal of this stage is to speed up Feature Selection and Model Tuning stages without degrading the model quality.
  3. Feature Selection: Selects a subset of features that are most predictive of the target. The goal of this stage is to reduce the number of features used in the later pipeline stages, especially during the model tuning stage to speed up the pipeline without degrading predictive accuracy.
  4. Model Tuning: Aims at increasing individual algorithm model quality based on the selected metric for each of the shortlisted algorithms.
  5. Feature Prediction Impact: This is the final stage in the AutoML UI pipeline. Here, the impact of each input column on the predictions of the final tuned model is computed. The computed prediction impact provides insights into the behavior of the tuned AutoML model.
Business users without extensive data science background can use AutoML UI to create and deploy machine learning models. Oracle Machine Learning AutoML UI provides two functional features:
  • Create machine learning models
  • Deploy machine learning models

AutoML UI Experiments

When you create an experiment in AutoML UI, it automatically runs all the steps involved in the machine learning workflow. In the Experiments page, all the experiments that you have created are listed. To view any experiment details, click an experiment. Additionally, you can perform the following tasks:

Figure 6-1 Experiments page

Experiments page
  • Create: Click Create to create a new AutoML UI experiment. The AutoML UI experiment that you create resides inside the project that you selected in the Project under the Workspace.
  • Edit: Select any experiment that is listed here, and click Edit to edit the experiment definition.
  • Delete: Select any experiment listed here, and click Delete to delete it. You cannot delete an experiment which is running. You must first stop the experiment to delete it.
  • Duplicate: Select an experiment and click Duplicate to create a copy of it. The experiment is duplicated instantly and is in Ready status.
  • Move: Select an experiment and click Move to move the experiment to a different project in the same or a different workspace. You must have either the Administrator or Developer privilege to move experiments across projects and workspaces.

    Note:

    An experiment cannot be moved if it is in RUNNING, STOPPING or STARTING states, or if an experiment already exists in the target project by the same name.
  • Copy: Select an experiment and click Copy to copy the experiment to another project in the same or different workspace.
  • Start: If you have created an experiment but have not run it, then click Start to run the experiment.
  • Stop: Select an experiment that is running, and click Stop to stop the running of the experiment.

6.1 Access AutoML UI

You can access AutoML UI from Oracle Machine Learning Notebooks.

To access AutoML UI, you must first sign in to Oracle Machine Learning Notebooks from Autonomous Database:
  1. To sign in to Oracle Machine Learning Notebooks from the Autonomous Database:
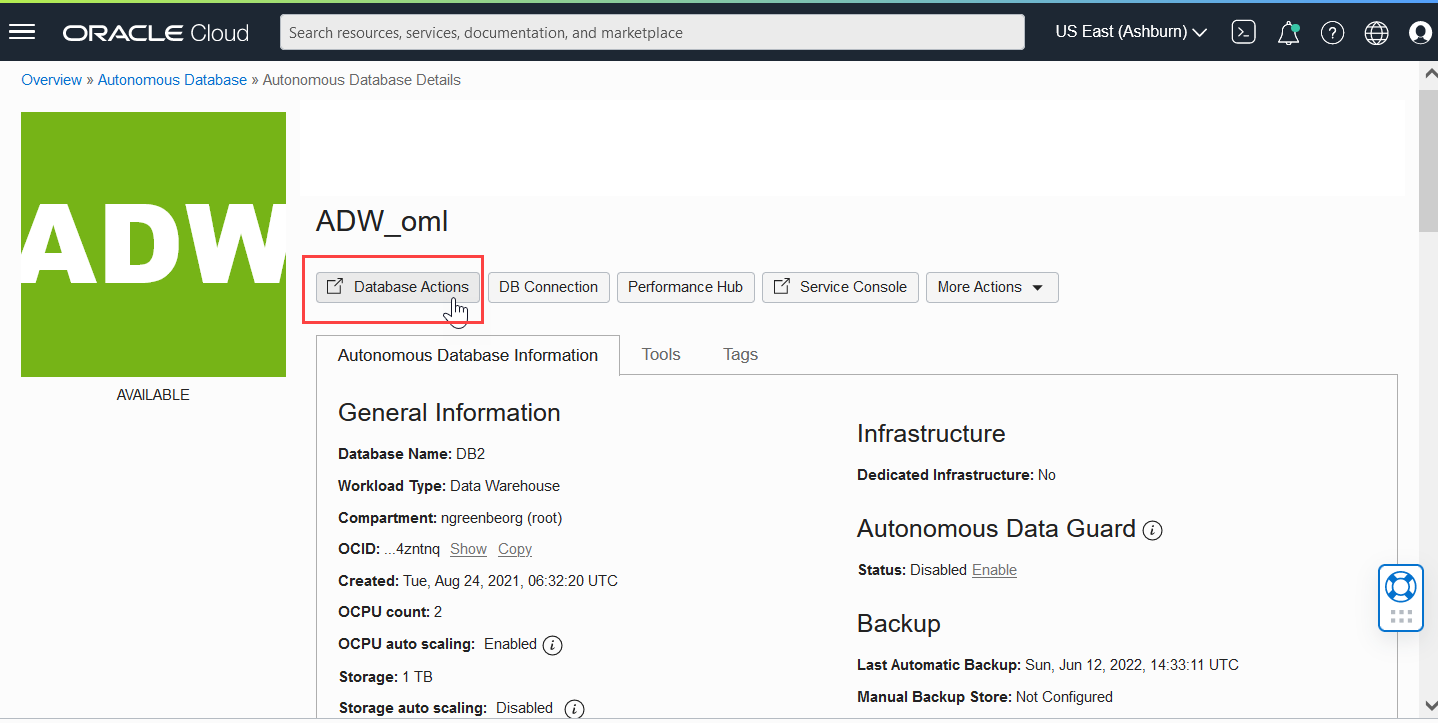
    1. Select an Autonomous Database instance and on the Autonomous Database details page click Database Actions.

      Figure 6-2 Database Actions

      Database Actions
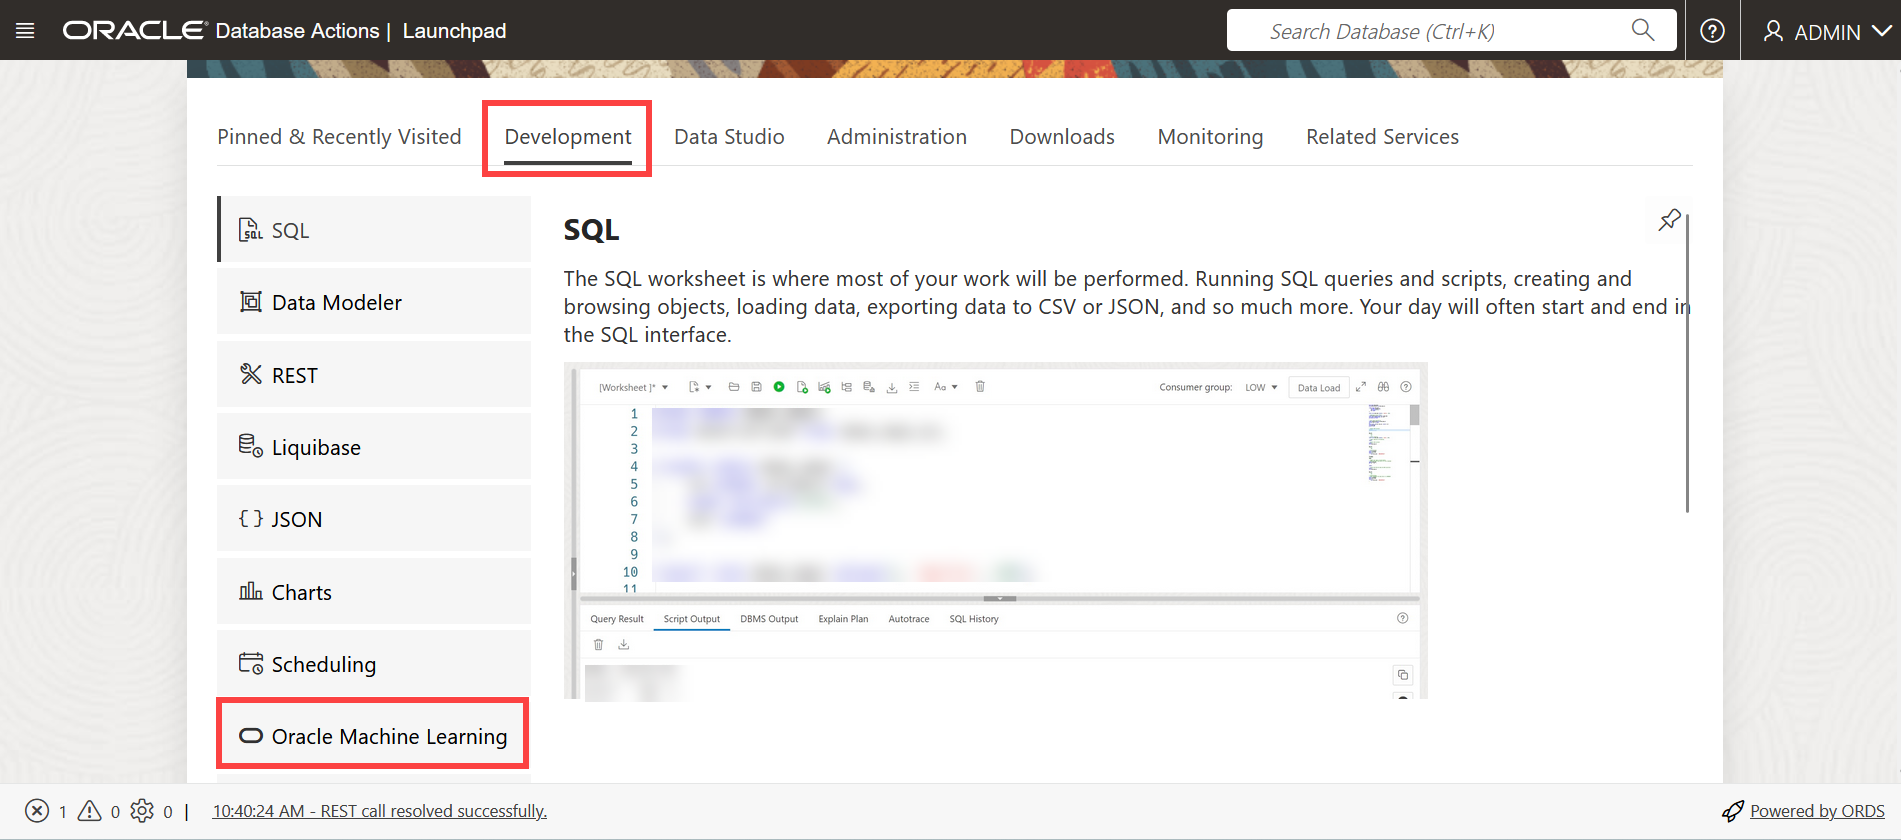
    2. On the Database Actions page, go to the Development section and click Oracle Machine Learning.

      Figure 6-3 Oracle Machine Learning

      Oracle Machine Learning
      The Oracle Machine Learning sign in page opens.
    3. Enter your username and password, and click Sign in.
    This opens the Oracle Machine Learning Notebooks homepage.
  2. On your Oracle Machine Learning Notebooks homepage, click AutoML..

    Figure 6-4 AutoML options

    AutoML option on home page and left navigation menu

    Alternatively, you can click the hamburger menu and click AutoML under Projects.

6.2 Create AutoML UI Experiment

To use the Oracle Machine Learning AutoML UI, you start by creating an experiment. An experiment is a unit of work that minimally specifies the data source, prediction target, and prediction type. After an experiment runs successfully, it presents you a list of machine learning models in order of model quality according to the metric selected. You can select any of these models for deployment or to generate a notebook. The generated notebook contains Python code using OML4Py and the specific settings AutoML used to produce the model.

To create an experiment, specify the following:
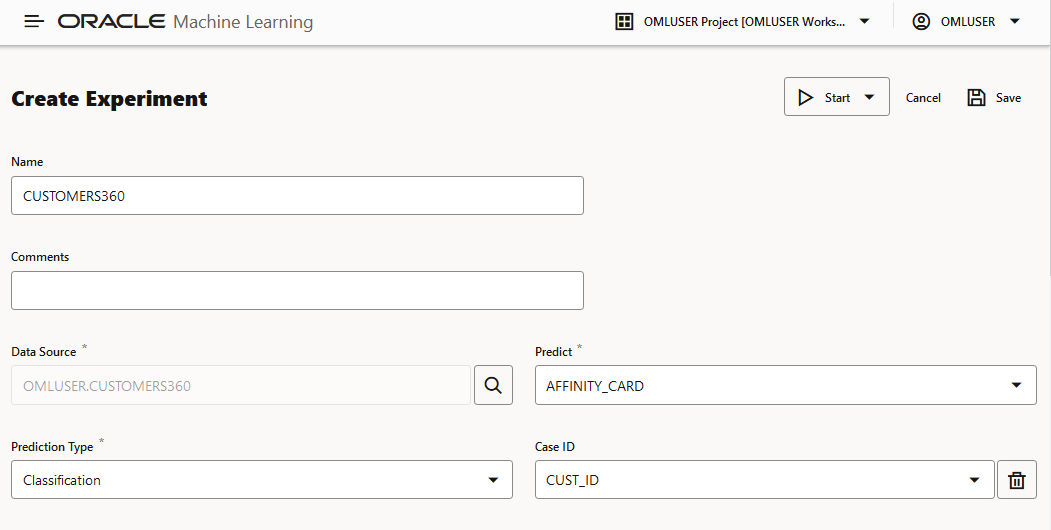
  1. In the Name field, enter a name for the experiment.

    Figure 6-5 Create an AutoML Experiment

    Description of Figure 6-5 follows
    Description of "Figure 6-5 Create an AutoML Experiment"
  2. In the Comments field, enter comments, if any.
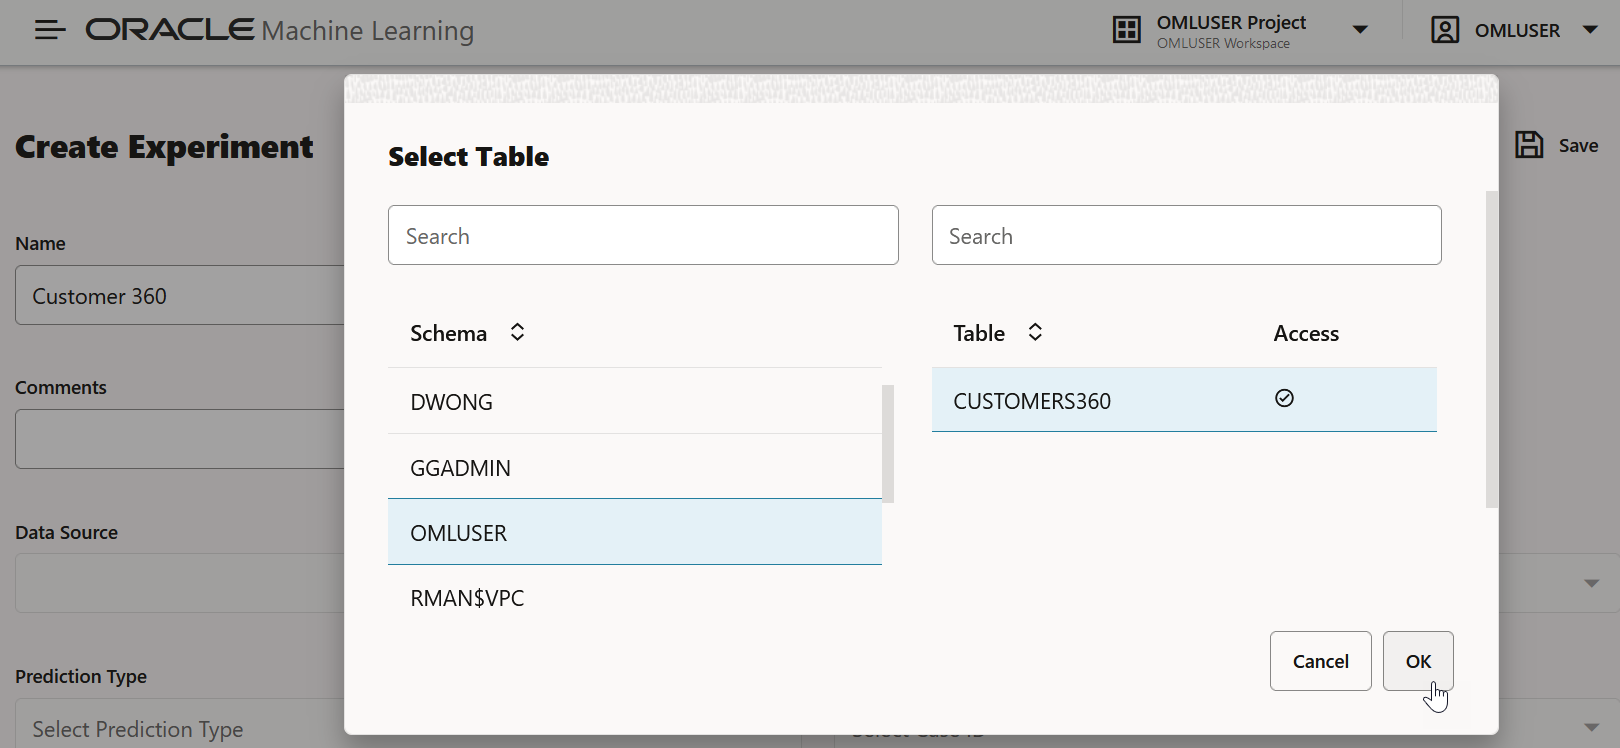
  3. In the Data Source field, select the schema and a table or view in that schema. Click the search icon to open the Select Table dialog box. Browse and select a schema, and then select a table from the schema list, which is the data source of your AutoML UI experiment.

    Figure 6-6 Select Table dialog

    Select Table dialog
    1. In the Schema column, select a schema.

      Note:

      While you select the data source, statistics are displayed in the Features grid at the bottom of the experiment page. Busy status is indicated until the computation is complete. The target column that you select in Predict is highlighted in the Features grid.
    2. Depending on the selected schema, the available tables are listed in the Table column. Select the table and click OK.

    Note:

    To create an AutoML experiment for a table or view present in the schema of another user, ensure that you have explicit privileges to access that table or view in the schema. Request the Database Administrator or the owner of the schema to provide you with the privileges to access the table or view. For example:
    grant select on <table> to <user>
  4. In the Predict drop-down list, select the column from the selected table. This is the target for your prediction.
  5. In the Prediction Type field, the prediction type is automatically selected based on your data definition. However, you can override the prediction type from the drop-down list, if data type permits. Supported Prediction Types are:
    • Classification: For non-numeric data type, Classification is selected by default.
    • Regression: For numeric data type, Regression is selected by default.
  6. The Case ID helps in data sampling and dataset split to make the results reproducible between experiments. It also aids in reducing randomness in the results. This is an optional field.
  7. In the Additional Settings section, you can define the following:

    Figure 6-7 Additional Settings of an AutoML Experiment

    Description of Figure 6-7 follows
    Description of "Figure 6-7 Additional Settings of an AutoML Experiment"
    1. Reset: Click Reset to reset the settings to the default values.
    2. Maximum Top Models: Select the maximum number of top models to create. The default is 5 models. You can reduce the number of top models to 2 or 3 since tuning models to get the top one for each algorithm requires additional time. If you want to get the initial results even faster, consider the top recommended algorithm. For this, set the Maximum Top Models to 1. This will tune the model for that algorithm.
    3. Maximum Run Duration: This is the maximum time for which the experiment will be allowed to run. If you do not enter a time, then the experiment will be allowed to run for up to the default, which is 8 hours.
    4. Database Service Level: This is database connection service level and query parallelism level. Default is Low. This results in no parallelism and sets a high runtime limit. You can create many connections with Low database service level. You can also change your database service level to Medium or High.
      • High level gives the greatest parallelism but significantly limits the number of concurrent jobs.
      • Medium level enables some parallelism but allows greater concurrency for job processing.

      Note:

      Changing the database service level setting on the Always Free Tier will have no effect since there is a 1 OCPU limit. However, if you increase the OCPUs allocated to your autonomous database instance, you can increase the Database Service Level to Medium or High.

      Note:

      The Database Service Level setting has no effect on AutoML container level resources.
    5. Model Metric: Select a metric to choose the winning models. The following metrics are supported by AutoML UI:
      • For Classification, the supported metrics are:
        • Balanced Accuracy
        • ROC AUC
        • F1 (with weighted options). The weighted options are weighted, binary, micro and macro.
          • Micro-averaged: Here, all samples equally contribute to the final averaged metric
          • Macro-averaged: Here, all classes equally contribute to the final averaged metric
          • Weighted-averaged: Here, each class' contribution to the average is weighted by its size
        • Precision (with weighted options)
        • Recall (with weighted options)
      • For Regression, the supported metrics are:
        • R2 (default)
        • Negative mean squared error
        • Negative mean absolute error
        • Negative median absolute error
    6. Algorithm: The supported algorithms depend on Prediction Type that you have selected. Click the corresponding checkbox against the algorithms to select it. By default, all the candidate algorithms are selected for consideration as the experiment runs. The supported algorithms for the two Prediction Types:
      • For Classification, the supported algorithms are:
        • Decision Tree
        • Generalized Linear Model
        • Generalized Linear Model (Ridge Regression)
        • Neural Network
        • Random Forest
        • Support Vector Machine (Gaussian)
        • Support Vector Machine (Linear)
      • For Regression, the supported algorithms are:
        • Generalized Linear Model
        • Generalized Linear Model (Ridge Regression)
        • Neural Network
        • Support Vector Machine (Gaussian)
        • Support Vector Machine (Linear)

      Note:

      You can remove algorithms from being considered if you have preferences for particular algorithms, or have specific requirements. For example, if model transparency is essential, then excluding models such as Neural Network would make sense. Note that some algorithms are more compute intensive than others. For example, Naïve Bayes and Decision Tree are normally faster than Support Vector Machine or Neural Network.
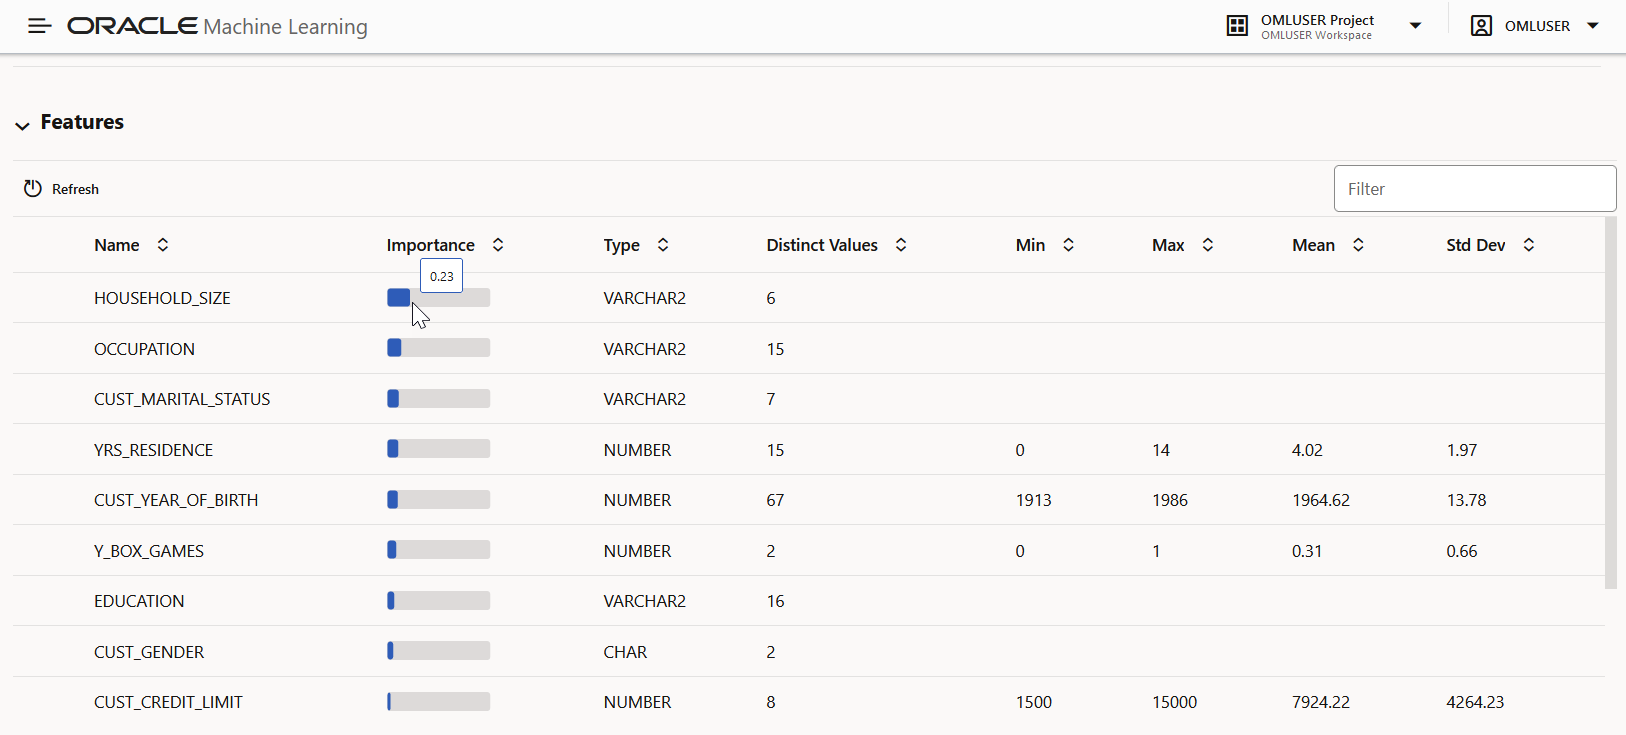
  8. Expand the Features grid to view the statistics of the selected table. The supported statistics are Distinct Values, Minimum, Maximum, Mean, and Standard Deviation. The supported data sources for Features are tables, views and analytic views. The target column that you selected in Predict is highlighted here. After an experiment run is completed, the Features grid displays an additional column Importance. Feature Importance indicates the overall level of sensitivity of prediction to a particular feature.

    Figure 6-8 Features

    Features
    You can perform the following tasks:
    • Refresh: Click Refresh to fetch all columns and statistics for selected data source.
    • View Importance: Hover your cursor over the horizontal bar under Importance to view the value of Feature Importance for the variables. The value is always depicted in the range 0 to 1, with values closer to 1 being more important.
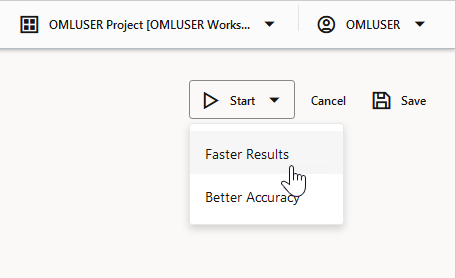
  9. When you complete defining the experiment, the Start and Save buttons are enabled.

    Figure 6-9 Start Experiment Options

    Start Experiment Options
    • Click Start to run the experiment and start the AutoML UI workflow, which is displayed in the progress bar. Here, you have the option to select:
      1. Faster Results: Select this option if you want to get candidate models sooner, possibly at the expense of accuracy. This option works with a smaller set of the hyperparamter combinations, and hence yields faster result.
      2. Better Accuracy: Select this option if you want more pipeline combinations to be tried for possibly more accurate models. A pipeline is defined as an algorithm, selected data feature set, and set of algorithm hyperparameters.

        Note:

        This option works with the broader set of hyperparameter options recommended by the internal meta-learning model. Selecting Better Accuracy will take longer to run your experiment, but may provide models with more accuracy.

      Once you start an experiment, the progress bar appears displaying different icons to indicate the status of each stage of the machine learning workflow in the AutoML experiment. The progress bar also displays the time taken to complete the experiment run. To view the message details, click on the respective message icons.

    • Click Save to save the experiment, and run it later.
    • Click Cancel to cancel the experiment creation.

6.2.1 Supported Data Types for AutoML UI Experiments

When creating an AutoML experiment, you must specify the data source and the target of the experiment. This topic lists the data types for Python and SQL that are supported by AutoML experiments.

Table 6-1 Supported Data Types by AutoML Experiments

Data Types SQL Data Types Python Data Types
Numerical NUMBER, INTEGER, FLOAT, BINARY_DOUBLE, NUMBER, BINARY_FLOAT, DM_NESTED_NUMERICALS, DM_NESTED_BINARY_DOUBLES, DM_NESTED_BINARY_FLOATS

INTEGER, FLOAT(NUMBER, BINARY_DOUBLE, BINARY_FLOAT)

Categorical

CHAR, VARCHAR2, DM_NESTED_CATEGORICALS

STRING(VARCHAR2, CHAR, CLOB)

Unstructured Text

CHAR, VARCHAR2, CLOB, BLOB, BFILE

BYTES (RAW, BLOB)

6.3 View an Experiment

In the AutoML UI Experiments page, all the experiments that you have created are listed. Each experiment will be in one of the following stages: Completed, Running, and Ready.

To view an experiment, click the experiment name. The Experiment page displays the details of the selected experiment. It contains the following sections:

Edit Experiment

In this section, you can edit the selected experiment. Click Edit to make edits to your experiment.

Note:

You cannot edit an experiment that is running.

Metric Chart

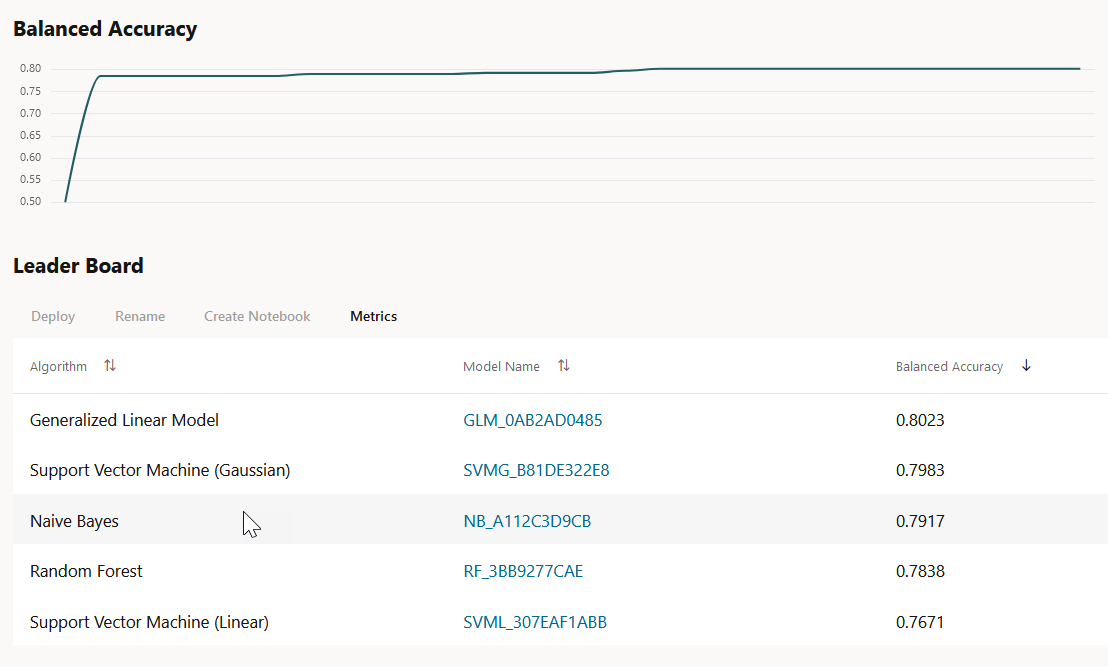
The Model Metric Chart depicts the best metric value over time as the experiment runs. It shows improvement in accuracy as the running of the experiment progresses. The display name depends on the selected model metric when you create the experiment.

Leader Board

When an experiment runs, it starts to show the results in the Leader Board. The Leader Board displays the top performing models relative to the model metric selected along with the algorithm and accuracy. You can view the model details and perform the following tasks:

Figure 6-10 Leader Board

Leader Board
  • View Model Details: Click on the Model Name to view the details. The model details are displayed in the Model Details dialog box. You can click multiple models on the Leader Board, and view the model details simultaneously. The Model Details window depicts the following:
    • Prediction Impact: Displays the importance of the attributes in terms of the target prediction of the models.
    • Confusion Matrix: Displays the different combination of actual and predicted values by the algorithm in a table. Confusion Matrix serves as a performance measurement of the machine learning algorithm.
  • Deploy: Select any model on the Leader Board and click Deploy to deploy the selected model. Deploy Model.
  • Rename: Click Rename to change the name of the system generated model name. The name must be alphanumeric (not exceeding 123 characters) and must not contain any blank spaces.
  • Create Notebook: Select any model on the Leader Board and click Create Notebooks from AutoML UI Models to recreate the selected model from code.
  • Metrics: Click Metrics to select additional metrics to display in the Leader Board. The additional metrics are:
    • For Classification
      • Accuracy: Calculates the proportion of correctly classifies cases - both Positive and Negative. For example, if there are a total of TP (True Positives)+TN (True Negatives) correctly classified cases out of TP+TN+FP+FN (True Positives+True Negatives+False Positives+False Negatives) cases, then the formula is: Accuracy = (TP+TN)/(TP+TN+FP+FN)
      • Balanced Accuracy: Evaluates how good a binary classifier is. It is especially useful when the classes are imbalanced, that is, when one of the two classes appears a lot more often than the other. This often happens in many settings such as Anomaly Detection etc.
      • Recall: Calculates the proportion of actual Positives that is correctly classified.
      • Precision: Calculates the proportion of predicted Positives that is True Positive.
      • F1 Score: Combines precision and recall into a single number. F1-score is computed using harmonic mean which is calculated by the formula: F1-score = 2 × (precision × recall)/(precision + recall)
    • For Regression:
      • R2 (Default): A statistical measure that calculates how close the data are to the fitted regression line. In general, the higher the value of R-squared, the better the model fits your data. The value of R2 is always between 0 to 1, where:
        • 0 indicates that the model explains none of the variability of the response data around its mean.
        • 1 indicates that the model explains all the variability of the response data around its mean.
      • Negative Mean Squared Error: This is the mean of the squared difference of predicted and true targets.
      • Negative Mean Absolute Error: This is the mean of the absolute difference of predicted and true targets.
      • Negative Median Absolute Error: This is the median of the absolute difference between predicted and true targets.

Features

The Features grid displays the statistics of the selected table for the experiment.The supported statistics are Distinct Values, Minimum, Maximum, Mean, and Standard Deviation. The supported data sources for Features are tables, views and analytic views. The target column that you selected in Predict is highlighted here. After an experiment run is completed, the Features grid displays an additional column Importance. Feature Importance indicates the overall level of sensitivity of prediction to a particular feature. Hover your cursor over the graph to view the value of Importance. The value is always depicted in the range 0 to 1, with values closer to 1 being more important.

Figure 6-11 Features

Features Section

6.3.1 Create Notebooks from AutoML UI Models

You can create notebooks using OML4Py code that will recreate the selected model using the same settings. It also illustrates how to score data using the model. This option is helpful if you want to use the code to re-create a similar machine learning model.

To create a notebook from an AutoML UI model:
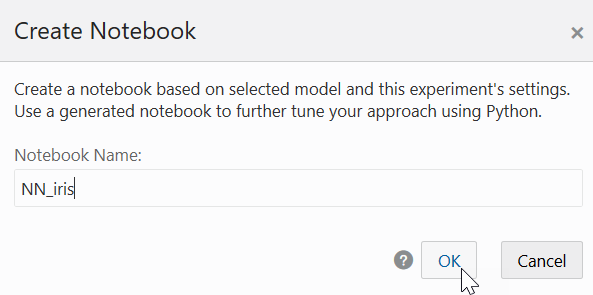
  1. Select the model on the Leader Board based on which you want to create your notebook, and click Create Notebook. The Create Notebook dialog opens.

    Figure 6-12 Create Notebook

    Create Notebook
  2. In the Notebook Name field, enter a name for your notebook.
    The REST API endpoint derives the experiment metadata, and determines the following settings as applicable:
    • Data Source of the experiment (schema.table)
    • Case ID. If the Case ID for the experiment is not available, then the appropriate message is displayed.
    • A unique model name based on the current model name is generated
    • Information related to scoring paragraph:
      • Case ID: If available, then it merges the Case ID column into the scoring output table
      • Generate unique predict output table name based on build data source and unique suffix
      • Prediction column name: PREDICTION
      • Prediction probability column name: PROBABILITY (applicable only for Classification)
  3. Click OK. The generated notebook is listed in the Notebook page. Click to open the notebook
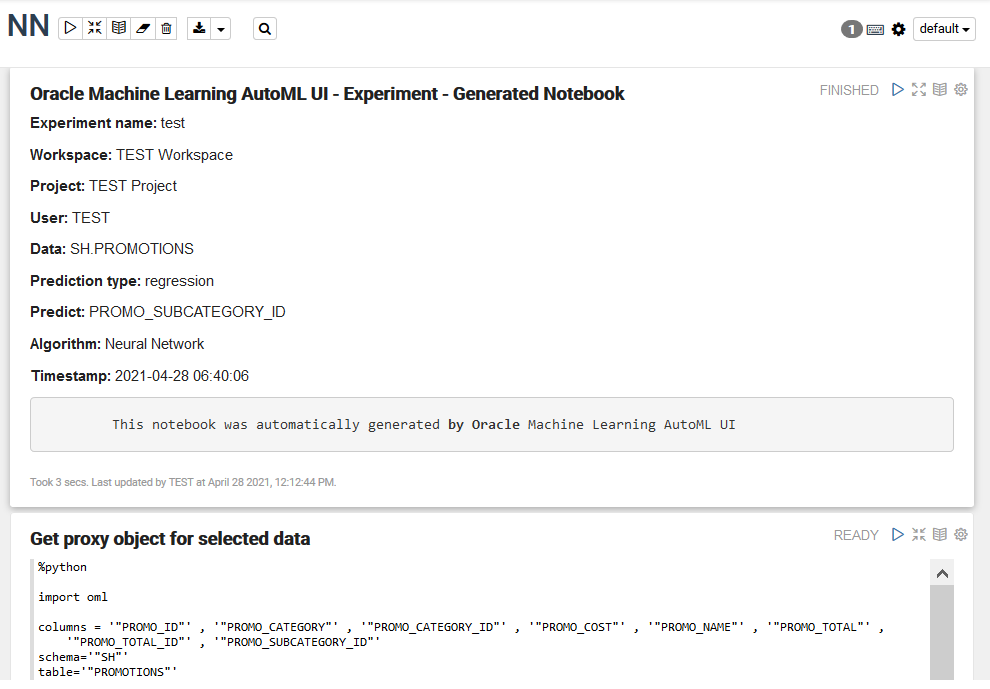
    The generated notebook displays paragraph titles for each paragraph along with the python codes. Once you run the notebook, it displays information related to the notebook as well as the AutoML experiment such as the experiment name, workspace and project in which the notebook is present, the user, data, prediction type and prediction target, algorithm, and the time stamp when the notebook is generated. AutoML UI Generated Notebook