Data Monitoring
Data Monitoring evaluates how your data evolves over time. It helps you with insights on trends and multivariate dependencies in the data. It also gives you an early warning about data drift.
Data drift occurs when data diverges from the original baseline data over time. Data drift can happen for a variety of reasons, such as a changing business environment, evolving user behavior and interest, data modifications from third-party sources, data quality issues, or issues with upstream data processing pipelines.
The key to accurately interpret your models and to ensure that the models are able to solve business problems is to understand how data evolves over time. Data monitoring is complementary to successful model monitoring, as understanding the changes in data is critical in understanding the changes in the efficacy of the models. The ability to quickly and reliably detect changes in the statistical properties of your data ensures that your machine learning models are able to meet business objectives.
You can monitor your data using the data monitoring functionality of Oracle Machine Learning User Interface. To monitor your data, click on the Cloud menu on the Oracle Machine Learning UI home page, click Monitoring and then click Data to open the Data Monitors page. On the Data Monitors page, you can perform the following tasks:
Figure 1: Data Monitors page
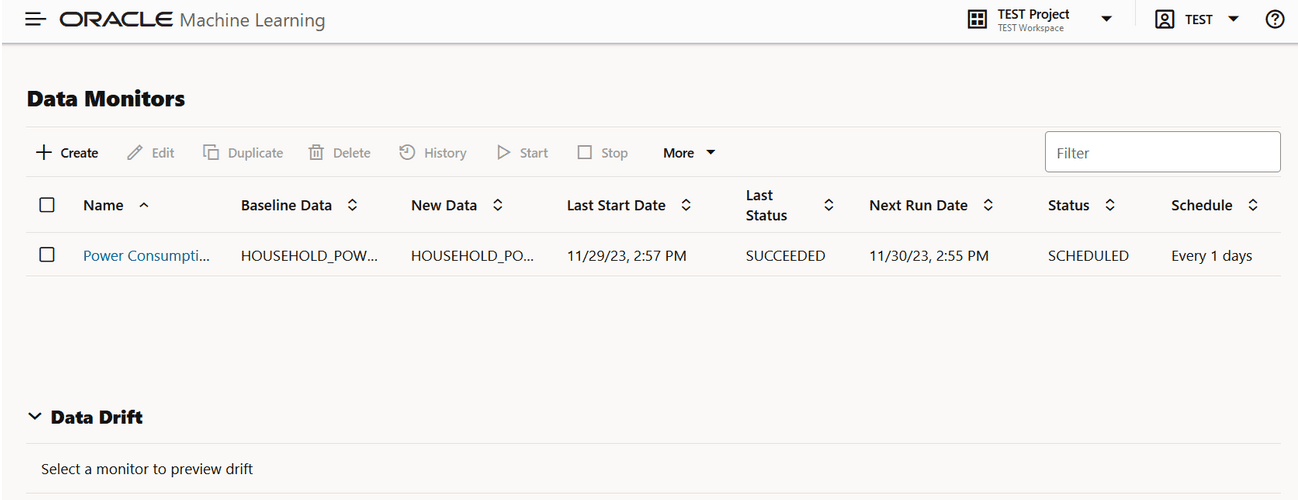
Description of the illustration data_monitor_page.png
-
Create: Create a data monitor.
Note: The supported data types for data monitoring are NUMERIC and CATEGORICAL.
-
Edit: Select a data monitor and click Edit to edit a data monitor.
-
Duplicate: Select a data monitor and click Duplicate to create a copy of the monitor.
-
Delete: Select a data monitor and click Delete to delete a data monitor.
-
History: Select a data monitor and click History to view the runtime details. Click Back to Monitors to go back to the Data Monitoring page.
-
Start: Start a data monitor.
-
Stop: Stop a data monitor that is running.
-
More: Click More for additional options to:
Figure 2: More option under Data Monitors
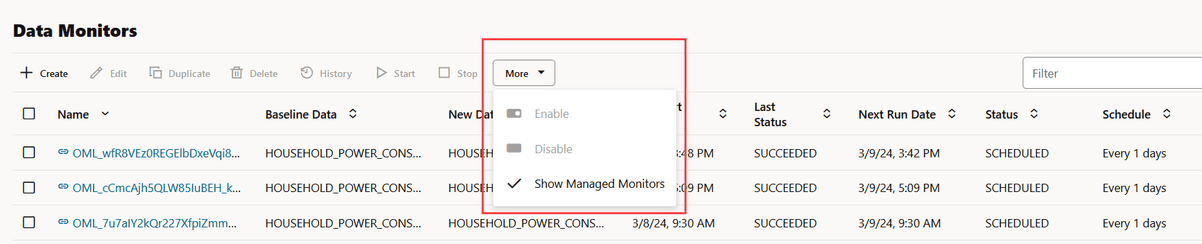
Description of the illustration data_monitor_more.png
-
Enable: Select a data monitor and click Enable to enable a monitor that is disabled. By default, a data monitor is enabled. The status is displayed as
SCHEDULED. -
Disable: Select a data monitor and click Disable to disable a data monitor. The status is displayed as
DISABLED. -
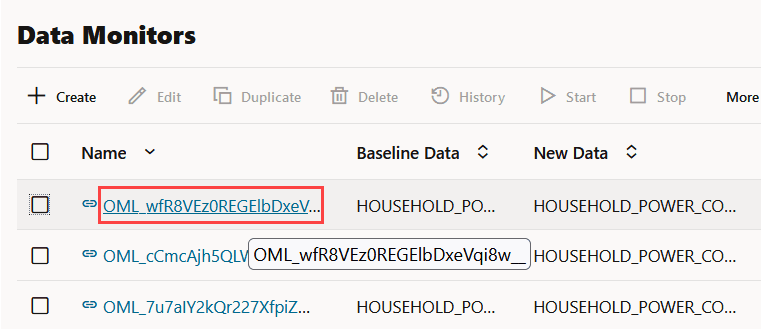
Show Managed Monitors: Click this option to view the data monitors that are created and managed by OML Services REST API and Model Monitors in Oracle Machine Learning UI. The data monitors that are managed by these two components have a system generated name, and are indicated by specific icons against its name.
-
- Click on the link icon against a managed data monitor name to view the details of the associated model monitor. The associated model monitor details are displayed on a separate pane that slides in. The slide-in pane displays the model monitor name with links to view the model monitor results and settings. Clicking on the link icon also displays the data drift details on the lower pane of the Data Monitors page. Click on the X on the top left corner to close the pane.
Figure 3: Data Monitors page displaying the associated model monitor results and settings
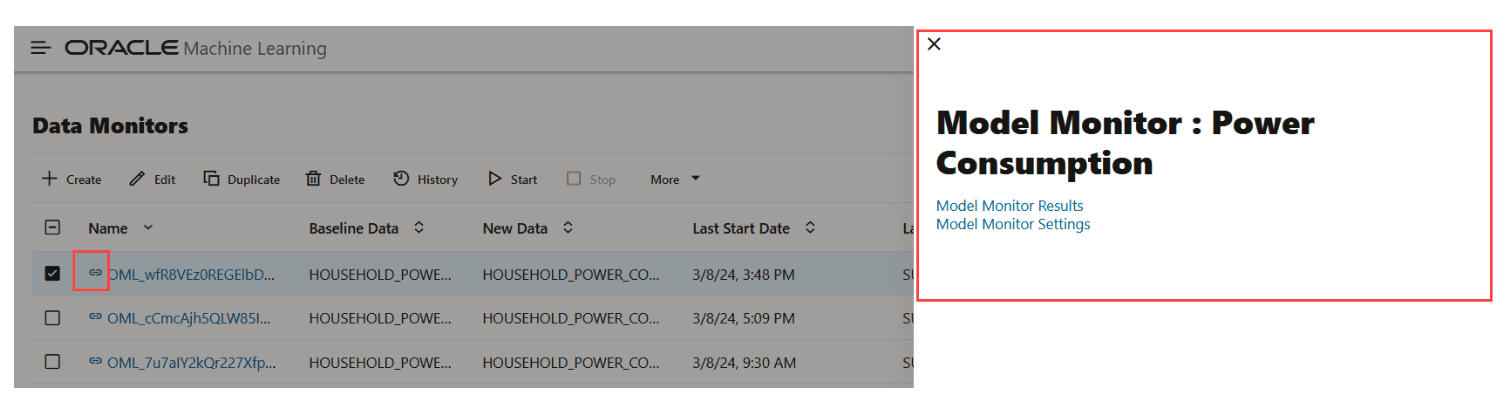
Description of the illustration dm_managed_monitors.png
In this example, the slide-in pane displays the details of the model monitor Power Consumption. On the slide-in pane:
-
Click Model Monitor Results to view the results computed by the model monitor — settings, models, model drift, metric, and prediction statistics. Click Monitors to return to the Data Monitors page. See View Model Monitor Results.
-
Click Model Monitor Settings to view and edit the settings, details, and models monitored by the model monitor on the Edit Model Monitor page. Click Cancel to return to the Data Monitors page. Click Save to save any changes.
-
- Click on the check box against the data monitor name to view the data drift values on the lower pane.
Figure 4: Select a managed data monitor
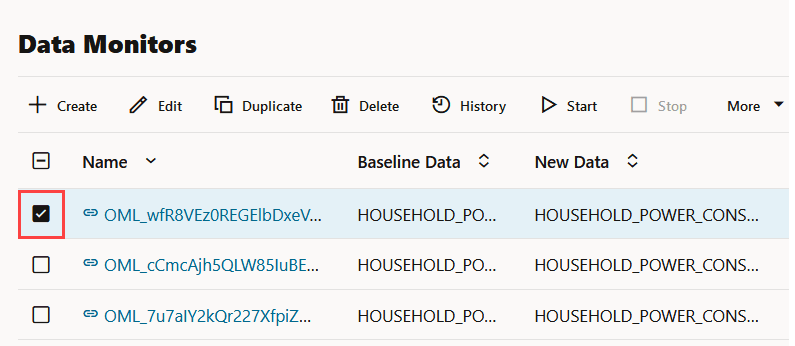
- Click on the data monitor name to view the details of the data monitor — settings, data drift values and monitored features.
Figure 5: Data monitor click
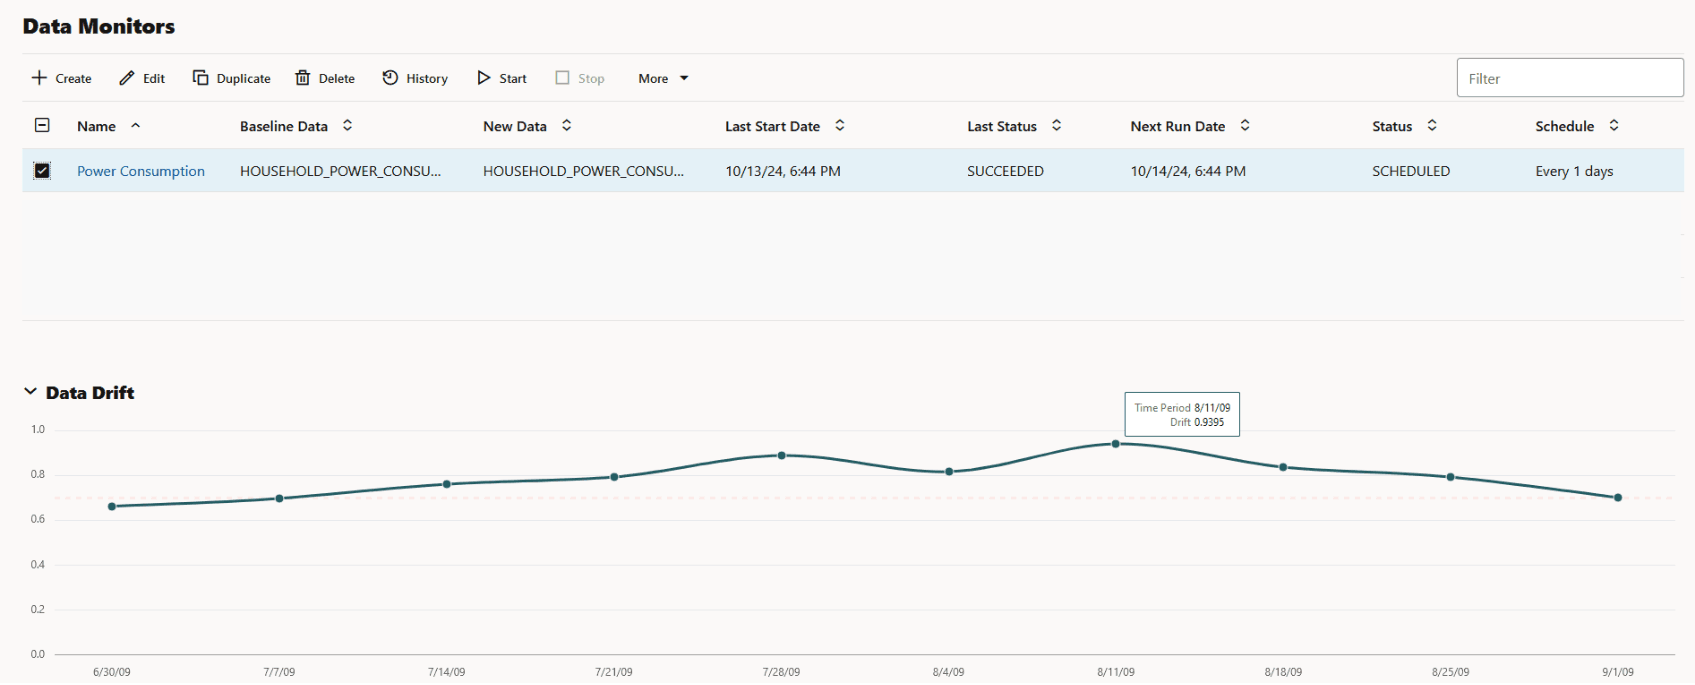
The Data Monitors page displays the information about the selected monitor: Monitor name, Baseline Data, New Data, Last Start Date, Last Status, Next Run Data, Status, and Schedule. The page also displays the data drift, if the data monitor has run successfully. To view data drift:
Figure 6: Data Drift preview on Data Monitors page
Description of the illustration data_monitoring_page.png
Select a data monitor that has run successfully, as shown in the screenshot. On the lower pane, the data drift of the selected monitor is displayed. The X axis depicts the analysis period, and the Y axis depicts the data drift values. The horizontal dotted line is the threshold value, and the line depicts the drift value for each point in time for the analysis period. Hover your mouse over the line to view the drift values. For more information on this example, see View Data Monitor Results.
-
Create a Data Monitor Data Monitoring allows you to detect data drift over time and the potentially negative impact on the performance of your machine learning models. On the Data Monitor page, you can create, run, and track data monitors and the results.
-
View Data Monitor Results The Data Monitor Results page displays the information on the selected data monitor that have run successfully, along with data drift details for each monitored feature.
-
View History The History page displays the runtime details of data monitors.
Related Topics
Create a Data Monitor
Data Monitoring allows you to detect data drift over time and the potentially negative impact on the performance of your machine learning models. On the Data Monitor page, you can create, run, and track data monitors and the results.
To create a data monitor:
-
On the Oracle Machine Learning UI left navigation menu, expand Monitoring and then click Data to open the Data Monitoring page.
-
On the Data Monitoring page, click Create to open the New Data Monitor page.
-
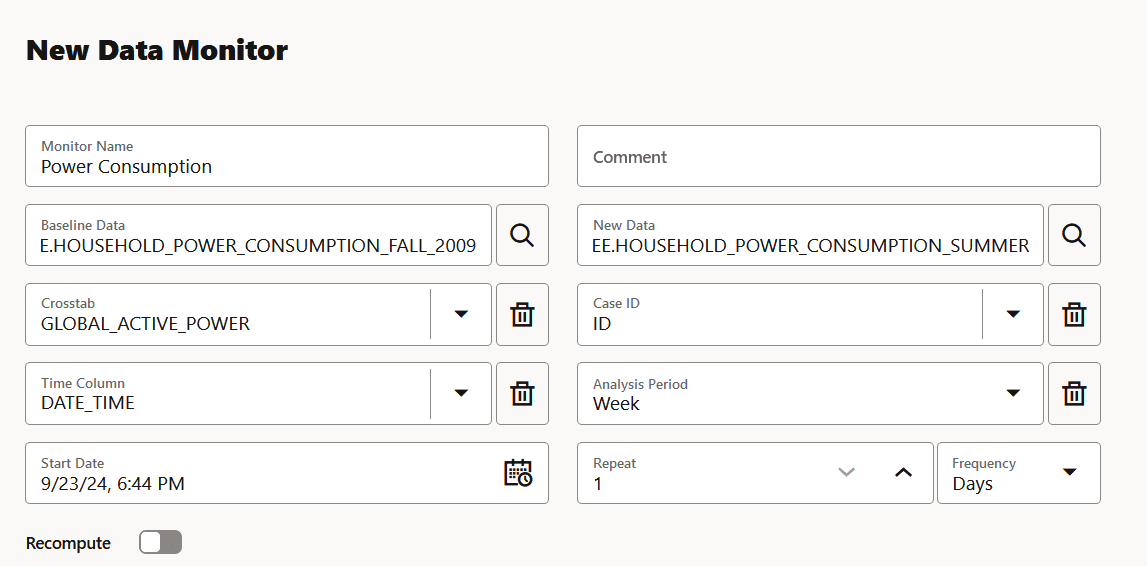
On the New Data Monitor page, enter the following details:
Figure 7: New Data Monitor
Description of the illustration new_data_monitor.png
-
Monitor Name: Enter a name for the data monitor.
-
Comments: Enter comments. This is an optional field.
-
Baseline Data: This is a table or view that contains baseline data to monitor. Click the search icon to open the Select Table dialog. Here, select a schema, and then a table.
Note: The supported data types for data monitoring are
NUMBER, BINARY_DOUBLE, FLOAT, BINARY_FLOAT, VARCHAR2, CHAR, NCHAR,andNVARCHAR2with length<=4000. -
New Data: This is a table or view with new data to be compared against the baseline data. Click the search icon to open the Select Table dialog. Select a schema, and then a table.
Note: The supported data types for data monitoring are
NUMBER, BINARY_DOUBLE, FLOAT, BINARY_FLOAT, VARCHAR2, CHAR, NCHAR,andNVARCHAR2with length<=4000. -
Crosstab: Select an attribute from the drop-down list. This attribute in the baseline and new data acts as an anchor or target for bi-variate analysis of your data.
Note: The target column in supervised problems can be passed as an anchor column in this field. For unsupervised problems, it can be any column of interest. However, it will be application specific.
-
Case ID: This is an optional field. Enter a case identifier for the baseline and new data to improve the repeatability of the results.
-
Time Column: This is the name of a column storing time information in the New Data table or view. Select the time column from the drop-down list.
Note: If the Time Column is blank, the entire New Data is treated as one period.
-
Analysis Period: This is the length of time for which data monitoring is performed on the New Data. Select the analysis period for data monitoring. The options are
Day,Week,Month,Year. -
Start Date: This is the start date of your data monitor schedule. If you do not provide a start date, the current date will be used as the start date.
-
Repeat: This value defines the number of times the data monitor run will be repeated for the frequency defined. Enter a number between 1 and 99. For example, if you enter
2in the Repeat field here, andMinutesin the Frequency field, then the data monitor will run every 2 minutes. -
Frequency: This value determines how frequently the data monitor run will be performed on the New Data. Select a frequency for data monitoring. The options are Minutes, Hours, Days, Weeks, Months. For example, if you select
Minutesin the Frequency field,2in the Repeat field, and5/30/23in the Start Date field, then as per the schedule, the data monitor will run from 5/30/23 every 2 minutes.
-
-
Click Recompute: Select this option to recompute the analysis for the already computed time period. By default, Recompute is disabled.
-
When enabled, the data drift analysis is performed for the time period specified in the Start Date field and the end time. The analysis will overwrite the already existing results for the specified time period. This means that the analysis will be computed for the time period with new data other than the current data. New analysis results may overlap with the existing results depending on the selected frequency.
-
When disabled, the data for the time period that is present in the results table will be retained as is. Only the new data for the most recent time period will be considered for analysis, and the results will be added to the results table.
-
-
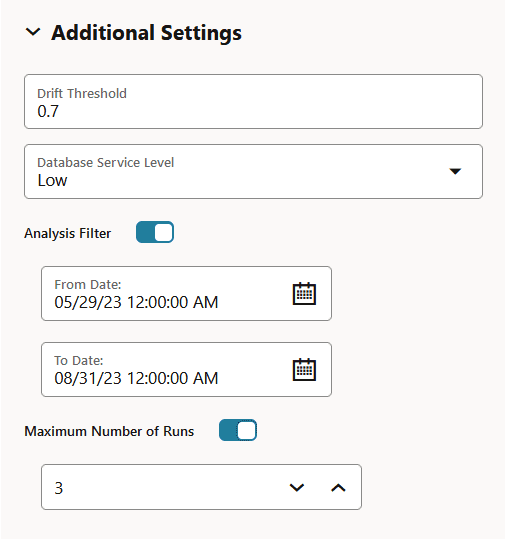
Click Additional Settings to expand this section and provide advanced settings for your data monitor:
Figure 8: Data Monitoring Additional Settings
Description of the illustration additional_settings.png
-
Drift Threshold: Drift captures the relative change in performance between the baseline data and the new data period. Based on your specific machine learning problem, set the threshold value for your data drift detection. The default is
0.7.Note: You may adjust the threshold value depending on your use case. Increasing the value will generate fewer alerts, while decreasing the value will generate more alerts.
-
A drift above this threshold indicates a significant change in your data. Exceeding the threshold indicates that rebuilding and redeploying your model may be necessary.
-
A drift below this threshold indicates that there are insufficient changes in the data to warrant further investigation or action.
-
-
Database Service Level: This is the Autonomous AI Database service levels -
Low,Medium,HighandGPU. The default isLow.-
Service level
Mediumprovides more resources to the data monitor run compared toLow. -
Service level
Highprovides more resources to the data monitor run compared toMedium.
-
-
Analysis Filter: Enable this option if you want the data monitoring analysis for a specific time period. Move the slider to the right to enable it, and then select a date in From Date and To Date fields respectively. By default, this field is disabled.
-
From Date: This is the start date or timestamp of monitoring in New Data. It assumes the existence of a time column in the table. This is a mandatory field if you use the Analysis Filter option.
-
To Date: This is the end date or timestamp of monitoring in the New Data. It assumes the existence of a time column in the table. This is a mandatory field if you use the Analysis Filter option.
-
-
Maximum Number of Runs: This is the maximum number of times the data monitor can be run according to this schedule. The default is
3.
-
-
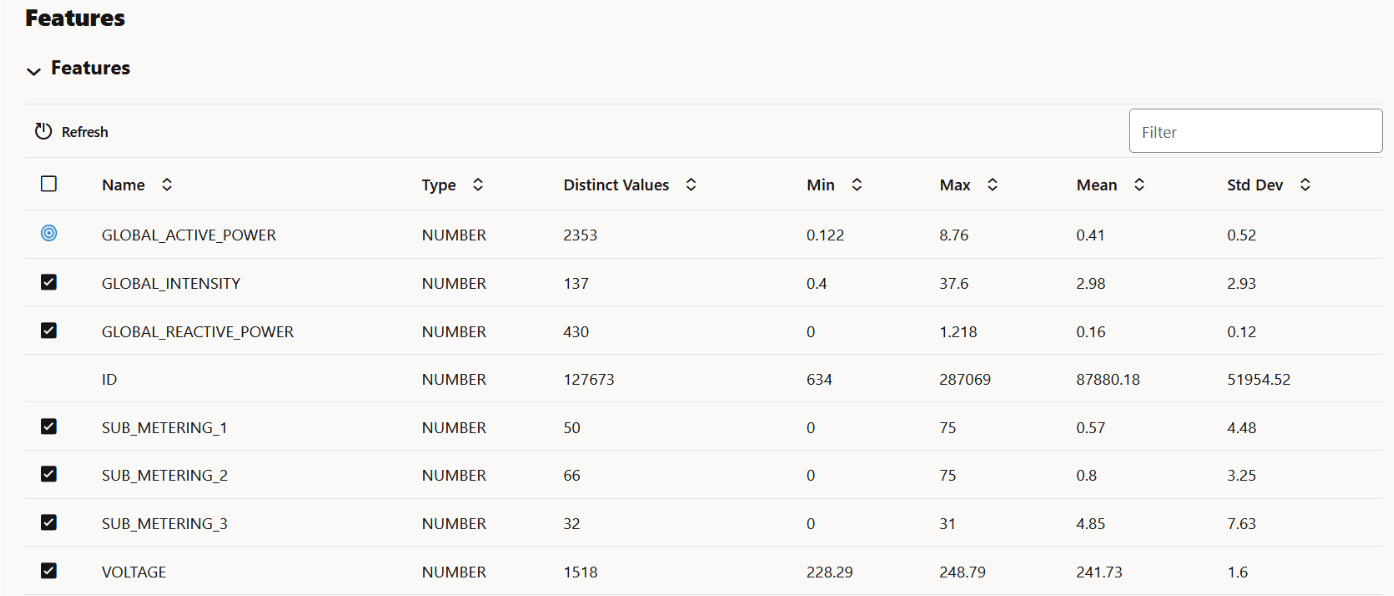
The Features grid displays the list of features to monitor. Here, you can select or deselect features to include or exclude from monitoring. By default, all features are selected. Feature statistics are provided if the selected data is a table and has RDBMS statistics automatically gathered by Autonomous AI Database. Oracle Machine Learning Services calculates the statistics on the first run for both, tables and views, and the computations are displayed here after the first run. The statistics are updated by subsequent runs.
Figure 9: Features grid in Data Monitor
Description of the illustration data_monitoring_features1.png
Note: The Case ID and Cross-Tab columns cannot be selected.
-
Click Save. This completes the task of creating your data monitor.
Note: You must now go to the Data Monitoring page, select the data monitor and click Start to begin data monitoring.
After the data monitor runs successfully, select the monitor on the Data Monitoring page to view the data drift and other details of the data monitor. See Data Monitoring for more information.
View Data Monitor Results
The Data Monitor Results page displays the information on the selected data monitor that have run successfully, along with data drift details for each monitored feature.
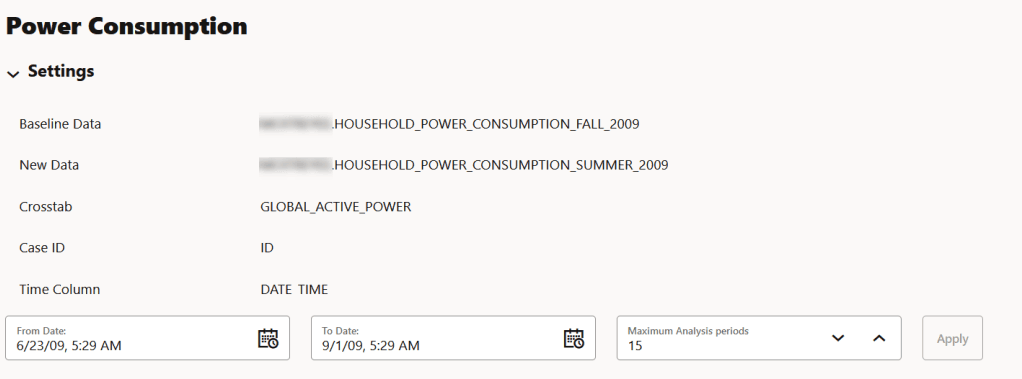
On the Data Monitors page, click on a data monitor that has run successfully. In this example, the data monitor Power Consumption is selected. The results of the data monitor is displayed on the Data Monitor Results page which comprises these sections:
- Settings: The Settings section displays the data monitor settings. Click on the arrow against Settings to expand this section. You have the option to edit the data monitor settings by clicking Edit on the top right corner of the page. In this screenshot, the settings for the data monitor Power Consumption is seen.
Figure 10: Settings section on the Data Monitor Results page
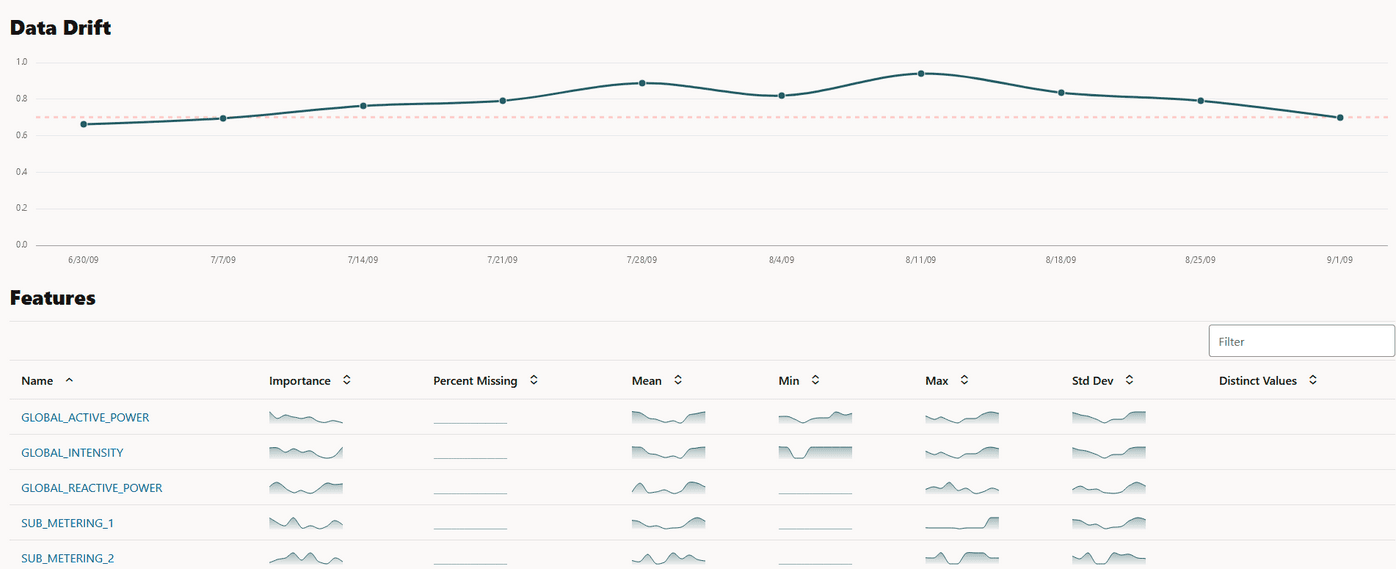
- Drift: The Drift section displays the details of data drift for each monitored feature. In this example, the data monitor Power consumption data monitor is selected. The X axis depicts the analysis period, and the Y axis depicts the data drift values. The horizontal dotted line is the threshold value, and the line depicts the drift value for each point in time for the analysis period. Hover your mouse over the line to view the drift values.
Figure 11: Data Drift section on the Data Monitor Results page
-
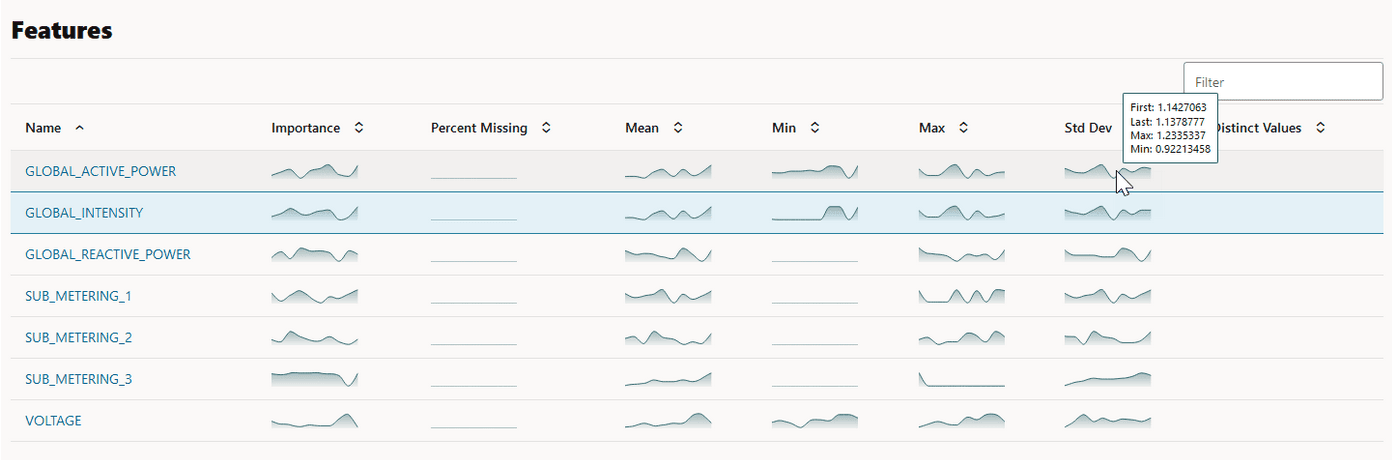
Features: The Features section displays the monitored features along with the computed statistics.
Figure 12: Features section on the Data Monitor Results page
Description of the illustration data_monitoring_features.png
The value in the Importance column indicates how impactful the feature has been on data drift over a specified time period.
For numerical data, the following statistics are computed:
-
Mean
-
Standard Deviation
-
Range (Minimum, Maximum)
-
Number of nulls
For categorical data, the following statistics are computed:
-
Number of unique values
-
Number of nulls
For each monitored feature, hover your mouse to view the following additional details, as shown in the screenshot here.
-
First: This is the first value of the computed statistics for the analysis period.
-
Last: This is the last value of the computed statistics for the analysis period.
-
Max: This is the highest value of the computed statistics for the analysis period.
-
Min: This is the lowest value of the computed statistics for the analysis period.
-
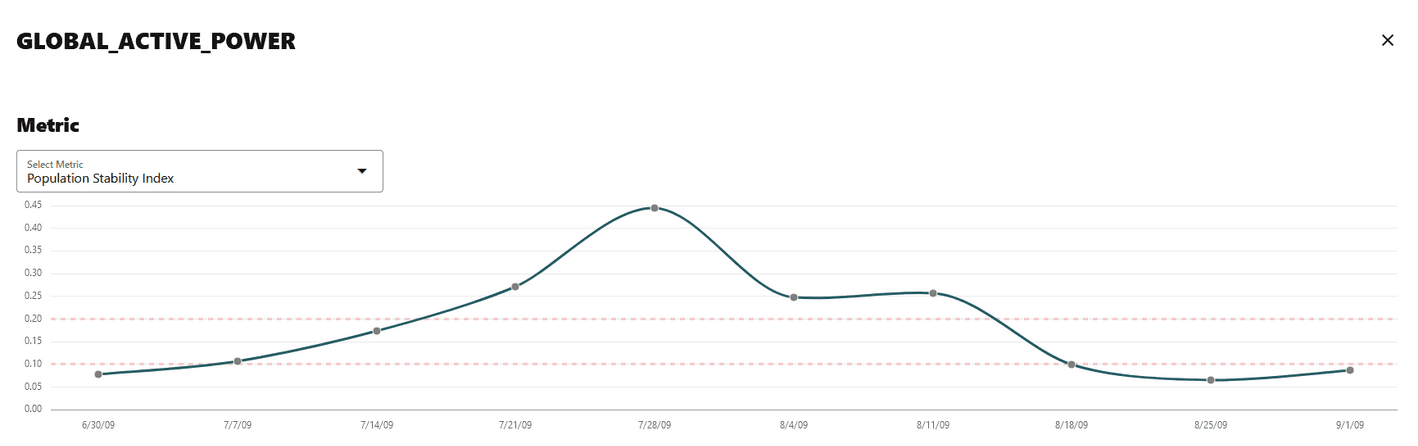
- Click on any monitored feature in the Features section to view the Metric, Statistics, Distribution, and Distribution with Crosstab Column, as shown in the screenshot here. In the screenshot here, the Population Stability Index is shown for the feature GLOBAL_REACTIVE_POWER.
Figure 13: Population Stability Index
Description of the illustration metric_psi.png
The computations include:
-
Metric: The following metrics are computed:
-
Population Stability Index (PSI): This is a measure of how much a population has shifted over time or between two different samples of a population in a single number. The two distributions are binned into buckets, and PSI compares the percents of items in each of the buckets. PSI is computed as
PSI = sum((Actual_% - Expected_%) x ln (Actual_% / Expected_%))The interpretation of PSI value is:
-
PSI < 0.1implies no significant population change -
0.1 <= PSI < 0.2implies moderate population change -
PSI >= 0.2implies significant population change
-
-
Jenson Shannon Distance (JSD): This is a measure of the similarity between two probability distributions. JSD is the square root of the Jensen-Shannon Divergence which is related to the Kullbach-Leibler Divergence (KLD). JSD is computed as:
SD(P || Q)= sqrt(0.5 x KLD(P || M) + 0.5 x KLD(Q || M))Where, P and Q are the 2 distributions,
M = 0.5 x (P + Q), KLD(P || M) = sum(Pi x ln(Pi / Mi)), and KLD(Q || M) = sum(Qi x ln(Qi / Mi))The value of JSD ranges between 0 and 1.
-
Crosstab Population Stability Index: This is the PSI for two variables.
-
Crosstab Jenson Shannon Distance: This is the JSD for two variables.
-
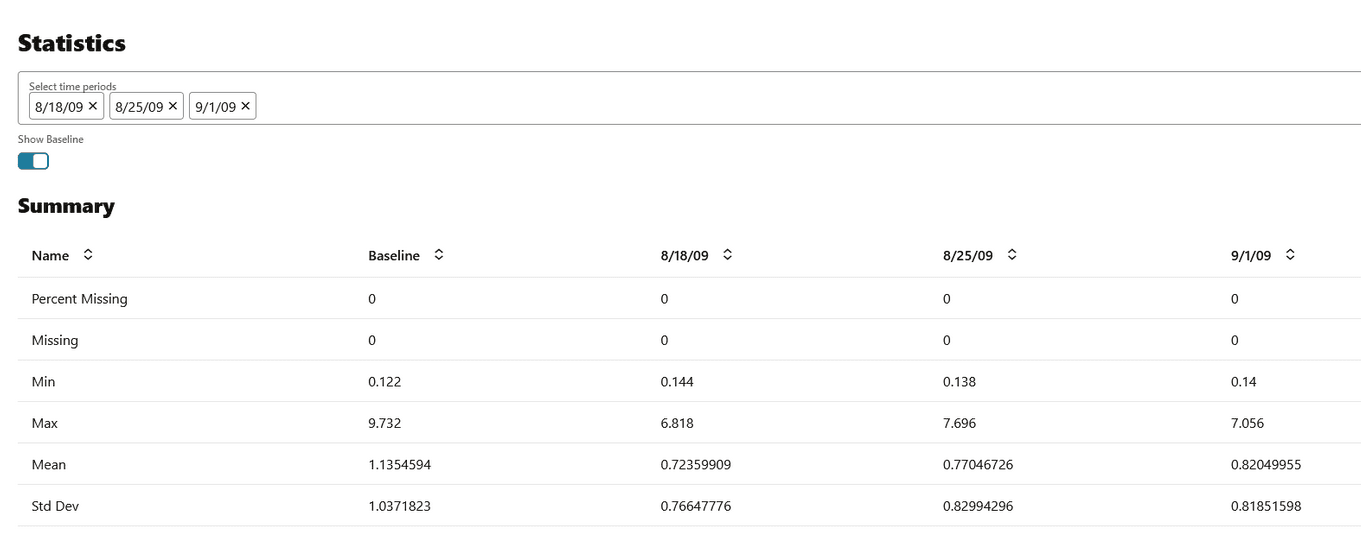
- Statistics: You can view statistics for up to 3 selected periods. Data drift is quantified using these statistical computations.
Figure 14: Statistics
Description of the illustration stats.png
For numerical data, the following statistics are computed:
-
Mean
-
Standard Deviation
-
Range (Minimum, Maximum)
-
Number of nulls
For categorical data, the following statistics are computed:
-
Number of unique values
-
Number of nulls
-
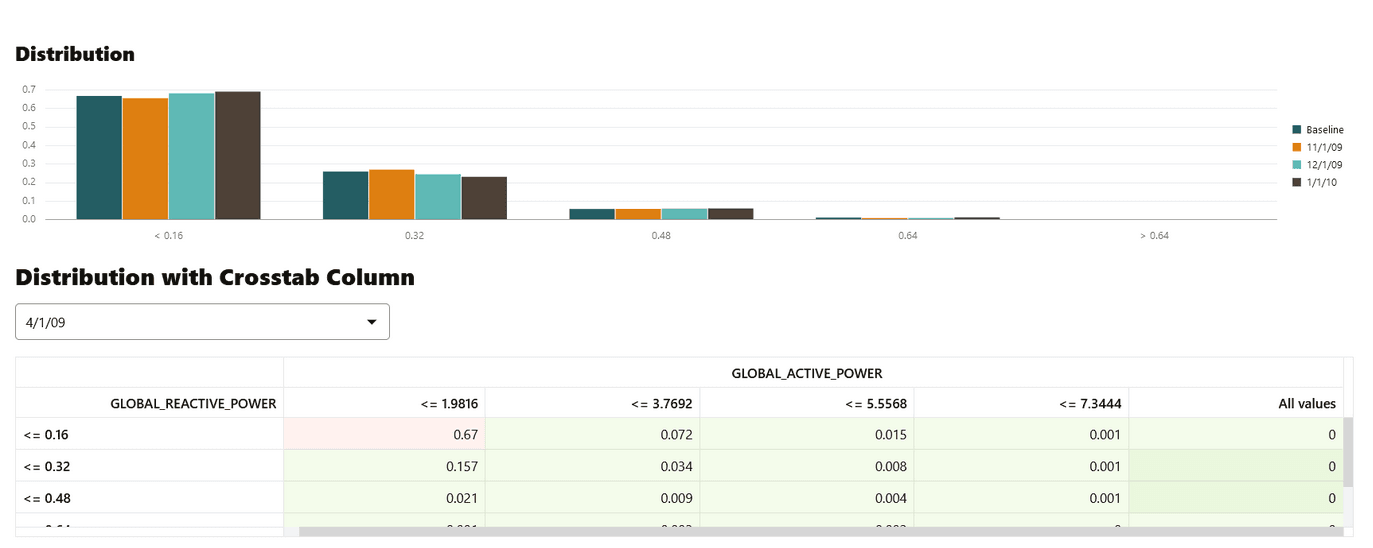
- Distribution: The feature distribution chart with legend displays bins of feature for selected periods and the baseline (optional).
Figure 15: Distribution Chart and Distribution with Crosstab column
-
Distribution with Crosstab Column: The heat map indicates the density of distribution for the selected crosstab and the feature column. Red denotes highest density.
Note: In data drift monitoring,
nullsare are tracked separately asnumber_of_missing_values.
-
View History
The History page displays the runtime details of data monitors.
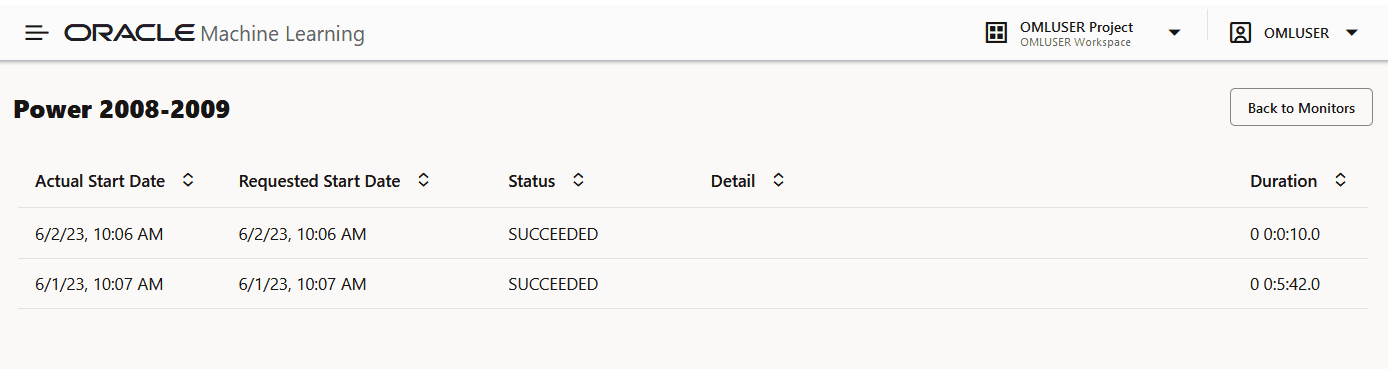
Select a data monitor and click History to view the runtime details. The history page displays the following information about the data monitor runtime:
Figure 16: Data Monitor History page
Description of the illustration view_history.png
-
Actual Start Date: This is the date when the data monitor actually started.
-
Requested Start Date: This is the date entered in the
Start Datefield while creating the data monitor. -
Status: The statuses are
SUCCEEDEDandFAILED. -
Detail: If a data monitor fails, the details are listed here.
-
Duration: This is the time taken to run the data monitor.
Click Back to Monitors to go back to the Data Monitoring page.