12.3 Setup and Configuration for Using Oracle RDF Graph Adapter for Eclipse RDF4J
To use the Oracle RDF Graph Adapter for Eclipse RDF4J, you must first setup and configure the system environment.
The adapter can be used in the following three environments:
- Programmatically through Java code
- Accessed over HTTP as a SPARQL Service
- Used within the Eclipse RDF4J workbench environment
The following sections describe the actions for using the adapter for Eclipse RDF4J in the above mentioned environments:
- Setting up Oracle RDF Graph Adapter for Eclipse RDF4J for Use with Java
- Setting Up Oracle RDF Graph Adapter for Eclipse RDF4J for Use in RDF4J Server and Workbench
- Setting Up Oracle RDF Graph Adapter for Eclipse RDF4J for Use As SPARQL Service
Parent topic: RDF Graph Support for Eclipse RDF4J
12.3.1 Setting up Oracle RDF Graph Adapter for Eclipse RDF4J for Use with Java
To use the Oracle RDF Graph Adapter for Eclipse RDF4J programmatically through Java code, you must first ensure that the system environment meets all the prerequisites as explained in Prerequisites for Using Oracle RDF Graph Adapter for Eclipse RDF4J.
Before you can start using the adapter to store, manage, and query RDF graphs in Oracle AI Database, you need to create an RDF network. An RDF network acts like a folder that can hold multiple RDF graphs created by database users. RDF networks can be created in a user schema (referred to as a schema-private network).
A network can be created by invoking the following command:
sem_apis.create_RDF_network(<tablespace_name>,
                network_owner=><network_owner>,
                network_name=><network_name>)
See RDF Networks for more information.
See Also:
Setting up Oracle RDF Graph Adapter for Eclipse RDF4J for Use with Java for Oracle Database 19c and laterCreating a Schema-Private RDF Network
- Connect to Oracle AI Database
as a
SYSTEMuser with a DBA privilege (or asADMINuser on Autonomous AI Database Serverless instance).CONNECT system/<password-for-system-user>
- Create a tablespace for storing the user data.
Use a suitable operating system folder and file name.
If you are using an Autonomous AI Database, then use the pre-created
DATAtablespace rather than creating a separateusertbs.CREATE TABLESPACE usertbs DATAFILE 'usertbs.dat' SIZE 128M REUSE AUTOEXTEND ON NEXT 64M MAXSIZE UNLIMITED SEGMENT SPACE MANAGEMENT AUTO;
- Create a database user to create and own the RDF
network. This user can create or use RDF graphs or do both within this
schema-private network using the adapter.
If you are using an Autonomous AI Database, then you can create a database user and grant privileges using Database actions in the Oracle Cloud Infrastructure (OCI) console. See The Database Users Page in Using Oracle AI Database Actions for more information.
CREATE USER rdfuser
  IDENTIFIED BY <password-for-rdfuser>
  DEFAULT TABLESPACE usertbs
  QUOTA 5G ON usertbs;
- Grant the necessary privileges to the new database
user.
GRANT CONNECT, RESOURCE, CREATE VIEW TO rdfuser;
- Connect to the database as
rdfuser.CONNECT rdfuser/<password-for-rdf-user>
- Create a schema-private RDF network named
NET1.EXECUTE SEM_APIS.CREATE_RDF_NETWORK(tablespace_name =>'usertbs', network_owner=>'RDFUSER', network_name=>'NET1');
- Verify that schema-private RDF network has been created
successfully.
SELECT table_name
  FROM sys.all_tables
  WHERE table_name = 'NET1#RDF_VALUE$' AND owner='RDFUSER';
Presence of
<NETWORK_NAME>#RDF_VALUE$table in the network owner’s schema shows that the schema-private RDF network has been created successfully.TABLE_NAME ----------- NET1#RDF_VALUE$
You can now set up the Oracle RDF Graph Adapter for Eclipse RDF4J for use with Java code by performing the following actions:
- Download and configure Eclipse RDF4J Release 5.2.2 from RDF4J Downloads.
- Download the adapter for Eclipse RDF4J, (Search for Oracle Adapter for Eclipse RDF4J) from Oracle Software Delivery Cloud.
- Unzip the downloaded kit (
V1053892-01.zip) into a temporary directory, such as/tmp/oracle_adapter, on a Linux system. If this temporary directory does not already exist, create it before the unzip operation. - Include the Oracle Adapter for Eclipse RDF4J jar files from the
/jardirectory of the kit in yourCLASSPATH:oracle-rdf4j-adapter-5.2.2-20260114.jarsdordf-26.1.0-20251013.2.jarsdordf-client-26.1.0-20251013.2.jarsdoutl-26.1.0-20251013.2.jar
- Include appropriate Oracle JDBC Thin Driver and Universal Connection
Pool libraries for your Java version and database version (available from Oracle Database JDBC driver and
Companion Jars Downloads).
ojdbc8.jar(for Java 11 and database versions 19c and 26ai)ucp.jar(for Java 11 and database versions 19c and 26ai)
- Include the following supporting libraries in
your
CLASSPATHto run your Java code through your IDE. These jars can be downloaded from public repositories like Maven Central or automatically managed by build tools like Gradle or Apache Maven.- Dependencies for build tools:
- Group:
org.eclipse.rdf4j, Version: 5.2.2:rdf4j-queryresultio-sparqljsonrdf4j-repository-sailrdf4j-rio-jsonldrdf4j-rio-nquadsrdf4j-rio-rdfjsonrdf4j-rio-rdfxmlrdf4j-sail-apirdf4j-sail-baserdf4j-sail-inferencerrdf4j-shacl
- Group:
org.apache.logging.log4j, Version: 2.25.3log4j-apilog4j-corelog4j-slf4j-impl
- Group:
- List of library dependencies:
commons-codec-1.15.jarcommons-io-2.18.0.jarcommons-lang3-3.18.0.jarcommons-math3-3.6.1.jarcommons-text-1.10.0.jarerror_prone_annotations-2.41.0.jarfailureaccess-1.0.3.jarguava-33.5.0-jre.jarhasmac-json-ld-0.10.2.jarhttpclient-4.5.14.jarhttpclient-cache-4.5.14.jarhttpcore-4.4.16.jarj2objc-annotations-3.1.jarjackson-annotations-2.13.5.jarjackson-core-2.13.5.jarjackson-databind-2.13.5.jarjakarta.json-2.0.1.jarjakarta.json-2.0.1-module.jarjakarta.json-api-2.0.1.jarjcl-over-slf4j-1.7.36.jarjsonld-java-0.13.4.jarjspecify-1.0.0.jarlistenablefuture-9999.0-empty-to-avoid-conflict-with-guava.jarlog4j-api-2.25.3.jarlog4j-core-2.25.3.jarlog4j-slf4j-impl-2.25.3.jarrdf4j-collection-factory-api-5.2.2.jarrdf4j-common-annotation-5.2.2.jarrdf4j-common-exception-5.2.2.jarrdf4j-common-io-5.2.2.jarrdf4j-common-iterator-5.2.2.jarrdf4j-common-order-5.2.2.jarrdf4j-common-text-5.2.2.jarrdf4j-common-transaction-5.2.2.jarrdf4j-common-xml-5.2.2.jarrdf4j-http-client-5.2.2.jarrdf4j-http-protocol-5.2.2.jarrdf4j-model-5.2.2.jarrdf4j-model-api-5.2.2.jarrdf4j-model-vocabulary-5.2.2.jarrdf4j-query-5.2.2.jarrdf4j-queryalgebra-evaluation-5.2.2.jarrdf4j-queryalgebra-model-5.2.2.jarrdf4j-queryparser-api-5.2.2.jarrdf4j-queryparser-sparql-5.2.2.jarrdf4j-queryresultio-api-5.2.2.jarrdf4j-queryresultio-binary-5.2.2.jarrdf4j-queryresultio-sparqljson-5.2.2.jarrdf4j-queryresultio-sparqlxml-5.2.2.jarrdf4j-repository-api-5.2.2.jarrdf4j-repository-sail-5.2.2.jarrdf4j-repository-sparql-5.2.2.jarrdf4j-rio-api-5.2.2.jarrdf4j-rio-datatypes-5.2.2.jarrdf4j-rio-jsonld-5.2.2.jarrdf4j-rio-languages-5.2.2.jarrdf4j-rio-nquads-5.2.2.jarrdf4j-rio-ntriples-5.2.2.jarrdf4j-rio-rdfjson-5.2.2.jarrdf4j-rio-rdfxml-5.2.2.jarrdf4j-rio-trig-5.2.2.jarrdf4j-rio-turtle-5.2.2.jarrdf4j-sail-api-5.2.2.jarrdf4j-sail-base-5.2.2.jarrdf4j-sail-inferencer-5.2.2.jarrdf4j-sail-memory-5.2.2.jarrdf4j-sail-model-5.2.2.jarrdf4j-shacl-5.2.2.jarslf4j-api-1.7.36.jar
- Dependencies for build tools:
- Install JDK 11 if it is not already installed.
- Set the
JAVA_HOMEenvironment variable to refer to the JDK 11 installation. Define and verify the setting by executing the following command:echo $JAVA_HOME
12.3.2 Setting Up Oracle RDF Graph Adapter for Eclipse RDF4J for Use in RDF4J Server and Workbench
This section describes the installation and configuration of the Oracle RDF Graph Adapter for Eclipse RDF4J in RDF4J Server and RDF4J Workbench.
The RDF4J Server is a database management application that provides HTTP access to RDF4J repositories, exposing them as SPARQL endpoints. RDF4J Workbench provides a web interface for creating, querying, updating and exploring the repositories of an RDF4J Server.
Prerequisites
Ensure the following prerequisites are configured to use the adapter for Eclipse RDF4J in RDF4J Server and Workbench:
- Java 11 runtime environment.
- Download the supporting libraries as explained in Include Supporting Libraries.
- A Java Servlet Container that supports Java Servlet API 4.0 and Java Server Pages
(JSP) 2.3, or newer.
Note:
All examples in this chapter are executed on a recent, stable version of Apache Tomcat (9.0.104). - Standard installation of the RDF4J Server, RDF4J Workbench, and RDF4J Console . See RDF4J Server and Workbench Installation and RDF4J Console installation for more information.
-
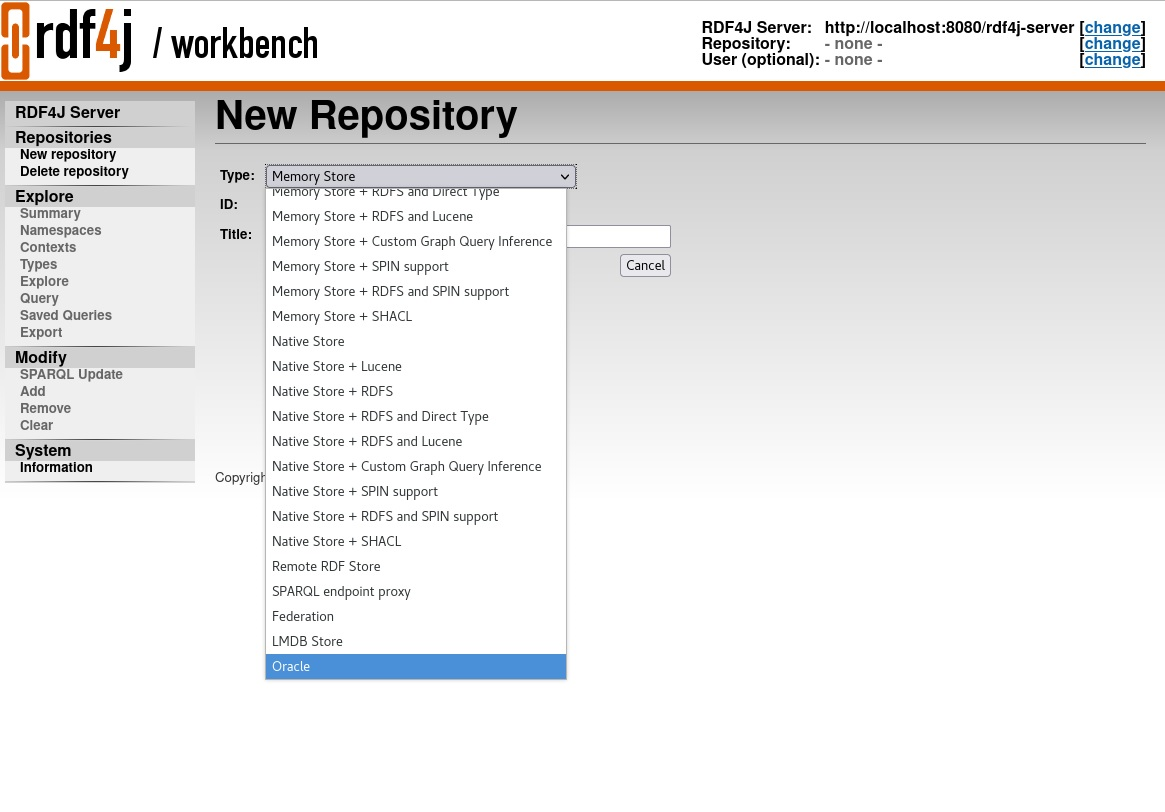
Verify that Oracle is not listed as a default repository in the drop-down in the following Figure 12-1.
Figure 12-1 Data Source Repository in RDF4J Workbench
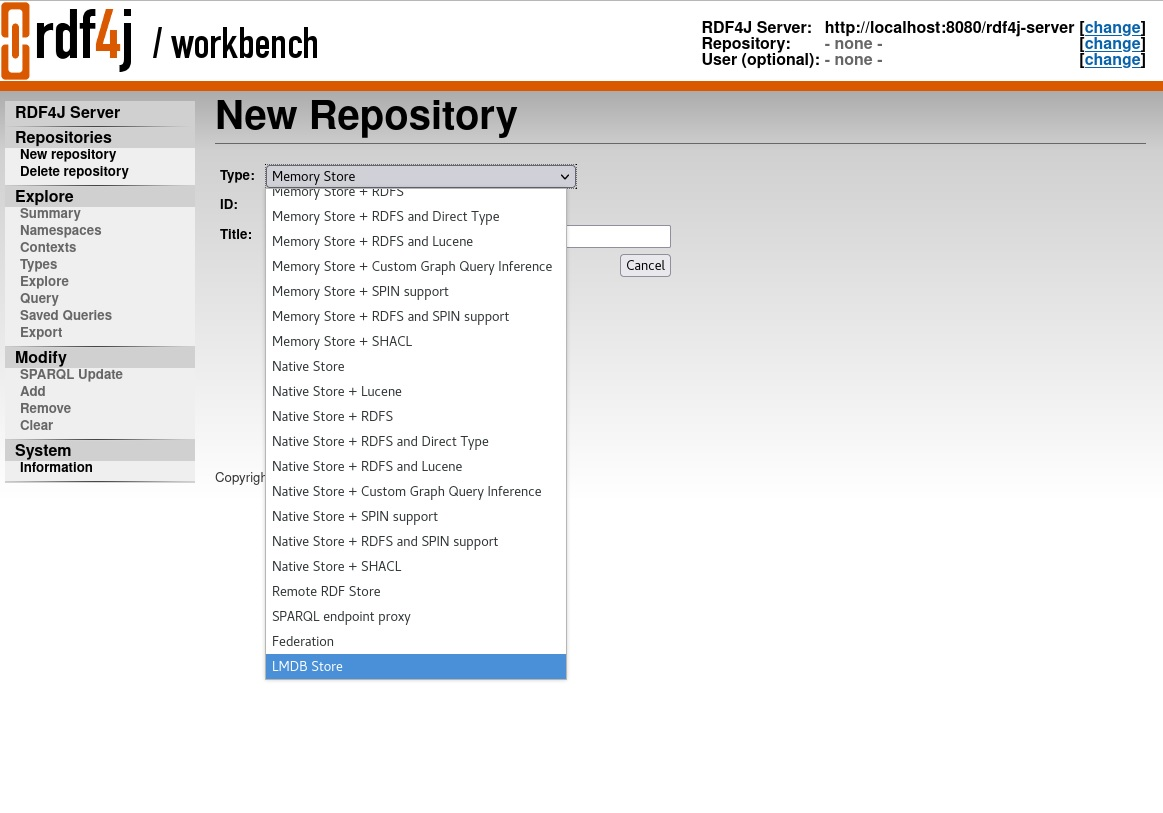
Description of "Figure 12-1 Data Source Repository in RDF4J Workbench"Note:
If the Oracle data source repository is already set up in the RDF4J Workbench repository, then it will appear in the preceding drop-down list.
Adding the Oracle Data Source Repository in RDF4J Workbench
To add the Oracle data source repository in RDF4J Workbench, you must execute the following steps:
-
Add the Data Source to
context.xmlin Tomcat main$CATALINA_HOME/conf/context.xmldirectory, by updating the following highlighted fields.- Using JDBC driver <Resource name="jdbc/OracleSemDS" auth="Container" driverClassName="oracle.jdbc.OracleDriver" factory="oracle.jdbc.pool.OracleDataSourceFactory" scope="Shareable" type="oracle.jdbc.pool.OracleDataSource" user="<<username>>" password="<<pwd>>" url="jdbc:oracle:thin:@<< host:port:sid >>" maxActive="100" minIdle="15" maxIdel="15" initialSize="15" removeAbandonedTimeout="30" validationQuery="select 1 from dual" /> - Using UCP <Resource name="jdbc/OracleSemDS" auth="Container" factory="oracle.ucp.jdbc.PoolDataSourceImpl" type="oracle.ucp.jdbc.PoolDataSource" connectionFactoryClassName="oracle.jdbc.pool.OracleDataSource" minPoolSize="15" maxPoolSize="100" inactiveConnectionTimeout="60" abandonedConnectionTimeout="30" initialPoolSize="15" user="<<username>>" password="<<pwd>>" url="jdbc:oracle:thin:@<< host:port:sid >>" /> - Copy Oracle jdbc and ucp driver to Tomcat
libfolder.cp -f ojdbc8.jar $CATALINA_HOME/lib cp -f ucp.jar $CATALINA_HOME/lib
- Copy the
oracle-rdf4j-adapter-5.2.2-20260114.jar,sdordf-26.1.0-20251013.2.jar,sdordf-client-26.1.0-20251013.2.jar,sdoutl-26.1.0-20251013.2.jarto RDF4J Serverlibfolder.cp -f oracle-rdf4j-adapter-5.2.2-20260114.jar $CATALINA_HOME/webapps/rdf4j-server/WEB-INF/lib cp -f sdordf-26.1.0-20251013.2.jar $CATALINA_HOME/webapps/rdf4j-server/WEB-INF/lib cp -f sdordf-client-26.1.0-20251013.2.jar $CATALINA_HOME/webapps/rdf4j-server/WEB-INF/lib cp -f sdoutl-26.1.0-20251013.2.jar $CATALINA_HOME/webapps/rdf4j-server/WEB-INF/lib
- Copy the
oracle-rdf4j-adapter-5.2.2-20260114.jar,sdordf-26.1.0-20251013.2.jar,sdordf-client-26.1.0-20251013.2.jar,sdoutl-26.1.0-20251013.2.jarto RDF4J Workbenchlibfolder.cp -f oracle-rdf4j-adapter-5.2.2-20260114.jar $CATALINA_HOME/webapps/rdf4j-workbench/WEB-INF/lib cp -f sdordf-26.1.0-20251013.2.jar $CATALINA_HOME/webapps/rdf4j-workbench/WEB-INF/lib cp -f sdordf-client-26.1.0-20251013.2.jar $CATALINA_HOME/webapps/rdf4j-workbench/WEB-INF/lib cp -f sdoutl-26.1.0-20251013.2.jar $CATALINA_HOME/webapps/rdf4j-workbench/WEB-INF/lib
- Create the configuration file
create-oracle.xslwithin the Tomcat$CATALINA_HOME/webapps/rdf4j-workbench/transformationsfolder.<?xml version="1.0" encoding="UTF-8"?> <xsl:stylesheet version="1.0" xmlns:xsl="http://www.w3.org/1999/XSL/Transform" xmlns:sparql="http://www.w3.org/2005/sparql-results#" xmlns="http://www.w3.org/1999/xhtml"> <xsl:include href="../locale/messages.xsl" /> <xsl:variable name="title"> <xsl:value-of select="$repository-create.title" /> </xsl:variable> <xsl:include href="template.xsl" /> <xsl:template match="sparql:sparql"> <form action="create" method="post"> <table class="dataentry"> <tbody> <tr> <th> <xsl:value-of select="$repository-type.label" /> </th> <td> <select id="type" name="type"> <option value="oracle"> Oracle Sail Store </option> </select> </td> <td></td> </tr> <tr> <th> <xsl:value-of select="$repository-id.label" /> </th> <td> <input type="text" id="id" name="Repository ID" size="16" value="native" /> </td> <td></td> </tr> <tr> <th> <xsl:value-of select="$repository-title.label" /> </th> <td> <input type="text" id="title" name="Repository title" size="50" value="Native store" /> </td> <td></td> </tr> <tr> <th> Model Name <strong style="color:Red">*</strong> </th> <td> <input type="text" id="oracleSemModelName" name="Model Name" size="50" value="" /> </td> <td></td> </tr> <tr> <th> Network Owner </th> <td> <input type="text" id="oracleSemNetworkOwner" name="Network Owner" size="50" value="" /> </td> <td></td> </tr> <tr> <th> Network Name </th> <td> <input type="text" id="oracleSemNetworkName" name="Network Name" size="50" value="" /> </td> <td></td> </tr> <tr> <th> DataSource Name </th> <td> <input type="text" id="oracleSemDataSourceName" name="DataSource Name" size="30" value="OracleSemDS" /> </td> <td></td> </tr> <tr> <td></td> <td> <input type="button" value="{$cancel.label}" style="float:right" data-href="repositories" onclick="document.location.href=this.getAttribute('data-href')" /> <input id="create" type="button" value="{$create.label}" onclick="checkOverwrite()" /> </td> </tr> </tbody> </table> </form> <script src="../../scripts/create.js" type="text/javascript"></script> </xsl:template> </xsl:stylesheet> - Replace the configuration file
create.xslwithin the Tomcat$CATALINA_HOME/webapps/rdf4j-workbench/transformationstransformation folder.<?xml version="1.0" encoding="UTF-8"?> <!DOCTYPE xsl:stylesheet [ <!ENTITY xsd "http://www.w3.org/2001/XMLSchema#" > ]> <xsl:stylesheet version="1.0" xmlns:xsl="http://www.w3.org/1999/XSL/Transform" xmlns:sparql="http://www.w3.org/2005/sparql-results#" xmlns="http://www.w3.org/1999/xhtml"> <xsl:include href="../locale/messages.xsl" /> <xsl:variable name="title"> <xsl:value-of select="$repository-create.title" /> </xsl:variable> <xsl:include href="template.xsl" /> <xsl:template match="sparql:sparql"> <form action="create"> <table class="dataentry"> <tbody> <tr> <th> <xsl:value-of select="$repository-type.label" /> </th> <td> <select id="type" name="type"> <option value="memory"> Memory Store </option> <option value="memory-lucene"> Memory Store + Lucene </option> <option value="memory-rdfs"> Memory Store + RDFS </option> <option value="memory-rdfs-dt"> Memory Store + RDFS and Direct Type </option> <option value="memory-rdfs-lucene"> Memory Store + RDFS and Lucene </option> <option value="memory-customrule"> Memory Store + Custom Graph Query Inference </option> <option value="memory-shacl"> Memory Store + SHACL </option> <option value="native"> Native Store </option> <option value="native-lucene"> Native Store + Lucene </option> <option value="native-rdfs"> Native Store + RDFS </option> <option value="native-rdfs-dt"> Native Store + RDFS and Direct Type </option> <option value="memory-rdfs-lucene"> Native Store + RDFS and Lucene </option> <option value="native-customrule"> Native Store + Custom Graph Query Inference </option> <option value="native-shacl"> Native Store + SHACL </option> <option value="remote"> Remote RDF Store </option> <option value="sparql"> SPARQL endpoint proxy </option> <option value="federate">Federation</option> <option value="lmdb">LMDB Store</option> <option value="oracle">Oracle</option> </select> </td> <td></td> </tr> <tr> <th> <xsl:value-of select="$repository-id.label" /> </th> <td> <input type="text" id="id" name="id" size="16" /> </td> <td></td> </tr> <tr> <th> <xsl:value-of select="$repository-title.label" /> </th> <td> <input type="text" id="title" name="title" size="48" /> </td> <td></td> </tr> <tr> <td></td> <td> <input type="button" value="{$cancel.label}" style="float:right" data-href="repositories" onclick="document.location.href=this.getAttribute('data-href')" /> <input type="submit" name="next" value="{$next.label}" /> </td> </tr> </tbody> </table> </form> </xsl:template> </xsl:stylesheet> - Restart Tomcat and navigate to
https://localhost:8080/rdf4j-workbench.
Note:
The configuration files,create-oracle.xsl and create.xsl contain the word
"Oracle", which you can see in the drop-down in Figure 12-2
"Oracle" appears as an option in the drop-down list in RDF4J Workbench.
- Using the Adapter for Eclipse RFD4J Through RDF4J Workbench
You can use RDF4J Workbench for creating and querying repositories.
12.3.2.1 Using the Adapter for Eclipse RFD4J Through RDF4J Workbench
You can use RDF4J Workbench for creating and querying repositories.
RDF4J Workbench provides a web interface for creating, querying, updating and exploring repositories in RDF4J Server.
Creating a New Repository using RDF4J Workbench
- Start RDF4J Workbench by entering the url
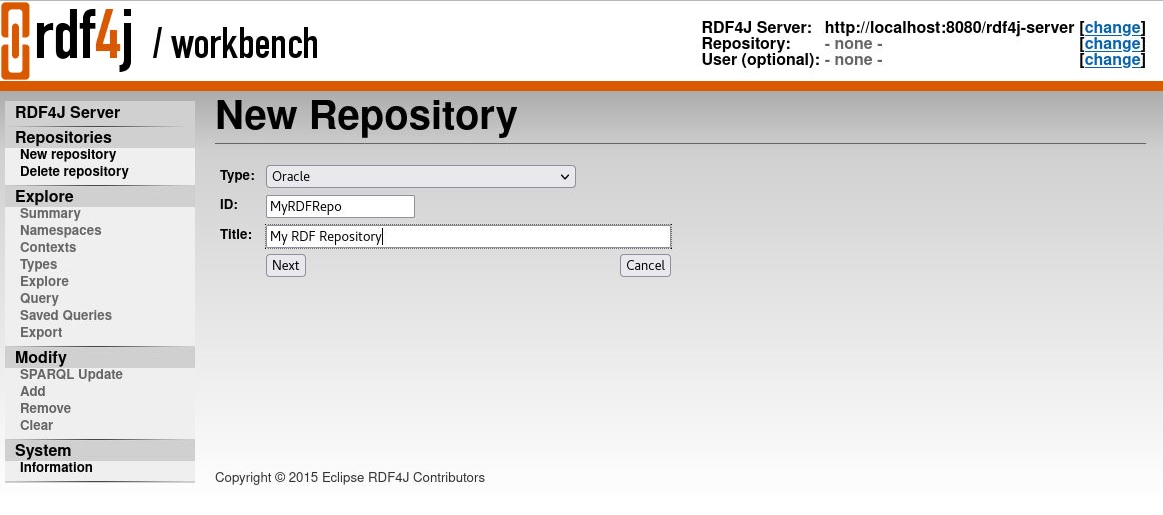
http://localhost:8080/rdf4j-workbenchin your browser. - Click New Repository in the sidebar menu and select the new repository Type as "Oracle".
- Enter the new repository ID and Title as shown in the following figure and click Next.
Figure 12-3 RDF4J Workbench New Repository
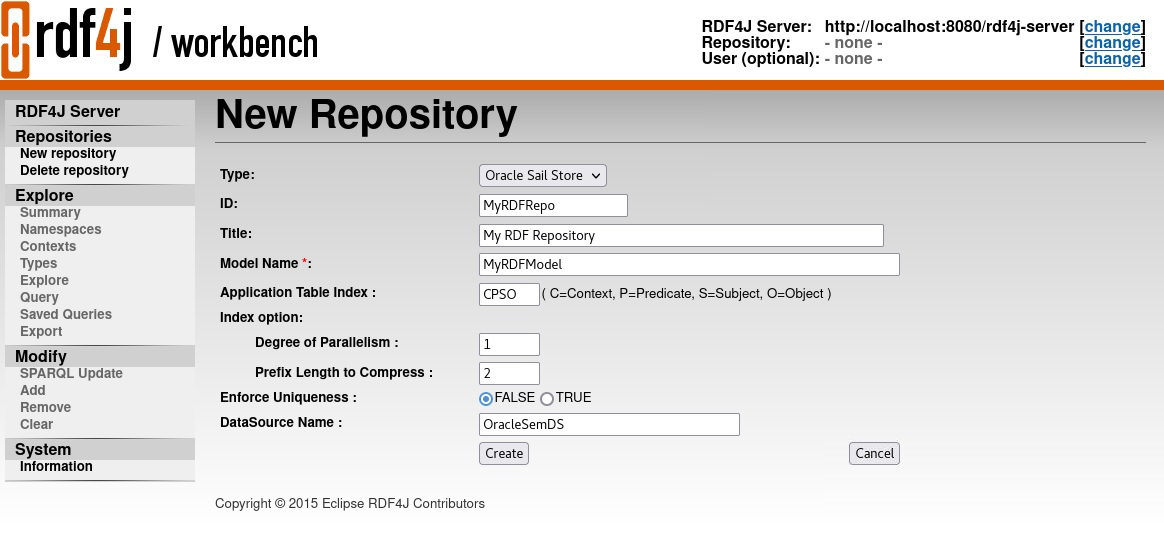
- Enter your Model (RDF graph) details and click Create to create the
new repository.
Figure 12-4 Create New Repository in RDF4J Workbench
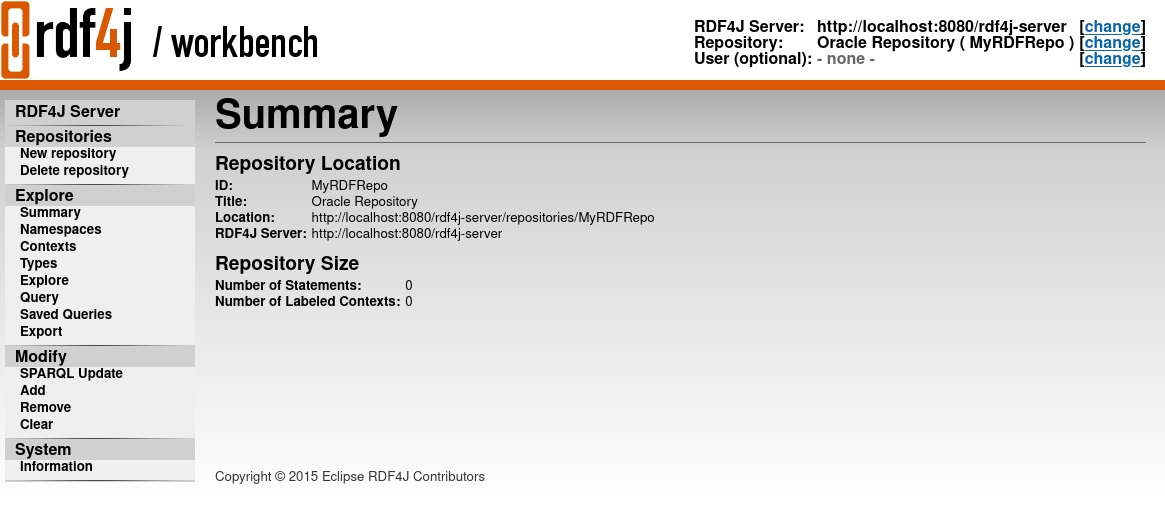
The newly created repository summary is display as shown:Figure 12-5 Summary of New Repository in RDF4J Workbench
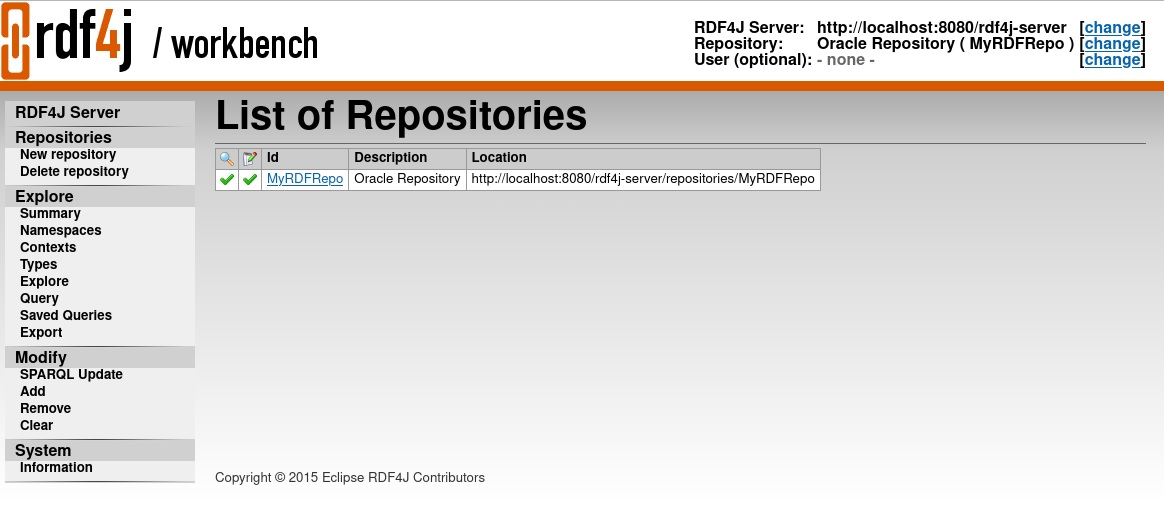
You can also view the newly created repository in the List of Repositories page in RDF4J Workbench.
12.3.3 Setting Up Oracle RDF Graph Adapter for Eclipse RDF4J for Use As SPARQL Service
In order to use the SPARQL service via the RDF4J Workbench, ensure that the Eclipse RDF4J server is installed and the Oracle Data Source repository is configured as explained in Setting Up Oracle RDF Graph Adapter for Eclipse RDF4J for Use in RDF4J Server and Workbench
The Eclipse RDF4J server installation provides a REST API that uses the HTTP Protocol and covers a fully compliant implementation of the SPARQL 1.1 Protocol W3C Recommendation. This ensures that RDF4J server functions as a fully standards-compliant SPARQL endpoint. See The RDF4J REST API for more information on this feature.
The following section presents the examples of usage:
12.3.3.1 Using the Adapter Over SPARQL Endpoint in Eclipse RDF4J Workbench
This section provides a few examples of using the adapter for Eclipse RDF4J through a SPARQL Endpoint served by the Eclipse RDF4J Workbench.
Example 12-2 Request to Perform a SPARQL Update
The following example inserts some simple triples using HTTP POST. Assume
that the content of the file sparql_update.rq is as follows:
PREFIX ex: <http://example.oracle.com/>
INSERT DATA {
  ex:a ex:value "A" .
  ex:b ex:value "B" .
}
You can then run the preceding SPARQL update using the
curl command line tool as shown:
curl -X POST --data-binary "@sparql_update.rq" \
-H "Content-Type: application/sparql-update" \
"http://localhost:8080/rdf4j-server/repositories/MyRDFRepo/statements"
Example 12-3 Request to Execute a SPARQL Query Using HTTP GET
This curl example executes a SPARQL query using HTTP
GET.
curl -X GET -H "Accept: application/sparql-results+json" \
"http://localhost:8080/rdf4j-server/repositories/MyRDFRepo?query=SELECT%20%3Fs%20%3Fp%20%3Fo%0AWHERE%20%7B%20%3Fs%20%3Fp%20%3Fo%20%7D%0ALIMIT%2010"
Assuming that the previous SPARQL update example was executed on an empty repository, this REST request should return the following response.
{
  "head" : {
    "vars" : [
      "s",
      "p",
      "o"
    ]
  },
  "results" : {
    "bindings" : [
      {
        "p" : {
          "type" : "uri",
          "value" : "http://example.oracle.com/value"
        },
        "s" : {
          "type" : "uri",
          "value" : "http://example.oracle.com/b"
        },
        "o" : {
          "type" : "literal",
          "value" : "B"
        }
      },
      {
        "p" : {
          "type" : "uri",
          "value" : "http://example.oracle.com/value"
        },
        "s" : {
          "type" : "uri",
          "value" : "http://example.oracle.com/a"
        },
        "o" : {
          "type" : "literal",
          "value" : "A"
        }
      }
    ]
  }
}
