Cloud Within Region: Configuring Oracle GoldenGate Hub
Configure and deploy MAA Oracle GoldenGate Hub architecture within one region on Oracle Cloud using the provided planning considerations, tasks, management, and troubleshooting information.
Overview of MAA GoldenGate Hub
To achieve the highest levels of availability, resulting in zero or near-zero downtime for both unplanned outages and planned maintenance activities, you can use the combination of Oracle Real Application Clusters (Oracle RAC), Oracle Active Data Guard, and Oracle GoldenGate.
This architecture, typically referred as MAA Platinum, or Never Down Architecture, delivers near zero Recovery Time Objective (RTO–downtime incurred during outage) and potentially zero or near zero Recovery Point Objective (RPO–data loss potential).
Traditionally, Oracle GoldenGate is installed and run locally on the database server that the GoldenGate processes connect to. When used with Oracle Grid Infrastructure Standalone Agent (XAG), Oracle GoldenGate processes can be configured to seamlessly relocate or failover between Oracle RAC nodes and follow Oracle Active Data Guard switchover and failovers.
Using MAA Oracle GoldenGate Hub (MAA GGHub) moves the GoldenGate software and processes off of the Exadata database servers, reducing complexity and system resource utilization. MAA GGHub centralizes Oracle GoldenGate management and offloads the majority of the Oracle GoldenGate processing and associated CPU and storage resource utilization from Exadata system resources. Connectivity between the GoldenGate processes and the databases they operate against is managed with Oracle Net Services.
To achieve an MAA Platinum solution in the Oracle Cloud, you follow these high level steps:
- Review MAA Platinum and MAA Diamond: Oracle RAC and Exadata to understand Platinum MAA benefits and use cases.
- Deploy or migrate your database onto Exadata Cloud Service, Base Database Service, or Autonomous Database on Dedicated Infrastructure Service.
- Add symmetric standby databases in the Oracle Cloud using Oracle Cloud Control Plan or Cloud automation.
- Configure and deploy Oracle Data Guard Fast Start Failover using the Oracle MAA best practice recommendations in Configure Fast Start Failover. For Exadata Cloud Service and Base Database Service, this is manual step.
- Set up MAA GGHub within a single OCI region, which is detailed in the topics that follow. For an MAA GGHub setup across OCI regions, see Cloud Across Regions: Configuring Oracle GoldenGate Hub.
- Configure Bidirectional Replication and Automatic Conflict Detection and Resolution. See Oracle Cloud Infrastructure GoldenGate documentation for information.
- Decide on Application Failover Options such as Global Data Services (see Oracle Global Data Services Best Practices), or use your own customized application failover.
Planning GGHub Placement in the Platinum MAA Architecture
Extreme availability that delivers zero downtime (RTO=0 or near zero) and zero or near zero data loss (RPO=0 or near zero) typically requires the following Platinum MAA architecture.
- You have the source and target database in an Oracle GoldenGate architecture to allow your application to fail over immediately in the case of disaster (database, cluster, or site failure) or switch over in the case of a database or application upgrade. This architecture enables the potential RTO of zero or near zero for disaster scenarios and database and application upgrade maintenance.
- Each source and target database is deployed in Exadata cloud systems so any local failures are tolerated or recovered almost instantly.
- Each source and target database is configured with a standby database with Data Guard Fast-Start Failover so any failure of the database results in activating a new primary database in seconds to minutes. If SYNC transport is leveraged with Max Availability protection mode, zero data loss Data Guard failover is achieved.
- Configured with GoldenGate replication using MAA GGhub between the source and target databases.
- Configured so that any standby becoming a primary database due to Data Guard switchover or failover will automatically resynchronize with its target GoldenGate database. If zero data loss Data Guard switchover or failover occurs, GoldenGate resychronization ensures zero data loss across the distributed database environment.
- Configured with GoldenGate Automatic Conflict Detection and Resolution, which is required after any Data Guard failover operation occurs.
Where to Place the MAA Primary GGHub and Standby GGHub
- The GGHub Pair (Primary and Standby GGHub) must reside in the same OCI regions as each primary and standby database. For example:
- If the primary database is in AD1, Region A, and the standby database is in AD2, Region A, then the GGHub pair will reside in Region A. For this configuration, continue reading the topics in this chapter.
- If the primary database is in Region A and the standby database is in Region B, then the GGHub pair will split between Region A and B. The primary, or active, GGHub must be co-located in the same OCI region as the target primary database. For this configuration, see Cloud Across Regions: Configuring Oracle GoldenGate Hub.
- Performance implications:
- Primary or active GGHub must reside in the same data center as the target database to ensure round trip latency of 4ms or less. (Replicat performance)
- Primary or active GGHub should be < 90 ms from the source database without incurring GoldenGate performance degradation. (Extract performance)
- GoldenGate distribution path:
- A GoldenGate distribution path is required if the source and target GGHubs are in different regions and latency between the OCI regions is > 90 ms.
- In Oracle Cloud, when your Oracle GoldenGate source and target databases reside in the same region, or in different regions in the same country, you never need to set up a GoldenGate distribution path because the latency is always < 90 ms.
MAA GGHubs Placed in the Same OCI Region
In this scenario, the primary and standby database are located in the same OCI region, and so the primary (active) GGHub and the standby GGHub are also located in the same region.
The following architectural components are contained within GGHubs, as shown in the image below:
- Primary database and associated standby database are configured with Oracle Active Data Guard Fast Start Failover (FSFO). FSFO can be configured with any Data Guard protection mode, with ASYNC or SYNC redo transport, depending on your maximum data loss tolerance.
- Primary GGHub Active/Passive Cluster: Only one GGHub software deployment and configuration on the 2-node cluster. This cluster contains the 21c Oracle GoldenGate software deployment that can support Oracle Database 11g (11.2.0.4) and later releases. This GGHub can support many primary databases and encapsulates the GoldenGate processes. GoldenGate Extract mines transactions from the source database and GoldenGate Replicat applies the same changes to target database. GoldenGate trail and checkpoint files also reside in the GGhub ACFS file system. The HA failover solution is built-in to the GGhub, which includes automatic failover to the passive node in the same cluster, and restarts GoldenGate processes and activity after a node failure.
- Standby GGHub Active/Passive Cluster: A Symmetric standby GGhub is configured. ACFS replication is set up between the primary and standby GGHubs to preserve all GoldenGate files. Manual GGhub failover, which includes ACFS failover, can be performed in the rare case that you lose the entire primary GGhub.
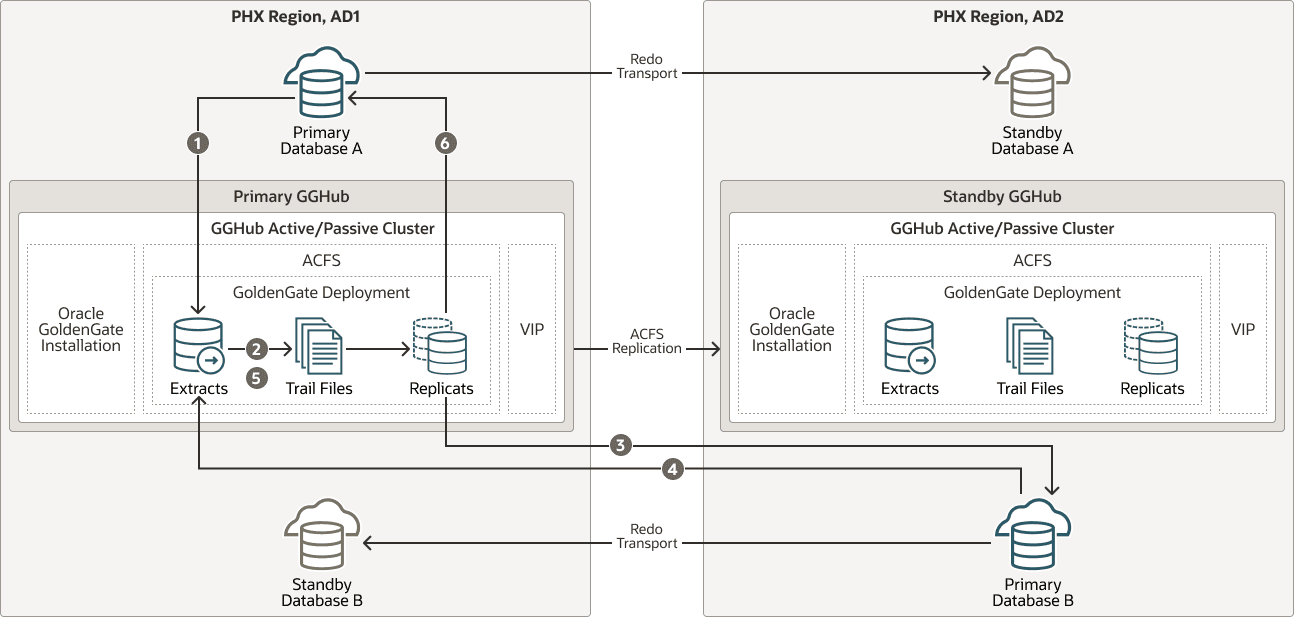
The figure above depicts data replicated from Primary Database A to Primary Database B and Primary B back to Primary A with the following steps:
- Primary Database A: Primary Aâ€TMs Logminer server sends redo changes to a Primary GGHub Extract process.
- Primary GGHub: An Extract process writes changes to trail files.
- Primary GGHub to Primary Database B: A Primary GGHub Replicat process applies those changes to the target database (Primary B).
- Primary Database B: Primary Bâ€TMs Logminer server sends redo to a Primary GGHub Extract process.
- Primary GGHub: A Primary GGHub Extract process writes changes to trail files.
- Primary GGHub to Primary Database A: A Primary GGHub Replicat process applies those changes to the target database (Primary A).
Note: One GGHub can support multiple source and target databases, even when the source and target databases are different Oracle Database releases.
| Outage Scenario | Application Availability and Repair | Restoring Redundancy and Pristine State |
|---|---|---|
| Primary Database A (or Database B) failure | Impact: Near-zero application downtime. GoldenGate replication resumes when a new primary database starts.
|
|
| Primary or standby GGHub single node failure | Impact: No application impact. GoldenGate replication resumes automatically after a couple of minutes. No action is required. The HA failover solution built in to the GGHub includes automatic failover and restart of GoldenGate processes and activity. Replication activity is blocked until GoldenGate processes are active again. GoldenGate replication blackout could last a couple of minutes. |
Once the node restarts, active/passive configuration is re-established. |
| Primary GGHub cluster crashes and is not recoverable | Impact: No application impact. GoldenGate replication resumes after restarting the existing GGHub or performing a manual GGHub failover operation.
|
If the previous GGHub eventually restarts, ACFS replication resumes in the other direction automatically. If the GGHub cluster is lost or unrecoverable, you need to rebuild a new standby GGHub. |
| Standby GGHub cluster crashes and not recoverable | Impact: No application or replication impact.
|
N/A |
| Complete Data Center or Availability Domain (AD1 or AD2) failure | Impact: Near-zero application downtime. GoldenGate replication resumes when the new primary database starts.
|
|
Task 1: Configure the Source and Target Databases for Oracle GoldenGate
The source and target Oracle GoldenGate databases should be configured using the recommendations that follow.
Step 1.1 - Configure the Databases
For Oracle Autonomous Database (ADB-D), Oracle Database 19c (19.20) or a later release is required to support parallel integrated Replicat and conflict resolution. For Oracle Exadata Database Service (ExaDB) or BaseDB, you can use any supported Oracle Database release available in the Oracle cloud.
The database configuration steps that follow are applicable for each Database Cloud Service that supports Platinum MAA solution.
The source and target Oracle GoldenGate databases should be configured using the following recommendations:
For Oracle Autonomous Database (ADB-D), you only need to add supplemental logging:
PDB: ALTER PLUGGABLE DATABASE ADD SUPPLEMENTAL LOG DATA;
For Oracle Exadata Database Service (ExaDB) or BaseDB do the following steps:
- Enable Archivelog Mode.
SQL> ARCHIVE LOG LIST Database log mode Archive Mode Automatic archival Enabled Archive destination USE_DB_RECOVERY_FILE_DEST Oldest online log sequence 110 Next log sequence to archive 113 Current log sequence 113 - Enable Force Logging.
ALTER DATABASE FORCE LOGGING; - Enable GoldenGate replication.
ALTER SYSTEM SET ENABLE_GOLDENGATE_REPLICATION=TRUE SCOPE=BOTH SID='*' - Add supplemental logging.
ALTER DATABASE ADD SUPPLEMENTAL LOG DATA; - Configure
STREAMS_POOL_SIZElarger to accommodate GoldenGate. Use this formula to calculate the appropriateSTREAMS_POOL_SIZEvalue:STREAMS_POOL_SIZE = (((#Extracts + #Integrated Replicats) * 1GB) * 1.25)For example, in a database with 2 Extracts and 2 integrated Replicats:STREAMS_POOL_SIZE = 4GB * 1.25 = 5GBAnd the parameter is set:ALTER SYSTEM SET STREAMS_POOL_SIZE=5G SCOPE=BOTH SID='*';
For the steps to prepare the database for Oracle GoldenGate, see Preparing the Database for Oracle GoldenGate.
Step 1.2 - Create a GoldenGate Database Administrator User
For ADB-D
For ADB-D deployments, you only need to issue
ALTER USER ggadmin IDENTIFIED BY <password> ACCOUNT UNLOCK;
For Oracle Exadata Database Service (ExaDB) or BaseDB
The following steps are only applicable for Oracle Exadata Database Service (ExaDB) or BaseDB.
The source and target databases need a GoldenGate administrator user created, with appropriate privileges assigned as follows:
- For the multitenant container database (CDB):
- Source database - GoldenGate Extract must be configured to connect to a user in the root container database, using a c##
- Target database - a separate GoldenGate administrator user is needed for each pluggable database (PDB).
- For details about creating a GoldenGate administrator in an Oracle Multitenant Database, see Configuring Oracle GoldenGate in a Multitenant Container Database.
- For non-CDB databases, see Establishing Oracle GoldenGate Credentials
- As the
oracleOS user on the source database system, execute the following SQL instructions to create the database user for Oracle GoldenGate and assign the required privileges:[opc@exadb1_node1 ~]$ sudo su - oracle [oracle@exadb1_node1 ~]$ source dbName.env [oracle@exadb1_node1 ~]$ sqlplus / as sysdba # Source CDB SQL> alter session set container=cdb$root; create user c##ggadmin identified by "ggadmin_password" container=all default tablespace USERS temporary tablespace temp; alter user c##ggadmin quota unlimited on users; grant set container to c##ggadmin container=all; grant alter system to c##ggadmin container=all; grant create session to c##ggadmin container=all; grant alter any table to c##ggadmin container=all; grant resource to c##ggadmin container=all; exec dbms_goldengate_auth.grant_admin_privilege('c##ggadmin',container=>'all'); # Source PDB SQL> alter session set container=pdbName; create user ggadmin identified by "ggadmin_password" container=current; grant create session to ggadmin container=current; grant alter any table to ggadmin container=current; grant resource to ggadmin container=current; exec dbms_goldengate_auth.grant_admin_privilege('ggadmin'); - As the
oracleOS user on the target system, execute the following SQL instructions to create the database user for Oracle GoldenGate and assign the required privileges:[opc@exadb2_node1 ~]$ sudo su - oracle [oracle@exadb2_node1 ~]$ source dbName.env [oracle@exadb2_node1 ~]$ sqlplus / as sysdba # Target PDB SQL> alter session set container=pdbName; create user ggadmin identified by "ggadmin_password" container=current; grant alter system to ggadmin container=current; grant create session to ggadmin container=current; grant alter any table to ggadmin container=current; grant resource to ggadmin container=current; grant dv_goldengate_admin, dv_goldengate_redo_access to ggadmin container=current; exec dbms_goldengate_auth.grant_admin_privilege('ggadmin');
Step 1.3 - Create the Database Services
Note: This step is not required for ADB-D deployments.
If the source and target databases are running the recommended configuration on an Oracle RAC cluster with Oracle Data Guard, a role-based service must be created that allows the Extract or Replicat processes to connect to the correct Data Guard primary database instance.
When using a source multitenant database, a separate service is required for the root container database (CDB) and the pluggable database (PDB) that contains the schema being replicated. For a target multitenant database, a single service is required for the PDB.
- As the
oracleOS user on the primary database system, usedbaasclito find the CDB and PDB name, as shown here:[opc@exadb1_node1 ~]$ sudo su - oracle [oracle@exadb1_node1 ~]$ source dbName.env [oracle@exadb1_node1 ~]$ dbaascli database getDetails --dbname dbName |egrep 'dbName|pdbName' "dbName" : "dbName", "pdbName" : "pdbName", - As the
oracleOS user on the primary and standby database systems, create and start the CDB database service using the following command:[opc@exadb1_node1 ~]$ sudo su - oracle [oracle@exadb1_node1 ~]$ source dbName.env [oracle@exadb1_node1 ~]$ srvctl add service -db $ORACLE_UNQNAME -service dbName.goldengate.com -preferred ORACLE_SID1 -available ORACLE_SID2 -role PRIMARY - As the
oracleOS user on the primary and standby database systems, create and start the PDB database service using the following command:[oracle@exadb1_node1 ~]$ srvctl add service -db $ORACLE_UNQNAME -service dbName.pdbName.goldengate.com -preferred ORACLE_SID1 -available ORACLE_SID2 -pdb pdbName -role PRIMARY - As the
oracleOS user on the primary and standby database systems, start and verify that the services are running, as shown here:[oracle@exadb1_node1 ~]$ srvctl start service -db $ORACLE_UNQNAME -role [oracle@exadb1_node1 ~]$ srvctl status service -d $ORACLE_UNQNAME |grep goldengate Service dbName.goldengate.com is running on instance(s) SID1 Service dbName.pdbName.goldengate.com is running on instance(s) SID1Note: Repeat Step 1.3 in the source and target database system.
Task 2: Deploy Oracle GoldenGate Maximum Availability Hub on Oracle Cloud Marketplace
Oracle GoldenGate Maximum Availability Hub was designed to save you time in setting up and configuring your Oracle GoldenGate high availability solution.
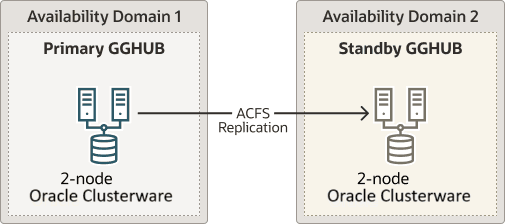
It provides high availability by configuring a 2-node cluster server for fast and simple failover, and disaster recovery by leveraging Oracle Advanced Cluster File System (ACFS) replication to another identical GoldenGate hub server on a separate 2-node cluster server.
Follow the steps in Using Oracle GoldenGate Maximum Availability Hub on Oracle Cloud Marketplace to deploy the system, and come back to this topic to continue with the GGHub configuration.
Figure 2: Oracle GoldenGate Maximum Availability Hub Hardware Architecture
Task 3: Configure the Oracle GoldenGate Environment
Step 3.1 - Create Database Credentials
With the Oracle GoldenGate deployment created, use the Oracle GoldenGate Administration Service home page to create the database credentials using the above TNS alias names. See figure 4 below for an example of the database credential creation using the TNS alias.
From a client machine with access to the GGHUB, create a ssh tunnel to connect to the Oracle GoldenGate Administration Service:
$ ssh -N -L <local_port>:<vip>:443 -p 22 <gghub-node>
As the oggadmin user, create the database credentials:
- Log in into the Administration Service: https://localhost:<localPort>/<instance_name>/adminsrvr.
- Click Configuration under Administration Service.
- Click the plus button to Add Credentials under the Database tab.
- Add the required information for the source and target CDB and PDB as shown in the table:
| Region | Container | Domain | Alias | User ID |
| — | — | — | — | — |
| Region 1 | CDB | GoldenGate | Reg1_CDB | c##ggadmin@
| | Region 1 | PDB | GoldenGate | Reg1_PDB | ggadmin@ | | Region 2 | CDB | GoldenGate | Reg2_CDB | c##ggadmin@ | | Region 2 | PDB | GoldenGate | Reg2_PDB | ggadmin@ |
Step 3.2 - Create an Oracle Net TNS Alias for Oracle GoldenGate Database Connections
To provide local database connections for the Oracle GoldenGate processes when switching between nodes, create a TNS alias on all nodes of the cluster where Oracle GoldenGate may be started. Create the TNS alias in the tnsnames.ora file in the TNS_ADMIN directory specified in the deployment creation.
If the source database is a multitenant database, two TNS alias entries are required, one for the container database (CDB) and one for the pluggable database (PDB) that is being replicated. For a target Multitenant database, the TNS alias connects the PDB to where replicated data is being applied. The pluggable database SERVICE_NAME should be set to the database service created in an earlier step (refer to Step 2.3: Create the Database Services in Task 2: Prepare a Primary and Standby Base System for GGHub).
As the oracle OS user on any database node of the primary and the standby database systems, use dbaascli to find the database domain name and the SCAN name:
# Primary DB
[opc@exadb1_node1]$ sudo su - oracle
[oracle@exadb1_node1]$ source db_name.env
[oracle@exadb1_node1]$ dbaascli database getDetails --dbname <db_name>
 |grep 'connectString'

        "connectString" : "<primary_scan_name>:1521/<service_name>"

# Standby DB
[opc@exadb2_node1]$ sudo su - oracle
[oracle@exadb2_node1]$ source db_name.env
[oracle@exadb2_node1]$ dbaascli database getDetails --dbname <db_name>
 |grep 'connectString'

      "connectString" : "<standby_scan_name>:1521/<service_name>"
As the oracle OS user on all nodes of the primary and standby GGHUB, add the recommended parameters for Oracle GoldenGate in the sqlnet.ora file:
[opc@gghub_prim1]$ sudo su - oracle
[oracle@gghub_prim1]$ mkdir -p /u01/app/oracle/goldengate/network/admin
[oracle@gghub_prim1]$
cat > /u01/app/oracle/goldengate/network/admin/sqlnet.ora <<EOF
DEFAULT_SDU_SIZE = 2097152
EOF
As the oracle OS user on all nodes of the primary and standby GGHUB, follow the steps to create the TNS alias definitions:
[opc@gghub_prim1 ~]$ sudo su - oracle
[oracle@gghub_prim1 ~]$

cat > /u01/app/oracle/goldengate/network/admin/tnsnames.ora <<EOF

# Source
<source_cbd_service_name>=
 	(DESCRIPTION =
 		(CONNECT_TIMEOUT=3)(RETRY_COUNT=2)(LOAD_BALANCE=off)(FAILOVER=on)(RECV_TIMEOUT=30)
 		(ADDRESS_LIST =
 			(ADDRESS = (PROTOCOL = TCP)(HOST=<primary_scan_name>)(PORT=1521)))
 		(ADDRESS_LIST =
 			(ADDRESS = (PROTOCOL = TCP)(HOST=<standby_scan_name>)(PORT=1521)))
 		(CONNECT_DATA=(SERVICE_NAME = <source_cbd_service_name>.goldengate.com)))

<source_pdb_service_name>=
	(DESCRIPTION =
		(CONNECT_TIMEOUT=3)(RETRY_COUNT=2)(LOAD_BALANCE=off)(FAILOVER=on)(RECV_TIMEOUT=30)
		(ADDRESS_LIST =
			(ADDRESS = (PROTOCOL = TCP)(HOST=<primary_scan_name>)(PORT=1521)))
		(ADDRESS_LIST =
			(ADDRESS = (PROTOCOL = TCP)(HOST=<standby_scan_name>)(PORT=1521)))
		(CONNECT_DATA=(SERVICE_NAME = <source_pdb_service_name>.goldengate.com)))

# Target
<target_pdb_service_name>=
	(DESCRIPTION =
		(CONNECT_TIMEOUT=3)(RETRY_COUNT=2)(LOAD_BALANCE=off)(FAILOVER=on)(RECV_TIMEOUT=30)
		(ADDRESS_LIST =
			(ADDRESS = (PROTOCOL = TCP)(HOST=<primary_scan_name>)(PORT=1521)))
		(ADDRESS_LIST =
			(ADDRESS = (PROTOCOL = TCP)(HOST=<standby_scan_name>)(PORT=1521)))
		(CONNECT_DATA=(SERVICE_NAME = <target_pdb_service_name>.goldengate.com)))

EOF

[oracle@gghub_prim1 ~]$ scp /u01/app/oracle/goldengate/network/admin/*.ora
 gghub_prim2:/u01/app/oracle/goldengate/network/admin
Note: When the tnsnames.ora or sqlnet.ora (located in the TNS_ADMIN directory for the Oracle GoldenGate deployment) are modified, the deployment needs to be restarted to pick up the changes.
Step 3.3 - Set Up Schema Supplemental Logging
- Log in to the Oracle GoldenGate Administration Server.
- Click Configuration under Administration Service.
- Click the Connect to database button under Actions for the Source Database (Reg_CDB).
- Click the plus button (Add TRANDATA) to Add TRANDATA for the Schema or Tables.
Step 3.4 - Create the Autostart Profile
Create a new profile to automatically start the Extract and Replicat processes when the Oracle GoldenGate Administration Server is started. Then, restart if any Extract or Replicat processes are abandoned. With GoldenGate Microservices, auto start and restart is managed by Profiles.
Using the Oracle GoldenGate Administration Server GUI, create a new profile that can be assigned to each of the Oracle GoldenGate processes:
- Log in to the Administration Service on the Source and Target GoldenGate.
- Click on Profile under Administration Service.
- Click the plus (+) sign next to Profiles on the Managed Process Settings home page.
- Enter the details as follows:
- Profile Name: Start_Default
- Description: Default auto-start/resteart profile
- Default Profile: Yes
- Auto Start: Yes
- Auto Start Options
- Startup Delay: 1 min
- Auto Restart: Yes
- Auto Restart Options
- Max Retries: 5
- Retry Delay: 30 sec
- Retries Window: 30 min
- Restart on Failure only: Yes
- Disable Task After Retries Exhausted: Yes
- Click Submit
Step 3.5 - Configure Oracle GoldenGate Processes
When creating Extract, Distribution Paths, and Replicat processes with Oracle GoldenGate Microservices Architecture, all files that need to be shared between the GGHub nodes are already shared with the deployment files stored on a shared file system.
Listed below are essential configuration details recommended for running Oracle GoldenGate Microservices on GGhub for Extract, Distribution Paths, and Replicat processes.
The main goal is to prevent data divergence between GoldenGate replicas and their associated standby databases. This section focuses on configuring Extract so that GoldenGate Extract never gets ahead of the standby database which can result in data divergence.
| GoldenGate Parameter | Description | Recommendations |
|---|---|---|
TRANLOGOPTIONS HANDLEDLFAILOVER |
This is mandatory setting for Data Guard configurations that have Oracle GoldenGate to ensure GoldenGate Extract never extract data that has not been received by standby database. The HANDLEDLFAILOVER stands for handle DATA LOSS for Data Guard failover. The following parameter must be added to the Extract process parameter fileto avoid losing transactions and resulting in logical data inconsistencies after data loss Data Guard failover event. When the two primary tried to reconcile, this parameter ensures that all transactions can be reconciled since the new primary (old standby) is not further behind as expected. Prevents Extract from extracting redo data from the source database, and writing to the trail file data that has not yet been applied to the Oracle Data Guard standby database. If this parameter is not specified, after a data loss failover, it is possible to have data in the target database that is not present in the source database, leading to data divergence and logical data inconsistencies. |
MANDATORY when the source database is configured with Data Guard in Max Availaibility or Max Performance mode. |
TRANLOGOPTIONS FAILOVERTARGETDESTID n |
For multiple standby configurations or cases when Data Guard Fast-Start failover is not enabled, set When not using Data Guard Fast Start Failover (FSFO) in the source database, this parameter Identifies which standby database the Extract process must remain behind, with regard to not extracting redo data that has not yet been applied to the Oracle Data Guard standby database. |
MANDATORY when not using FSFO in the source database. To determine the correct value for |
TRANLOGOPTIONS HANDLEDLFAILOVER STANDBY_WARNING value |
The amount of time before a warning message is written to the Extract report file, if Extract is stalled, due to being unable to query the source database standby apply progress. This can occur after a Data Guard failover when the old primary database is not currently available. The default is 60 seconds. | OPTIONAL if want to adjust the timing of when the warning message is written to the Extract report file. Add |
TRANLOGOPTIONS HANDLEDLFAILOVER STANDBY_ABEND value |
The amount of time before Extract abends, if Extract is stalled, due to being unable to query the standby apply progress. The default is 30 minutes. | OPTIONAL if want to adjust the amount of time it takes Extract to abend, when the source database standby is not accessible to enforce the Add |
TRANLOGOPTIONS DLFAILOVER_TIMEOUT value |
The amount of time Extract will run on the new source primary database, after a Data Guard role transition, before it will check the status of the standby database. If standby database is not available after the DLFAILOVER_TIMEOUT, Extract will abend. The default is 300 seconds. NOTE: If during normal operations of the source Oracle Data Guard configuration, the standby database becomes unavailable, Extract will stop extracting data from the source database to prevent possible data divergence with the GoldenGate target database due to the HANDLEDLFAILOVER parameter. The DLFAILOVER_TIMEOUT parameter does not take effect when a Data Guard failover has not occurred, and there are no messages output to the Extract report file. |
OPTIONAL. if you want to adjust the amount of time an Extract can run on a new primary source database, after a role transition, when the standby is not yet available to honor the TRANLOGOPTIONS HANDLEDLFAILOVER parameter. |
Refer to the Oracle GoldenGate Parameters and Functions Reference Guide for more information about the Extract TRANLOGOPTIONS parameters.
When creating an Extract using the Oracle GoldenGate Administration Service GUI interface, leave the Trail SubDirectory parameter blank so that the trail files are automatically created in the deployment directories stored on the shared file system. The default location for trail files is the /
Step 3.5.1 - Extract Configuration
Create the Extract:
- Log in to the Oracle GoldenGate Administration Server.
- Click Overview under Administration Service.
- Click the plus button to Add Extract.
- Select Integrated Extract.
- Add the required information as follows:
- Process Name: EXT_1
- Description: Extract for Region 1 CDB
- Intent: Unidirection
- Begin: Now
- Trail Name: aa
- Credential Domain: GoldenGate
- Credential Alias: Reg1_CDB
- Register to PDBs: PDB Name
- Click Next and set parameters.
EXTRACT ext_1 USERIDALIAS Reg1_CDB DOMAIN GoldenGate EXTTRAIL aaTRANLOGOPTIONS HANDLEDLFAILOVER TRANLOGOPTIONS FAILOVERTARGETDESTID 2 SOURCECATALOG PDB_NAME TABLE OWNER.*; - Click Next.
- If using CDB Root Capture from PDB, add the
SOURCECATALOGparameter with the PDB Name. - Click Create and Run. Note: For ADB-D deployments, the extract requires a connection to the PDB rather than the CDB.
See Oracle GoldenGate Extract Failure or Error Conditions Considerations for more information.
Step 3.5.2 - Replicat Configuration
Oracle generally recommends using integrated parallel Replicat which offers better apply performance for most workloads when the GGHub is in the same region as the target Oracle GoldenGate database.
The best apply performance can be achieved when the network latency between the GGHub and the target database is as low as possible. The following configuration is recommended for the remote Replicat running on the Oracle GGHub.
APPLY_PARALLELISM– Disables automatic parallelism, instead of usingMAX_APPLY_PARALLELISMandMIN_APPLY_PARALLELISM, and allows the highest amount of concurrency to the target database. It is recommended to set this as high as possible based on available CPU of the hub and the target database server.MAP_PARALLELISM– Should be set with a value of 2 to 5. With a larger number of appliers, increasing the Mappers increases the ability to hand work to the appliers.BATCHSQL– applies DML using array processing which reduces the amount network overheads with a higher latency network. Be aware that if there are many data conflicts, BATCHSQL results in reduced performance, as rollback of the batch operations followed by a re-read from trail file to apply in non-batch mode.
Add a Replicat:
After youâve set up your database connections and verified them, you can add a Replicat for the deployment by following these steps:
- Log in to the Oracle GoldenGate Administration Server.
- Click theplus (+) sign next toReplicatson the Administration Service home page. The Add Replicat page is displayed.
- Select a Replicat type and click Next.
- Enter the details as follows:
- Process Name: REP_1
- Description: Replicat for Region 2 PDB
- Intent: Unidirectional
- Credential Domain: GoldenGate
- Credential Alias: Reg2_PDB
- Source: Trail
- Trail Name: aa
- Begin: Position in Log
- Checkpoint Table: “GGADMIN”.”CHKP_TABLE”
- ClickNext.
- From the Action Menu, click Details to edit the Replicat Parameters:
REPLICAT REP_1 USERIDALIAS Reg2_PDB DOMAIN GoldenGate MAP <SOURCE_PDB_NAME>.<OWNER>.*, TARGET <OWNER>.*; - From the Action Menu, click Start.
Step 3.5.3 - Distribution Path Configuration
Distribution paths are only necessary when trail files need to be sent to an additional Oracle GoldenGate Hub in a different, or even the same, region as described in the following figure.
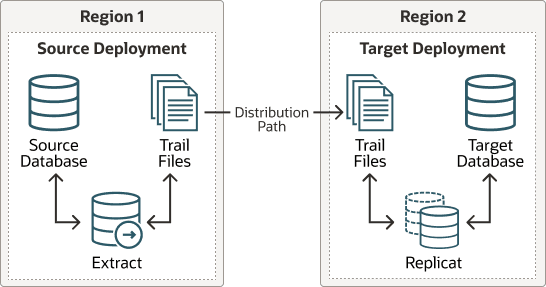
Description of the illustration gghub-trail-distribution-path.png
When using Oracle GoldenGate Distribution paths with the NGINX Reverse Proxy, additional steps must be carried out to ensure the path client and server certificates are configured.
More instructions about creating distribution paths are available in Add a Distribution Path. A step-by-step example is in the following video, âConnect an on-premises Oracle GoldenGate to OCI GoldenGate using NGINX,â to correctly configure the certificates.
Step 3.5.3.1 - Download the Target Serverâs Root Certificate, and then upload it to the source Oracle GoldenGate
Download the target deployment serverâs root certificate and add the CA certificate to the source deployment Service Manager.
- Log in to the Administration Service on the Target GoldenGate.
- Follow “Step 2 - Download the target serverâ€TMs root certificateâ€? in the video “Connect an on-premises Oracle GoldenGate to OCI GoldenGate using NGINX.â€?
Step 3.5.3.2 - Create a user in the Target Deployment for the Source Oracle GoldenGate to use
Create a user in the target deployment for the distribution path to connect to:
- Log in to the Administration Service on the Target GoldenGate.
- Click on Administrator under Administration Service.
- Click the plus (+) sign next to Users.
- Enter the details as follows:
- Username: ggnet
- Role: Operator
- Type: Password
- Click Submit
Step 3.5.3.3 - Create a Credential in the Source Oracle GoldenGate
Create a credential in the source deployment connecting the target deployment with the user created in the previous step. For example, a domain of OP2C and an alias of WSSNET.
- Log in to the Administration Service on the Source Oracle GoldenGate.
- Click in Configuration under Administration Service.
- Click the plus (+)sign next to Credentials on the Database home page.
- Enter the details as follows:
- Credential Domain: OP2C
- Credential Alias: wssnet
- User ID: ggnet
- Click Submit
Step 3.5.3.4 - Create a Distribution Path on the Source Oracle GoldenGate to the Target Deployment
A path is created to send trail files from the Distribution Server to the Receiver Server. You can create a path from the Distribution Service. To add a path for the source deployment:
- Log in to the Distribution Service on the Source Oracle Goldengate.
- Click the plus (+) sign next to Path on the Distribution Service home page. The Add Path page is displayed.
- Enter the details as follows: | Option | Description | | — | — | | Path Name | Select a name for the path. | | Source: Trail Name | Select the Extract name from the drop-down list, which populates the trail name automatically. If it doesnât, enter the trail name you provided while adding the Extract. | | Generated Source URI | Specify localhost for the serverâs name; this allows the distribution path to be started on any of the Oracle RAC nodes. | | Target Authentication Method | Use âUserID Aliasâ | | Target | Set the Target transfer protocol to wss (secure web socket). Set the Target Host to the target hostname/VIP that will be used for connecting to the target system along with the Port Number that NGINX was configured with (default is 443). | | Domain | Set the Domain to the credential domain created above in Step 11.3.3, for example, OP2C. | | Alias | The Alias is set to the credential alias wssnet, also created in Step 11.3.3. | | Auto Restart Options | Set the distribution path to restart when the Distribution Server starts automatically. This is required, so that manual intervention is not required after a RAC node relocation of the Distribution Server. It is recommended to set the number of Retries to 10. Set the Delay, which is the time in minutes to pause between restart attempts, to 1. |
- Click Create Path.
- From the Action Menu, click Start.
Step 3.3.4 - Set up a Heartbeat Table to Monitor Lag Times
Follow Steps to add Heartbeat Table in OCI GoldenGate to implement the best practices for creating a heartbeat process that can be used to determine where and when lag are developing between a source and target system.
This document walks you through the step-by-step process of creating the necessary tables and added table mapping statements needed to keep track of processing times between a source and target database. Once the information is added into the data flow, the information is then stored in a target table that can be analyzed to determine when and where the lag is being introduced between the source and target systems.