2 Administering Oracle Spatial Studio
Administering Oracle Spatial Studio involves certain actions that must be performed before non-administrative users can work with spatial data. If you are an administrative user of Spatial Studio, you must:
- Download the Oracle Spatial Studio application from Oracle Technical Resources (formerly called Oracle Technology Network) and install it.
- Set up a database schema to be the Spatial Studio schema, that is, to hold metadata for Spatial Studio.
The Spatial Studio schema can be either an existing database schema in which Spatial Studio metadata will be added, or a newly created schema that will be used only for Spatial Studio.
- Configure the newly installed Spatial Studio application.
When the installation and configuration actions are completed, users can connect to the database, start Spatial Studio, and use its features.
Note:
- Quick Start: A ready-to-run standalone application packaged in a zip file containing what you need to launch the Spatial Studio web application on your desktop. (You will still need to have JDK 8 64-bit, update 181 or later installed on your desktop, because no Java kit is bundled with this kit.)
Quick Start is well suited for personal and development use.
- A WLS-optimized EAR (Enterprise Application aRchive) file. This
.earfile can be deployed to an existing WebLogic Server domain administered by an organization's WLS or middleware administrator.This is the recommended installation and deployment method if you intend for multiple end users to access the same Spatial Studio web application.
A given person or database user can be both an administrative user and a non-administrative user, or can be only an administrative user or a non-administrative user.
- Prerequisites and Recommendations for Spatial Studio
This section describes the prerequisites and recommendations that apply for using Spatial Studio. - Downloading and Installing Spatial Studio
Spatial Studio must be downloaded and installed before anyone can use it to perform interesting work on spatial data. - Upgrading Spatial Studio
You can upgrade your existing Oracle Spatial Studio deployment to a 23.1 version. - Setting Up the Spatial Studio Metadata Schema
You must set up a database schema to be the Spatial Studio schema, which will hold metadata used by the Spatial Studio application. - Connection Requirements for Database Users of Spatial Studio
This section describes the connection requirements for database users to work on Spatial Studio. - Changing the Configuration Using the sgtech_config.json File
This section describes the configuration of important properties insgtech_config.jsonfile. - Recovery from Lost Master Key
If you accidentally delete or replace thesgtech_config.jsonfile, then the master key is lost and the Spatial Studio application will throw an error. - Enabling IDCS as Identity Provider in Spatial Studio
Starting from Oracle Spatial Studio Release 22.1.0, you can log into your Spatial Studio instance using users already managed by your own Oracle Cloud tenancy's IDCS identity domain. - Mapping External User Principals to Built-In Spatial Studio Roles
Spatial Studio supports mapping IDCS and other identity provider principals to the Spatial Studio built-in roles. This enables dynamically granting permissions to users by using custom groups, for instance.
2.1 Prerequisites and Recommendations for Spatial Studio
This section describes the prerequisites and recommendations that apply for using Spatial Studio.
Oracle Spatial must be installed on the database to which any users will connect to perform actions with Spatial Studio. (It is not sufficient to have only Oracle Locator installed.)
- Java versions: Java 8 (64-bit, update 181 or later); or JDK 11 (64-bit).
- Oracle Database 19c or later. This applies both to the Spatial Studio metadata
schema and to all database connections that will be used by Spatial Studio users.
Note:
Oracle Spatial Studio Releases are backward compatible with supported Oracle Database versions. - Oracle WebLogic Server 12.2.1.3 or later.
- All the privileges listed in section Setting Up the Spatial Studio Metadata Schema are required for each database user that works with Spatial Studio.
- Quota on the default tablespace for each database user that works with Spatial Studio. ALTER USER statement format:
ALTER USER [username] QUOTA [quota value] ON [default tablespace name];For example, for a user named
test_userwith default tablespaceusers:ALTER USER test_user QUOTA unlimited ON users; - The default tablespace for the Spatial Studio repository schema should not use compression.
Parent topic: Administering Oracle Spatial Studio
2.2 Downloading and Installing Spatial Studio
Spatial Studio must be downloaded and installed before anyone can use it to perform interesting work on spatial data.
Go to https://www.oracle.com/database/technologies/spatial-studio/get-started.html to see more information for downloading and installing Spatial Studio.
- Installing and Configuring the Spatial Studio Quick Start
Quick Start is an easy method for getting started, and is well suited for personal and development use. - Installing Spatial Studio on Oracle WebLogic Server
Spatial Studio can be deployed to a WebLogic Server domain, the recommended approach if multiple end users will access the same Spatial Studio application. - Installing Spatial Studio on Apache Tomcat
Starting with Oracle Spatial Studio patch release 23.1.1, you can deploy and run the Spatial Studio web application on Apache Tomcat version 9. - Installing Spatial Studio from Oracle Cloud Marketplace
You can provision Spatial Studio to Oracle Cloud from Oracle Cloud Marketplace.
Parent topic: Administering Oracle Spatial Studio
2.2.1 Installing and Configuring the Spatial Studio Quick Start
Quick Start is an easy method for getting started, and is well suited for personal and development use.
Before installing the Quick Start, ensure that you meet the following prerequisite requirements:
- You must have Java installed on your system and the
JAVA_HOMEenvironment variable is pointing to the full JDK installation of Java SE Development Kit. Note that the Quick start installation requires Java 8 (64-bit, update 181 or later) or JDK 11 (64-bit). - Ports
8080and4040on your system are not being used by any other (web) applications. Port8080is used with thehttp://protocol, while port4040is for thehttps://protocol. Although you can direct Spatial Studio to use different ports,8080and4040are the default.Note that by default Spatial Studio allows access using
httpsonly.
You can perform the following steps to install and configure the Spatial Studio Quick Start:
Parent topic: Downloading and Installing Spatial Studio
2.2.2 Installing Spatial Studio on Oracle WebLogic Server
Spatial Studio can be deployed to a WebLogic Server domain, the recommended approach if multiple end users will access the same Spatial Studio application.
Note:
A WebLogic Server license is required in order to host Spatial Studio in WebLogic Server for multiple end users.The general approach for deploying Spatial Studio to WebLogic Server is no different from deploying any other Java EE EAR application. The easiest way to do so is by using the WebLogic Server’s Admin console with the following steps. Note that in all or most steps you can accept the default values provided by the WLS Installation Application Wizard.
- Download the Studio EAR archive from Oracle Technical Resources or eDelivery, and save it to your local system.
- Log into the target WLS domain’s Admin console.
- Click the Deployments link on the left side.
- Click Install button under the Deployments section, as shown in the following figure (note that the exact contents may be different for your instance of WLS).
Figure 2-1 WLS Admin Console for Deploying Spatial Studio
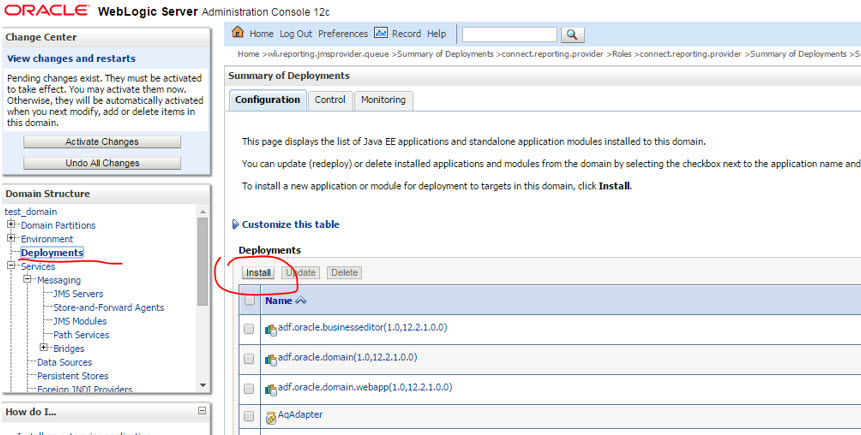
Description of "Figure 2-1 WLS Admin Console for Deploying Spatial Studio" - On the next page, select the Spatial Studio EAR file downloaded previously, and install it as an application (not as a library).
- Click through the remaining steps, including selecting the proper target server. You should accept the default options in all cases unless you know exactly what you are doing. Finally, click Save to complete the deployment.
- If your WLS runs in production mode, you may need to activate the changes to ensure the deployment is activated.
- Make sure the newly deployed Spatial Studio application is marked Active; otherwise, you may need to explicitly start it from the WLS administrative console.
- Access the Studio application using your managed server’s URL with the
/spatialstudiocontext root. For example:http://mycompany.com:7002/spatialstudio
- Preventing a Spatial Studio Admin User from General WLS Administration
If you want to prevent a Spatial Studio administrative user from performing other general WebLogic Server administrative operations, follow the instructions in this topic.
Parent topic: Downloading and Installing Spatial Studio
2.2.2.1 Preventing a Spatial Studio Admin User from General WLS Administration
If you want to prevent a Spatial Studio administrative user from performing other general WebLogic Server administrative operations, follow the instructions in this topic.
The Spatial Studio application by default allows all WebLogic managed admin users (those who are in WebLogic’s Administrators group) to log into the Spatial Studio application and assume Admin role inside the Spatial Studio application as well.
However, in some scenarios, your organization may not want to provide the WebLogic Server admin account information to the user(s) that will be administering only the Spatial Studio application. In such cases, the WLS system administrator can create a new WLS group with the id value of “SGTech_SystemAdmin” in the default WLS security realm. Then, either create a new user or assign an existing non-WLS-admin user to this group. From then on, this user will assume the admin role of the Spatial Studio whenever logged in, but will not be able to administrate the WLS server in general.
Also, note the following:
- All WLS managed users will be able to log into Spatial Studio by default, but they will be limited to accessing only their own Spatial Studio objects such as connections, datasets, and projects.
- Administrative users of Spatial Studio will have full access to every Spatial Studio object created by everyone.
- When using WebLogic's default embedded LDAP security realm as identity provider, if the user name and the assigned application role name differ only by casing (for example, admin and Admin respectively), then it is recommended that you adjust both the names to lowercase. This is to avoid case sensitivity issues in Spatial Studio between user, group, and security policies.
Parent topic: Installing Spatial Studio on Oracle WebLogic Server
2.2.3 Installing Spatial Studio on Apache Tomcat
Starting with Oracle Spatial Studio patch release 23.1.1, you can deploy and run the Spatial Studio web application on Apache Tomcat version 9.
- About the Spatial Studio WAR Archive for Tomcat
You must download thespatialstudio_tomcat.wararchive for running Spatial Studio on Tomcat. - Configuring Tomcat Users for Spatial Studio
In order to run Spatial Studio on Tomcat, you need to configure at least one Tomcat user who can act as the administrator for Spatial Studio.
Parent topic: Downloading and Installing Spatial Studio
2.2.3.1 About the Spatial Studio WAR Archive for Tomcat
You must download the spatialstudio_tomcat.war archive for
running Spatial Studio on Tomcat.
This archive file bundles all the required dependencies that enables it to run on a freshly downloaded and installed Tomcat instance.
It is important to note the following:
- You must rename the
spatialstudio_tomcat.warfile tospatialstudio.warwhen it is placed in the Tomcat’s webapps directory. This is because Tomcat uses the file name as the web application’s context root, and for Spatial Studio it is typically /spatialstudio. - If you have an existing Tomcat installation with other web applications running on it or different versions of the dependency libraries are already installed, then there might be issues running Spatial Studio due to library and version conflicts. In such cases, you can raise a service request with My Oracle Support in order to have the issues resolved.
Parent topic: Installing Spatial Studio on Apache Tomcat
2.2.3.2 Configuring Tomcat Users for Spatial Studio
In order to run Spatial Studio on Tomcat, you need to configure at least one Tomcat user who can act as the administrator for Spatial Studio.
Note that when you access the Spatial Studio web application, the
username and password that you enter in the login
page are passed to Tomcat for authentication. Once the user is authenticated, Spatial
Studio inspects the result principal. If the principal has a role named
SGTech_SystemAdmin, then the logged in user will be considered an admin user
for Spatial Studio.
If your Tomcat instance has already been configured to provide authentication using an external identity provider, then ensure one or some of the users provided by the external identity provider are assigned the SGTech_SystemAdmin role so they can administrate Spatial Studio.
If your Tomcat installation relies on its simple built-in user management
mechanism, then you will likely be adding the role and user to
tomcat-user.xml configuration file, which is found in the
<TOMCAT_HOME>/conf directory.
The following simple example defines two users and two roles, with one being
SGTech_SystemAdmin in tomcat-user.xml configuration
file:
<role rolename=”role1”/>
<role rolename="SGTech_SystemAdmin"/>
<user username="admin" password="Welcome1" roles="manager-gui, manager-script, SGTech_SystemAdmin"/>
<user username="scott" password="Welcome1" role="role1"/>
Once the roles are defined, then you can log into Spatial Studio using either the user name scott or admin. Since the admin user has the SGTech_SystemAdmin role, the user will be able to administrate Spatial Studio once logged in, whereas scott user will just be a regular Spatial Studio user.
Parent topic: Installing Spatial Studio on Apache Tomcat
2.2.4 Installing Spatial Studio from Oracle Cloud Marketplace
You can provision Spatial Studio to Oracle Cloud from Oracle Cloud Marketplace.
See Deploy Spatial Studio from Cloud Marketplace for more information on deploying Spatial Studio from Cloud Marketplace.
Parent topic: Downloading and Installing Spatial Studio
2.3 Upgrading Spatial Studio
You can upgrade your existing Oracle Spatial Studio deployment to a 23.1 version.
Note:
If you are running a Spatial Studio version earlier than 22.3.0, then you must first download and successfully log into Spatial Studio 22.3.0. This is because a new version control mechanism is introduced for the metadata schema in 23.1.0 and Spatial Studio expects any existing metadata schema to already be at the version of Spatial Studio 22.3.0. Therefore, you must log into the 22.3.0 web application at least once, before you can download and run the latest 23.1.0 version. Otherwise, Spatial Studio version 23.1.0 will log the followingSEVERE error message and abort the startup
process.
!!! Spatial Studio ver. 22.3.0 must
                                        be run at least once against your repository schema before
                                        upgrading to this version !!!
Tip:
To check the version of your current Spatial studio installation, log into the web application, then click the About menu item from the Avatar drop-down menu. The version number gets displayed.If you are already using Spatial Studio 22.3.0, then the following sections explain the steps for upgrading Spatial Studio in an existing host (in-place upgrade) or when deploying to a new host (out-of-place upgrade).
Parent topic: Administering Oracle Spatial Studio
2.3.1 Prerequisite Tasks for Upgrading Spatial Studio
Parent topic: Upgrading Spatial Studio
2.3.2 In-Place Upgrade
Parent topic: Upgrading Spatial Studio
2.3.3 Out-of-Place Upgrade
Parent topic: Upgrading Spatial Studio
2.4 Setting Up the Spatial Studio Metadata Schema
You must set up a database schema to be the Spatial Studio schema, which will hold metadata used by the Spatial Studio application.
The Spatial Studio schema can be either an existing database schema in which Spatial Studio metadata will be added, or a newly created schema that will be used only for Spatial Studio. The recommended practice is to create a new database user that will be used only by Spatial Studio. The database user for the Spatial Studio schema must have the following privileges:
- CONNECT
- CREATE PROCEDURE
- CREATE SEQUENCE
- CREATE SESSION
- CREATE SYNONYM
- CREATE TABLE
- CREATE TRIGGER
- CREATE TYPE
- CREATE VIEW
Note:
TheCREATE TRIGGER privilege is required only if you intend to store and display GeoRaster data in the schema.
For example, when connected as a user with DBA privileges:
SQL> create user SPATIAL_STUDIO identified by <password>;
SQL> grant connect, create procedure, create sequence, create session, create synonym, create table, create trigger, create type, create view to SPATIAL_STUDIO;
When the Spatial Studio application starts running for the first time, it will generate a configuration file in a folder named .sgtech under the current user’s operating system home folder. The configuration file is named sgtech_config.json. This is where Spatial Studio application will be obtaining and storing the connection details in its metadata schema.
After the connection to the metadata schema is established, the Spatial Studio application will automatically check if the required tables and other database objects are already present, and if their versions are up to date with the latest Spatial Studio application software. If these tables are not found, or if the tables require migration, the Spatial Studio application will run the necessary SQL scripts to create or migrate them, all without any intervention from the user.
The Spatial Studio schema will contain the following tables and views:
- SGTECH_OBJECT: stores all the domain objects for Spatial Studio.
- SGTECH_SYS_TYPE: defines all the known types of domain objects of Spatial Studio.
- SGTECH_SYS_JSON_SCHEMA: stores JSON data schema.
- SGTECH_TASK_QUEUE: stores long-running jobs of Spatial Studio.
- SGTECH_TASK_BROKER: stores job brokers for Spatial Studio.
Note:
Do not add, delete, or edit any of the Spatial Studio tables or views or the data within them. They are automatically maintained by Spatial Studio, and should not be modified by users unless directed by Oracle Support.
Managing Metadata Schema when Running Multiple Instances of Spatial Studio
Spatial Studio prevents you from running multiple application instances each having
its own sgtech_config.json file from using the same metadata
schema. In case you want to run another instance, it is recommended that you copy
the sgtech_config.json configuration file linked to the initial
instance to the system where you want to start the new instance.
Otherwise, any attempt to connect to the same metadata schema from an instance running on a different system is prevented by Spatial Studio with the following warning:
The selected
                repository is already registered to another instance of Spatial Studio. Check the
                system logs for more details.
In such a scenario, see Recovery from Lost Master Key to resolve the issue.
Parent topic: Administering Oracle Spatial Studio
2.5 Connection Requirements for Database Users of Spatial Studio
This section describes the connection requirements for database users to work on Spatial Studio.
Each individual user must connect as a database user who is authorized to run Spatial Studio. A Spatial Studio administrator can enable access for the database users.
You can create new database users specifically for Spatial Studio access, or you can modify existing database users to enable Spatial Studio access, or you can do a combination of these approaches.
All database users must have a minimum set of privileges. In addition, each database user that works with Spatial Studio must have quota on its default tablespace. The privilege and quota requirements are explained in Prerequisites and Recommendations for Spatial Studio.
Parent topic: Administering Oracle Spatial Studio
2.6 Changing the Configuration Using the sgtech_config.json File
This section describes the configuration of important properties in
sgtech_config.json file.
By default, Spatial Studio will create
(if it does not already exist) and use a JSON file named
sgtech_config.json for most of its essential configuration information.
This file is typically found in the operating system user’s home directory, in a
subfolder named .sgtech. This is true whether you deployed the
application EAR to a WebLogic domain or you are just using the Quick Start.
Note:
You must safeguard thesgtech_config.json file and ensure it has a backup on a regular
basis. If this file is lost, you will lose the master key that Spatial Studio used to encrypt sensitive
information, such as the database schema password for your data connections. This means
that next time you start up Spatial Studio, it will
no longer be able to decrypt such information, and none of your data connections will be
usable, as well as all the datasets in them. In such a scenario, refer to Recovery from Lost Master Key for more information.
The following topics describe some important properties in the configuration file that a system administrator should be aware of:
- Allow HTTPS-ONLY Access
- Connecting to the Spatial Studio Metadata Schema
- Caching Metadata Objects
- Importing Additional Configuration Files in Spatial Studio
- If the Spatial Studio Repository Schema Password Has Been Changed
Parent topic: Administering Oracle Spatial Studio
2.6.1 Allow HTTPS-ONLY Access
One of the top level properties in the sgtech_config.json config file is https_only. When this value is set to true (the default), Oracle Spatial Studio will actively monitor all incoming requests and only allow requests that were made using SSL. Normal http:// requests will be denied.
Thus, if you tried to access the Spatial Studio application using an http:// URL such as http://localhost:8080/spatialstudio, and if the value of https_only is set to true, then you will not be able to log in. In fact, you will not even see the login page itself, because none of the page resources will be accessible by your browser. Similarly, all RESTful requests will be blocked unless accessed using HTTPS.
If your environment (such as WebLogic Server) supports only http access, then you can change the value of https_only to false, and make sure to restart the Spatial Studio application or the JavaEE container where Spatial Studio is deployed.
2.6.2 Connecting to the Spatial Studio Metadata Schema
Spatial Studio must have access to a set of metadata tables, such as SGTECH_OBJECT. These tables are collectively considered the repository of the Spatial Studio application. The database schema that hosts these tables is considered the metadata schema or repository schema of Spatial Studio.
Spatial Studio must be able to establish a connection to this metadata schema as the first step during startup, when the connection details are found in the sgtech_config.json file in the metadata_schema section.
In an emergency situation, you can also manually edit this section to change or correct the connection details. However, be careful whenever editing this file, because any syntax error can cause Spatial Studio to stop working or fail to restart.
When you manually enter the repository schema connection details in the sgtech_config.json file (in the metadata_schema section), you must first specify whether CONTAINER or SPATAL_STUDIO is managing the physical JDBC connections:
"metadata_schema" : {
    "connection_manager": "CONTAINER"
}
Or
"metadata_schema" : {
    "connection_manager": "SPATIAL_STUDIO"
}
When connection_manager is set to CONTAINER, it means the JDBC connections to the Spatial Studio’s repository schema are managed through a Java EE data source already created in Jetty (for Quick Start) or WebLogic Server. For example, if there is a data source named jdbc/studioMetadata in the WLS domain, and if you want Studio to connect to the target schema using this data source, the relevant section in sgtech_config.json should look like this:
"metadata_schema" {
"connection_manager" : "CONTAINER",
"container_managed":{
        "jndi_datasource_name" : "jdbc/studioMetadata"
}
}
Note:
As of Spatial Studio Release 19.2, you cannot enter the container-managed connection details in the Spatial Studio application, so manually editing sgtech_config.json file is the only supported approach.
However, if you want Spatial Studio to manage the physical connections to its metadata schema, set connection_manager to SPATIAL_STUDIO, and supply the full set of JDBC connection details, which vary depending on whether the schema resides in an Oracle Autonomous database (which requires a database Wallet for establishing connections), or a regular database on-premises. You can check the inline comments inside the sgtech_config.json file for more details, but it is best if you simply log onto Spatial Studio as an admin user and then interactively supply the connection details for the repository schema. Such details will then be automatically saved in sgtech_config.json after Spatial Studio verifies the connection.
2.6.3 Caching Metadata Objects
During run time as users create connections, datasets, and projects, Spatial Studio is creating, modifying, and storing a large amount of metadata (sometimes called Spatial Studio’s "domain objects"), such as the definition of a dataset and all of its columns, or the definition of a project including the full layout of all of its visualizations.
All the metadata objects are permanently stored in the metadata table SGTECH_OBJECT, but if the database must be accessed frequently (such as every time you open a project or view the properties of a dataset), performance may suffer. If this occurs, the solution is to cache frequently accessed copies of such metadata objects in memory.
The cache section of the sgtech_config.json file lets you specify whether to enable such an in-memory cache of metadata objects. If the cache is enabled, then you can further specify how many such objects can be cached and for how long. A general rule is that max_size (the maximum number of metadata objects to be cached) should be no less than 1000, but probably should not exceed 10000 unless you have a very large amount of memory allocated to Spatial Studio.
2.6.4 Importing Additional Configuration Files in Spatial Studio
Spatial Studio 22.1 allows you to import different
configuration files into the main sgtech_config.json
configuration file.
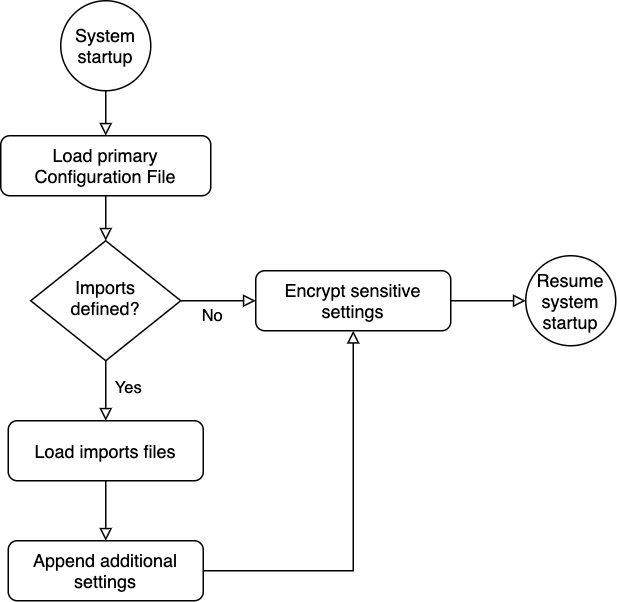
The following describes the workflow for handling multiple configuration files:
Figure 2-2 Workflow to Handle Multiple Configuration Files
Description of "Figure 2-2 Workflow to Handle Multiple Configuration Files"
- At startup, Spatial Studio loads
the primary configuration file,
sgtech_config.json.All the settings defined in
sgtech_config.jsonare used as the base settings. - If the
sgtech_config.jsonfile contains theimportsdirective, then it loads the import files in the order (top to bottom) in which they are declared.For each loaded import file, the system reads and appends the settings to the base settings.
- Once the base settings are all read in, the system encrypts any sensitive items and saves them back to their corresponding file.
- Spatial Studio resumes loading the rest of the system.
Adding imports to sgtech_config.json
You can edit the sgtech_config.json file and add the
new top-level imports directive as shown:
"imports" : {
   "<import_name>" : {
      "module" : "<import_file_path>",
      "description" : "<import_description>"
   }
}
In the preceding code:
- <import_name>: Name of the import file which must be unique. This is
used mainly by Spatial Studio to report
errors when loading
importsfiles. - <import_file_path>: The file path for the
importsfiles must be relative to the containing directory of the main configuration file (~/.sgtech/sgtech_config.json). - <import_description>: To describe the purpose of the
import.
descriptionis an optional parameter for theimportsproperty.
metadata_schema details as shown in the
following code in sgtech_config.dbsettings.json file.
The file path can be
~/.sgtech/extras/sgtech_config.dbsettings.json:{
"metadata_schema" : {
"connection_manager" : "CONTAINER",
"container_managed" : {
...
},
}
}
Also, configure the jobs details separately in
sgtech_config.jobs.json following the file path
~/.sgtech/extras/sgtech_config.jobs.json:
{
  "jobs" : {
    "init_threads_count" : 45
  }
}
You can now include the preceding two configuration files in the
imports directive in the main
sgtech_config.json file
(~/.sgtech/sgtech_config.json) as shown:
{
  "version" : "22.1.0",
  "work_dir" : "",
  "https_only" : true,
  "master_seed" : "<somerandommasterseed>",
  "logging" : {
    "level" : "INFO"
  },
  "imports" : {
    "jobs" : {
      "module" : "extras/sgtech_config.jobs.json"
    },
    "db" : {
      "module" : "extras/sgtech_config.dbsettings.json",
      "description" : "Database settings optimized for clustering"
    }
  }
}
Import Files Requirements
It is important you adhere to the following requirements when handling multiple import files:
- Files for
importsmust be located inside the same directory as the primarysgtech_config.jsonfile, or any of its subdirectories. - Settings included in the
importsfiles must not make collision with settings declared already in other configuration files, including the primarysgtech_config.jsonconfiguration file. - Since
importsfiles can contain sensitive data, only the file owner must have read, write or both access. version,work_dir,master_seedandimportsare settings which are restricted to the primary configuration file,sgtech_config.json.
2.6.5 If the Spatial Studio Repository Schema Password Has Been Changed
If the Spatial Studio Repository Schema Password has been changed, you must update
the sgtech_config.json configuration file, as follows:
- Make a backup copy of the file. For example, copy
~/.sgtech/sgtech_config.jsonto~/.sgtech/sgtech_config.json_backup. - On the Spatial Studio compute node, edit the file
~/.sgtech/sgtech_config.json. - In the metadata_schema section, update
database_passwordto the desired value. - Save the file and then restart the Spatial Studio deployment. To restart if you are using the Quick Start kit, see the README file for the Quick Start; to restart if this is a WebLogic Server deployment, use the WebLogic Server console.
- Open the Spatial Studio application. You should be able to log in.
You will still have all the artifacts you had created, including other (non-repository) connections, which you can edit as needed.
2.7 Recovery from Lost Master Key
If you accidentally delete or replace the
sgtech_config.json file, then the master key is lost and the Spatial Studio application will throw an
error.
sgtech_config.json file includes a master
seed property which contains the master key value that enables decryption
of encrypted items such as database passwords. It is therefore recommended to backup
your sgtech_config.json file in a safe location.
However, if you lose the sgtech_config.json file, then it is
possible to recover from a lost master key by performing the following
steps:
sgtech_config.json configuration file
safely this time so you do not have to repeat this process in the future.
Parent topic: Administering Oracle Spatial Studio
2.8 Enabling IDCS as Identity Provider in Spatial Studio
Starting from Oracle Spatial Studio Release 22.1.0, you can log into your Spatial Studio instance using users already managed by your own Oracle Cloud tenancy's IDCS identity domain.
The workflow to setup IDCS as the identity provider for Spatial Studio involves the following three steps:
- Adding Spatial Studio roles as Groups in IDCS.
- Creating an Application in IDCS.
- Copying IDCS settings into Spatial Studio's configuration file.
Before you begin, see Prerequisite Requirements for Setting Up IDCS with Spatial Studio to ensure that you meet all the prerequisite requirements.
- Prerequisite Requirements for Setting Up IDCS with Spatial Studio
- Adding Spatial Studio Role as a Group in IDCS
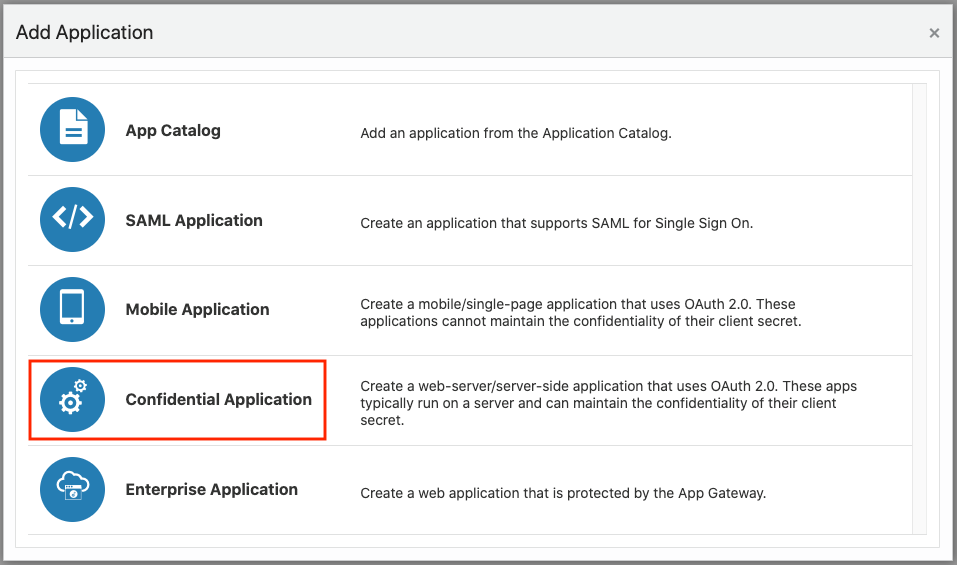
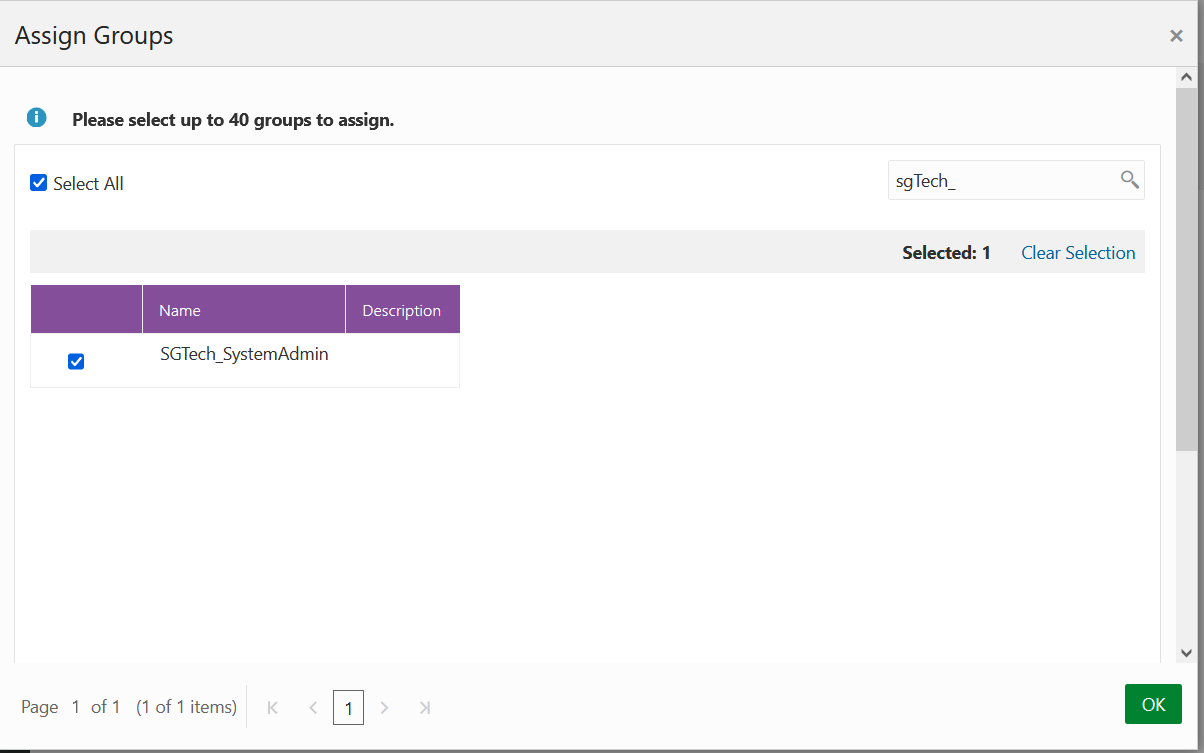
You must add the system administrator role supported in Spatial Studio as a group in IDCS. - Creating an Application in IDCS
This section describes the steps to add the Spatial Studio application in IDCS. - Copying IDCS Settings into Spatial Studio's Configuration File
To integrate Spatial Studio with IDCS, you must add the IDCS settings into thesgtech_config.jsonconfiguration file. - Testing IDCS Login
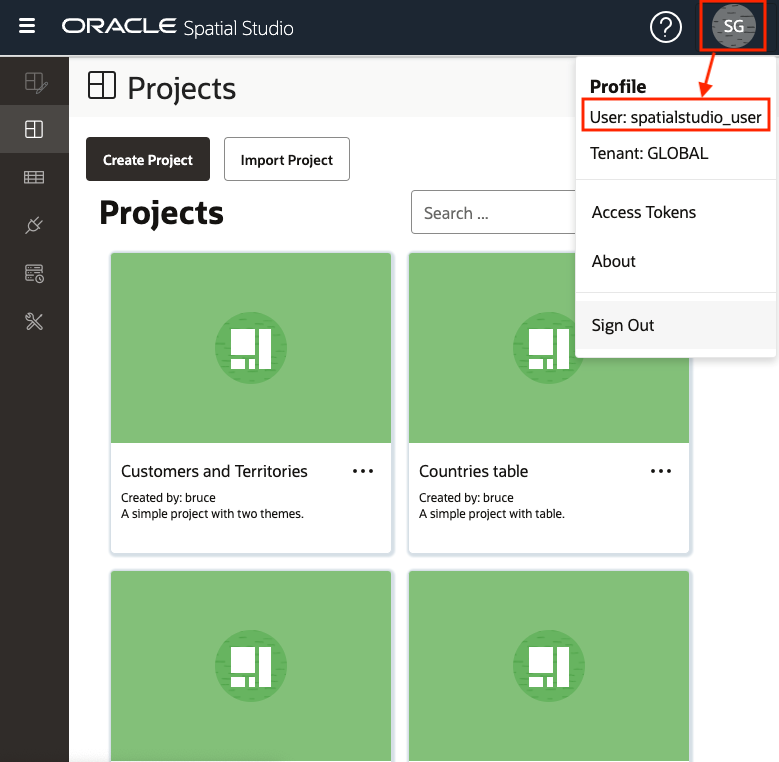
After all the setup steps are completed, you can test and verify the IDCS login.
Parent topic: Administering Oracle Spatial Studio
2.8.1 Prerequisite Requirements for Setting Up IDCS with Spatial Studio
To integrate IDCS with Spatial Studio, you must obtain the following details:
- Identify your IDCS tenant: See Retrieving IDCS Instance details.
- Identify your IDCS host: See Retrieving IDCS Instance details.
- Identify the Spatial Studio URL: https://localhost:4040/spatialstudio/ is the default.
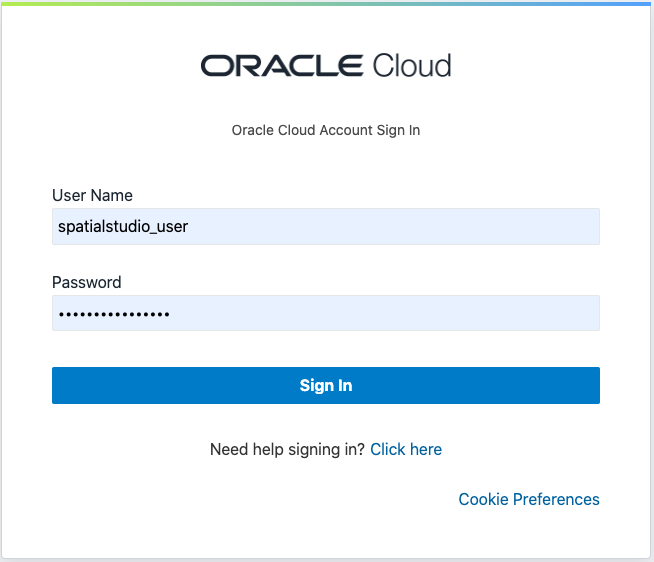
- Setup an IDCS admin account: See About Oracle Identity Cloud Service User Accounts and Groups for details.
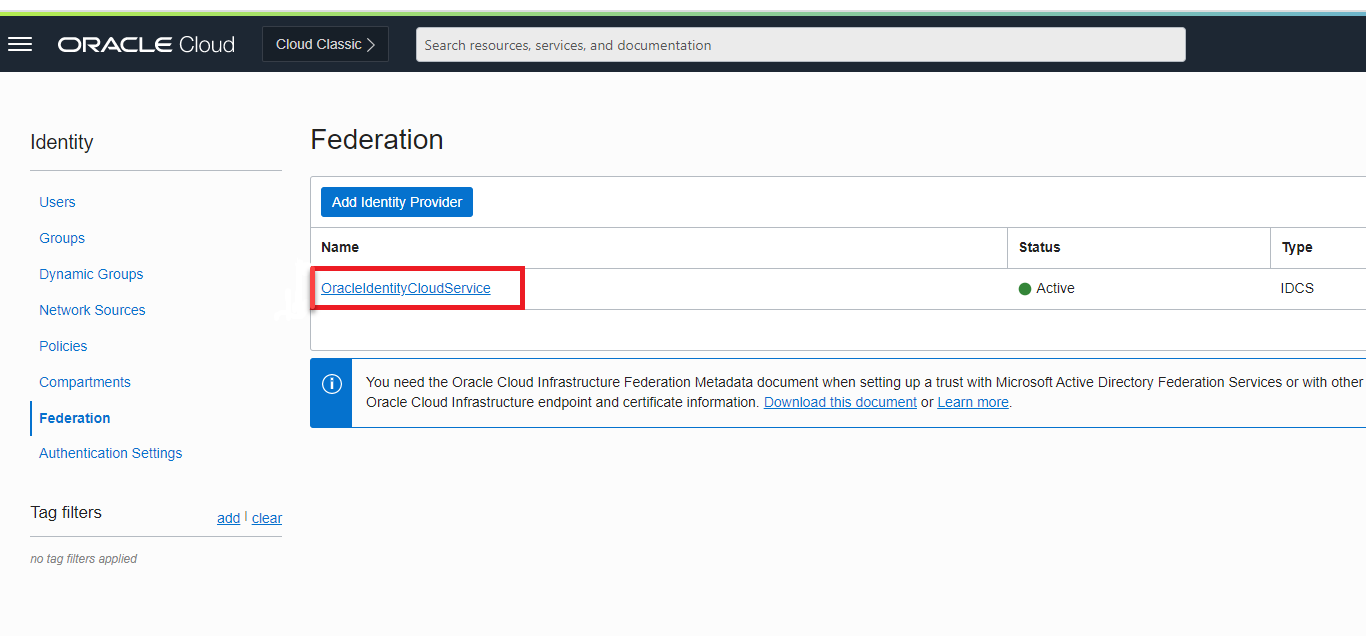
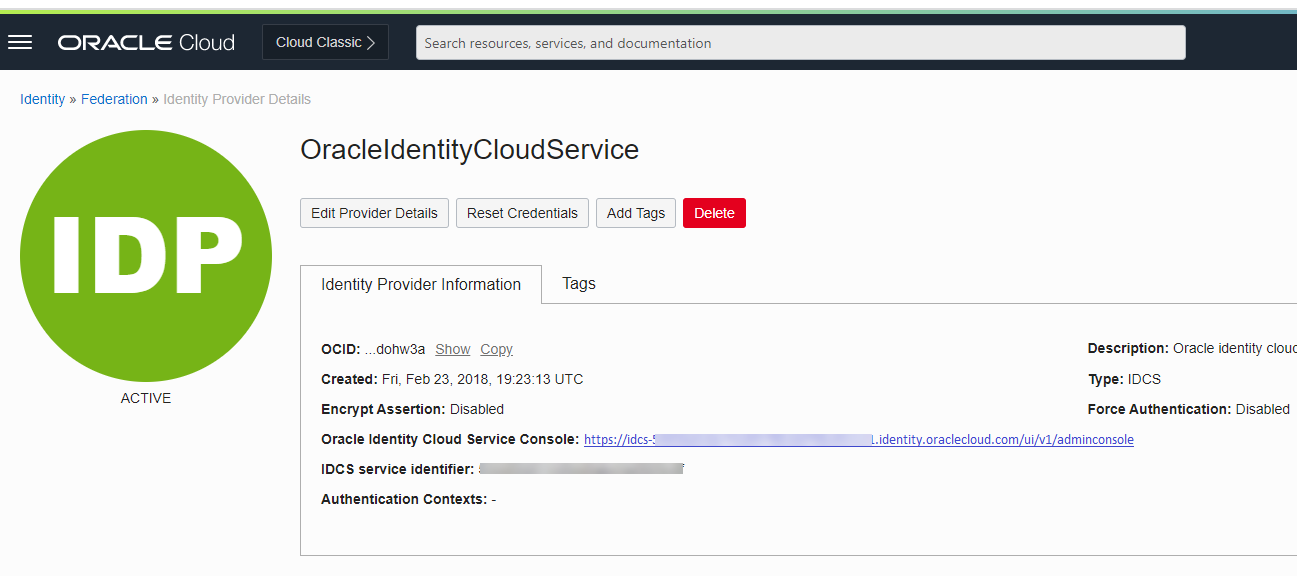
- Identify IDCS console URL: See Determining the IDCS Console URL for more information.
Retrieving IDCS Instance details
You can obtain the IDCS instance details by inspecting any of the IDCS URLs. For instance, you can inspect the IDCS login URL which you receive in the email when you are added as a user in IDCS. For example, consider the following sample IDCS cloud account login URL:
https://idcs-54656e616e742d4578616d706c652121.identity.oraclecloud.com/ui/v1/signin
- IDCS tenant: idcs-54656e616e742d4578616d706c652121
- IDCS host: identity.oraclecloud.com
- Determining the IDCS Console URL
OCI tenancies include a default IDCS instance and you can obtain the IDCS console URL using the OCI console.
Parent topic: Enabling IDCS as Identity Provider in Spatial Studio
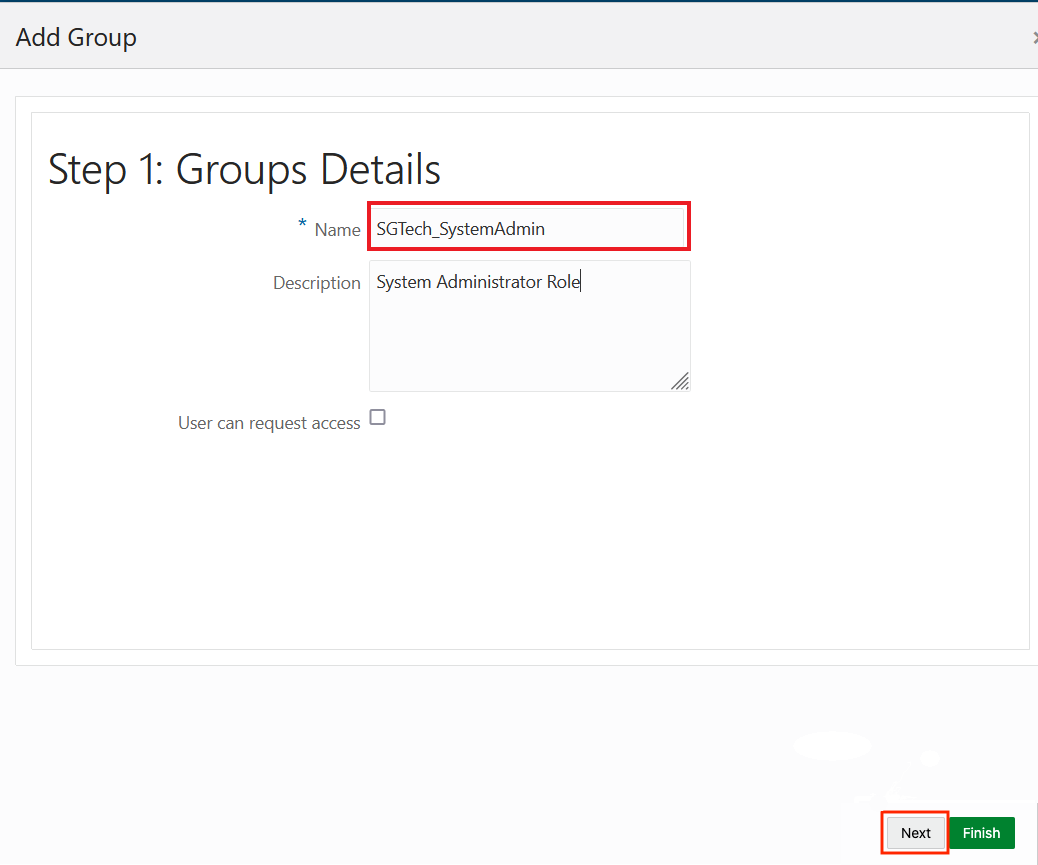
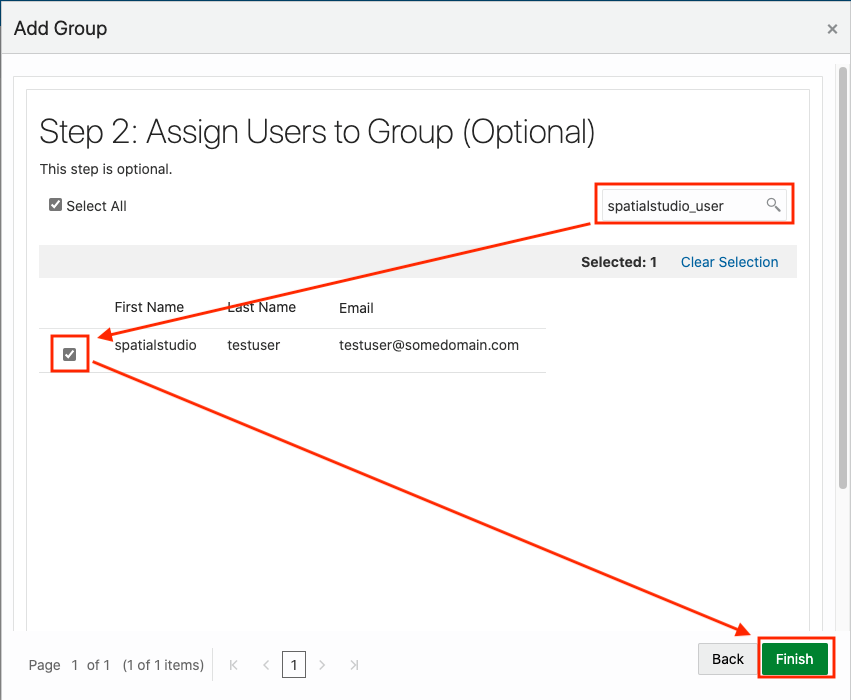
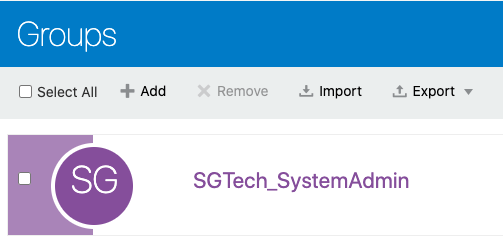
2.8.2 Adding Spatial Studio Role as a Group in IDCS
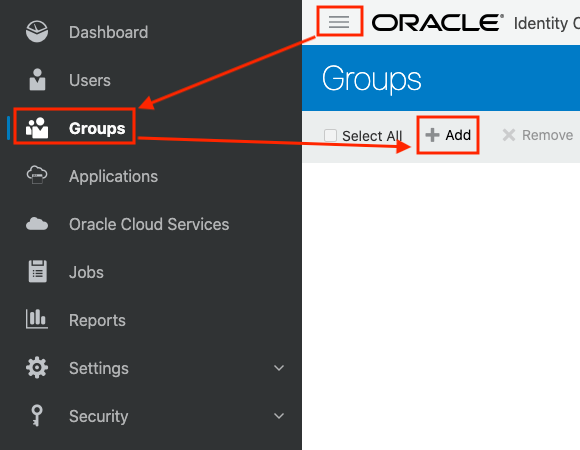
You must add the system administrator role supported in Spatial Studio as a group in IDCS.
You need to add this role as an IDCS group. However, the following applies:
- Users assigned to this group will have admin rights in the Spatial Studio instance that is being set up.
- Users who do not belong to this group will have regular access to the Spatial Studio instance when added to the IDCS application.
Perform the following steps to create the groups in IDCS:
Parent topic: Enabling IDCS as Identity Provider in Spatial Studio
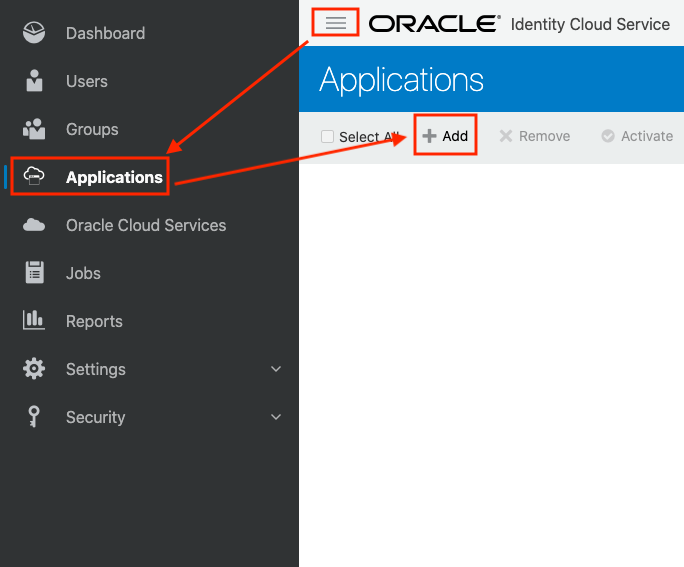
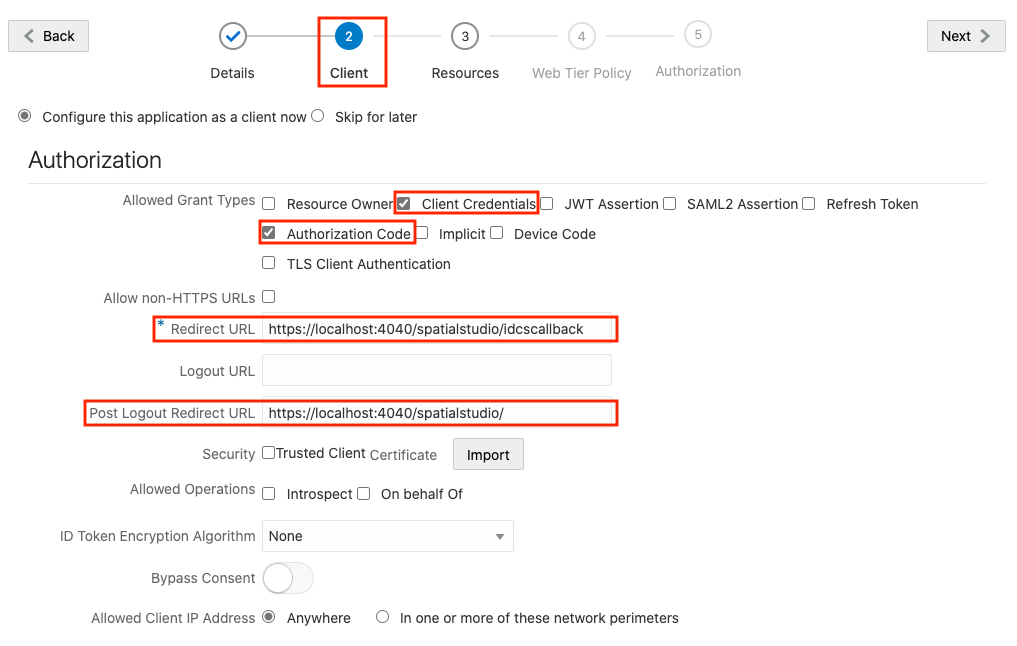
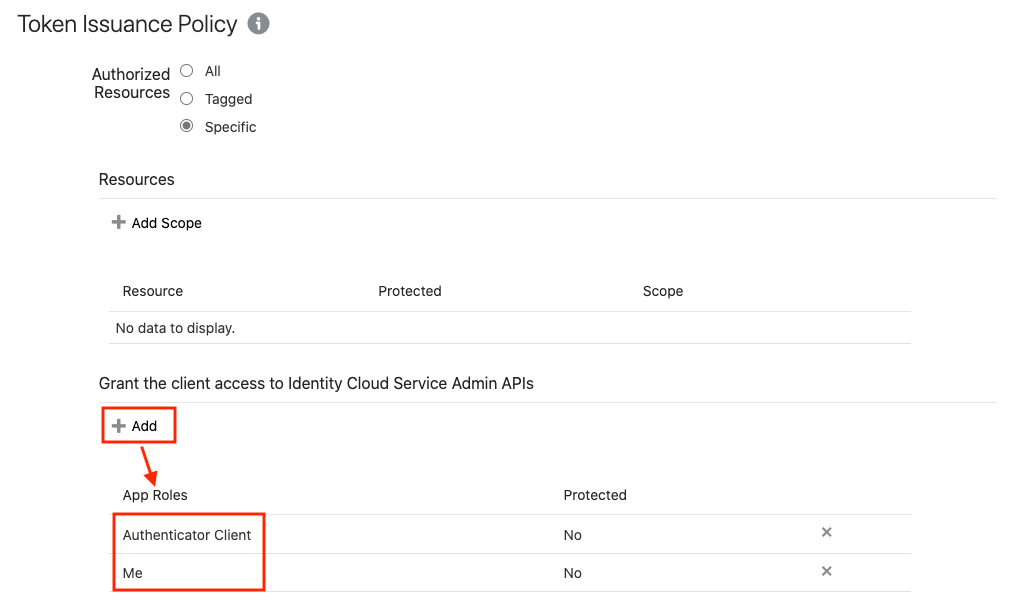
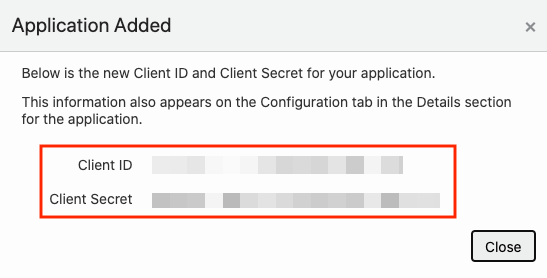
2.8.3 Creating an Application in IDCS
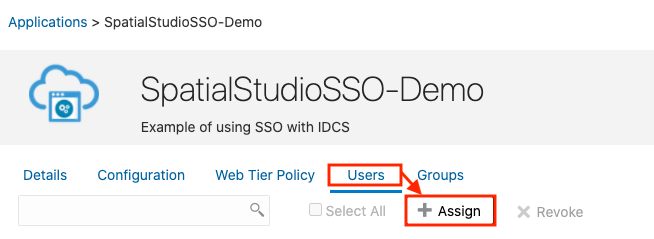
This section describes the steps to add the Spatial Studio application in IDCS.
Parent topic: Enabling IDCS as Identity Provider in Spatial Studio
2.8.4 Copying IDCS Settings into Spatial Studio's Configuration File
To integrate Spatial Studio with IDCS, you must add the IDCS settings
into the sgtech_config.json configuration file.
~/.sgtech/sgtech_config.json
path. You can directly append the IDCS settings into the
sgtech_config.json file. However, the best practice is
to have the IDCS settings in a separate configuration file and then import this file
into the main configuration file.
sgtech_config.json:
Parent topic: Enabling IDCS as Identity Provider in Spatial Studio
2.8.5 Testing IDCS Login
After all the setup steps are completed, you can test and verify the IDCS login.
Parent topic: Enabling IDCS as Identity Provider in Spatial Studio
2.9 Mapping External User Principals to Built-In Spatial Studio Roles
Spatial Studio supports mapping IDCS and other identity provider principals to the Spatial Studio built-in roles. This enables dynamically granting permissions to users by using custom groups, for instance.
~/.sgtech/sgtech_config.json path. You can directly append the
security settings into the sgtech_config.json file. However, the
best practice is to have the security settings in a separate configuration file and then
import this file into the main configuration file.
sgtech_config.json:
Parent topic: Administering Oracle Spatial Studio
