Downloading and Installing Spatial Studio
Spatial Studio must be downloaded and installed before anyone can use it to perform interesting work on spatial data.
See https://www.oracle.com/database/technologies/spatial-studio/get-started.html for more information on downloading and installing Spatial Studio.
The different types of installation options are described in the following sections:
Installing and Configuring the Spatial Studio Quick Start
Quick Start is an easy method for getting started, and is well suited for personal and development use.
Before installing the Quick Start, ensure that you meet the following prerequisite requirements:
- You must have Java installed on your system and the
JAVA_HOMEenvironment variable is pointing to the full JDK installation of Java SE Development Kit. Note that the Quick start installation requires Java JDK 11 (64-bit) or later. - Ports
8080and4040on your system are not being used by any other (web) applications. Port8080is used with thehttp://protocol, while port4040is for thehttps://protocol. Although you can direct Spatial Studio to use different ports,8080and4040are the default.Note that by default Spatial Studio allows access using
httpsonly.If you prefer to enable
httpaccess, then perform the following steps:- Edit the
conf/server.propertiesfile in theOracle_Spatial_Studiodirectory and update thehttpEnabledproperty totrue. - Edit the
sgtech_config.jsonfile and update thehttps_onlyproperty tofalse(see Changing the Configuration Using the sgtech_config.json File). - Restart the Spatial Studio application.
- Verify that the
httpport is opened in the host OS firewall.
- Edit the
You can perform the following steps to install and configure the Spatial Studio Quick Start:
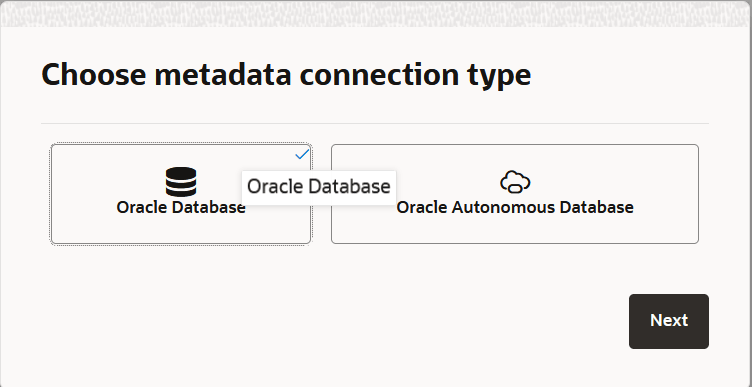
- Optionally, select the metadata connection type.
Perform this step only if you are starting a new instance of Spatial Studio on your system. This step is required to set the metadata repository in the database where Spatial Studio stores and manages the metadata for all its objects (such as the connections, dataset, and so on). See Setting Up the Spatial Studio Metadata Schema for more information on the metadata schema and the privileges required for the schema user.
Perform the following steps depending on your choice of Metadata connection type:
- Oracle Database
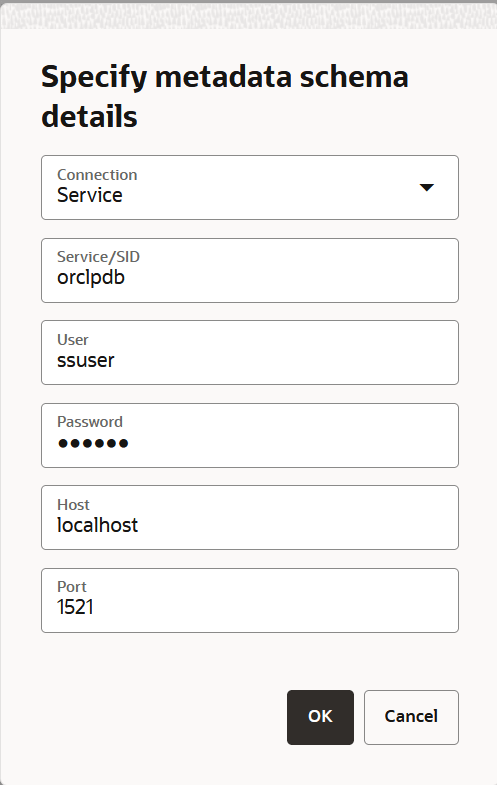
The Specify metadata schema details dialog opens as shown:
Figure 2-2 Metadata Schema Connection to Oracle Database
- Select the database
Connection.
Supported values are:
- Service
- SID
- Enter the Service/SID value depending on the connection value selected in the earlier step.
- Enter the database User name and the Password for the user.
- Enter the Host and Port details.
- Click OK.
- Select the database
Connection.
- Oracle Autonomous Database
The Upload wallet dialog opens.
- Drag and drop the wallet file (for your Autonomous AI Database instance) or click to upload the wallet from your system.
- Click OK.
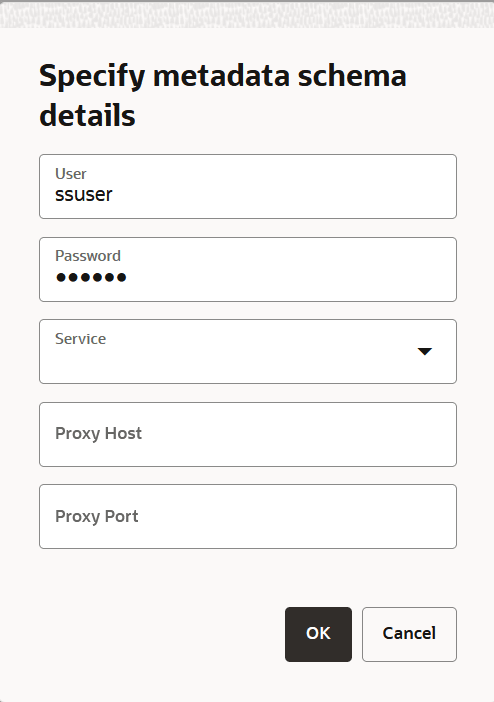
The Specify metadata schema details dialog opens as shown:
Figure 2-3 Metadata Schema Connection to Autonomous AI Database
- Enter the Autonomous AI Database User name and the Password for the user.
- Select the appropriate Service from the drop-down list.
- Optionally, enter the Proxy Host and Proxy Port details.
- Click OK.
The provided metadata schema details get stored in the
sgtech_config.jsonfile. The Getting Started page opens in the web application. See Using Oracle Spatial Studio to get started with Spatial Studio. - Oracle Database
Installing Spatial Studio on Oracle WebLogic Server
Spatial Studio can be deployed to an Oracle WebLogic Server 15c (15.x) domain. This is the recommended approach when multiple end users will access the same Spatial Studio application.
Note:
- A WebLogic Server license is required in order to host Spatial Studio in WebLogic Server for multiple end users.
- For WebLogic Server 15c, use the WebLogic Remote Console desktop
application to deploy and manage Spatial Studio. The
built-in WebLogic Server Administration Console at
host:7001/consoleis no longer used for WebLogic Server 15c.
The general approach for deploying Spatial Studio to WebLogic Server is no different from deploying any other Java EE EAR application. However, for a WebLogic Server 15c instance, deployment and life cycle operations are performed from WebLogic Remote Console.
- Download and install WebLogic Remote Console, if it is not already installed.
- Download the Studio EAR archive from Oracle Technical Resources or eDelivery, and save it to your local system.
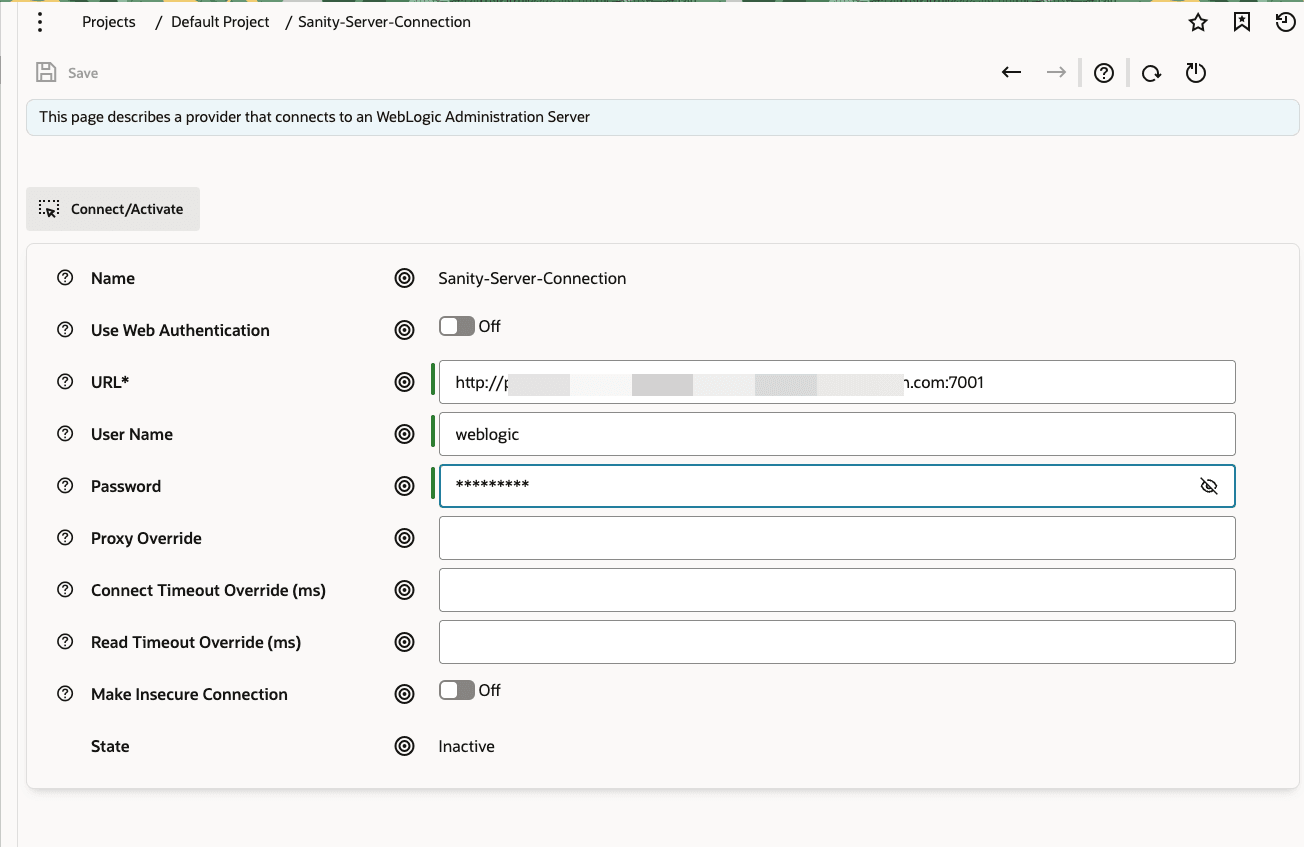
- Create a connection to the target WebLogic Server 15c
domain in WebLogic Remote Console.
If you do not already have a target domain, install WebLogic Server 15c, create a domain such as
base_domain, and then connect to it from WebLogic Remote Console.Figure 2-4 Creating a WebLogic Server Connection
- Create an application deployment using the Spatial Studio
EAR file.
- Select the connection for the target domain in WebLogic Remote Console.
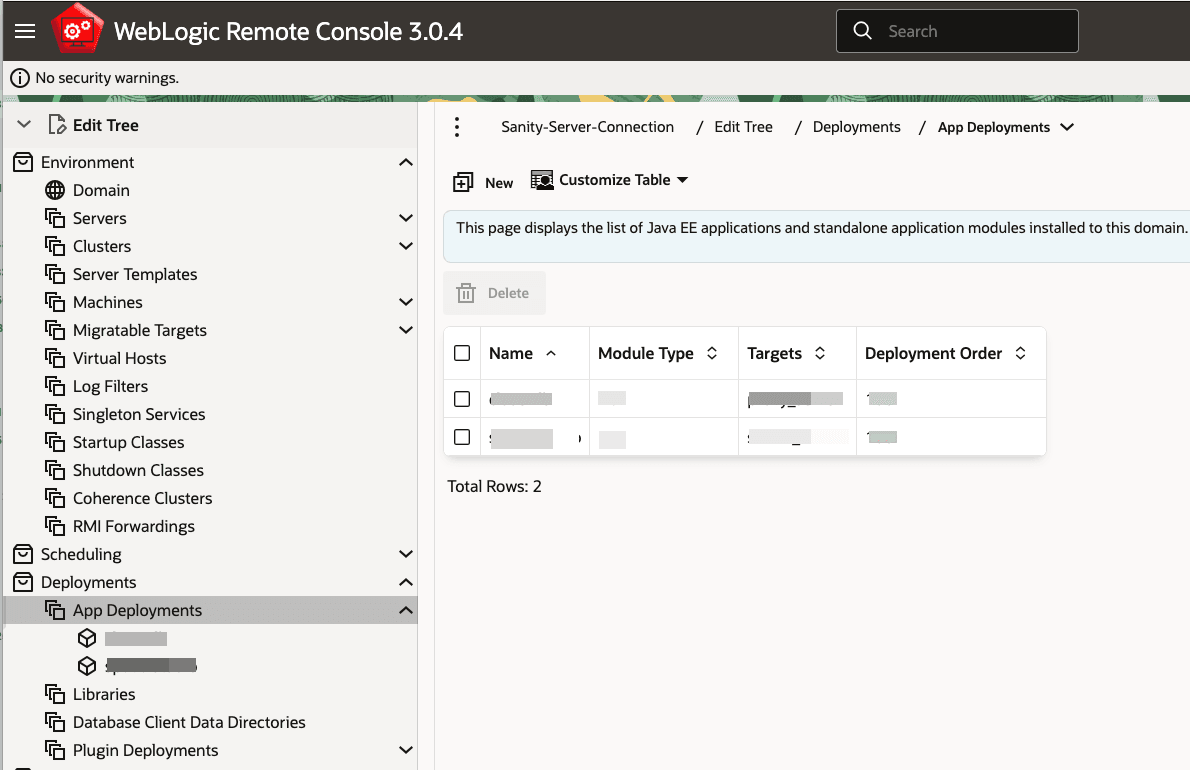
- Go to Edit Tree >
Deployments >
App Deployments.
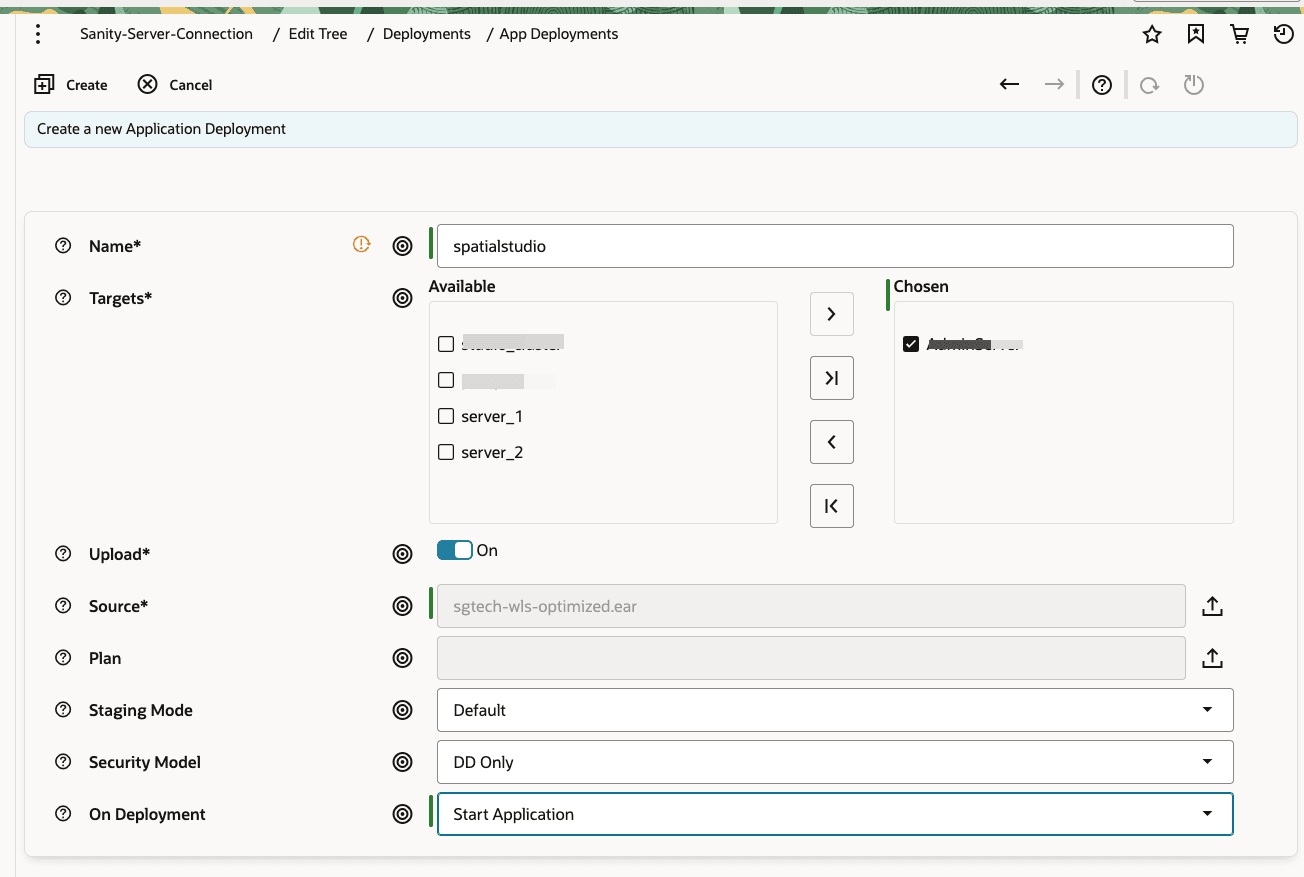
- Select or upload the EAR file, choose the
appropriate target server, and complete the
deployment form as shown in the following figure.
Figure 2-6 Creating a Spatial Studio Deployment
- Click Create.
The deployment gets added as an item in the shopping cart displayed on the top right of the page.
- Open the shopping cart and click
Commit Changes to deploy
the Spatial Studio application.
If On Deployment is set to Start Application, as shown in the preceding figure, then WebLogic Server automatically starts Spatial Studio after the deployment is complete. Otherwise, follow step-5 to manually start the application.
- Perform this step only if you need to manually start
Spatial Studio.
- Navigate to Monitoring Tree > Deployments > Application Deployment.
- Select the deployed Spatial Studio application and click Start.
- Access Spatial Studio using the WebLogic Server's URL
followed by the
/spatialstudiocontext path, such ashttp://localhost:7001/spatialstudio.
Preventing a Spatial Studio Admin User from General WLS Administration
If you want to prevent a Spatial Studio administrative user from performing other general WebLogic Server administrative operations, follow the instructions in this topic.
The Spatial Studio application by default allows all WebLogic managed admin users (those who are in WebLogic’s Administrators group) to log into the Spatial Studio application and assume Admin role inside the Spatial Studio application as well.
However, in some scenarios, your organization may not want to provide the WebLogic Server admin account information to the user(s) that will be administering only the Spatial Studio application. In such cases, the WLS system administrator can create a new WLS group with the id value of “SGTech_SystemAdmin” in the default WLS security realm. Then, either create a new user or assign an existing non-WLS-admin user to this group. From then on, this user will assume the admin role of the Spatial Studio whenever logged in, but will not be able to administrate the WLS server in general.
Also, note the following:
- All WLS managed users will be able to log into Spatial Studio by default, but they will be limited to accessing only their own Spatial Studio objects such as connections, datasets, and projects.
- Administrative users of Spatial Studio will have full access to every Spatial Studio object created by everyone.
- When using WebLogic's default embedded LDAP security realm as identity provider, if the user name and the assigned application role name differ only by casing (for example, admin and Admin respectively), then it is recommended that you adjust both the names to lowercase. This is to avoid case sensitivity issues in Spatial Studio between user, group, and security policies.
Installing Spatial Studio on Apache Tomcat
You can deploy and run the Spatial Studio web application on Apache Tomcat version 11.x.
About the Spatial Studio WAR Archive for Tomcat
You must download the spatialstudio_tomcat.war archive for
running Spatial Studio on Tomcat.
This archive file bundles all the required dependencies that enables it to run on a freshly downloaded and installed Tomcat instance.
It is important to note the following:
- You must rename the
spatialstudio_tomcat.warfile tospatialstudio.warwhen it is placed in the Tomcat’s webapps directory. This is because Tomcat uses the file name as the web application’s context root, and for Spatial Studio it is typically /spatialstudio. - If you have an existing Tomcat installation with other web applications running on it or different versions of the dependency libraries are already installed, then there might be issues running Spatial Studio due to library and version conflicts. In such cases, you can raise a service request with My Oracle Support in order to have the issues resolved.
Configuring Tomcat Users for Spatial Studio
In order to run Spatial Studio on Tomcat, you need to configure at least one Tomcat user who can act as the administrator for Spatial Studio.
Note that when you access the Spatial Studio web application, the
username and password that you enter in the login
page are passed to Tomcat for authentication. Once the user is authenticated, Spatial
Studio inspects the result principal. If the principal has a role named
SGTech_SystemAdmin, then the logged in user will be considered an admin user
for Spatial Studio.
If your Tomcat instance has already been configured to provide authentication using an external identity provider, then ensure one or some of the users provided by the external identity provider are assigned the SGTech_SystemAdmin role so they can administrate Spatial Studio.
If your Tomcat installation relies on its simple built-in user management
mechanism, then you will likely be adding the role and user to
tomcat-user.xml configuration file, which is found in the
<TOMCAT_HOME>/conf directory.
The following simple example defines two users and two roles, with one being
SGTech_SystemAdmin in tomcat-user.xml configuration
file:
<role rolename=”role1”/>
<role rolename="SGTech_SystemAdmin"/>
<user username="admin" password="Welcome1" roles="manager-gui, manager-script, SGTech_SystemAdmin"/>
<user username="scott" password="Welcome1" role="role1"/>
Once the roles are defined, then you can log into Spatial Studio using either the user name scott or admin. Since the admin user has the SGTech_SystemAdmin role, the user will be able to administrate Spatial Studio once logged in, whereas scott user will just be a regular Spatial Studio user.
Installing Spatial Studio from Oracle Cloud Marketplace
You can provision Spatial Studio to Oracle Cloud from Oracle Cloud Marketplace.
See Deploy Spatial Studio from Cloud Marketplace for more information on deploying Spatial Studio from Cloud Marketplace.