1 About Oracle Database Actions
Oracle Database Actions is a web-based interface that uses Oracle REST Data Services to provide development, data studio, administration and monitoring features for Oracle Autonomous Database.
The main features include executing your SQL statements and scripts, creating Data Modeler diagrams, developing RESTful web services, managing JSON collections, and using the Data Load, Catalog, Data Insights, Business Models, and Data Transforms tools to load data from local and remote sources, view data in your tables and views, view objects in your data dictionary, and organize, analyze, and transform your data.
Note:
Some features are only available if you sign in as a user with database administration rights. For such features, a "restricted availability" statement appears at the start of the feature description. For example:
Available only if you signed in as a database user with administrator rights.
Database Actions is also available for download and deployment in your own on-premises Oracle Database or in customer-managed Oracle Database cloud services. For more information, see Oracle Database Actions for On-Premises Oracle Database.
See Also:
-
Creating or Editing a User for creating users and assigning roles.
About the Database Actions User Interface
This section describes the Database Actions user interface.
The Database Actions user interface has three components:
-
The Header at the top
-
The page body, whose content varies depending on which page you are viewing
-
The Status Bar at the bottom
Header
The header contains the Selector icon, a Search field, the help icon, and the user drop-down list.
-
Selector Icon
Click the Selector icon
 to see the main navigation menu slide into view. Click Oracle
Database Actions in the header to go to the Launchpad page.
-
Search field
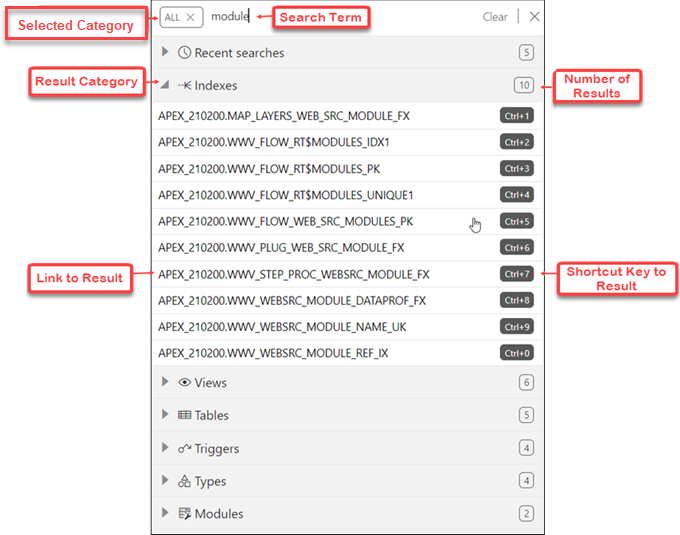
To enter a search term, click in the Search field or use the shortcut key Ctrl+K (Command+K for Apple computers). For more information, see Using the Omnisearch Bar.
-
Help Icon
Click the help icon to open the contextual or online help for the page you are viewing.
-
User Drop-Down List
The user drop-down list shows the database user you are signed in as, and provides the following items when you open it:
-
Preferences
The options are:
Region
- Language: Select one of the following languages for the user interface: English, German, Spanish, French, Italian, Japanese, Korean, Portuguese, and Chinese
- Timezone: Select UTC or Local time zone from the drop-down list.
Code Editor
Provides global settings that apply to the code editor, such as theme, indentation, font family and line numbers.
Worksheet
-
SQL History: Controls whether the history of commands executed in the code editor is enabled in the browser or not.
-
Log: Opens a dialog that shows the list of HTTP calls made during your session.
-
About: Opens a dialog providing version information for the database and other components as well as copyright and licensing information.
-
Sign Out: Signs you out of your database session.
-
Status Bar
The status bar contains icons that link to log files. The three icons (Errors, Warnings, Processes) are filters that have been applied to the log file.
![]()
Description of the illustration statusbar.png
Errors, Warnings: Displays an Errors or Warnings dialog, which lists log entries from unsuccessful REST calls or from any other problem in the application.
Processes: Displays a Processes dialog, which logs REST calls that are either finished or ongoing.
Log notification link: Displays a Log dialog, containing log entries of the following types: Errors, Warnings, Processes, SQL History and SQL Result.
Using the Omnisearch Bar
You can access the Omnisearch bar (Search field) in the header from any page in Database Actions.
To enter a search term, click in the search field located at the top right of the header, or use the shortcut key Ctrl+K (Command+K for Mac OS systems).
In the Omnisearch bar, you can filter the search entry by selecting a category (such as tables, views, templates, and so on) from the displayed list.
If you do select a category, you will then need to enter the exact search term.
If you do not select a category, ALL is selected by default. After you enter the search term, a search is performed across all categories. In some cases, the search term is searched across multiple attributes of a category. The following table lists the attributes that are searched for each category:
| Category | Attribute |
|---|---|
|
Tables |
Name |
|
Views |
Name |
|
Indexes |
Name |
|
Packages |
Name |
|
Functions |
Name |
|
Procedures |
Name |
|
Triggers |
Name |
|
Types |
Name |
|
Sequences |
Name |
|
Charts |
Name, Comments, URI_Prefix |
|
Dashboards |
Name, Comments, URI_Prefix |
|
Modules |
Name, Comments, URI_Prefix |
|
Templates |
Comments, URI_Prefix |
|
Handlers |
Comments |
|
Roles |
Name |
|
Privileges |
Label, Name, Comments, Description |
|
OAuth Clients |
Name, Description |
|
Database Users |
Username, Alias (alias is used depending on user permissions) |
|
APEX Workspaces |
Workspace, Workspace display name |
Displaying Results for the Search Term
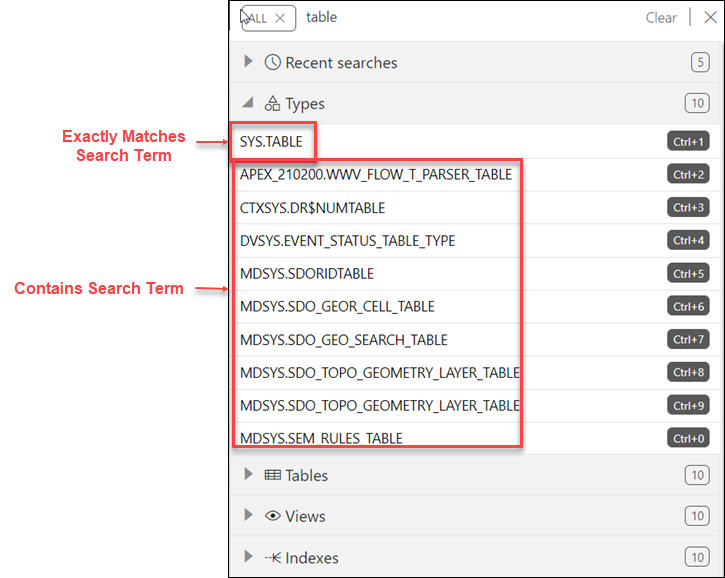
In the results displayed, categories are sorted based on the following criteria:
- Number of exact matches
- Most number of matched items
The results within a category are displayed as two groups. The first group consists of items that exactly match the search term. The second group consists of items that contain the search term but do not start with it. Within each group, the items are sorted alphabetically.
You can quickly access previous search terms using the Recent Searches list.
Accessing Database Actions
Database Actions runs in Oracle REST Data Services and access to it is provided through schema-based authentication. To access Database Actions, you must sign in as a database user whose schema has been enabled for Database Actions.
In Oracle Autonomous Database databases, the ADMIN user is pre-enabled. To enable another database user's schema, see Enabling User Access to Database Actions.
Enabling User Access to Database Actions
To enable a database user to access Database Actions, run the following code as the ADMIN user:
BEGIN
 ords_admin.enable_schema(
  p_enabled => TRUE,
  p_schema => 'schema-name',
  p_url_mapping_type => 'BASE_PATH',
  p_url_mapping_pattern => 'schema-alias',
  p_auto_rest_auth => NULL
 );
 commit;
END;
where:
schema-nameis the database schema name in all-uppercase.schema-aliasis an alias for the schema name that will appear in the URL the user will use to access Database Actions. Oracle recommends that you do not use the schema name itself as a security measure to keep the schema name from being exposed.
After enabling user access, in the Autonomous Database Details page, click Database Actions. The Database Actions Launchpad page appears.
The Home Page - Launchpad
The Launchpad page for Database Actions can now dynamically display categories and features based on whether you are logged in to an on-premises, Autonomous Database or OCI environment. For on-premises, the main categories displayed are Pinned and Recently Visited, Development, Administration and Monitoring. For Autonomous Database, additional categories displayed are Data Studio and Downloads. Descriptions for features belonging to these categories are provided below.
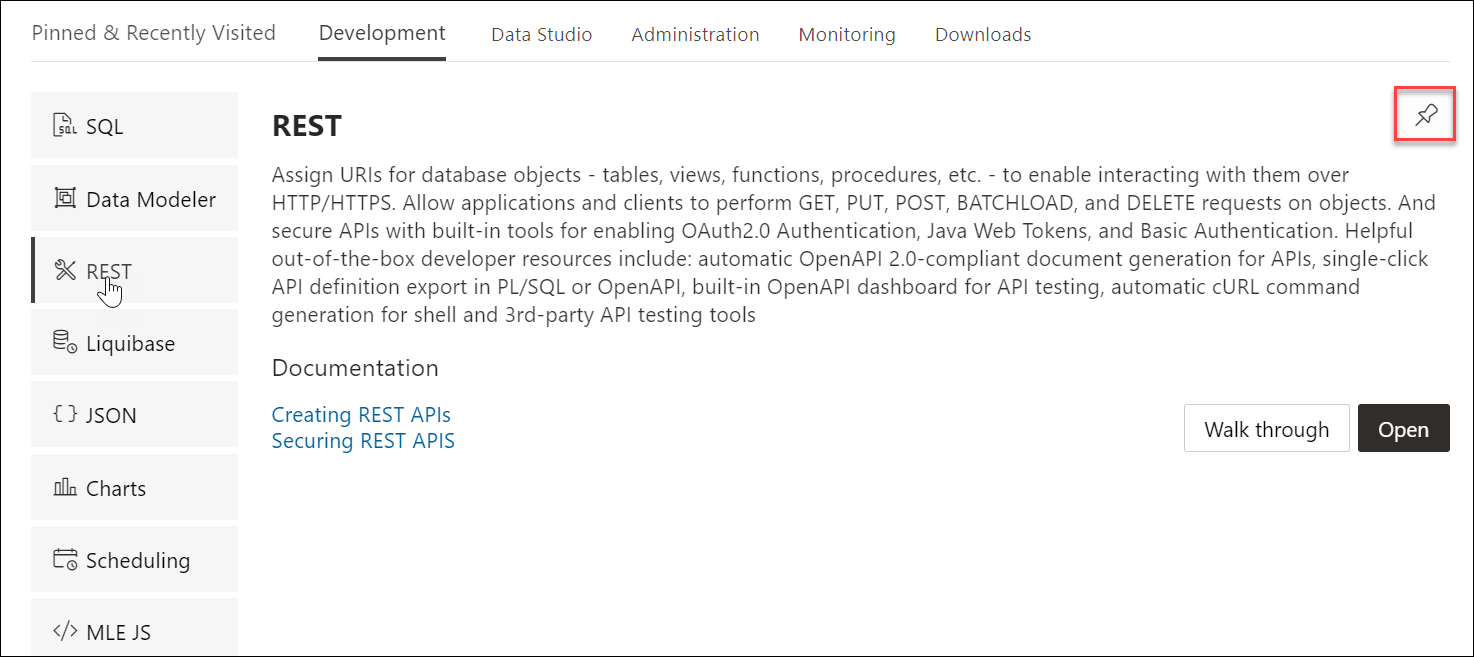
The first time you log in, the Development tab is displayed by default. All features that pertain to the Development category are displayed vertically on the left side of the screen. When you hover over a feature name, its description is displayed on the right along with links to specific documentation pages. A new feature is highlighted with a blue label.
In Pinned & Recently Visited, Pinned lists all features that you have pinned (saved). To pin a feature, click the Pin icon displayed on the top right of the feature description. There is no limit on the number of features that can be pinned. Recently Visited lists the last seven features that you have accessed.
To navigate to a specific feature such as the REST pages, click REST on the left or click Open in the feature description part.
The following is a description of each feature displayed on the home page.
Development
-
SQL: Enter and execute SQL and PL/SQL commands, and create database objects. See The SQL Page
-
Data Modeler: Create diagrams from existing database schemas, generate DDL statements, and create reports. See The Data Modeler Page
-
APEX: Link to the Oracle Application Express sign-in page. Application Express is a rapid web application development platform for the Oracle database. See Oracle Application Express documentation
-
REST: Develop RESTful web services and ensure secure access. See The REST Pages
-
Liquibase: View changelogs for your schema. See The Liquibase Page
-
Charts: Create charts and dashboards containing multiple charts using SQL queries. See The Charts and Dashboards Page
-
JSON: Manage and query JSON collections. JSON is available only if you are signed in as a database user with the SODA_APP role. See The JSON Page
-
Scheduling: Provide details of scheduled jobs, chains, programs and schedules. See The Scheduling Pages
-
Oracle Machine Learning: Link to the Oracle Machine Learning sign-in page. See Creating Dashboards, Reports and Notebooks
-
Graph Studio: Link to the Autonomous Database sign-in page. See Using Oracle Graph with Autonomous Database
Administration
Administration is available only if you are signed in as a database user with administrator rights.
-
Database Users: Perform user management tasks such as create, edit, and REST enable users. See The Database Users Page
-
Data Pump: Monitor Data Pump jobs initiated through the available Database API endpoints, the DBMS_DATAPUMP package, or the SQL Developer Data Pump Export and Import wizards. See The Data Pump Page
-
APEX Workspaces: Create and manage APEX workspaces. See Creating Applications with Oracle APEX
-
Download Client Credentials: Download and use the wallet file to securely connect your existing tools and applications to Autonomous Database. See Download Database Connection Information
-
Set Resource Management Rules: Set resource management rules to allocate CPU/IO shares to consumer groups and to cancel SQL statements based on their runtime and amount of IO. See Manage Runaway SQL Statements on Autonomous Database and Manage CPU/IO Shares on Autonomous Database
Monitoring
Monitoring is available only if you are signed in as a database user with administrator rights.
-
Monitor database activity and performance using various tools. See The Monitoring Pages
-
Performance Hub: Shows the performance data for the specified time period. See The Performance Hub Page
-
Database Monitor: Provides information about the performance of an Autonomous Database instance. See The Database Dashboard Page
Downloads
-
Download Oracle Instant Client: Link to the Oracle Instant Client page on OTN. See Import Data Using Oracle Data Pump on Autonomous Database
-
Download SODA Drivers: Link to the Oracle JSON Document Database page on OTN. See Simple Oracle Document Access (SODA)
-
Download Microsoft Excel/Google Sheets Add-In: Opens a Download screen with Microsoft Excel and Google Sheets tabs. Click the Download icon in the Microsoft Excel tab to download the Oracle Autonomous Database Add-in for Excel. Click the Download icon in the Google Sheets tab to download the Oracle Autonomous Database Add-in for Google Sheets.The individual tabs consists of instructions to install the respective add-ins for the database. See Oracle Autonomous Database Add-in for Excel and Oracle Autonomous Database add-on for Google Sheets for more details on this.
Related Services
-
RESTful Services and SODA: Oracle REST Data Services (ORDS) provides HTTPS interfaces for working with the contents of your Oracle Database in one or more REST enabled schemas.. See Developing RESTful Services in Autonomous Database
-
Oracle Machine Learning RESTful Services: Oracle Machine Learning provides REST APIs for OML4Py Embedded Python Execution and OML Services.
-
Oracle Database API for MongoDB: Oracle Database API for MongoDB enables Mongo-DB compatible clients and drivers to connect directly to Autonomous Database. See Using Oracle Database API for MongoDB
About Session State in Database Actions
In Database Actions, a connection to the database is stateless.
In a stateless environment, each HTTPS request from a client maps to a new database session. Therefore, a session begins and ends with every SQL statement or script execution.
As the session state is not maintained, session attributes do not persist and commands such as ROLLBACK and COMMIT do not apply. If a SQL statement or script executes successfully, an implicit commit is performed. If it executes with an error, an implicit rollback is performed.
Therefore, when needed, include the ROLLBACK and COMMIT commands or session attributes in the PL/SQL code block that is sent to the database for a session.
The only configuration commands that persist during a session in Database Actions are:
SET DEF[INE] <ON|OFF|prefix_character>SET ESC[APE] <ON|OFF|escape_character>SET TIMI[NG] <ON|OFF>
Enabling Detailed Request Error Messages for a Specific Schema
To set this up, run the following code block:
Note:
You need theORDS_ADMINISTRATOR_ROLE to run this code
block.
begin
ords_admin.set_property(
   p_schema => 'HR',
   p_key => 'debug.printDebugToScreen',
   p_value  => 'true'
);
end;
/
Subsequently, any user request that produces an error response will include a detailed message, including a stack trace.
After debugging, turn the schema-level configuation off by setting the
parameter to false.
Note:
This setting must not be enabled on productions systems due to the risk of sensitive information being revealed to an attacker.

