23.4 Consume Share
Once the providers share the objects, there are a few steps the recipients need to follow to consume the share.
- Consume Share Overview:
To consume data shares, you need to subscribe to them and create views of tables included in the share.
- Consume Versioned Share:
As a recipient, you will need to download your share profile, subscribe to the data share provider, register the shares and create external tables on top of your shares. The Data Share tool authorizes the access using the JSON profile sent to the recipient using the activation mail. After the access is granted, the Data Share tool links the shared objects with the Data link tool where the consumer can run the data link job and access the objects shared by the provider.
- Consume Live Share:
This lets you as a recipient to consume live data from the database.
- View Share Provider Entity Details:
Use the Actions icon at the right of the live share or delta share provider entity entry to view details about the live share or delta share provider entity you create.
23.4.1 Consume Share Overview
The Consume Share page provides an overview of the list of share providers, with options to search for and add share providers.
- On the Data Studio menu, select Consume Share under the Data Share menu.
- On the Data Share page, click the Consume Share widget present in the Provider and Consumer section.
The Consume Share page contains: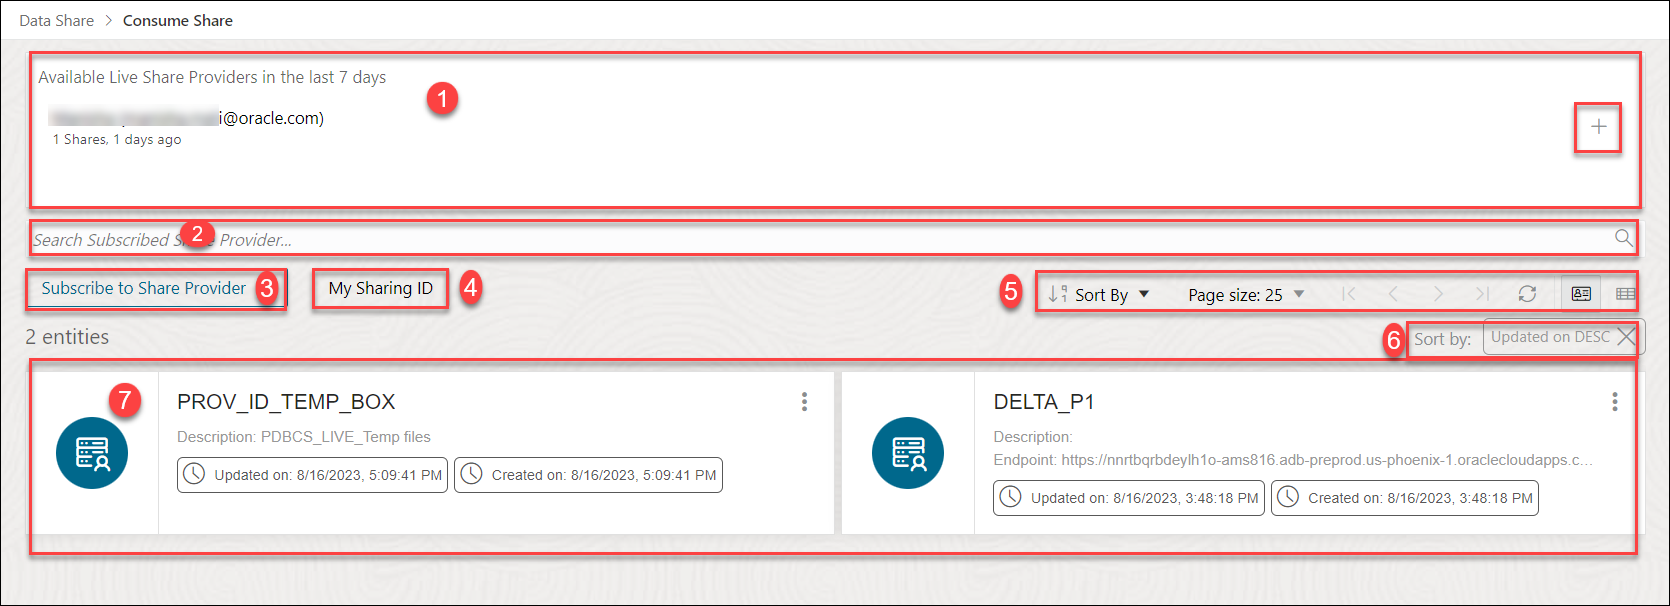
Description of the illustration consume-share-new.png
- Available Live Share Providers in the last 7 Days
This area displays the list of available Live Share Providers you create in the last 7 days. You can update any of the fields as per your wish. You can also subscribe to Live Share using the + sign to the right of Shares listed in Available shares in the last 7 days.
-
Search Subscribed Share Provider field
You can search for the Share Recipient you create by entering the name of the Subscribed Share Provider. Enter the name of the Subscribed Share Provider, for example, REVIEW_PROVIDER and click the magnifier icon to complete the search. The Share tool displays the search results in the display area.
- Select + Subscribe to Share Provider to subscribe to a new Share Provider. See Subscribe to Share Provider for exploring this icon.
- My Sharing ID
A Sharing ID is a unique provider for your Autonomous Database. Copy this ID to the clipboard and paste it in the Sharing ID field of the Create Share Recipient wizard. This enables a Live Share to be shared with a share provider.
- Toolbar
The toolbar consists of the sort by, page size, refresh and entity view options.
- Sort by settings
When you set sorting values by using the Sort By control in the toolbar, the settings are displayed in small boxes beneath the toolbar. You can delete a setting by clicking the X icon in the box. Or you can change the settings by returning to the Sort By control in the toolbar.
-
Display area
The area beneath the Search Consumer Share Providers field displays the entities returned by a search and that match the filter criteria set in the Filters panel. You can sort the entities by clicking the Sort By button and then setting sort values.
23.4.2 Consume Versioned Share
You must follow these steps to make shared versioned data available to you within Oracle Autonomous Database. Data shared with you through Delta Sharing is not automatically available and discoverable in your Autonomous Database.
- Download JSON profiles
- Subscribe to the data share provider
- Register the shares made available to you
- Create external tables for your shares
About JSON Profiles
Delta Sharing Profiles helps you to connect to a share provider and access a Delta Sharing Server. The profile information is stored in a zip file containing the client credentials in JSON format. To access the share data, you must register the shared objects using an authorized JSON profile. You can then use the JSON profile for authenticating with a Delta Sharing Server and access the available data shares.
Download JSON Profiles
When the Share Tool creates a share object, the recipient receives an email notification with a link to download the Delta Sharing Profiles. You can also download the JSON profiles from the Database Actions console:
-
On the Provide Share page, click the three dots next to a recipient and select Copy Profile Activation Link to Clipboard.
-
Open the link in a web browser to access the Delta Profile Download page.
-
Click Get Profile Information to download a zip file containing Delta Sharing JSON profiles.
Note:
For security reasons, you can download the profile information only one time. Clicking the button twice results in failure to download the profile. For more information, see Quick Start Guide.
JSON Profile Types
The image illustrates the JSON profiles and shows how to consume Delta
Share using bearerToken and OIDC
for Databricks.
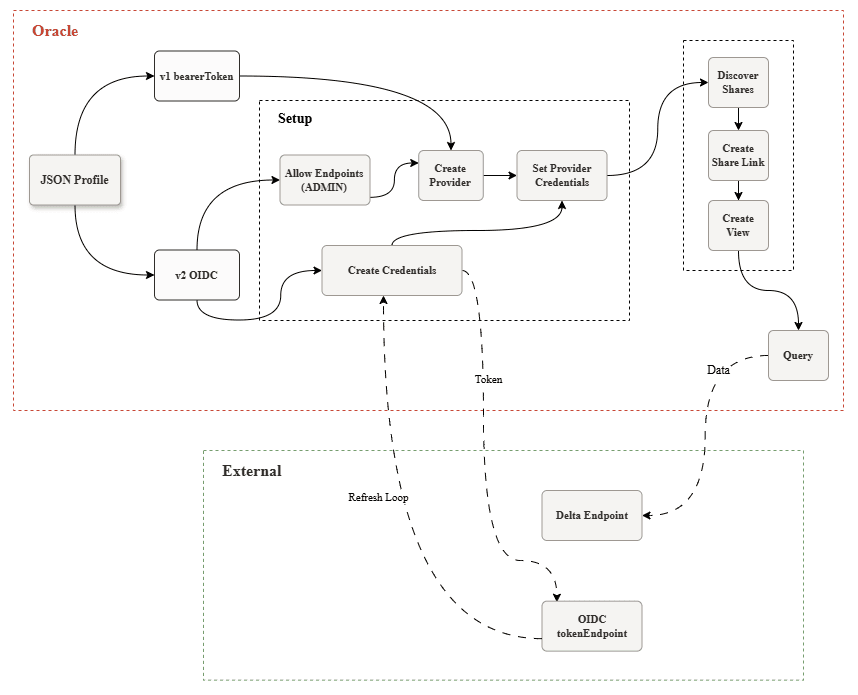
Delta Sharing supports the following profiles:
-
Profile Version 1 using bearerToken
This JSON file can include
tokenEndpoint,clientID, andclientSecretso the token can be refreshed. -
Profile Version 2 using OIDC (PL/SQL only) for Databricks Share
This JSON file contains OpenID Connect (OIDC) and OAuth client credentials, for example,
clientId,clientSecret, andtokenEndpoint. Databricks OIDC profiles useshareCredentialsVersion 2andtype oauth_client_credentialsbut do not supportbearerToken. Autonomous Database uses thetokenEndpointto get access tokens with shorter validity and refreshes them automatically.Profile version 2 provides better security because of no long-lived bearer tokens to distribute, has easier rotation of secrets, and provides more automation.
Note:
For OIDC, you must allow outbound access to the Databricks
endpoint and IdP
tokenEndpoint.
When you subscribe to a Delta Share Provider in Consume Share, you can use JSON file version 1 or version 2, or upload the zip file directly in the Share Provider JSON field.
{
        "shareCredentialsVersion": 1,
        "endpoint": "https://myhost.us.example.com/ords/prov/_delta_sharing/",
        "tokenEndpoint": "http://myhost.us.example.com:1234/ords/pdbdba/oauth/token",
        "bearerToken": "-xxxxxxxxxxxxxxxxxxxxx",
        "expirationTime": "20XX-01-13T07:53:11.073Z",
        "clientID": "xxxxxxxxxxxxxxxxxxxxxx..",
        "clientSecret": "xxxxxxxxxxxxxxxxxxxx.."
}-
shareCredentialsVersion: Displays the profile format version 1. -
endpoint: Specifies the base HTTPS URL of the Delta Sharing server hosted by Autonomous Database. You can call this REST endpoint to discover shares, schemas, tables, and to fetch signed URLs for Parquet files. -
tokenEndpoint: Specifies the token endpoint. The Share tool client use the token endpoint to refresh the timeout on your bearer token if you consume the share using Oracle. -
bearerToken: This is a cryptic string which the authentication server generates in response to a login request. It usually has a longer validity. -
expirationTime: This is the time taken for the authentication to expire. clientID: Specifies the public identifier the authentication server generates when you register the instance for authentication.clientSecret: Specifies a secret identifier the authentication server generates for authorization.
{
        "shareCredentialsVersion": 2,
        "endpoint": "https://myhost.us.example.com/ords/prov/_delta_sharing/",
        "tokenEndpoint": "http://myhost.us.example.com:1234/ords/pdbdba/oauth/token",
        "type": "oauth_client_credentials",
        "clientId": "xxxxxxxxxxxxxxxxxxxxxx..",
        "clientSecret": "xxxxxxxxxxxxxxxxxxxx..",
        "tokenScope": "xxxxxxxxxx"
}-
shareCredentialsVersion: Displays the profile format version 2. -
endpoint: Specifies the base HTTPS URL of the Delta Sharing server hosted by Autonomous Database. You can call this REST endpoint to discover shares, schemas, tables, and to fetch signed URLs for Parquet files. -
tokenEndpoint: Specifies the token endpoint. -
type: The authentication flow to use. Here, it is OAuth 2.0 Client Credentials Grant. clientId: Specifies the public identifier the authentication server generates when you register the instance for authentication.clientSecret: Specifies a secret identifier the authentication server generates for authorization.-
tokenScope: The OAuth scope(s) to request at token acquisition (often space‑delimited). Determines the access level granted for share discovery and data retrieval.
Note the difference in case for client IDs in both profiles. Profile 1
has clientID and Profile 2 has
clientId.
Security Enhancements
As a share recipient, you must set up an access control list
(ACL) to the share provider’s machine by using the
APPEND_HOST_ACE procedure as an ADMIN user,
or another privileged user. This allows you to access the share via
the Internet.
Note:
This must be done before using the Add Share Provider Wizard to add an access control entry (ACE) to the access control list (ACL) of the host (i.e. Share provider). You can find the host name from the JSON profile you downloaded in the previous step.
For example, if you wish to allow a database user,
A_SHARE_USER to access the endpoints on a host (Share provider)
named, here is a sample of PL/SQL procedure you will need to run in
the SQL worksheet editor as an admin. As a prerequisite, extract the
host name from the endpoint property in the delta sharing JSON
profile, as provided in the example above. The hostname from the
example is myhost.us.example.com.
BEGIN
        dbms_network_acl_admin.append_host_ace(
        host =>'myhost.us.example.com',
        lower_port=>443,
        upper_port=>443,
        ace => xs$ace_type(
        privilege_list => xs$name_list('http', 'http_proxy'),
        principal_name =>'A_SHARE_USER',
        principal_type => xs_acl.ptype_db));
        COMMIT;
        END;
/
Following are the parameters with their description:
- host- Specifies the name or the IP address of the host. The host or domain name is not case-sensitive.
- lower port- Specifies the lower port of an optional TCP port range.
- upper port- Specifies the upper port of an optional TCP port range.
- ace – The Access Control Entry.
- privilege list- Specifies the list of network privileges to be granted or denied.
- principal_name- It is the principal (database user or role) to whom the privilege is granted or denied. It is case-sensitive.
- principal_type- Specifies the type of principal you use.
Refer to the PL/SQL Packages
and Types Reference document for more details on the
DBMS_NETWORK_ACL_ADMIN package
subprograms.
PRIV_ORDS_ACL CONSTANT PLS_INTEGER := 8;Allow Outbound Access for Delta Sharing on a Private Endpoint
If the consumer Autonomous AI Database uses a private endpoint, configure outbound access before subscribing to the Delta Sharing provider and creating external tables for shared data.
Delta Sharing uses the provider endpoint and, if
present, the tokenEndpoint to discover shares and
obtain access tokens. The consumer database then reads shared
Parquet files directly from object storage by using the signed URLs
returned by the Delta Sharing server. Therefore, configure outbound
connectivity for both the Delta Sharing provider endpoints and the
object storage hosts referenced by the signed URLs.
Prerequisites
-
The consumer Autonomous AI Database uses Private endpoint access.
-
You can connect to the database as ADMIN.
-
You have the Delta Sharing JSON profile from the provider.
-
You know whether the shared files are stored behind a public storage endpoint protected by firewall or IP rules, or behind a private storage endpoint.
Configure Outbound Access
-
Connect to the consumer database as ADMIN.
-
Check the current outbound routing mode.
SELECT property_name, property_value
FROM database_properties
WHERE property_name = 'ROUTE_OUTBOUND_CONNECTIONS';
If the query returns no rows, the property is not set. In this case, outbound connections to public endpoints use the service VCN NAT gateway.
-
If
ROUTE_OUTBOUND_CONNECTIONSis not set, determine the outbound IP address used by the consumer database for public endpoints.SELECT cloud_identity FROM v$pdbs;Locate the
OUTBOUND_IP_ADDRESSfield in the JSON output.-
If the signed URLs reference a public storage endpoint protected by firewall or IP rules, add the consumer database
OUTBOUND_IP_ADDRESSto the storage service allowlist. -
If the shared files use a private storage endpoint, configure private connectivity and DNS instead of public IP allowlisting. This enables the consumer database to reach the storage account through the private network path.
-
-
Route Delta Sharing traffic through the private endpoint.
ALTER DATABASE PROPERTY
SET ROUTE_OUTBOUND_CONNECTIONS = 'ENFORCE_PRIVATE_ENDPOINT';
Note:
Oracle recommends using
ENFORCE_PRIVATE_ENDPOINTbecause it includes the restrictions ofPRIVATE_ENDPOINTand also applies them to outbound connections made by theDBMS_CLOUDpackages and external tables.When this property is set, outbound connections must comply with the private endpoint egress rules configured in the VCN security list or in the Network Security Group (NSG) associated with the private endpoint.
To restore the default behavior, run:
ALTER DATABASE PROPERTY SET ROUTE_OUTBOUND_CONNECTIONS = ''; -
Ensure that the consumer database can resolve and reach all required hosts, that is:
-
the Delta Sharing endpoint
-
the
tokenEndpoint, if present -
the object storage hosts referenced by the signed URLs returned at query time
-
Before subscribing to the share provider, create the required ACL entry for the provider host in the consumer schema.
Upload a JSON Profile to Create a Share Provider Subscription
In this process you will load the provider’s JSON profile for configuration and credentials to enable access to the recipients.
- Open the Consume Share page and click +
Subscribe to Share Provider to select
Subscribe to Delta Share
Provider from the drop-down. This opens
the Subscribe to Share Provider window.
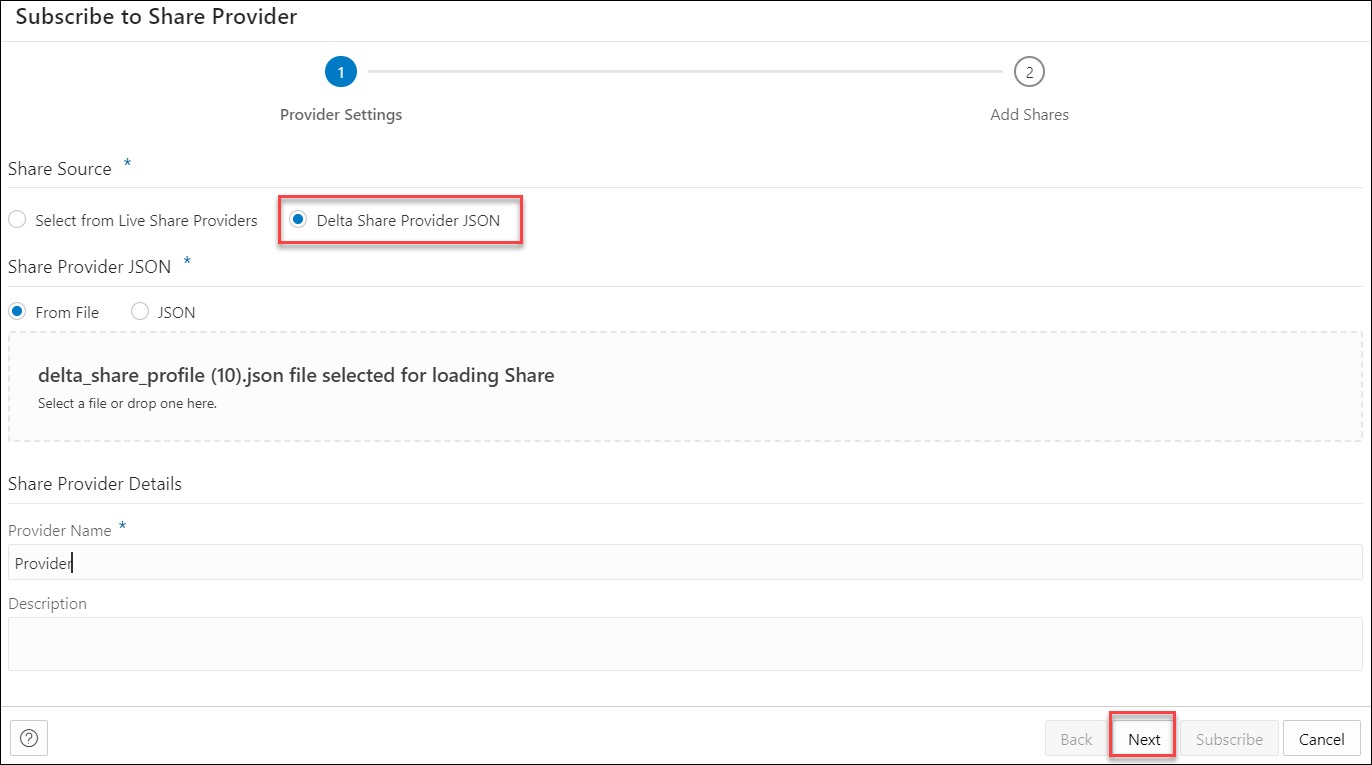
Description of the illustration subscribe-share-provider-version-providersettings.png -
Specify the following in Provider Settings:
-
Share Source: Select Delta Share Provider JSON.
-
Share Provider JSON: You can share the JSON profile using the following options-
From File: Select this option and click Delta Share Profile JSON to browse and upload the JSON profile on your system. Alternatively, you can also upload the zip file containing the JSON Profiles directly in the Share Provider JSON field.
JSON: Select this option to paste the contents of a JSON file in the provided space. Ensure that you copy the entire content including the start and end curly brackets.
-
In Share Provider Details, enter a Provider Name and optionally add a Description.
-
- On the Add Shares tab of the dialog, you will view
the list of available shares. Click the share you wish to
consume from the Available Shares and select any of the
available options:
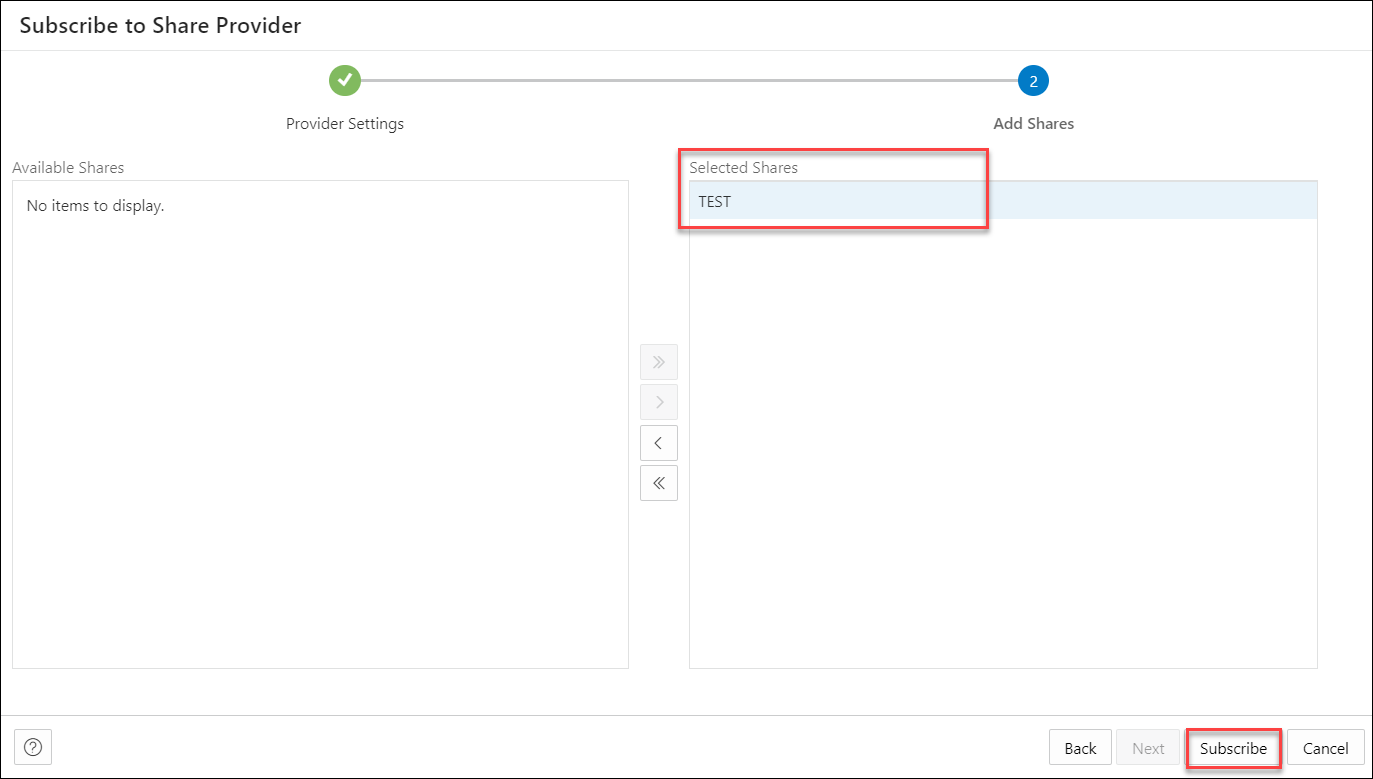
Description of the illustration subscribe-share-provider-version-addshares.png- >: This option enables you to move the Available Share to Selected Shares.
- <: Select this option to remove the selected share from Selected Shares.
- >>: This option allows you to move all the shares to the Selected Shares.
- <<: Select this option to remove all the selected shares from Selected Shares.
-
Click Subscribe to add the share. A confirmation prompt appears when the provider is created successfully. After successful creation of the provider, you will now view the Link Cloud Object screen of the Data Load page.
- You can view the name of the provider in the cloud
storage location field. The share appears in the source file
location with the files you add to the share.
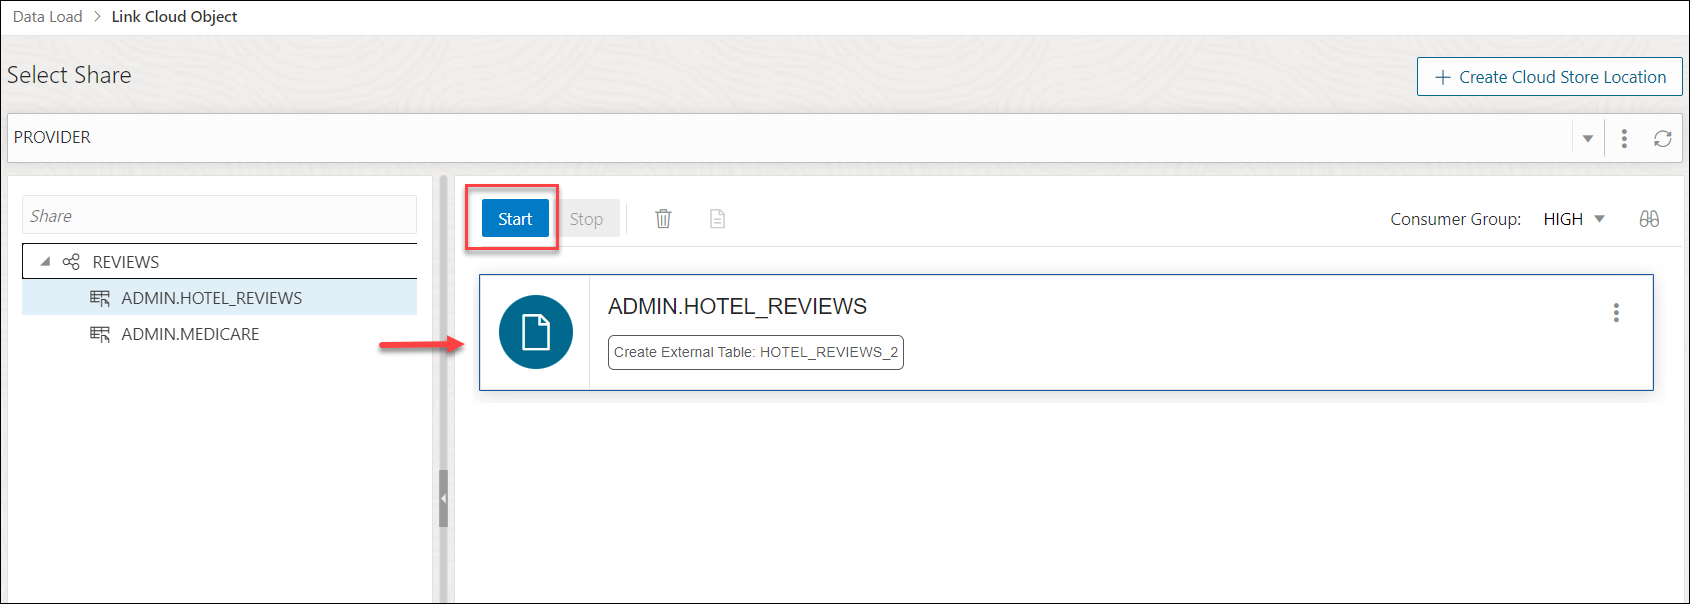
Description of the illustration link-cloud-object.pngExpand the Share folder cart, drag and drop the file you share from the source to the Data Link cart.
Select Start in the Data link cart to run the data link job.
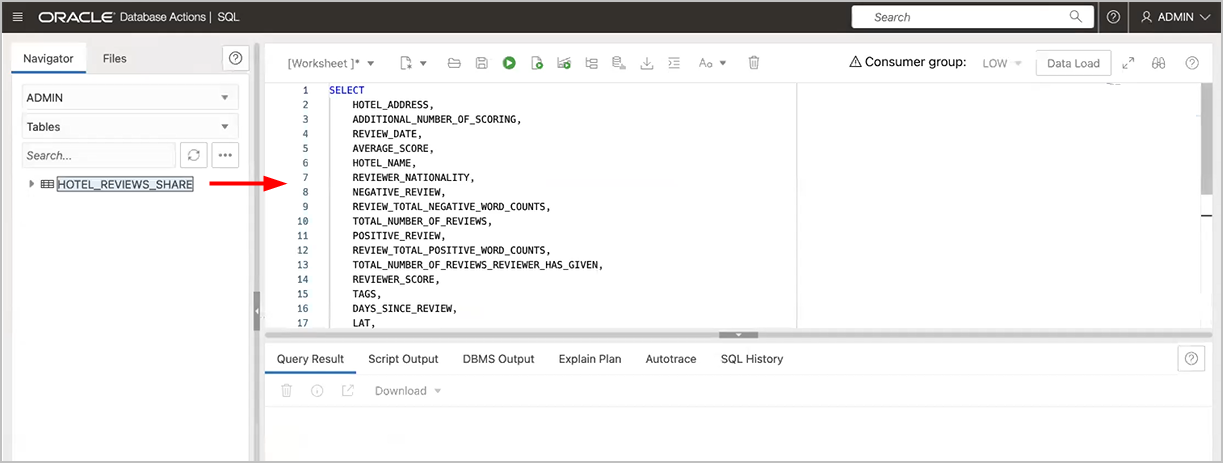
- View the created tables from Database Actions.
- Click on Database Actions, in the breadcrumb, to go back to the Database Actions launchpad.
- Click on the SQL tile.
- Select the external table, drag and
drop it into the worksheet.
The SQL Select statement for the table appears. This SQL statement can be run to consume the shared data.
Description of the illustration xt_sql.png
23.4.3 Enable File-Level Change Data Feed Access for Versioned Shares
Autonomous AI Database supports versioned shares, where data is published as a sequence of distinct versions. Each published version references a specific set of Parquet files.
How File-Level Change Data Feed Works
Change data feed enables consumers to process only the files that changed between two published versions instead of reading the latest full snapshot each time.
For example, a provider publishes a 1 TB share as version 3, modifies the data, and publishes version 4. Instead of reading the entire 1 TB snapshot again, a consumer can request the differences between versions 3 and 4 and process only the returned incremental files.
To use this capability, enable version-based access.
Enable Version-based Access
To enable access to historical versions and file-level changes for a versioned share, configure version access for both the recipient and the share.
-
VERSION_ACCESS_CURRENTallows access only to the current version. -
VERSION_ACCESS_ANYallows access to current and retired versions.
Use the following PL/SQL example:
BEGIN
  DBMS_SHARE.UPDATE_RECIPIENT_PROPERTY(
    recipient_name     => 'my_recipient',
    recipient_property => DBMS_SHARE.PROP_RECIPIENT_VERSION_ACCESS,
    new_value          => DBMS_SHARE.VERSION_ACCESS_ANY);

  DBMS_SHARE.UPDATE_SHARE_PROPERTY(
    share_name     => 'my_versioned_share',
    share_property => DBMS_SHARE.PROP_SHARE_VERSION_ACCESS,
    new_value      => DBMS_SHARE.VERSION_ACCESS_ANY);
END;
/
Note:
You must update both properties to enable version-based access.
Request Change Data Using the Delta Sharing REST API
Use the Delta Sharing changes endpoint to request change data for a table.
Example request:
GET {prefix}/shares/my_share/schemas/my_schema/tables/my_table/changes?startingVersion=3&endingVersion=4
Authorization: Bearer <token>
The response is newline-delimited JSON and includes protocol, metadata, and change-file action objects for the requested version range.
Example response fragment:
{"protocol":{"minReaderVersion":1}}
{"metaData":{"format":{"provider":"parquet"}}}
{"add":{"url":"https://.../part-0001.snappy.parquet","id":"file-a","size":573,"version":4}}
{"remove":{"url":"https://.../part-0000.snappy.parquet","id":"file-c","size":573,"version":4}}
This allows the consumer to process only the files returned for the requested version range.
For an Oracle-specific Databricks example that reads changed files for a version range and reports row counts, see Oracle Delta Sharing CDF.
23.4.4 Consume Live Share
Live data shared with you through data sharing is not automatically available for consumption.
To consume live data shares, you need to subscribe to them and create views of tables included in the live share. The views can be queried using SQL scripts.
- Open the Consume Share page and click + Subscribe to Share Provider to select Subscribe to Live Share Provider from the drop-down. This opens the Subscribe to Share Provider dialog box.
- On the Provider Settings pane of the Subscribe to Share Provider dialog box, specify the following details:
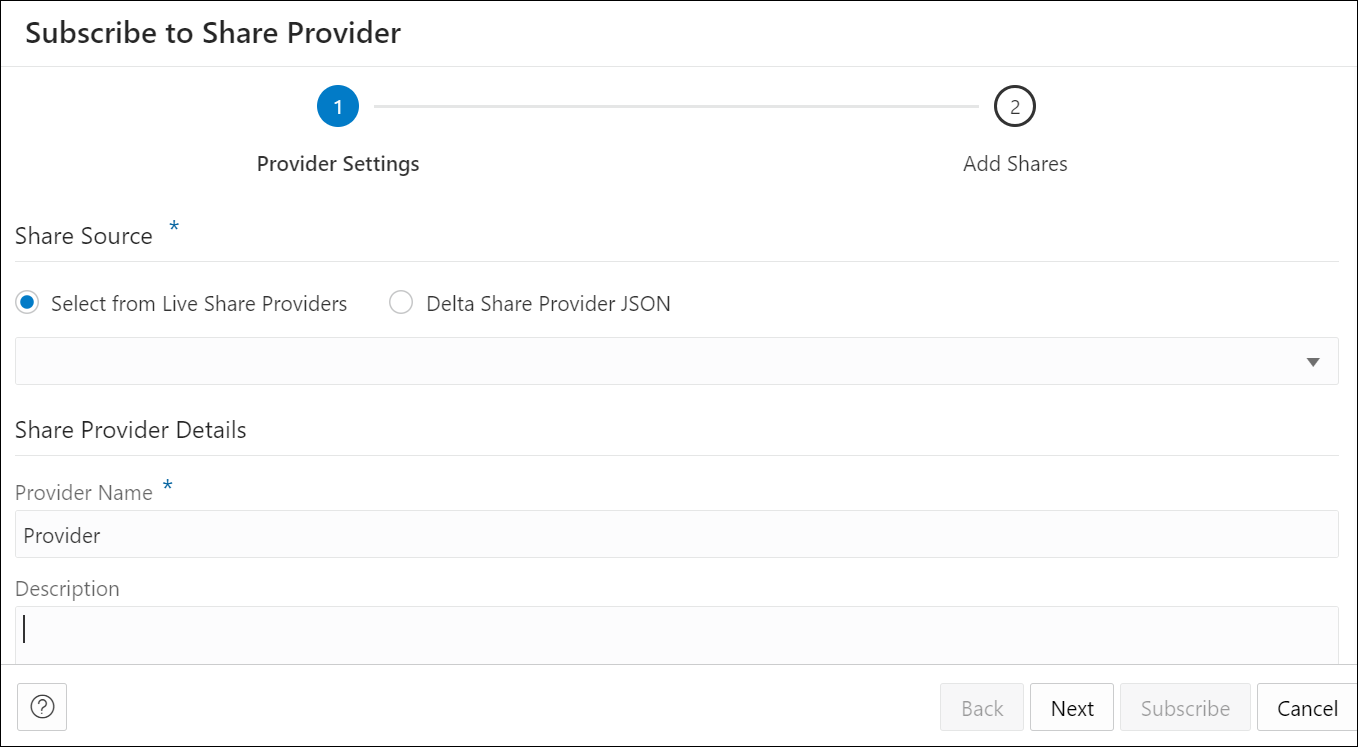
Description of the illustration subscribe-live-share-provider.pngUnder Share Source section, choose Select from Live Share Providers and select the provider from the drop-down.
Under Share Provider Details field, enter the following:- Provider Name: Specify the name of the provider.
- Description: Enter a description of the Provider.
Click Next to progress to the Add Shares tab.
- On the Add Shares tab of the dialog, you will view the list of available shares. Click the share you wish to consume from the Available Shares and select any of the available options:
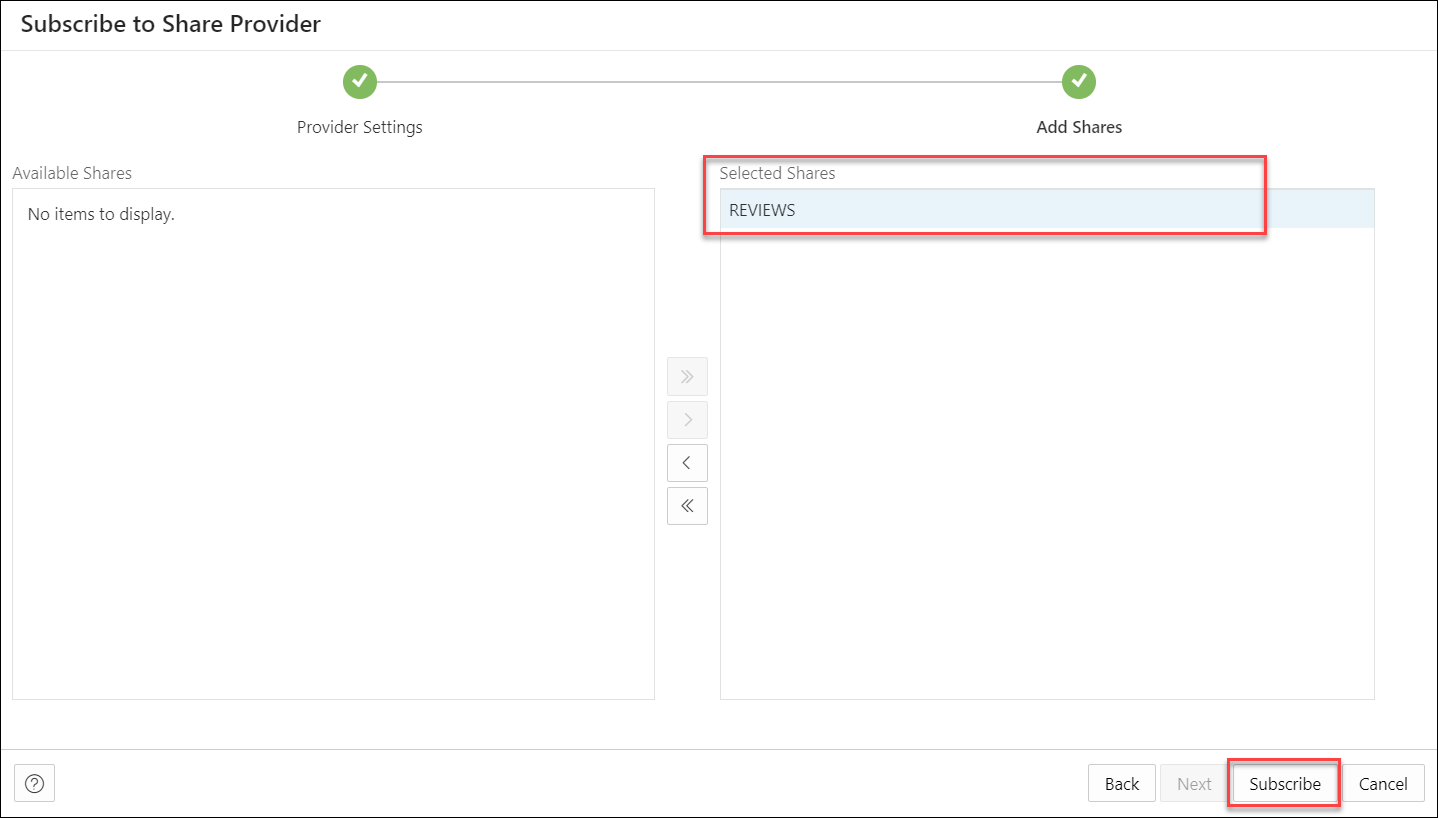
Description of the illustration add-shares.png- >: This option enables you to move the Available Share to Selected Shares.
- <: Select this option to remove the selected share from Selected Shares.
- >>: This option allows you to move all the shares to the Selected Shares.
- <<: Select this option to remove all the selected shares from Selected Shares.
Click Subscribe to add the share. A confirmation prompt appears when the provider is created successfully. After successful creation of the provider, you will now view the Link Cloud Object screen of the Data Load page.
- You can view the name of the Share provider in the cloud storage location field. The share appears in the source file location with the files you add to the share.
Description of the illustration link-cloud-object.pngExpand the Share folder cart, drag and drop the file you share from the source to the Data Link cart.
Select Start in the Data link cart to run the data link job.
23.4.5 View Share Provider Entity Details
To view details about the Share Provider entity, click the Actions icon at the right of the Share Provider entity entry, then click View Details.
For all entities, the details include Lineage and Impact sections.
For a specific Share Provider entity, you can perform the following actions using the Actions context menu.
- View Details: See View Share Provider Entity Details.
- Manage Shares: Opens a Manage Shares for Share provider dialog box. This lists the shares you select to share with the recipient. You can edit the list of shares you wish to share with the recipient. Click OK to save any changes or select Cancel to discard the process of editing.
- Load to table: You are directed to the Load Data page with the Share tab selected.
- Link to table: You are directed to the Link Data page with the Share tab selected to view and run the related link object. Drag and drop the shared data to add it to the data link job.
- Rename: Renames the Provider Name. Select Yes to make changes else click No.
- Copy Endpoint: Copies the endpoint.
- Delete: Removes the Share Provider Entity.
23.4.6 Sharing Databricks Tables with Deletion Vectors
Describes how to share Databricks Delta Tables when Autonomous AI Database is a Delta Sharing consumer.
ORA-29913: error while processing ODCIEXTTABLEFETCH routineDatabricks providers can share Delta tables when Autonomous AI Database is a Delta Sharing consumer in the following scenarios:
-
Scenario 1 - Drop Deletion Vectors from the table
-
Scenario 2 - Create a view and share the view
-
Scenario 3 - Disable Deletion Vectors in Workspace Settings for future tables
Scenario 1 - Drop Deletion Vectors from the Table
Use this if you are ready to stop using deletionVectors on a
specific table.
-
Run this in Databricks.
ALTER TABLE table_name DROP FEATURE deletionVectors -
Add the table
table_nameto the Delta share and configure Autonomous AI Database as a consumer.
This option applies all pending deletes and removes the
deletionVectors feature from the table. The table behaves like
a regular Delta table without deletionVectors.
-
No ongoing cost for view materialization.
-
Simple implementation in Autonomous AI Database.
-
A one-time rewrite for large tables.
-
Affects all workloads that read this table, not just Autonomous AI Database.
-
Losing the deletion vector benefits for future deletes on this table.
Scenario 2 - Create a View and Share the View
Use this when you want to keep deletionVectors on the base
table.
-
Run this in Databricks.
CREATE VIEW view_name AS SELECT * FROM table_name; -
Add the view
view_nameto the Delta share instead of the table.Autonomous AI Database consumers can run query this:
SELECT *
FROM "MY_SHARE"."MY_SCHEMA"."view_name";
In this scenario, the Databricks base table keeps using Deletion Vectors. Databricks resolves Deletion Vectors when running the view, so Autonomous AI Database does not see them. For non-Databricks recipients, such as Autonomous AI Database, Databricks may materialize the view and charge the provider for compute and storage. The provider can configure a materialization TTL in Databricks to control the balance between cost and data refresh, a shorter or lower TTL for new data or a longer or higher TTL for cost effective.
-
No change to the base table.
-
Other Databricks workloads can continue using deletion vectors.
-
You can add filters, masking, or column projections into the view.
-
The provider bears cost for view materialization and storage in Databricks.
-
Managing TTL settings for cost control and data freshness.
-
More complex than sharing a table.
Scenario 3 - Disable Deletion Vectors in Workspace Settings for Future Tables
Use this to prevent new tables from using Deletion Vectors by default.
-
Open Workspace settings or the Admin console as the Databricks admin user and go to Advanced.
-
Find Auto-Enable Deletion Vectors and set it to Disabled.
-
Save the changes and restart the running compute.
ALTER TABLE table_name
SET TBLPROPERTIES ('delta.enableDeletionVectors' = FALSE);
In this scenario, all new tables created after this change will not have Deletion Vectors enabled by default. However, the existing tables that already use Deletion Vectors would require the scenarios explained earlier.
-
Prevents new tables from using Deletion Vectors automatically.
-
No additional maintenance for future tables shared with Autonomous AI Database.
-
Does not fix the existing tables that already use deletion vectors.
-
Maintenance of workspace-wide setting. Some internal workloads might still use deletion vectors by default.
Verify if Deletion Vectors are Enabled in Databricks
To check whether Deletion Vectors are enabled for a specific table in Databricks, run this command:
SHOW TBLPROPERTIES table_name ('delta.enableDeletionVectors');