Use Essbase Administration Services Lite
You can optionally manage applications using Essbase Administration Services (EAS) Lite.
Although the Essbase web interface is the modern administration interface that supports all current platform features, a lite version of Essbase Administration Services is a limited-support option for continued management of your applications if your organization isn't ready to adopt the new interface. This option is available only for Essbase 21c independent installations of Essbase.
EAS Lite supports only features and functionality available in 11g, and not features added in later Essbase releases.
- Select to Include EAS Lite as a Managed Server
- Access the EAS Lite Console
- Access the EAS Lite Web Console
- Manage Applications Using EAS Lite
- Limitations of EAS Lite
- Limitations of Essbase web interface for EAS-Managed Applications
- View Application and Agent Logs in EAS Lite
Select to Include EAS Lite as a Managed Server
When you configure Essbase, during the configuration of WebLogic server ports, you can optionally select a check box to enable EAS. This deploys both EAS and Essbase as WebLogic managed servers.
If you configured to include EAS Lite, then running status.sh (or status.cmd) for your Essbase services shows the AdminServer, Essbase server, and EAS server as RUNNING, SHUTDOWN, or FAILED. The following example is on Linux.
[/scratch/username/essbase21c/config/domains/essbase_domain/esstools/bin]$ ./status.sh
Domain status; Using domainHome: /scratch/username/essbase21c/config/domains/essbase_domain ...
Initializing WebLogic Scripting Tool (WLST) ...
Welcome to WebLogic Server Administration Scripting Shell
Type help() for help on available commands
Reading domain...
/Servers/AdminServer/ListenPort=7001
Accessing admin server using URL t3://myhost:7001
 Server Name       Server Status   Type     Essbase Status  Machine
 ...........       .............   ....     .............   ...........
 AdminServer       RUNNING         Server   --              myhost.example.com
 essbase_server1   RUNNING         Server   Active          myhost.example.com
 eas_server1       RUNNING         Server   --              myhost.example.com
Access the EAS Lite Console
You can download and install EAS Lite for Windows, and alternatively access it using a web console.
You can also work on your EAS-managed application in MaxL, ESSCMD, and software developed using APIs.
To install EAS Lite on Windows
-
If an older version of Essbase Administration Services Console is already installed, uninstall it. You must use the latest version, downloaded from the Essbase web interface. Previously downloaded versions may not work correctly.
-
Ensure that Oracle Java 8 is installed. You can get it from https://www.oracle.com/java/technologies/javase/javase-jdk8-downloads.html.
-
From the Essbase web interface, click Console, expand Essbase Administration, and download Essbase Administration Services Console to a local directory.
-
Extract
EASConsole.zip, and double-clickEASConsole.exeto extract and run the installer. -
When the installation is complete, launch the Essbase Administration Services Console from Start Menu > Oracle Essbase > Start Administration Services Console.
-
Log in.
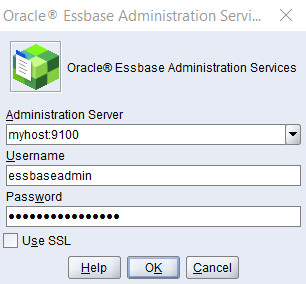
- For Administration Server, enter
hostname:port, where the host name is the machine where EAS managed server runs, and the port number is what you configured for the EAS managed server when you ran Essbase Configuration Tool. If you enabled secure mode, the default port isn't 9100. - For Username and Password enter your Essbase administrator credentials.
- Click OK.
- For Administration Server, enter
-
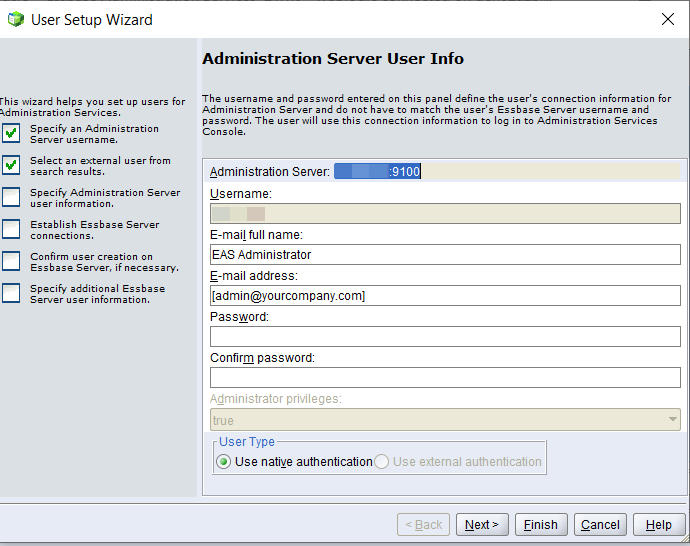
On the Administration Server User Info page, enter the e-mail information, re-enter your Essbase administrator password, and click Next. (No separate Administration Server user name is required).
-
On the Essbase Server Connection page, enter the fully qualified host name and port of your Essbase managed server (for example,
http://myhost.example.com:9000), and enter the Essbase administrator credentials. Click Set and click Next. -
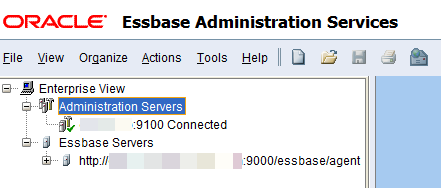
Confirm if prompted, and click Finish. If the setup was successful, you should see a connected Administration Server and a corresponding, connected Essbase server.
-
If you expand the Essbase server and there are no applications displayed, you still need to set up an EAS managed application using the Essbase web interface. See Manage an Application Using EAS Lite section below.
-
If you have additional Essbase servers, you can also enter information for them:
- Add an additional Administration Server by right-clicking Administration Servers under Enterprise View.
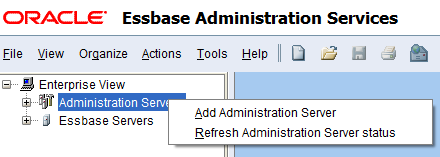
- Enter the Essbase server connection information.
You can add one Essbase server per Administration Server. Only one can be connected at a time.
- Add an additional Administration Server by right-clicking Administration Servers under Enterprise View.
Access the EAS Lite Web Console
-
Open a web browser and navigate to the URL of the EAS managed server. For example,
http://hostname.example.com:9100/easconsolePort numbers are configurable in the Essbase Configuration Tool, so the port number for your URL may be different. If you enabled secure mode, the default port isn't 9100.
-
Click Launch. If the EAS Lite console doesn't launch, you may need to configure your browser with a Java Web Start (javaws) plugin that can launch .jnlp files.
Tip:
You may need to use an older browser. Also, if your Essbase deployment is Windows Server 2022, see EAS Lite Troubleshooting.If Using TLS Everywhere and EAS Lite
Before you can log in from the EAS Lite web console, you need to import a certificate to the Java trust store. Do the following steps on the machine from which you will access the web console.
-
Export a self-signed certificate from the web browser.
-
In the browser address bar, go to the EAS Lite https web console URL.
-
To the left of the URL address, click the security alert icon (these vary by browser).
-
Download or copy the certificate to a file (instructions vary by browser).
-
Export the certificate to the file system.
-
-
Find the Java trust store by checking the value of the following option in
admincon.bat:-Djavax.net.ssl.trustStore=%JAVA_HOME%\lib\security\cacerts -
Import the certificate to the trust store.
For example, for Java keytool,
-
Set JAVA_HOME and PATH variables to indicate the correct version of Java that you installed locally or on another volume. The following example is for the bash shell on Linux, and persists only for the current shell. If you want the settings to persist longer, you can add the export statements to your bash configuration file,
.bashrc.export JAVA_HOME=/usr/bin/java export PATH=$JAVA_HOME/bin:$PATH -
Import the certificate to the trust store. For example, on Windows,
keytool.exe -import -trustcacerts -keystore "C:\Program Files(x86)\Java\jre1.8.0_241\lib\security\cacerts" -alias "my01certificate" -file D:\my01elc.cerIf you are prompted for a password after issuing the command, enter your new password.
-
-
To check if the certificate was added, use the keytool list option to search based on alias. For example, on Windows,
keytool.exe -list -keystore "C:\Program Files(x86)\Java\jre1.8.0_241\lib\security\cacerts" | findstr "my01"
Manage Applications Using EAS Lite
Before you can connect to an application in EAS Lite, you must set it as an EAS managed application.
Note:
To set an application as EAS managed, during Essbase configuration of WebLogic server ports, Enable EAS must have been checked.To manage an application using EAS Lite in the Essbase web interface,
-
Log in to the Essbase web interface.
In the Redwood Interface,- Open the application.
- Click Settings, and select Managed by Essbase Administration Services.
In the Classic Web Interface,- From the Actions menu to the right of the application name, launch the inspector, and click Settings.
- From the General tab, select Managed by Essbase Administration Services.

-
Click Save, OK, and Close.
If you decide to try managing the application fully in the Essbase web interface, instead of using EAS Lite, you can unselect the Managed by Essbase Administration Services option from the application general settings.
Caution:
This action is irreversible for the current application. It's recommended to back up the EAS-managed application before implementing this action.- In Excel, on the cube designer ribbon, select Admin tasks
 .
.
- Select EAS Managed Applications.
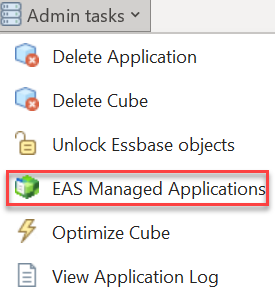
- Enter your Essbase login credentials if prompted to do so.
- In the EAS Managed Applications dialog box, select applications and use the Add>> and <<Remove options to switch to and from EAS Managed.
Once you have switched applications to EAS Managed and then switched them back to non-EAS Managed, those applications will be greyed out because you cannot go back to EAS Managed again.
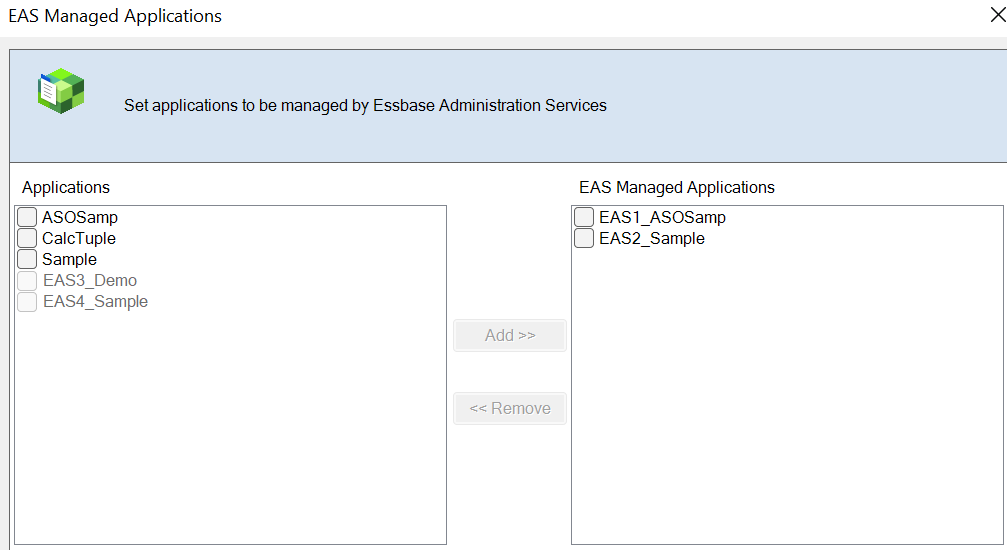 It's recommended to back up EAS managed applications before switching them back to being managed in the Essbase web interface, as this action is irreversible.
Caution:
Limitations of EAS Lite
Note the following limitations of EAS Lite:
- Global (server level) configuration settings are disabled.
-
There are no EAS Console users in EAS Lite. Log in as an Essbase user, in whatever security model you’re using.
-
You can connect only to the Essbase server instance from which EAS Lite Console was launched, and you can't add other Essbase servers.
-
You can't access Provider Servers.
-
In the EAS Server node, Edit properties and Externalize users aren't available. In a particular EAS Server node, Users and Properties nodes aren't available.
-
In the Essbase Servers node, Add Essbase Server, Refresh Essbase Server List, and Show cluster information aren't available.
-
In the Connected Essbase Server node:
-
View Log Charts and Generate logs aren't available.
-
Security node and its child nodes Users and Groups aren't available.
-
-
In the Cube node, Preview data isn't available.
-
Essbase filter assignment within Shared Services isn't available.
-
Under File > Wizards, User Setup and Migration aren't available.
-
Within each application's action and context menus, user/group access and Register aren't available.
-
Within each cube's action and context menus, user/group access isn't available.
-
Outline conversion wizard (from block storage to aggregate storage) isn't available.
- When you are selecting aggregate views in Aggregation Design Wizard, charts are not displayed unless your JRE is bundled with JavaFX jars.
Limitations of Essbase web interface for EAS-Managed Applications
When you're using an EAS-managed application, you can access it in the Essbase web interface as well as in EAS Lite, though some of the functionality in the Essbase web interface is unavailable. Examples of functionality not available for EAS-managed applications are:
-
Outline editing (opens in view-only mode)
-
Scenario management (new platform feature)
-
Connections and datasources (new platform features)
-
Drill through support (new platform features)
Password is Required when Importing Partitions Exported to the File System
Starting in release 21.5, when a replicated or transparent partition is exported from EAS Lite to the file system as an XML file, password values of the source and target connections are not exported. When the exported partition XML file is imported back into EAS Lite, the password fields in the Partition dialog box in the EAS console are blank. During import, you must manually enter the password values in the source and target connections in the Partition dialog box.
View Application and Agent Logs in EAS Lite
In Release 21.2.2.0.0 or higher, you can enable viewing the agent log from EAS Lite. You can also enable viewing trimmed logs for improved legibility in the Log Viewer.
Application Logs in EAS Lite
By default, any user with Application Manager permission can view application logs.
To enable viewing trimmed application and agent logs, see the instructions below for setting ESSBASE_TRIM_ODL_LOGS to TRUE.
Agent Log in EAS Lite
Only service administrators can view the agent log. As agent logs may contain system paths, they are not viewable by default in the Log Viewer. You must explicitly enable the ability to view agent logs in the Log Viewer, by setting an environment variable, ENABLE_ESSBASE_LOG_VIEW, to TRUE. If the environment variable is not set, EAS Lite returns a "permission denied" error.
View Trimmed Logs in EAS Lite
By default, the Log Viewer displays log entries in Oracle Diagnostics Logging (ODL) format. The following is an example of an untrimmed ODL log entry:
[2021-11-03T16:31:52.180-07:00] [Sample] [NOTIFICATION:16] [MBR-120] [MBR] [ecid: 1635982305564,0] [tid: 140444520277760] [REQ_ID: 61831be10000008c] [DBNAME: Basic] Loading New Outline for Database [Basic] SucceededThe following is an example of a trimmed log entry:
[2021-11-03T16:31:52.180-07:00][INFO][DBNAME: Basic]Loading New Outline for Database [Basic] SucceededSet the Log Display Options for EAS Lite
Caution:
The Essbase platform includes scripts in <DOMAIN HOME>/bin that can customize the environment and behaviors of Essbase functionality. However, making changes to these domain environment or startup scripts can have unintended effects, including startup failure. Oracle recommends making changes in a test environment first. Before editing these scripts, always:
-
Stop the Essbase managed servers, using
<DOMAIN HOME>/esstools/bin/stop.sh(on Linux), or<DOMAIN HOME>\esstools\bin\stop.cmd(on Windows). -
In
<DOMAIN HOME>/bin, make a backup copy of the file you want to edit. For example,On Linux
cp setStartupEnv.sh setStartupEnv_bak.shOn Windows
copy setStartupEnv.cmd setStartupEnv_bak.cmd -
Edit carefully, using only Oracle’s documented instructions, or working with Oracle Support.
-
Restart Essbase, using
<DOMAIN HOME>/esstools/bin/start.sh(on Linux), or<DOMAIN HOME>\esstools\bin\start.cmd(on Windows). Check that startup completed normally.
To enable viewing the agent log in the Log Viewer,
-
On the Essbase managed server machine, open one of the following startup files for editing. They are located in <DOMAIN HOME>/bin.
setEssbaseEnvOverrides.sh(orsetEssbaseEnvOverrides.cmd)setStartupEnv.sh(orsetStartupEnv.cmd)setDomainEnv.sh(orsetDomainEnv.cmd)
-
Add a command to set the environment variable to enable Agent log to be viewed in Log Viewer by a service administrator.
Linux example
export ENABLE_ESSBASE_LOG_VIEW=TRUEWindows example
set ENABLE_ESSBASE_LOG_VIEW=TRUE -
Save the file and restart Essbase.
To enable trimmed log display in Log Viewer,
-
On the Essbase managed server machine, open
setDomainEnv.shfor editing (orsetDomainEnv.cmd, on Windows). It is located in <DOMAIN HOME>/bin. -
Add a command to set the environment variable to view trimmed log format in Log Viewer.
Linux example
export ESSBASE_TRIM_ODL_LOGS=TRUEWindows example
set ESSBASE_TRIM_ODL_LOGS=TRUE -
Save the file and restart Essbase.
Sample Domain Environment Script
The administrator has added these lines to the end of setDomainEnv.sh.
