About Cube Designer
Cube designer helps you to design, create and modify application workbooks to meet their strict layout and syntax requirements.
The basic components of Cube Designer are the Cube Designer ribbon and the Designer Panel. See About the Cube Designer Ribbon and About the Designer Panel.
About the Cube Designer Ribbon
You can use options on the Cube Designer ribbon to perform a number of cube management tasks, such as loading data, editing formulas and viewing jobs.

Cube Designer Ribbon Options
- Connections: Opens the Connections dialog box, in which you choose the Essbase URL.
- Catalog: Opens the Essbase Files dialog box, which contains a selection of prebuilt
application workbooks, from which you can build sample applications and cubes.
Also, a catalog toolbar is available in this dialog box from which that you can perform many file operations within the catalog, such as upload, download, cut, copy, paste, delete, rename, and create a new folder.
- Local: Provides a drop-down menu with options to open or save an application workbook locally, or to export a cube to an application workbook.
- Designer Panel: Opens the Designer Panel, a series of panels in which you can design and edit application workbooks.
- Calculation Editors cube designer ribbon icon is context aware. When you’ve selected a formula cell on a dimension worksheet, the Member formula editor option is enabled. When you’ve selected a calculation worksheet, the Calculation script editor option is enabled.
- Hierarchy Viewer: Opens the Dimension Hierarchy dialog box, in which you can view the hierarchy for the selected dimension worksheet in an application workbook, and perform tasks, such as renaming members and changing storage settings. See Work with Dimension Worksheets in Cube Designer.
- Federated Partition: Opens the Federated Partition wizard, where you can create a federated partition in Cube Designer by creating a Cube.FederatedPartition worksheet in the application workbook for your Essbase cube, and then validating the sheet and saving the partition to the server.
- Build Cube: Opens the Build Cube dialog box, where you can build a cube from the active application workbook. In this dialog box, cube designer automatically detects existing data and calculation worksheets, and then pre-selects options to load the data and run the worksheets.
- Load Data: Opens the Load Data dialog box, which contains options to clear all data and to load data.
- Calculate: Opens the Calculate Data dialog box, in which you can select an application, a cube, and a calculation script to execute.
- Analyze: Provides a drop-down menu with options to create a Smart View ad hoc grid, or connect application workbook query worksheets (Query.query_name worksheets) to Smart View.
- View Jobs: Opens the Job Viewer dialog box, in which you can monitor the status of jobs, such as data loads, calculations, imports, and exports.
- Transform Data: Opens the Transform Data dialog box, which lets you build a cube from tabular data.
- Options: Provides options to specify the default working folder and to activate the cube designer log.
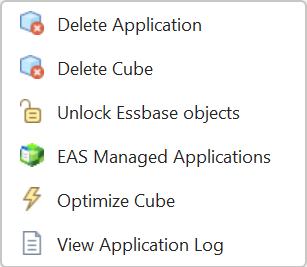
- Admin Tasks: Opens a menu from which you can
delete an application, delete a cube, unlock objects, set applications to EAS
Managed, open the expert mode (optimize cube) dialog box, or view the
application log.

-
Server name: Shows the currently defined connection location. When you click Server name and log in (if prompted to do so), the server name and the client and server versions are displayed.
About the Designer Panel
The Designer Panel uses a manual system of reading and writing to the worksheets in an application workbook. The From Sheet button at the bottom of the Designer Panel reads the entire application workbook’s data and populates the panel with the data. The To Sheet button updates the entire application workbook with the data from the Designer Panel. The Reset button clears the data from the Designer Panel.
One common use of panel is to populate it with information from one application workbook using From Sheet, open a new blank workbook, and then use To Sheet to make a clone of the first application workbook.
You can design and edit application workbooks in the Designer Panel. Each of its five tabs correspond to one of the five types of worksheets in an application workbook. See Design and Create Cubes Using Application Workbooks.
To open the panel, click Designer Panel
![]() on the Cube Designer ribbon.
on the Cube Designer ribbon.
If the Smart View panel displays when you click Cube
Designer, then click Switch To
![]() , and select Cube Designer from the drop down
menu.
, and select Cube Designer from the drop down
menu.
The Designer Panel contains the following tabs:
-
Cube: You can design and modify the Essbase.Cube worksheet in an application workbook.
-
Settings: You can design and modify the Cube.Settings worksheet in an application workbook.
See:
-
Work with the Cube.Settings Worksheet: Alias Tables in Cube Designer.
-
Work with the Cube.Settings Worksheet: Properties in Cube Designer.
-
Work with the Cube.Settings Worksheet: Dynamic Time Series in Cube Designer.
-
Work with the Cube.Settings Worksheet: Attribute Settings in Cube Designer.
- Work with Typed Measures Worksheets in Cube Designer
-
-
Dimensions: You can design and modify the Dim.dimname worksheets in an application workbook.
-
Data: You can design and modify the Data.filename worksheet in an application workbook.
-
Calc: You can design and modify the Calc.scriptname worksheet in an application workbook.