Work with Application Workbooks in Cube Designer
Each application workbook contains a number of worksheets that, taken together, define the cube. Using Designer Panel, you can modify an application workbook, and then you can use the modified workbook to create an updated cube, reflecting your changes.
-
Work with the Cube.Settings Worksheet: Alias Tables in Cube Designer
-
Work with the Cube.Settings Worksheet: Properties in Cube Designer
-
Work with the Cube.Settings Worksheet: Dynamic Time Series in Cube Designer
-
Work with the Cube.Settings Worksheet: Attribute Settings in Cube Designer
-
Work with the Cube.Settings Worksheet: Substitution Variables in Cube Designer
- Work with Data Worksheets in Cube Designer
- Work with MDX Worksheets in Cube Designer
- Work with Typed Measures Worksheets in Cube Designer
- Create a Cube from a Local Application Workbook in Cube Designer
Work with the Essbase.Cube Worksheet in Cube Designer
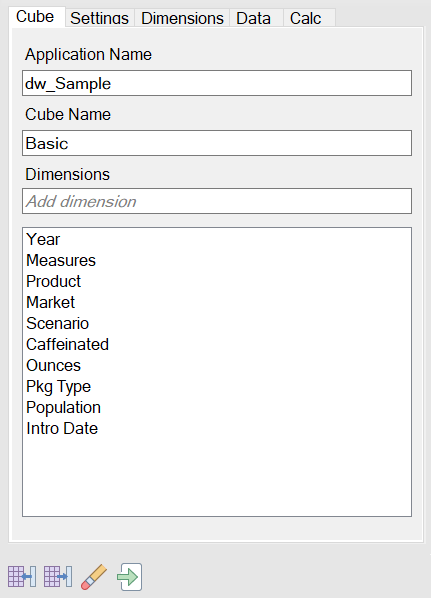
Using the Cube tab in the Designer Panel, you can modify the Application Name, Cube Name, and Dimension Definitions fields on the Essbase.Cube worksheet. You can change the application name and cube name, and delete one or more dimensions.
- On the Cube Designer ribbon, select Designer Panel
 .
. - In the Designer Panel, select the Cube tab.
- Select From Sheet
 to populate the Designer Panel with the contents of the application
workbook.
 - Change the application name or the cube name, if you want to.
- Add one or more dimensions by typing the name in the text box and pressing the enter key after each one.
- In the Dimensions list
- If you want to delete a dimension, right click the dimension name and select Delete Dimension.
Alternatively, you can select a dimension name and press the delete key.
- If you want to rename a dimension, right click the dimension name and select Rename Dimension.
- If you want to delete a dimension, right click the dimension name and select Delete Dimension.
- Select To Sheet
 to propagate the changes to the application workbook.
 - Examine the updated application workbook to see your changes.
See also: Understand the Essbase.Cube Worksheet.
Work with the Cube.Settings Worksheet: Alias Tables in Cube Designer
You can add new alias tables in the Cube.Settings worksheet.
Note:
Changes to the Cube.Settings worksheet cannot be applied incrementally. Instead, you must rebuild the cube to apply those changes.Work with the Cube.Settings Worksheet: Properties in Cube Designer
You can add new properties in the Cube.Settings worksheet.
- In the Designer Panel, select the Settings tab.
- Select From Sheet
 to populate the Designer Panel with the contents of the application
workbook.
 - Expand the Properties section.
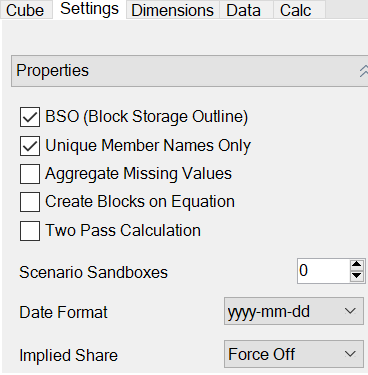
- Make your selections.
- Select To Sheet
 to propagate the changes to the application workbook.
Note:
Changes to the Cube.Settings worksheet cannot be applied incrementally. Instead, you must rebuild the cube to apply those changes.See also: Understand the Cube.Settings Worksheet: Properties.
Work with the Cube.Settings Worksheet: Dynamic Time Series in Cube Designer
You can add dynamic time series members in the Cube.Settings worksheet.
- In the Designer Panel, select the Settings tab.
- Select From Sheet
 to populate the Designer Panel with the contents of the application
workbook.
 - Expand the Dynamic Time Series section.
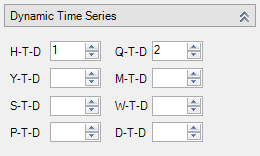
- Make the changes that you want.
- Select To Sheet
 to propagate the changes to the application workbook.
There are reserved generations names used by dynamic time series. For example, using the generation name of “Year” activates dynamic time series for “Y-T-D.”
Note:
Changes to the Cube.Settings worksheet cannot be applied incrementally. Instead, you must rebuild the cube to apply those changes.See also: Understand Dimension Worksheets.
Work with the Cube.Settings Worksheet: Attribute Settings in Cube Designer
You change attribute settings on the Cube.Settings worksheet.
- In the Designer Panel, select the Settings tab.
- Select From Sheet
 to populate the Designer Panel with the contents of the application
workbook.
 - Expand the Attribute Settings section.
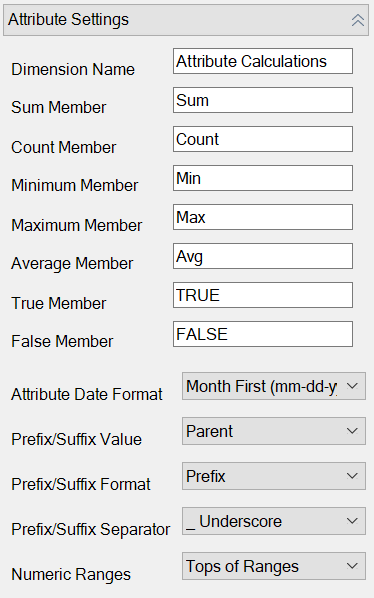
- Make the changes that you want.
- Select To Sheet
 to propagate the changes to the application workbook.
Note:
Changes to the Cube.Settings worksheet cannot be applied incrementally. Instead, you must rebuild the cube to apply those changes.See also: Understand the Cube.Settings Worksheet: Attribute Settings.
Work with the Cube.Settings Worksheet: Substitution Variables in Cube Designer
You can add cube-level substitution variables on the Cube.Settings worksheet.
Enter the name of the substitution variable in column A. Enter the corresponding value of the substitution variable in column B.
You must enclose member names in double quotes.

Note:
Changes to the Cube.Settings worksheet cannot be applied incrementally. Instead, you must rebuild the cube to apply those changes.Work with Dimension Worksheets in Cube Designer
On dimension worksheets, you can define dimensions, including name, type, storage type, build method, and more.
-
After adding alias tables using Designer Panel, populate the alias table column with alias names manually, or by copying them from a source.
-
Use no more than 1024 characters when naming dimensions, members, or aliases.
-
The length limit for the dimension worksheet is 30 characters, including 3 characters for the "Dim." at the beginning of the sheet name. So, the name following "Dim." can contain up to 27 characters.
Work with Data Worksheets in Cube Designer
You can create data worksheets in the Designer Panel for new or existing application workbooks. You can also edit the display of dimensions and members in new or existing data worksheets.
To create a new data worksheet:
- In the Designer Panel, select the Data tab.
- Enter a name for the new data worksheet in the Data Sheets field.
- In Sheet Type, select the type of sheet to create:
- Data Dimension
In a data dimension sheet, dimensions are represented in the column headers. These indicate the member combinations to which to load the data. The right-most columns are the data columns. The data column headers specify members of the data dimension, which is the dimension to which you are loading data. The data values reside in the data column rows.
- Flat
In a flat sheet, each dimension is represented in a column header. The last column, *Data* contains the data values for the specified member combinations.
- Sandbox
In a sandbox sheet, each dimension is represented in a column header. The first dimension is Dimension.Sandbox. The last three column headers display members of the CellProperties dimension: EssValue, EssStatus, and EssTID. Do not modify the EssValue, EssStatus, and EssTID columns, as they are for internal purposes and it is important that they not be changed.
- Data Dimension
- Press Enter.
- Optional: Edit the data layout. Change the order of the dimension columns, and (for the Data Dimension sheet type only) select members and set their order. See subsequent sections in this topic for instructions.
- Select To Sheet
 .
.
After you select a sheet type, and then select To Sheet or From Sheet, you cannot change the sheet type from the Designer Panel.
A new data worksheet is created in the application workbook.
To change the order of dimensions in the data worksheet:
- In the Designer Panel, select the Data tab.
- In Data Sheets, select the sheet that you want to edit.
- In Dimension Column Order, select the dimension that you want to move.
- Use the up and down arrows to move the dimension.
- Select To Sheet
 to add your changes to the selected Data tab in the
worksheet.
To change the order of members on the data worksheet (Data Dimension sheet type only):
- In the Designer Panel, select the Data tab.
- In Data Columns, select the member that you want to move.
- Use the up and down arrows to move the member.
- Select To Sheet
 to add your changes to the selected Data tab in the
worksheet.
To select the members to display in a data worksheet (Data Dimension sheet type only):
- In the Designer Panel, select the Data tab.
- Click Member Selection.
- In the Member Selector, check the members you want to display and clear the members you don't want to display.
- Click OK.
- Select To Sheet
 to add your changes to the selected Data tab in the
worksheet.
To add data worksheets to an existing application workbook, go to the
Data tab in the Designer Panel, click From
Sheet
![]() , and proceed with the steps in this topic.
, and proceed with the steps in this topic.
Work with Calculation Worksheets in Cube Designer
Work with MDX Worksheets in Cube Designer
You can create new MDX worksheets in the Designer Panel.
- In the Designer Panel, select the Calc tab.
- Select From Sheet
 to populate the Designer Panel with the contents of the application
workbook.
 - In the MDX Insert Sheets field, enter a name for the new MDX worksheet.
- Press Enter.
- Select To Sheet
 .
.
A new MDX worksheet is created in the application workbook.
Work with Typed Measures Worksheets in Cube Designer
You can add date measures or text list definitions to application workbooks to work with typed measures.
- Open an application workbook.
- On the Cube Designer ribbon, click Cube Designer to open the Designer Panel.
- Click the Settings tab.
- Click From Sheet to populate the Designer Panel with the contents of the application workbook.
- To add date measures:
- In the Cube.Settings worksheet, under Properties, modify the Date Format to the format you want to load into the cube.
- If a Cube.TypedMeasures sheet does not exist in the application workbook,
add one:
- On the Designer Panel, Settings tab, expand Text Lists.
- In the Text Lists field, type a name.
- Press Enter.
- Identify the members in Accounts dimension and add them in cells to the right of Associated Members in the Date Measures section. These are the members that will allow dates to be loaded into the cube as data.
- Rebuild the cube.
- To add text lists:
- If a Cube.TypedMeasures sheet does not exist in the
application workbook, add one:
- On the Designer Panel, Settings tab, expand Text Lists.
- In the Text Lists field, type a name.
- Press Enter.
The text list name is moved to the text box below the Text Lists field.
- If a Cube.TypedMeasures sheet already exists in the application workbook, you can create additional text list tables to that sheet by following the steps in 6a and using a new name in the Text Lists field.
- After you add the text list, you must enter the text list information manually. This includes the associated members for the text list, the valid text items in the list and their related numeric values.
- Rebuild the cube.
- If a Cube.TypedMeasures sheet does not exist in the
application workbook, add one:
