4.7.2.1 Booting a Server using the Diagnostic ISO File

Use this procedure to boot an Oracle Exadata Storage Server or Oracle Exadata Database Server using the diagnostic ISO file (diagnostics.iso).

Note:

For information on booting an Oracle Linux KVM guest using the diagnostic ISO file, see Starting a Guest using the Diagnostic ISO File.
  1. Download the diagnostic ISO file (diagnostics.iso) corresponding to your current Oracle Exadata System Software release.

    If required, use the imageinfo command on a running server to determine your current Oracle Exadata System Software release.

    Download the diagnostic ISO file to a client workstation or server that you will use to access the ILOM interface on the server that you want to boot in diagnostics mode. The client machine must have a Web browser and network access to the ILOM interface on the target server.

    If you are using Oracle Exadata System Software Release 18.x, or earlier, you can find the diagnostic ISO file at /opt/oracle.SupportTools/diagnostics.iso on your Oracle Exadata Storage Servers or Oracle Exadata Database Servers. Otherwise, search the My Oracle Support (MOS) patch repository using "exadata diagnostic iso" as the search term.

    You can also locate the diagnostic ISO file in the Supplemental README that is associated with your Oracle Exadata System Software release. The Supplemental README for each Oracle Exadata System Software release is documented in My Oracle Support document 888828.1.

  2. Start the ILOM Web client.

    Start a Web browser on your client machine and navigate to http://ILOM_SP_IPaddress. In the URL, ILOM_SP_IPaddress is the IP address of the ILOM service processor (SP) on the target server.

    If you do not know the IP address of the ILOM SP, you can make a serial connection to the ILOM SP and list the network properties by using the show /network and show /networkipv6 commands. For more details, see Connect to Oracle ILOM.

    The Oracle ILOM Web client login dialog appears.
  3. Log in to the Oracle ILOM Web client using the root account and the password.
  4. Use the ILOM Web interface to attach the diagnostics.iso file as a virtual CDROM device.
    1. In the ILOM Web interface navigation hierarchy, click Remote Control, and then click Redirection
      Depending on the version of the ILOM Web interface that you are using, Redirection may appear in the left hand navigation pane or in a strip of options running along the top of the page.
    2. In the Redirection pane, click Use Video Redirection, then Launch Remote Console.
      In some versions of the ILOM Web interface, the Use Video Redirection button does not exist. In that case, go directly to Launch Remote Console.
    3. In the Remote Console window, choose the Storage menu option in the KVMS menu.
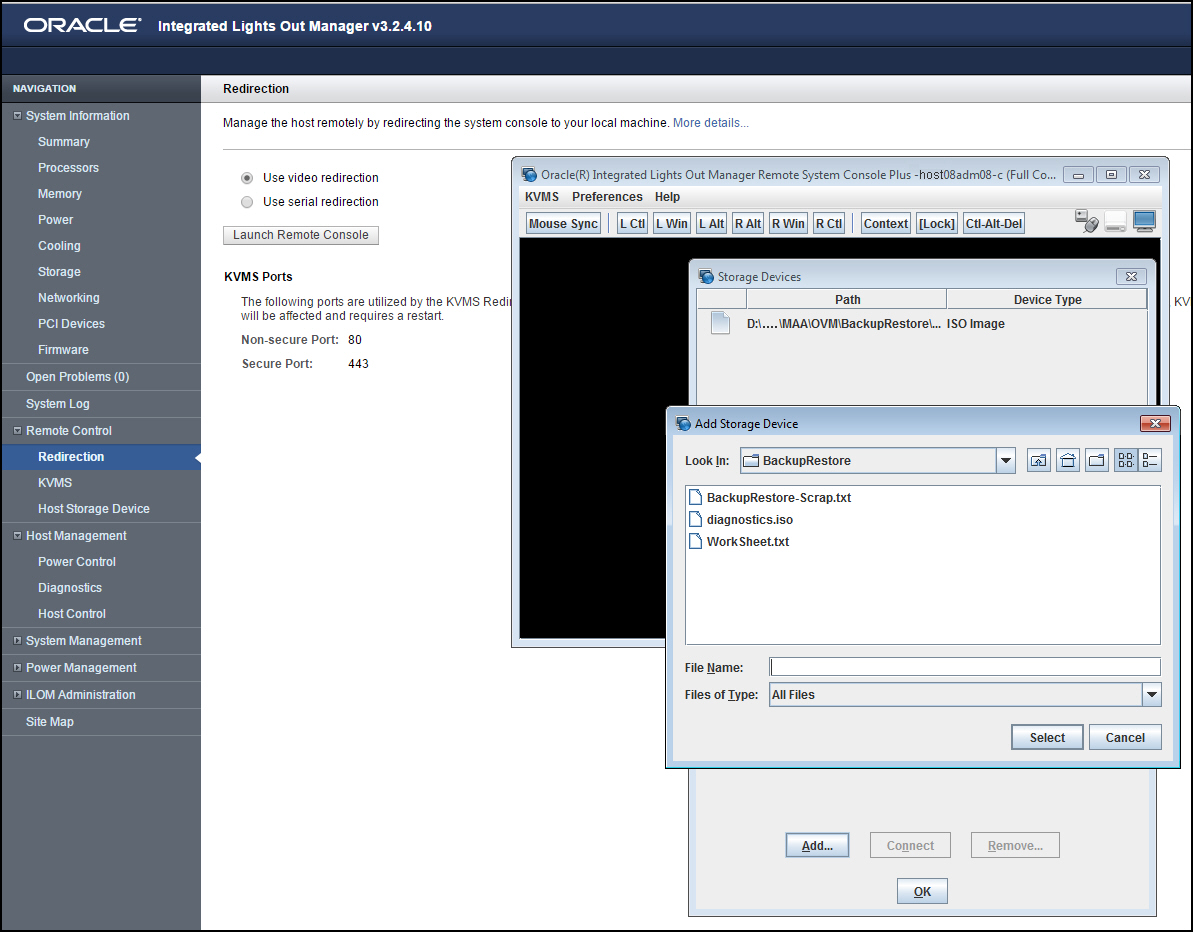
    4. In the Storage Devices dialog, click Add. And in the resulting dialog, select the diagnostics.iso file.

      The following screen image shows an example of what you may see.


      Description of ilom-web-interface-add-storage-device-dialog.jpg follows
      Description of the illustration ilom-web-interface-add-storage-device-dialog.jpg
    5. Back in the Storage Devices dialog, select the entry associated with the diagnostics.iso file and click Connect.

      After the connection is established, the label on the Connect button in the Storage Devices dialog changes to Disconnect.

      Keep in mind the navigation path to the Storage Devices dialog so that you can easily disconnect the diagnostics.iso file after you are done with it.

  5. Configure the server to boot from the diagnostics.iso file by using the newly configured virtual CDROM device.
    1. In the ILOM Web interface navigation hierarchy, click Host Management, and then click Host Control
      Depending on the version of the ILOM Web interface that you are using, Host Control may appear in the left hand navigation pane or in a strip of options running along the top of the page.
    2. From the resulting list of values, select CDROM.
    3. Click Save.
    Now, when the system is booted, the diagnostics.iso file is used as the default boot image.
  6. Back in the Remote Console window, restart the system by using the following command:
    ->  Start /SP/console -script
    The system now reboots using the diagnostics.iso file as the default boot image.