9.7.4.2 Creating a Snapshot of a Full Database

You create an Exadata snapshot of a full database.

The following figure shows the lifecycle of an Exadata test master database and snapshot databases where the test master is based on an Oracle Data Guard replica.

Figure 9-13 Lifecycle of Test Master and Snapshot Databases
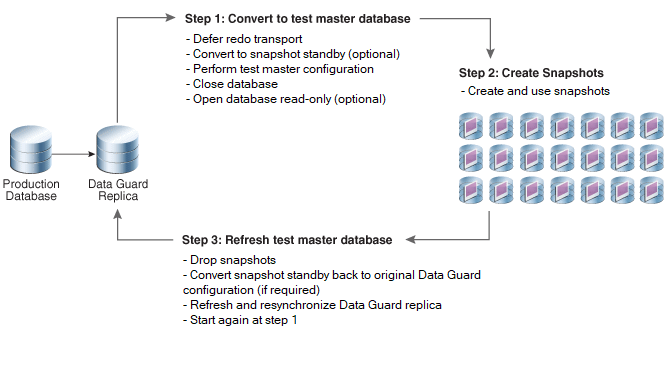
Description of Figure 9-13 follows
Description of "Figure 9-13 Lifecycle of Test Master and Snapshot Databases"

Note that the test master database cannot be used as a failover target to provide high availability or disaster recovery (a Data Guard configuration may have multiple replicas that can each serve different purposes). Similar to test master PDBs, test master databases cannot be modified while Exadata snapshots exist against them.

The test master database cannot be a read-only physical standby database that is in recovery mode (for example, Active Data Guard in Real Time Apply).

The test master database and their Exadata snapshots must be in the same Oracle ASM cluster environment.

Note:

If the test master is an Oracle RAC database, you have to do one of the following:

  • Create redo logs for all threads in the CREATE CONTROLFILE statement for the sparse clone, OR
  • Specify Oracle Managed Files for the redo logs using the ONLINE_LOG_CREATE_DEST_1 initialization parameter in the SPFILE of the sparse clone to have the redo logs created automatically.
  1. In the test master database, create a sample control file script to use for your Exadata snapshot databases by backing up the existing control file to trace.

    Connect to the test master database via SQL*Plus as SYSDBA and do the following:

    1. Determine name and location of any trace file to be generated by your session.

      For example:

      SQL> SELECT value FROM v$diag_info WHERE name = 'Default Trace File';
      
      VALUE
      ---------------------------------------------------------------------------------
      /u01/app/oracle/diag/rdbms/TESTMASTER/TESTMASTER1/trace/TESTMASTER1_ora_26756.trc
    2. Run the BACKUP CONTROLFILE TO TRACE command to place the CREATE CONTROLFILE command into the trace file.
      SQL> ALTER DATABASE BACKUP CONTROLFILE TO TRACE;
    3. Retrieve the file shown for the Default Trace File.
  2. In the test master database, determine the existing file names for the rename that will happen in step 11.

    For example, log into SQL*Plus as SYSDBA and run the following:

    SET newpage 0
    SET linesize 999
    SET pagesize 0
    SET feedback off
    SET heading off
    SET echo off
    SET space 0
    SET tab off
    SET trimspool on
    SPOOL rename_files.sql
    SELECT 'EXECUTE dbms_dnfs.clonedb_renamefile -
    ('||''''||name||''''||','||''''||REPLACE(REPLACE(REPLACE(name,'.','_'),-
    'TESTMASTER','SNAPTEST'),'+DATA','+SPARSE')||''''||');' FROM v$datafile;
    EXIT

    The example script builds a file named rename_files.sql that contains statements for each data file similar to the following:

    EXECUTE dbms_dnfs.clonedb_renamefile (
    '+DATA/TESTMASTER/DATAFILE/system.257.865863315',
    '+SPARSE/SNAPTEST/DATAFILE/system_257_865863315');
    

    In the example script, the REPLACE function:

    • Replaces periods with underscores in the original file name

    • Replaces the original database name of TESTMASTER with SNAPTEST

    • Replaces the original disk group name of +DATA with +SPARSE

    If you modify the example to suite your environment, ensure that you maintain consistency throughout the rest of the procedure.

  3. Create an init.ora file with the contents of the test master SPFILE.
    SQL> CREATE PFILE = 'init_TestMaster.ora' FROM SPFILE;
  4. Shut down the test master.
    SQL> shutdown;
  5. Create an init.ora file for the Exadata snapshot database.

    You can use the init.ora file of the test master as a template, but make sure to change the db_name and control_files entries.

    For this procedure, the init.ora file for the Exadata snapshot database is referenced as snap_init.ora in commands and examples.

    $ cp init_TestMaster.ora snap_init.ora

    Modify snap_init.ora with the new database name, new control file name, and audit file destination, for example:

    db_name = SNAPTEST
    control_files = '+DATA/SNAPTEST/control1.f'
    audit_file_dest=/u01/app/oracle/admin/snaptest/adump

    You can save the modified snap_init.ora file as a template for creating additional snapshot copies of the test master.

  6. Create a script to create a control file for the Exadata snapshot database.
    You will use this script later in step 10.
    1. Examine the trace file generated in step 1 and locate the CREATE CONTROLFILE command that includes the RESETLOGS clause.

      The required command is located in the trace file immediately after the following comments:

      --     Set #2. RESETLOGS case
      -- 
      -- The following commands will create a new control file and use it
      -- to open the database.
      -- Data used by Recovery Manager will be lost.
      -- The contents of online logs will be lost and all backups will
      -- be invalidated. Use this only if online logs are damaged.
    2. Copy the CREATE CONTROLFILE command into a new script file.

      Copy only the complete CREATE CONTROLFILE command and discard all surrounding comments and commands.

      For example, the script file may be named crt_ctlfile.sql.

    3. Modify the CREATE CONTROLFILE command to create a control file for the Exadata snapshot database.

      The control file should be created with the Exadata snapshot database name, new log file names, and the data file names of the test master. The new log files can be in any disk group that has enough space, but they should not be created in the sparse Oracle ASM disk group.

      The following shows an example CREATE CONTROLFILE command. In the example, SNAPTEST is the Exadata snapshot database. The LOGFILE lines specify the new log file locations, and the DATAFILE lines specify the data file locations for the test master database.

      CREATE CONTROLFILE REUSE SET DATABASE SNAPTEST RESETLOGS ARCHIVELOG
            MAXLOGFILES 32 
            MAXLOGMEMBERS 2 
            MAXINSTANCES 1 
            MAXLOGHISTORY 908 
        LOGFILE 
            GROUP 1 '+DATA/SNAPTEST/t_log1.f' SIZE 100M BLOCKSIZE 512,
            GROUP 2 '+DATA/SNAPTEST/t_log2.f' SIZE 100M BLOCKSIZE 512
        DATAFILE
            '+DATA/TESTMASTER/DATAFILE/system.257.865863315',
            '+DATA/TESTMASTER/DATAFILE/sysaux.258.865863317',
            '+DATA/TESTMASTER/DATAFILE/sysext.259.865863317',
            '+DATA/TESTMASTER/DATAFILE/tbs_1.256.865863315'
        CHARACTER SET WE8DEC; 
      

    You can save the modified script file as a template for creating additional snapshot copies of the test master.

  7. Create the audit_file_dest directory on all nodes on which the snapshot will be running.
    $ mkdir -p /u01/app/oracle/admin/snaptest/adump
  8. Create the directories in Oracle ASM for the snapshot data files.

    For example:

    $ asmcmd -p 
    ASMCMD > cd +SPARSE 
    ASMCMD [+sparse] > mkdir SNAPTEST 
    ASMCMD [+sparse] > cd SNAPTEST 
    ASMCMD [+sparse/snaptest] > mkdir DATAFILE

    If the test master is a container database (CDB), create additional data file sub-directories for each pluggable database (PDB). Use the globally unique identifier (GUID) for each PDB, which is available in the V$PDBS view.

    For example:

    $ sqlplus / as sysdba
    SQL> ALTER SESSION set container=PDB1;
    SQL> SELECT guid FROM v$pdbs;
    
                                GUID
    –-------------------------------
    A839E00B5E9E7820E053412E850A5F18
    $ asmcmd -p 
    ASMCMD > cd +SPARSE 
    ASMCMD > cd +SPARSE/SNAPTEST 
    ASMCMD [+sparse/snaptest] > mkdir A839E00B5E9E7820E053412E850A5F18
    ASMCMD [+sparse/snaptest] > cd A839E00B5E9E7820E053412E850A5F18
    ASMCMD [+sparse/snaptest/A839E00B5E9E7820E053412E850A5F18] > mkdir DATAFILE
  9. Start a database instance pointing to the Exadata snapshot database init.ora file (snap_init.ora) using the following commands:
    $ sqlplus / as sysdba
    SQL> startup nomount pfile=snap_init.ora
    
  10. Create the Exadata snapshot control file using the script created in step 6.

    In the following example the script is named crt_ctlfile.sql.

    SQL> @crt_ctlfile
    
  11. Run the script you modified in step 2.

    All the files must be renamed prior to opening the Exadata snapshot database.

    Connect using SQL*Plus as SYSDBA to the Exadata snapshot database and run the following command:

    SQL> @rename_files
    

    This script modifies the permissions of the test master database files stored in Oracle ASM, marking them as READONLY.

    The dbms_dnfs.clonedb_renamefile procedure, which is called by rename_files.sql, sets up the parent-child relationship between the test master database and the snapshot database, and renames the file names in the snapshot database's control file.

  12. Open the Exadata snapshot database with the RESETLOGS option:
    SQL> ALTER DATABASE OPEN RESETLOGS;
    
  13. Confirm that the Exadata snapshot files are child files of the test master database. Connect using SQL*Plus as SYSDBA to the Exadata snapshot, and run the following command:
    SQL> SELECT filenumber num, clonefilename child, snapshotfilename parent
    FROM V$CLONEDFILE;
    

    The following is an example of the output from the query:

    NUM  CHILD                                        
    ---- ---------------------------------------------
    PARENT 
    -----------------
    1     +SPARSE/SNAPTEST/DATAFILE/system_257_865863315
    +DATA/TESTMASTER/DATAFILE/system.257.865863315
    
    2     +SPARSE/SNAPTEST/DATAFILE/sysaux_258_865863317
    +DATA/TESTMASTER/DATAFILE/sysaux.258.865863317
    
    3     +SPARSE/SNAPTEST/DATAFILE/sysext_259_865863317
    +DATA/TESTMASTER/DATAFILE/sysext.259.865863317
    
    4     +SPARSE/SNAPTEST/DATAFILE/tbs_1_256_865863315
     +DATA/TESTMASTER/DATAFILE/tbs_1.256.865863315 
  14. Log in using SQL*Plus to the Exadata snapshot database, and add temp files to the TEMP tablespace. This is a full size temp file, not a sparse temp file.
    SQL> ALTER TABLESPACE temp ADD TEMPFILE '+DATA' SIZE 10G;
    

    Additionally, for a snapshot of a complete CDB, connect to each PDB and add a temp file to the PDB-specific TEMP tablespace.

    For example:

    SQL> ALTER SESSION set container=PDB1;
    SQL> ALTER TABLESPACE temp ADD TEMPFILE '+DATA' SIZE 10G;