Browsing Through Time and Pin Operation
AHF Scope display is dynamic when connected to a GIMR and receiving live data in real-time. AHF Scope is receiving new samples and advancing all timelines. With every new sample or with a change of a cursor position, the corresponding time point is automatically displayed with a set of abnormal probes together with their values. This time point is indicated by a vertical marker. Once a time point of interest is identified, it can be "pinned" using
- Double-click any time at the target status timeline.
- Press the Hot Ley "p" while hovering over target status timeline.
- Press the left or right arrow key while hovering over target status timeline.
The pinned time point may be fine-tuned by pressing the left or right arrow keys and observing the displayed timestamp. Once the time point is pinned, the position marker will no longer follow the cursor. Its color changes from orange to blue to indicate this mode of operation. Moving the cursor to any other time and pressing "p" changes the pin point to the new location. Pressing "f" will unpin the time point causing it to again follow the cursor.
Note that pinning to a specific time point selects its corresponding set of probes in abnormal state. When browsing through the visible values of this set, the pin point can be preserved. To achieve this, either hover cursor over the timelines of the probes, or use the down arrow key to move focus to these timelines. Press and hold the Control key and move the timestamp marker sideward using mouse or left or right arrow keys. Besides the light blue pin marker, a second marker is displayed following the cursor position. The bottom information line shows the time point associated with this marker. The floating label at the bottom of each bar graph shows the values at the position of the cursor.
Figure 6-13: Browsing Through Time and Pin Operation
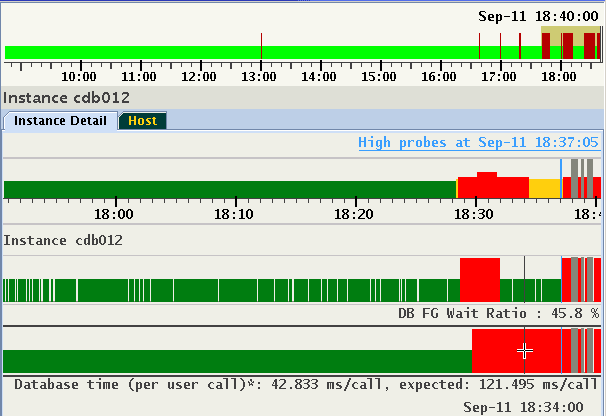
Image shows a set of two probes in abnormal state at pinned time 18:37:05. Press the Control key and move the cursor along the timeline. Each position corresponds to a different point in time. In this example, the values sampled at 18:34:00 of a set of probes selected at 18:37:05 are shown. With the Control key remaining pressed, use the left ot right arrow keys to step through time points one sample at a time.
To activate this feature permanently, select the checkbox "Follow Cursor" in the floating menu.
Pin point is automatically preserved in every entity sharing the same cluster. This feature is used to move between different panels and explore values of probes at the same time point. When viewing live data, the pin will be released when its timestamp reaches the left or right end of the viewport.