3.2.3 Installation

Follow the installation procedures sequentially to install Oracle Health Check Collections Manager.

Note:

Upgrade Oracle Health Check Collections Manager directly from Oracle Autonomous Health Framework.

3.2.3.1 Configuring Oracle Application Express and Creating a Workspace

Configure Oracle Application Express and create a workspace.

  1. Download the latest version of Oracle Application Express.
  2. To install and configure Oracle Application Express, refer to the Application Express Installation Guide:
  3. Create a workspace.
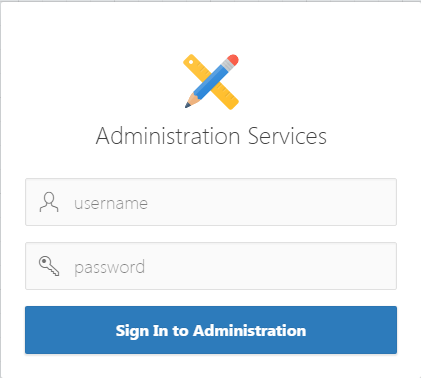
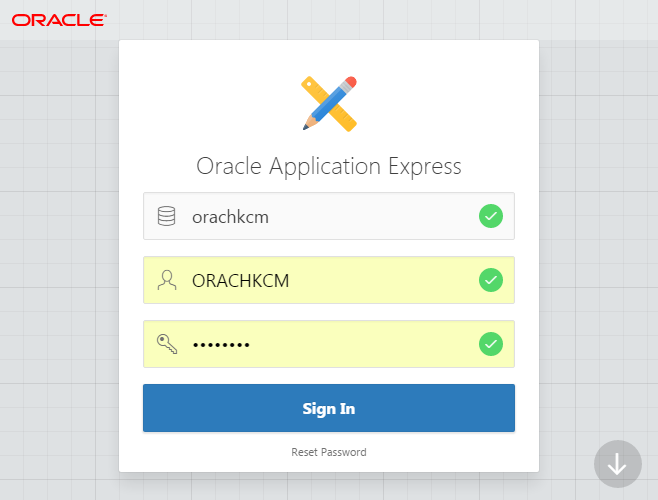
    1. Log in to Oracle Application Express administration services.

      Note:

      The URLs used for accessing the Oracle Health Check Collections Manager application depend on how Oracle Application Express was deployed initially.
      • If you have configured Oracle Application Express using the Oracle HTTP Server with mod_plsql, then specify the URL as follows:
        http://host:port/pls/apex/apex_admin
      • If you have configured Oracle Application Express the Oracle XML DB HTTP listener with the embedded PL/SQL gateway, then specify the URL as follows:
        http://host:port/apex/apex_admin
        For example:
        http://dbserver.domain.com:8080/apex/apex_admin
      • The default schema user for Oracle Application Express administration services in the Oracle database is ADMIN.
      • The password is the one you gave at the time of configuring the Oracle Application Express component in the Oracle database.

      Figure 3-36 Administration Services Login

      Description of Figure 3-36 follows
      Description of "Figure 3-36 Administration Services Login"
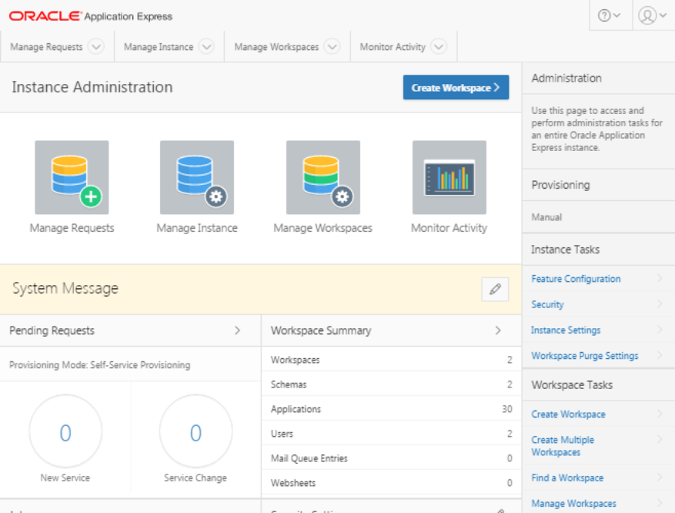
    2. In the Oracle Application Express Admin home page, click Manage Workspaces.
    3. Under Workspace Actions, click Create Workspace.

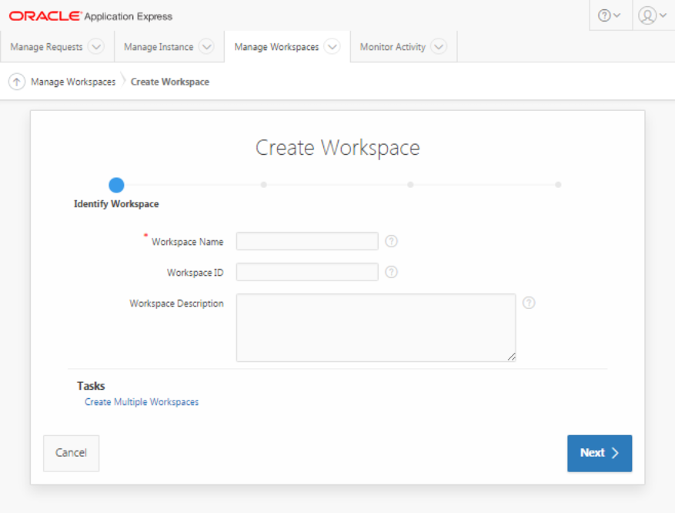
      The Create Workspace Wizard appears.

      • Identify Workspace:
        1. Workspace Name: Enter a unique workspace name, for example, ORAchk_CM_WS.
        2. Workspace ID: Leave Workspace ID blank to have the new Workspace ID automatically generated.

          Workspace ID must be a positive integer greater than 100000.

        3. Workspace Description: Enter workspace description.
        4. Click Next.

        Note:

        Associate a workspace with a database schema.
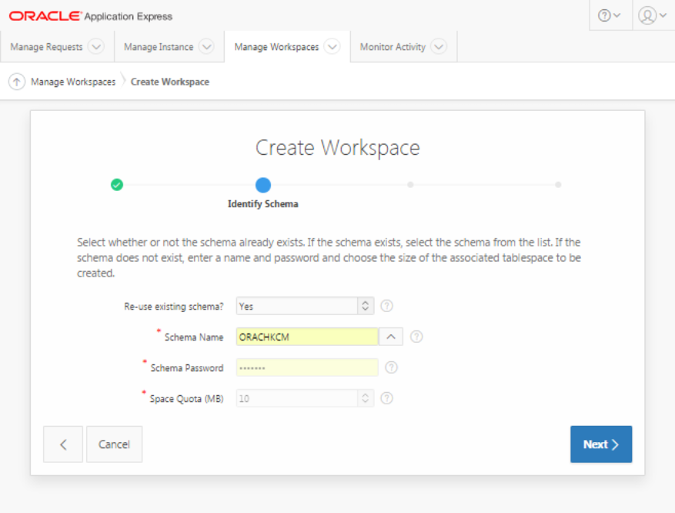
      • Identify Schema:
        1. Specify whether you are reusing an existing schema or creating a new one. This depends on whether you already have Oracle Orachk and Oracle Exachk configured to upload data to a schema in the database. If you do, then specify the existing schema. If not, then the name of the schema you create must be the one you intend to use for uploading the Oracle Orachk data once configured.
        2. If you choose an existing schema in the database, then it should not be an Oracle Application Express administration schema (admin).
          • If you are using an existing schema:
            1. For Re-use existing schema, select YES.
            2. Select a schema from the list.
            3. Click Next.

              Figure 3-39 Identify Schema - Reuse Schema

              Description of Figure 3-39 follows
              Description of "Figure 3-39 Identify Schema - Reuse Schema"
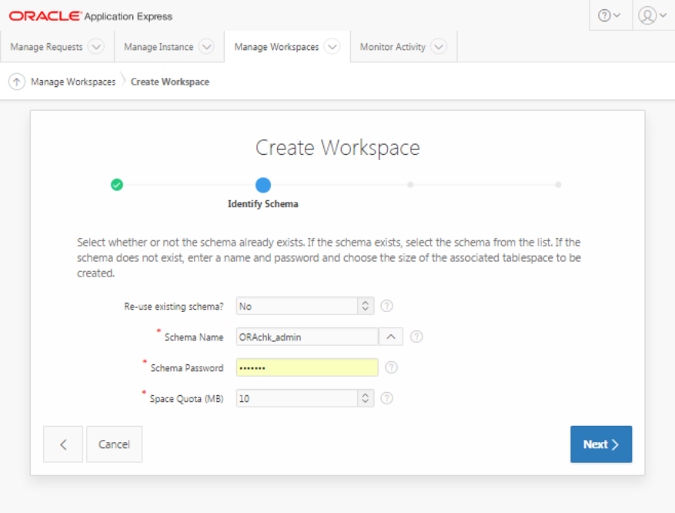
          • If you are creating a new schema:
            1. For Re-use existing schema, select NO.
            2. Enter the schema name and password, for example, ORAchk_admin, and so on.
            3. Specify the space quota.
            4. Click Next.

              Figure 3-40 Identify Schema - New Schema

              Description of Figure 3-40 follows
              Description of "Figure 3-40 Identify Schema - New Schema"

              Note:

              Minimum Space Quota should not be less than 100 MB to prevent application import failures.

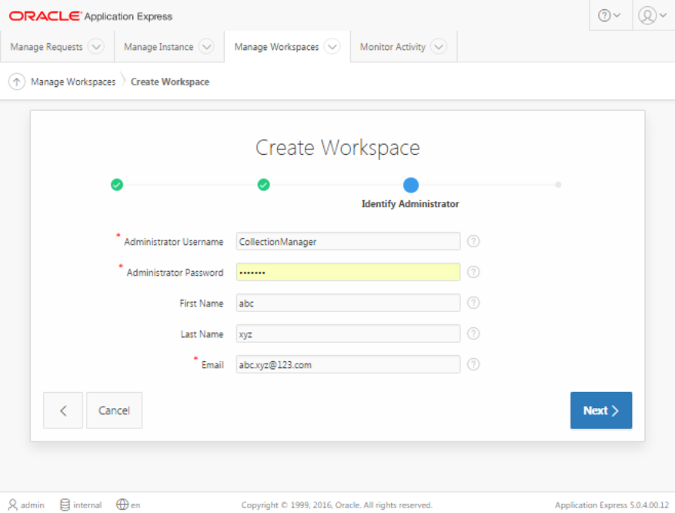
      • Identify Administrator:
        1. Enter administrator user name and password.
        2. Enter Personal details.
        3. Click Next.

          Figure 3-41 Identify Administrator

          Description of Figure 3-41 follows
          Description of "Figure 3-41 Identify Administrator"
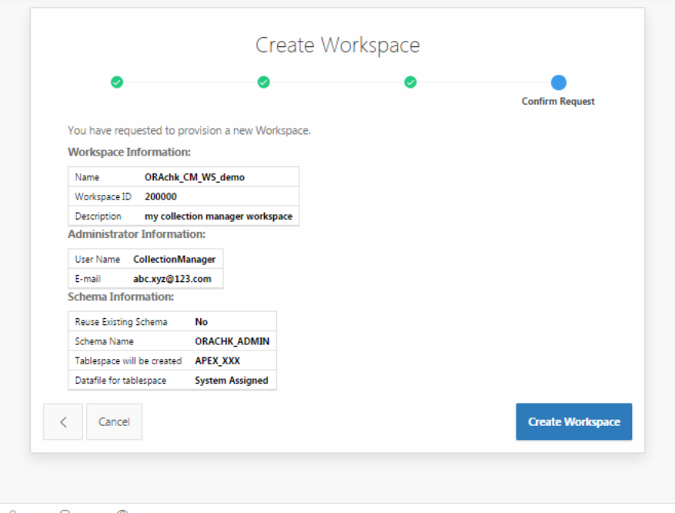
      • Confirm your selections and then click Create Workspace.

        Figure 3-42 Create Workspace - Confirm Request

        Description of Figure 3-42 follows
        Description of "Figure 3-42 Create Workspace - Confirm Request"

        Your workspace is created.

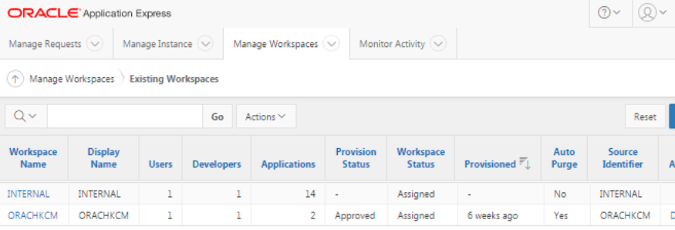
  4. Click Manage Workspaces.
    • Under Workspace Reports, click Existing Workspaces.

      Figure 3-43 Manage Workspaces - Existing Workspaces

      Description of Figure 3-43 follows
      Description of "Figure 3-43 Manage Workspaces - Existing Workspaces"
    • To edit Workspace information, click the workspace name, edit any necessary details, and then click Apply Changes.
    • Log out from Oracle Application Express Administration services.

3.2.3.1.1 Log in to the Workspace

Log in to Oracle Application Express admin user workspace using these procedures.

  1. Log in to Oracle Application Express Admin User Workspace.

    Note:

    The URLs used for accessing the Oracle Health Check Collections Manager application depend on how Oracle Application Express was deployed initially.

    • If you have configured Oracle Application Express the Oracle HTTP Server with mod_plsql, then specify the URL as follows:
      http://host:port/pls/apex/apex_admin
    • If you have configured Oracle Application Express using the Oracle XML DB HTTP listener with the embedded PL/SQL gateway, then specify the URL as follows:
      http://host:port/apex/apex_admin
      For example:
      http://dbserver.domain.com:8080/apex/apex_admin
  2. To log in, enter the workspace name, workspace user name, and password details.

    Figure 3-44 Log in to the Workspace

    Description of Figure 3-44 follows
    Description of "Figure 3-44 Log in to the Workspace"
  3. For the first time login, Application Express prompts you to change the password.
  4. Log in again using the new password.

3.2.3.1.2 Oracle Application Express User Accounts

Oracle Application Express provides three types of users, namely, workspace administrators, developers, and end users.

Table 3-10 Oracle Application Express Types of Users

Type of User Description

Workspace administrators

Workspace administrators can also create and edit user accounts, manage groups, and manage development services.

Developers

Developers can create and modify applications and database objects.

End users

End users are non-administrative who have no development privileges and can only access applications that do not use an external authentication scheme. For the Oracle Health Check Collections Manager Application, almost all the users fall into this category. A special role within the Oracle Health Check Collections Manager Application, DBA Managers, and the DBAs manage all application users.

To grant access to the Oracle Health Check Collections Manager Application for non-administrative users, log in to the Workspace as an administrator.

  1. Log in to Oracle Application Express admin user workspace.
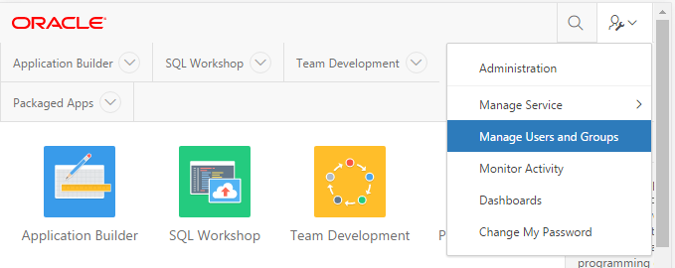
  2. Click the Administration tab.
  3. Click Manage Users and Groups.

    Figure 3-45 Manage Users and Groups

    Description of Figure 3-45 follows
    Description of "Figure 3-45 Manage Users and Groups"
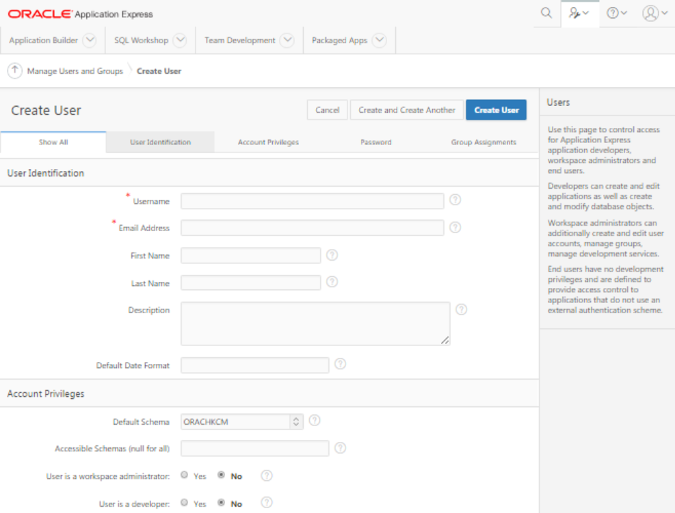
  4. Click Create User.
    • These users are application admin users, DBA Managers, and DBAs who can authenticate to the application and manage their collections.

  5. Fill in the user details.
    • Follow a consistent naming convention and specify unique user names. A reasonable naming convention would be firstname.lastname.

      Figure 3-46 Application Express User Accounts

      Description of Figure 3-46 follows
      Description of "Figure 3-46 Application Express User Accounts"
    • For non-administrators, use the default, No for User is a developer and User is a Workspace Administrator options.

  6. Assign a temporary password for each user and communicate that password to them. Application Express prompts them to change this password the first time they log in.
  7. Click Create User.

3.2.3.2 Install Oracle Health Check Collections Manager Application

To install Oracle Health Check Collections Manager, follow these procedures.

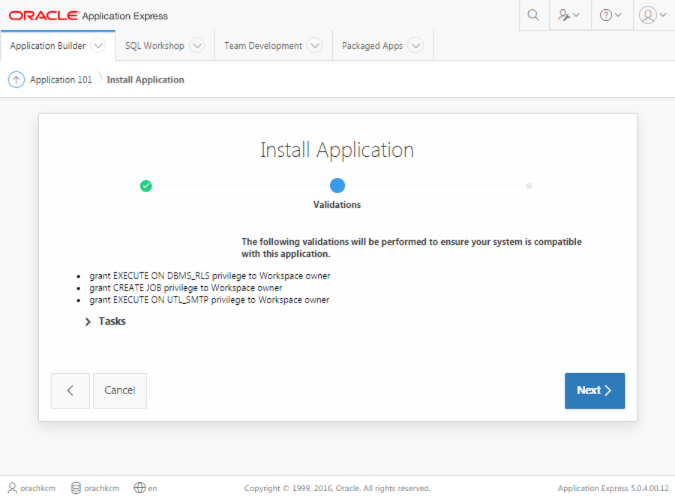
  1. Verify if the workspace admin schema owner and the owner of the schema used for import of the Oracle Health Check Collections Manager Application have grants to:
    • Create Job

    • Execute on the database packages DBMS_RLS and UTL_SMTP owned by the SYS user.

    The Oracle Health Check Collections Manager Application is distributed as an SQL script. Stage the script on the workstation that is used to install the application.

    Execute privilege on the database package UTL_SMTP is required only if you use Oracle Health Check Collections Manager Email Notification System Feature. Oracle Health Check Collections Manager uses UTL_SMTP package on one of the objects RAC13_EMAIL. Failing to grant EXECUTE ON UTL_SMTP privilege to workspace owner ends up in compilation error. You can see this information in the Installation Summary. Ignore this information, if you are not using the Oracle Health Check Collections Manager Email Notification System feature.

  2. Verify if you have required privileges by running the SQL query as follows:
    select GRANTEE,TABLE_NAME,PRIVILEGE  from USER_TAB_PRIVS; 
    GRANTEE      TABLE_NAME	PRIVILEGE
    CM_USER     DBMS_RLS		EXECUTE
    CM_USER     UTL_SMTP		EXECUTE
    
    select USERNAME,PRIVILEGE from USER_SYS_PRIVS;
    USERNAME    PRIVILEGE
    CM_USER     CREATE JOB
    
  3. Log in to the Oracle Application Express workspace administration services.
  4. Click Application Builder on the Home page.
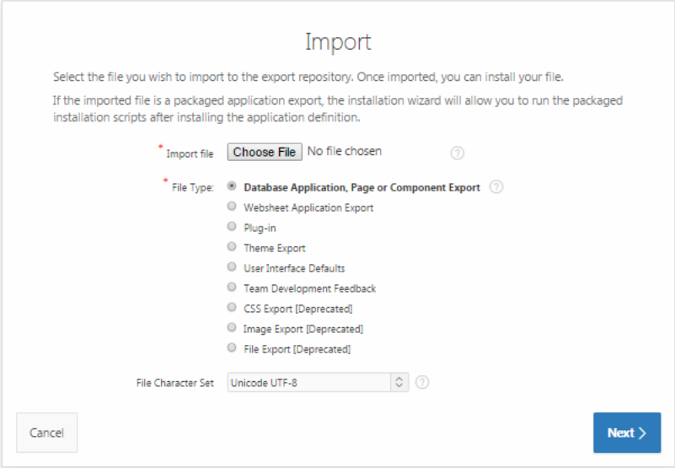
  5. Click Import .
  6. Click Choose import file, select the SQL script appropriate for the Oracle Application Express version you are using:
    • Apex5_CollectionManager_App.sql when using Oracle Application Express 5.x

  7. File type: select the default option Database Application, or Component Export.
  8. File Character Set: select the default option Unicode UTF-8.
  9. Click Next.
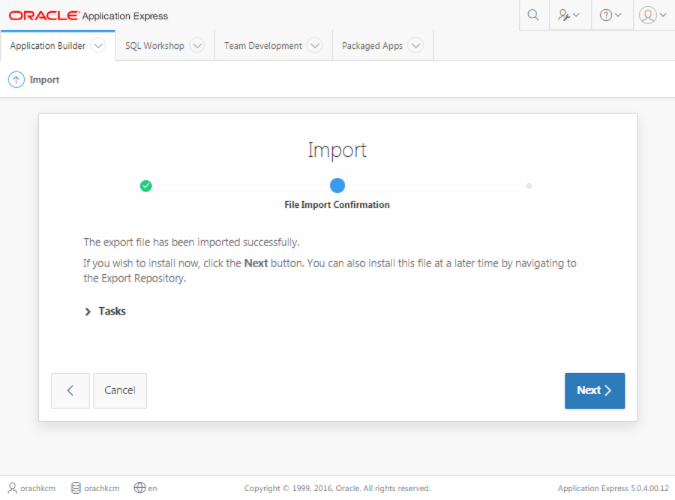
  10. Click Install Application.

    Figure 3-50 File Import Confirmation

    Description of Figure 3-50 follows
    Description of "Figure 3-50 File Import Confirmation"
  11. Click Next.

    Note:

    Ensure that the execute privilege on DBMS_RLS and UTL_SMTP packages and create job sys privilege are granted to parsing schema owner before starting the import of the application. This prevents database support object creation failures that prevent the proper installation of the application.

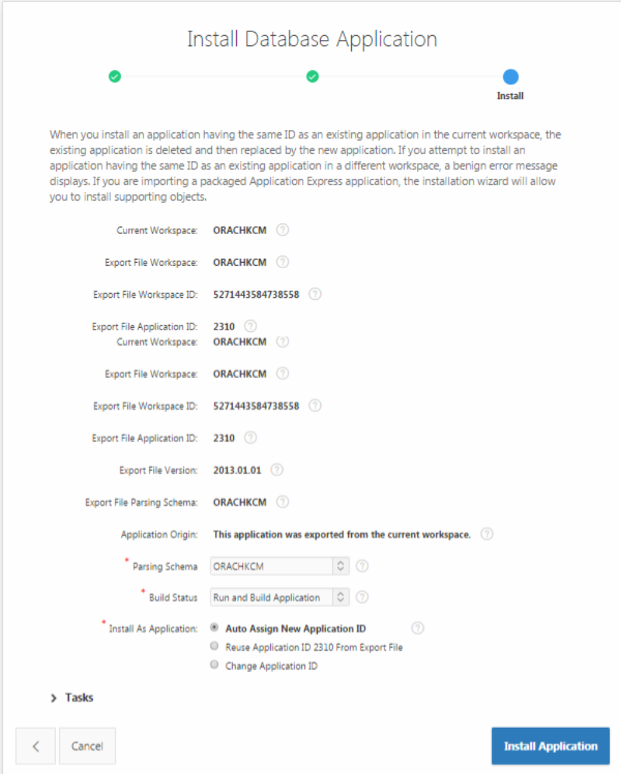
    • For Parsing Schema, select the schema specified for the workspace.

    • Build Status: select default option Run and Build Application.

    • Install As Application.

    • Select any one option based on your requirement or if possible use the same application id as it is easy to upgrade the application in future. However, the application Id must be unique. Ensure that the application ID is not used by any other application, or any workspace administrators within Oracle Application Express Administration server.

      Figure 3-51 Install Application

      Description of Figure 3-51 follows
      Description of "Figure 3-51 Install Application"
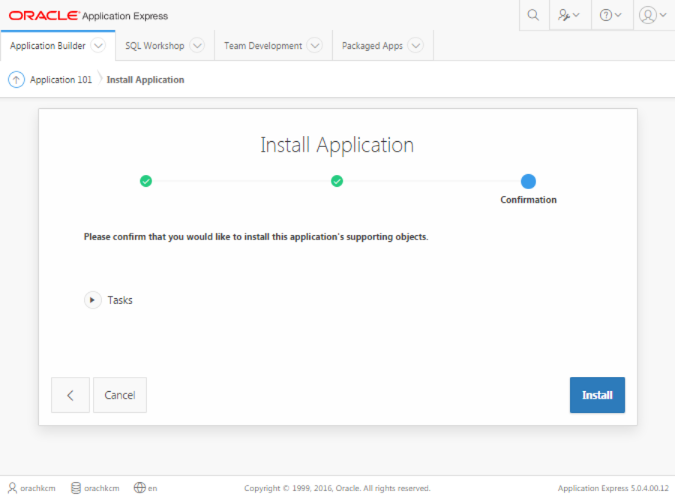
  12. Click Install Application.
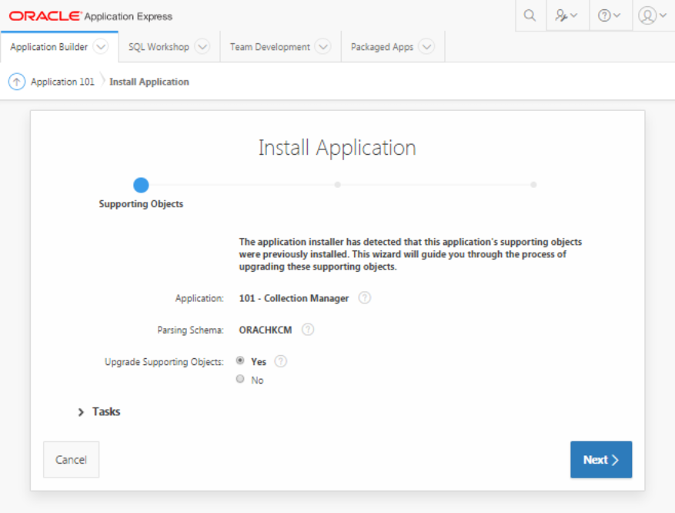
  13. Click Next.

    Figure 3-54 Install Applications Supporting Objects

    Description of Figure 3-54 follows
    Description of "Figure 3-54 Install Applications Supporting Objects"
  14. Click Install.

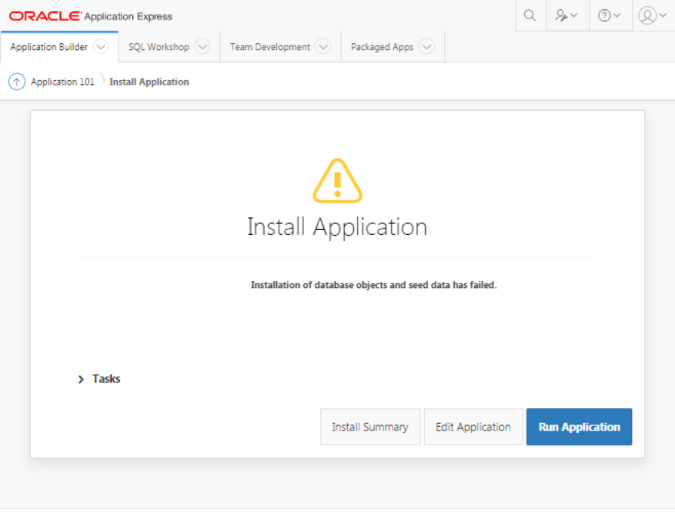
    Figure 3-55 Application Installed Successfully

    Description of Figure 3-55 follows
    Description of "Figure 3-55 Application Installed Successfully"
  15. Review the Installation summary for any errors or installation of database objects and seed data has failures.
  16. Capture the application ID generated for the application from the dialog upon successful installation of the application.

    The application ID is used in the URLs for accessing the application. Distribute the correct URL to the eventual users of the application.

  17. Click Run Application.

3.2.3.3 Log in to Oracle Health Check Collections Manager Application

To log in to Oracle Health Check Collections Manager, follow these procedures.

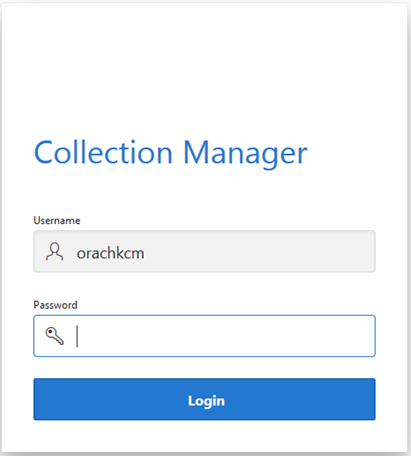
  1. Enter user name and password details to log in to the Oracle Health Check Collections Manager Application, click Login.

    Figure 3-56 Log in to Oracle Health Check Collections Manager Application

    Description of Figure 3-56 follows
    Description of "Figure 3-56 Log in to Oracle Health Check Collections Manager Application"

    After successful login, you are all set to use Oracle Health Check Collections Manager Application and its features.

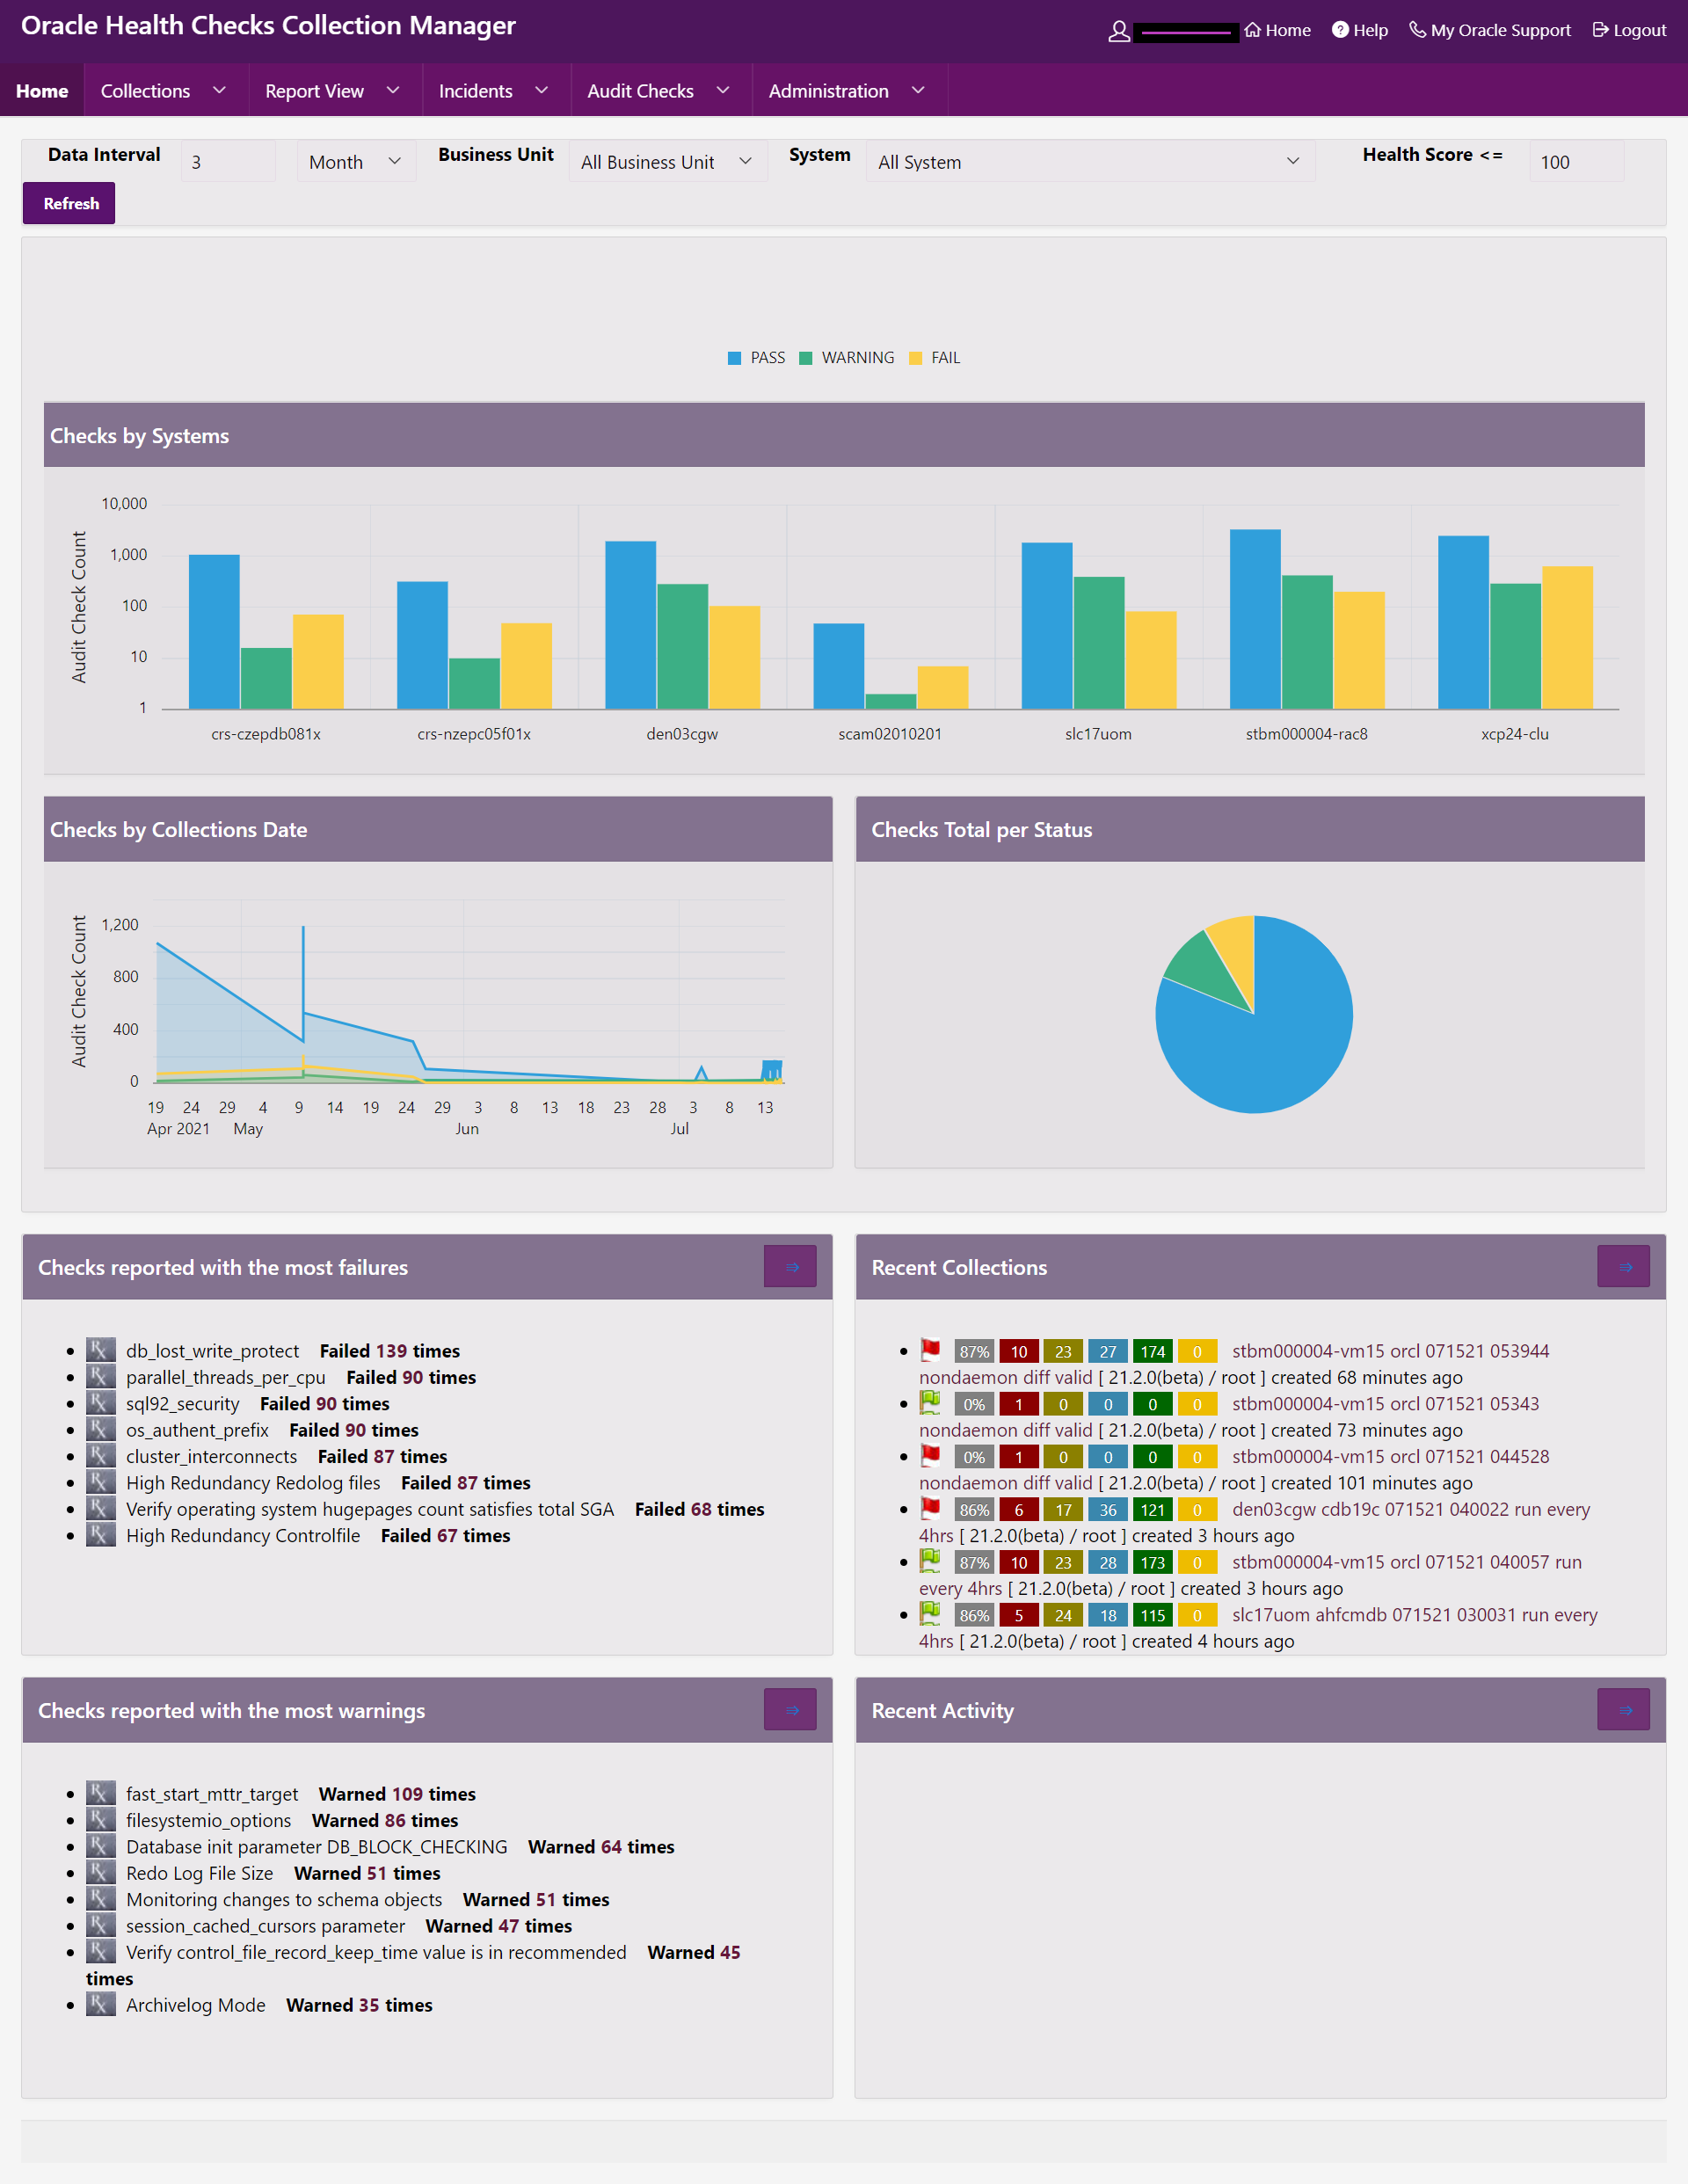
    By default, the Oracle Health Check Collections Manager Application is deployed with some default sample data for acclimating new users to the application. Oracle Health Check Collections Manager displays the sample data In the Home page. Sample data is hidden automatically once your own data starts streaming into the application as you establish the automation and upload functionality of the tool. If you are already using the upload functionality and have your audit check results data in the database tables, and that data replaces the sample data.

    Figure 3-57 Oracle Health Check Collections Manager Default View

    Description of Figure 3-57 follows
    Description of "Figure 3-57 Oracle Health Check Collections Manager Default View"

    The Home page contains Oracle Jet Charts for Checks by Systems, Checks by Collection Date, and so on.

    Apply filters for all charts by hovering over the check statuses: PASS, WARNING, or FAIL and selecting or de-selecting them. This will still honor the global filters such as Data Interval, Business Unit, System, and Health Score.

    Click any chart series to display specific type of checks in detail for that system.

  2. Log in to Oracle Health Check Collections Manager Application as End user:
    • The end user is not an administrator. The end users have only limited access to the application. Non-administrator users cannot do any administrative access unless administrator or developer privileges are granted.

    • The End User accounts must exist in the workspace where the application is installed.

    • To log in to the application, end user needs an application URL and login credentials.

      Provide the end users with one of the following URLs (they are interchangeable) and the temporary password that was assigned for them.
      http://hostname:port/apex/f?p=ApplicationID
      http://hostname:port/pls/apex/f?p=ApplicationID
      For example:
      http://dbserver.domain.com:8080/apex/f?p=103
  3. Delete the sample data using one of two methods:

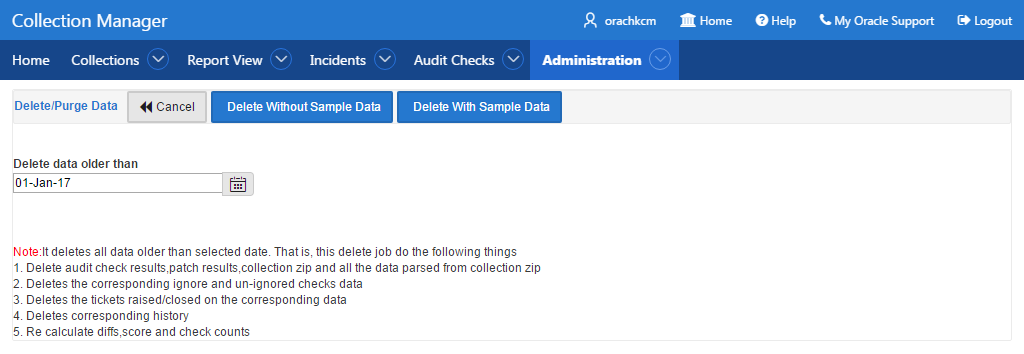
    Administration > Delete Old Data: Select a date and then click Delete With Sample Data.

    Figure 3-58 Oracle Health Check Collections Manager - Delete Old Data

    Description of Figure 3-58 follows
    Description of "Figure 3-58 Oracle Health Check Collections Manager - Delete Old Data"

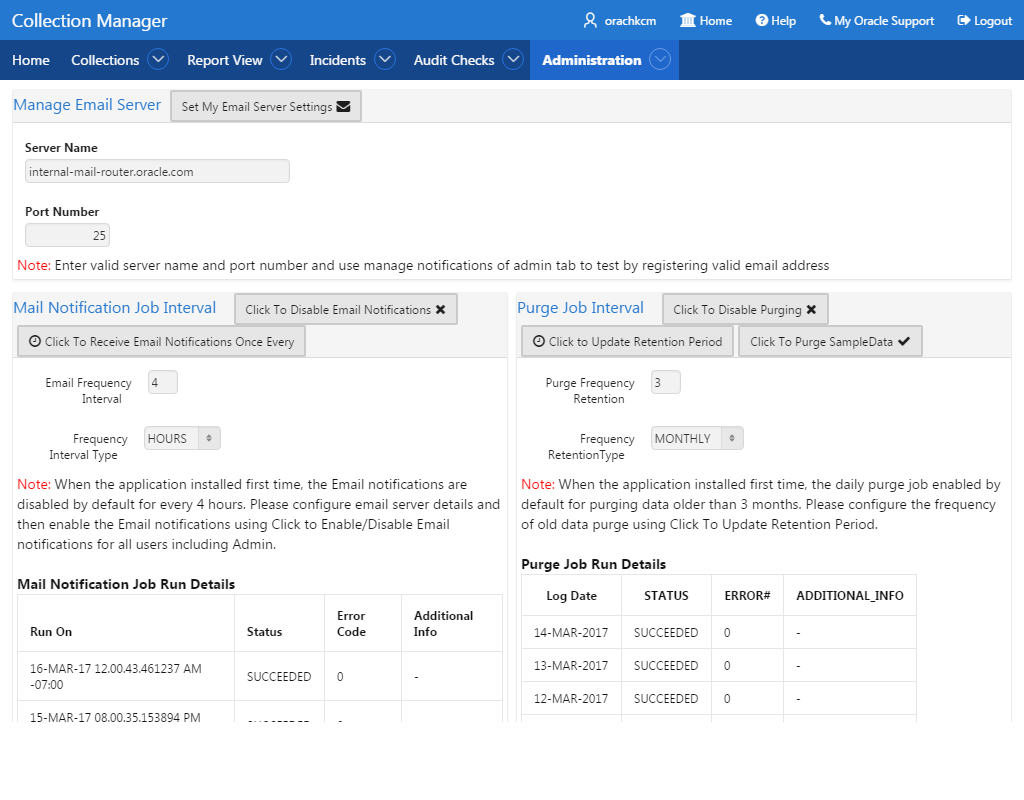
    Configure Email > Configure Mail Server/Notification/Purge Job: click Click To Purge SampleData.

    Figure 3-59 Oracle Health Check Collections Manager - Purge Sample Data

    Description of Figure 3-59 follows
    Description of "Figure 3-59 Oracle Health Check Collections Manager - Purge Sample Data"
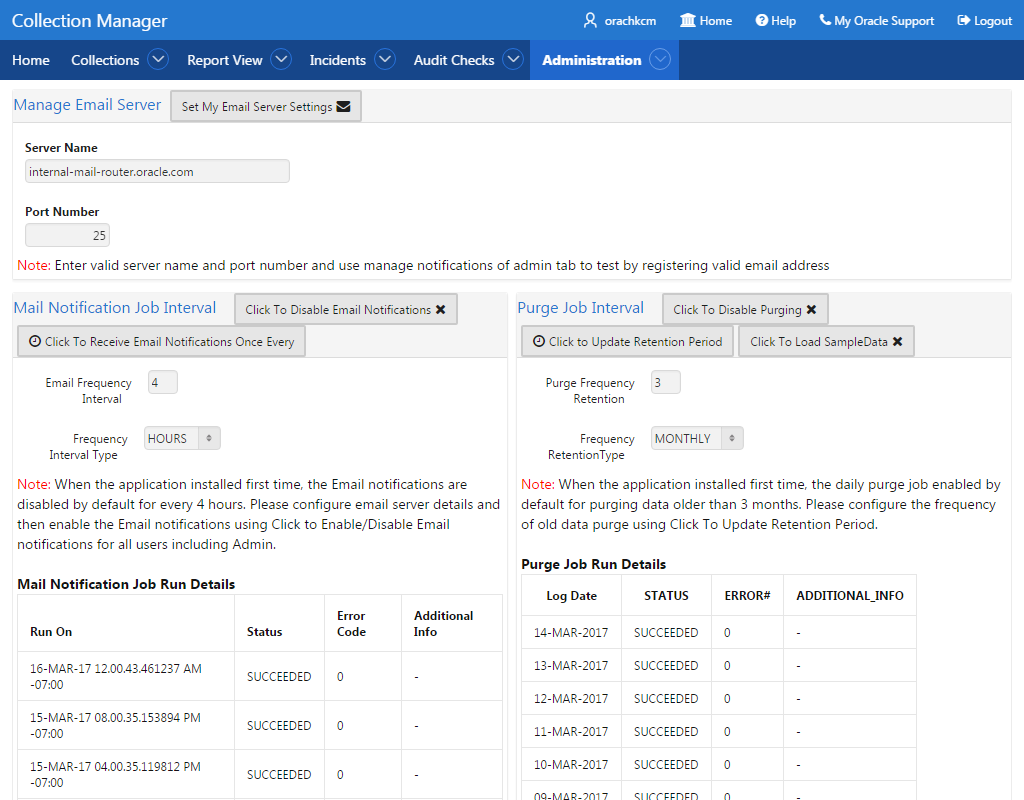
  4. To load sample data again, Configure Email > Configure Mail Server/Notification/Purge Job and then click Click to Load SampleData.

    Figure 3-60 Oracle Health Check Collection Manager - Load Sample Data

    Description of Figure 3-60 follows
    Description of "Figure 3-60 Oracle Health Check Collection Manager - Load Sample Data"

3.2.3.4 Apply a Theme

To apply a theme, follow these procedures.

  1. Enter user name and password details to log in to the Oracle Health Check Collections Manager Application, click Login.
  2. Click the Administration drop-down list and then select Application Theme Style.
  3. Select a theme from the Desktop Theme Style list, and then click Appy Changes.
    You can select any of the following Desktop Theme Styles:
    • Aubergine
    • Choco-Mint
    • Redwood-Light
    • Vita
    • Vita-Slate