5 Provisioning an Oracle Database Appliance Virtualized Platform

Oracle Database Appliance provides you with the option to reimage the system and configure the appliance as a virtualized platform.

Note:

You can provision Standard Edition and Standard Edition 2 Oracle Real Application Cluster (Oracle RAC) databases, but you must use Oracle VM virtualization on a virtualized platform on Oracle Database Appliance and follow the single socket per server licensing restriction. The single socket restriction means that you can use a maximum of 18 cores per server, in multiples of two. You can use the remaining cores for applications.

Determining if the System is Configured with a Virtualized OS Image

Before deploying a Virtualized Platform on Oracle Database Appliance, determine if the system has the Virtualized OS ISO image.

Oracle Database Appliance ships from the factory with a bare metal ISO image installed. To use the virtualization features, you must reimage the system with the Virtualized OS ISO image.

A bare metal system uses the odacli and odaadmcli commands. A virtualized system uses the oakcli commands.

Perform the following steps to determine if you need to re-image Oracle Database Appliance and install the Virtualization Platform ISO image:

  1. Log in as root.
  2. To verify that a system is a virtualized platform, enter the command oakcli show env_hw. For example:
    # oakcli show env_hw 
    VM-ODA_BASE ODA X7-2-HA

    The system is configured as a virtualized system when the command is valid and returns output that is prefixed with the string VM-ODA_BASE. For example, the output of the command shows that the platform is configured with a virtual machine environment (VM-ODA_BASE) and identifies the hardware platform.

    If the system is configured as a bare metal platform, then the command oakcli show env_hw is invalid.

Setting Up the Virtualized Platform

Set up the dom0 virtualized operating system on both nodes and configure the initial public network.

You must provision the virtualized operating system image on both nodes, either at the same time, or one after another.
  1. Download the Oracle Database Appliance 18.7 Virtualized OS ISO Image.
    1. From an external client machine, log on to My Oracle Support.
    2. Locate the patch for the Oracle Database Appliance Virtualized OS ISO Image. Refer to the Oracle Database Appliance Release Notes for the patch number.
    3. Select the patch version for release 18.7.
    4. Click Download to download the zip file onto your external client. Unzip the zip file onto external client to get the ISO image.
  2. Open a browser and connect to Oracle Integrated Lights Out Manager (ILOM) on Node0 as root.
    The Summary home page appears.
  3. Launch the Remote Console.
    1. Expand Remote Control in the left navigation.
    2. Click the Redirection tab.
    3. Click Launch Remote Console.
      The state of the system determines what appears on the Console page.
  4. Add the Virtualized OS ISO Image.
    1. Click the Devices tab, then select CD-ROM.
      A file browser on the local client opens.
    2. Browse to the Oracle Database Appliance Virtualized OS ISO Image, highlight the image, then click Open.
  5. Configure the CD-ROM as the next boot device.
    1. Expand Host Management in the left menu of the ILOM Remote Console tab.
    2. Click Host Control.
    3. Select CDROM from the Next Boot Device menu, then click Save.
  6. Power cycle the system.
    1. Click Power Control in the Host Management menu.
    2. Select Power Cycle.

    When the node comes back after the power cycle, reimaging starts automatically.

    It can take a couple of hours to reimage. The Running Post-Install scripts page is a static page and might give the impression that the reimaging process is not progressing. The post-install process during reimaging will wait until the synchronization between the partitions of the two mirrored local hard disks is complete, which can take 15 to 20 minutes to complete.

    To check the progress of resynchronization, press the ALT-F2 key combination to open a second console and enter the following command:

    # cat /proc/mdstat

    When the resynchronization is complete, reimaging is completed and the machine restarts.

  7. Repeat Steps 1 through 6 for Node1.
    Reimaging is node-specific. You must reimage both nodes. You can reimage both nodes at the same time.
  8. Verify that the host name in the Console is oak1 for Node0 and oak2 for Node1.
    If the host name is something other than oak1 or oak2, then reboot the node. You might need to reboot more than once.
    Once the image is completed on both nodes, you will see the screen with oak1 for Node0 (sc0).

    Note: Ensure that you provide the node numbers for both nodes during the reboot. Specify node number 0 for the first node and node number 1 for the second node.

  9. Use the command oakcli configure firstnet to configure a local or global network. For local network, run the command on both nodes. For global network, run the command on any one node.
    The global configuration sets the initial public network for both the nodes on Oracle Database Appliance, enabling you to download the deployment software onto the appliance.
    # oakcli configure firstnet
    Configure the network for the node(s)(local, global) [global]: 
    The network configuration for both nodes:
    Domain Name: example.com
    DNS Server(s): Primary Dns Server: 192.0.2.18 
                         Secondary Dns Server: 192.0.2.19
                         Tertiary Dns Server: 
    Node Name Host Name
    0 node1
    1 node2
    Choose the network interface to configure (net1, net2) [net1]: 
    Configure DHCP on net1 (yes/no) [no]: 
    INFO: You have chosen static configuration on net1
    Enter the IP address for net1 on Node 0: 192.0.2.18
    Enter the IP address for net1 on Node 1: 192.0.2.19
    Netmask for net1: 255.255.252.0
    Gateway Address for net1 [192.0.2.18]: 
    INFO: Plumbing the IPs now on Node 0 ...
    INFO: Restarting the network now on Node 0 ...
    Determining if ip address 192.0.2.18 is already in use for device net1...
    :::::::::::::::::::::::::::::::::::
    INFO: Plumbing the IPs now on Node 1 ...
    INFO: Restarting the network now on Node 1 ...
    :::::::::::::::::::::::::::::::::::
    
  10. Check the IP addresses to the nodes with the command oakcli show firstnet. For example:
    # oakcli show firstnet
    Node: 0
    Host Name: odax7-2ha-brm06-a-n0
    Domain Name: example.com
    Network BootProto IP Address Subnet Gateway
    ------------------------------------------------------------------------------------
    net1 static 192.0.2.18 255.255.252.0 192.0.2.1
    ------------------------------------------------------------------------------------
    Node: 1
    Host Name: odax7-2ha-brm06-a-n1
    Domain Name: example.com
    Network BootProto IP Address Subnet Gateway
    ------------------------------------------------------------------------------------
    net1 static 192.0.2.18 255.255.252.0 192.0.2.1
    ------------------------------------------------------------------------------------
    DNS Address: 192.0.2.18,192.0.2.19

Installing Virtualized Platform Software and Deploying the Appliance

Deploy the ODA_BASE domain for a virtualized platform and then deploy the appliance.

  1. Download and copy the template files to the /OVS directory on dom0 (Node 0).
    1. From an external client machine, log on to My Oracle Support and download the Oracle Database Appliance VM Template.
    2. Select the latest version from the menu.
    3. Click Download for each of the zip files to download the current Oracle Database Appliance template onto your external client.
  2. Copy the template files to the /OVS directory on Node 0 (oak1-dom0).
    1. Use either a Secure Copy (scp) command or a USB storage device to copy the ODA_BASE template from the external client to dom0 on Node 0. Use the /OVS directory on Node 0 (test0-dom0) as the target location.

      Note:

      If you use a USB drive to transfer the file, then format it first as FAT32, ext3, or ext4. NTFS file formats are not supported.

    2. Log into dom0 as root on Node 0 of Oracle Database Appliance. Remain logged in to dom0 while you complete the remaining steps in this task.
    3. From the /OVS directory, use the unzip command to extract the zip files.
      unzip p16186172_18.7.0.0.0_Linux-x86-64_1of4.zip
      unzip p16186172_18.7.0.0.0_Linux-x86-64_2of4.zip
      unzip p16186172_18.7.0.0.0_Linux-x86-64_3of4.zip
      unzip p16186172_18.7.0.0.0_Linux-x86-64_4of4.zip
      When extracted, you will have the following files: oda_base_18.7.0.0.0.gz01, oda_base_18.7.0.0.0.gz02, oda_base_18.7.0.0.0.gz03, and oda_base_18.7.0.0.0.gz04.
    4. Use the cat command to concatenate the files into a single file.
      The file name is determined by the version. Ensure that you use the correct file name from the download. Do not change the file name.
      cat oda_base_18.7.0.0.0.gz01 oda_base_18.7.0.0.0.gz02 oda_base_18.7.0.0.0.gz03 oda_base_18.7.0.0.0.gz04 > oda_base_18.7.0.0.0.tar.gz
      Make a note of the file name and location. You need to specify the following in the next step: /OVS/oda_base_18.7.0.0.0.tar.gz
  3. (Optional) Define the virtual local area network (VLAN) and deploy ODA_BASE from the /opt/oracle/oak/bin/ directory. When prompted, enter the absolute path and file name for the template file that you created in the previous step, core licensing, and the base domain memory allocation.
    The deploy oda_base option automatically deploys ODA_BASE on both nodes.
    Values, such as the number of available CPU cores and default memory, differ between Oracle Database Appliance Virtualized Platform hardware platforms. The following excerpt is an example that creates a VLAN named v1200 with a vlanID of 200 using the bond0 interface. The example defines 20 CPU cores, which means that 20 CPU cores are licensed on each node for a total of 40 CPU cores, and uses the default memory.
    # /opt/oracle/oak/bin/oakcli create vlan vl200 -vlanid 200 -if bond0
    Created vlan vl200
    
    # /opt/oracle/oak/bin/oakcli deploy oda_base
    Enter the template location: /OVS/oda_base_18.7.tar.gz
    Core Licensing Options:
      1. 2 CPU Cores
      2. 4 CPU Cores
      3. 6 CPU Cores
      4. 8 CPU Cores
      5. 10 CPU Cores
      6. 12 CPU Cores
      7. 14 CPU Cores
      8. 16 CPU Cores
       9. 18 CPU Cores
     10. 20 CPU Cores
     11. 22 CPU Cores
     12. 24 CPU Cores
     <continued ...>
       Selection[1 .. 37] (default 74 CPU Cores): 10
    INFO: Using the 20 cores
        DA base domain memory in GB(min 16, max 244)[default 244]: 244
    INFO: Using default memory size i.e. 244 GB
    Additional vlan networks to be assigned to oda_base ? (y/n) [n]:
    INFO: Deployment in non local mode
    INFO: Verifying active cores on local node
    INFO: Verified active cores on local node
    INFO: Verifying active cores on remote node
    NFO: Verified active cores on remote node
    INFO: Running the command to copy the template /OVS/oda_base_18.7.tar.gz to remote node 1
    
    oda_base_18.7.tar.gz    100% 7475MB 62.8MB/s   01:59
    INFO: Spawned the process 17728 in the deployment node 0
    INFO: Spawned the process 17729 in the node 1
    INFO: Validating LSI HBA PCI Cards on node 0
    INFO: Validating LSI HBA PCI Cards on node 0
    INFO: Validating LSI HBA PCI Cards on node 1
    INFO: Validating LSI HBA PCI Cards on node 1
    INFO: Deployment in local mode
    INFO: Deployment in local mode
    templateBuild-2017-02-14-23-51/swap.img
    templateBuild-2017-02-14-23-51/swap.img
    templateBuild-2017-02-14-23-51/System.img
    templateBuild-2017-02-14-23-51/System.img
    templateBuild-2017-02-14-23-51/u01.img
    templateBuild-2017-02-14-23-51/u01.img
    INFO: Extracted the image files on node 1
    INFO: The VM Configuration data is written to /OVS/Repositories/odabaseRepo/VirtualMachines/oakDom1/vm.cfg file
    INFO: Running /sbin/losetup /dev/loop0 /OVS/Repositories/odabaseRepo/VirtualMachines/oakDom1/System.img command to mount the image file
    INFO: Mount is successfully completed on /dev/loop0
    INFO: Extracted the image files on node 0
    INFO: Validated dom0 and odabase version
    INFO: Making change to the /OVS/Repositories/odabaseRepo/VirtualMachines/oakDom1
    /tmpmnt/boot/grub/grub.conf file
    INFO: Assigning IP to the second node...
    INFO: The VM Configuration data is written to /OVS/Repositories/odabaseRepo/VirtualMachines/oakDom1/vm.cfg file
    INFO: Running /sbin/losetup /dev/loop0 /OVS/Repositories/odabaseRepo/VirtualMachines/oakDom1/System.img command to mount the image file
    INFO: Mount is successfully completed on /dev/loop0
    INFO: Created oda base pool
    INFO: Validated dom0 and odabase version
    INFO: Making change to the /OVS/Repositories/odabaseRepo/VirtualMachines/oakDom1
    /tmpmnt/boot/grub/grub.conf file
    INFO: Assigning IP to the first node...
    INFO: Created oda base pool
    INFO: Starting ODA Base...
    INFO: Starting ODA Base...
    Using config file "/OVS/Repositories/odabaseRepo/VirtualMachines/oakDom1/vm.cfg"
    .
    Started domain oakDom1 (id=1)
    INFO: Storing the odabase configuration information
    Using config file "/OVS/Repositories/odabaseRepo/VirtualMachines/oakDom1/vm.cfg"
    Started domain oakDom1 (id=1)
    INFO: Storing the odabase configuration information
    #
    The ODA_BASE setup is complete.
  4. Verify that your deployment of ODA_BASE is valid and that ODA_BASE is configured.
    • Run the command xm list to confirm that ODA_BASE is configured. When properly deployed, oakDom1 appears in the output with your configured memory and vcpus.
      # xm list
      Name                                        ID   Mem VCPUs      State   Time(s)
      Domain-0                                     0  4096    40     r----- 482672.4
      oakDom1                                      2 32768     4     -b---- 132134.6
      
      
    • Run the command oakcli show oda_base
      # /opt/oracle/oak/bin/oakcli show oda_base
      ODA base domain
      ODA base CPU cores      :2
      ODA base domain memory  :32
      ODA base template       :/OVS/oda_base_18.7.tar.gz
      ODA base vlans          :[ 'priv1', 'net1']
      ODA base current status :Running
  5. (Optional) After deployment of oda_base, if you want to change CPU or memory of ODA_BASE, run oakcli configure oda_base:
    # oakcli configure oda_base
    Core Licensing Options:
            1. 2 CPU Cores
            2. 4 CPU Cores
            3. 6 CPU Cores
            4. 8 CPU Cores
            5. 10 CPU Cores
            6. 12 CPU Cores
            7. 14 CPU Cores 
            8. 16 CPU Cores 
            Current CPU Cores :10 
            Selection[1 .. 8](default 16 CPU Cores) : 5 
            ODA base domain memory in GB(min 16, max 244)(Current Memory 160G)[default 160] : 100 
    Additional vlan networks to be assigned to oda_base ? (y/n) [n]: n 
    Vlan network to be removed from oda_base ? (y/n) [n]: n 

    To ensure your changes are reflected in the system, run the oakcli restart oda_base command.

  6. Connect to ODA_BASE using vncviewer or vncsession using the dom0 host name and port 5900 (test0-dom0:5900).
  7. Use the oakcli configure firstnet to configure an initial public network on the first node (Node 0) to complete the ODA_BASE deployment.
    1. ssh to 192.168.16.27 from test0-dom0
    2. Log in as root user.
    3. Run the command oakcli configure firstnet from the /opt/oracle/oak/oakcli directory. Enter the ODA_BASE (Node 0) network information.

      The command uses an interactive script and prompts you for the information needed to configure the network. Enter values based on your environment requirements.

      When prompted to configure the network nodes, select the local option that configures the network on the logged-on node.

      Configure net1 as the network interface.

      # /opt/oracle/oak/bin/oakcli configure firstnet
      Select the Interface to configure the network on (eth1 eth2) [eth1]:
      Configure DHCP on eth1 (yes/no) [no]:
      INFO: You have chosen Static configuration 
      Enter the IP address to configure : ip_odabase_node
      Enter the Netmask address to configure : ip_netmask
      Enter the Gateway address to configure : ip_gateway 
    The IP address is plumbed and the network is restarted on the local node.
  8. Check the firmware versions on both nodes with the following command:
    [root@test0 ~]# oakcli show version -detail
  9. If all the component versions are not either up-to-date or at a higher version, then unpack the patch bundle on both nodes.
    [root@test0 tmp]# oakcli unpack -package patch_number
  10. Use the oakcli update command to update the server components such as disks, ILOM, BIOS, and firmware.
    [root@test0 tmp]# oakcli update -patch release_number --server
    INFO: DB, ASM, Clusterware may be stopped during the patch if required
    INFO: Both Nodes may get rebooted automatically during the patch if required
    Do you want to continue: [Y/N]?: y
    INFO: User has confirmed for the reboot
    INFO: Patch bundle must be unpacked on the second Node also before applying the patch
    Did you unpack the patch bundle on the second Node? : [Y/N]? : y
    INFO: All the VMs except the oda_base will be shutdown forcefully if needed
    Do you want to continue : [Y/N]? : y
    INFO: Running pre-install scripts
    INFO: Running prepatching on node 0
    INFO: Running prepatching on node 1
    oakcli update -patch release_number --storage
    [root@test0 ~]# oakcli update -patch release_number --storage
    WARNING: OAKD is not running in foreground mode.
    INFO: Cannot determine if VMs or shared repos are running.
    INFO: Patching may not shutdown all VMs/repos before patching
    Do you want to continue: [Y/N]?: y
    INFO: Proceeding with patching...
    INFO: DB, ASM, Clusterware may be stopped during the patch if required
    INFO: Both Nodes may get rebooted automatically during the patch if required
    Do you want to continue: [Y/N]?: y
    INFO: User has confirmed for the reboot
    Please enter the 'root' password :
    Please re-enter the 'root' password:
    INFO: Setting up the SSH
    ............Completed
    INFO: Running pre-install scripts
    ............Completed
    INFO: Running prepatching on node 0
    INFO: Running prepatching on node 1
    INFO: Completed pre-install scripts
    INFO: Shared Storage components need to be patched
    INFO: Patching storage on node 192.168.16.28
  11. After the firmware patching is completed, confirm that all appropriate components are updated
    # oakcli show version -detail
  12. Deploy the Oracle Grid Infrastructure and Oracle Database software on the appliance.
    1. Start the X server, and navigate to the /opt/oracle/oak/bin directory and execute the command oakcli deploy to start the Oracle Database Appliance Manager Configurator.
      # startx
      # /opt/oracle/oak/bin/oakcli deploy
      The Oracle Appliance Manager Welcome window is displayed.
  13. Click Next on the Oracle Appliance Manager Welcome window.
  14. Complete the Configuration Type.
    • If you want to use a configuration file that you created earlier with this version of the Configurator, then click Browse and locate the file on your client. Click Next.
    • If you do not have a configuration file, select the Custom configuration type and select the hardware model from the menu. Click Next.
  15. Enter or review the configuration details for your system, network, and database information. For details, see “Running the Standalone Oracle Database Appliance Configurator”.
  16. On the Summary page, review your configuration options and deploy your configuration.
    1. (Optional) Click Save to save the configuration file.
    2. Click Install to deploy the configuration.
    The deployment can take an hour to complete. Monitor the install progress. When the deployment is complete, go to the next step.
  17. Validate the deployment by executing the oakcli show version -detail command on ODA_BASE (Node 0).
    # /opt/oracle/oak/bin/oakcli show version -detail
    The output displays the System Version, Component Name, Installed Version, and Supported Version for each of the components.
  18. If you configured ASR, then verify the deployment, by running the following the command on Node0:
    # oakcli test asr

Creating a Configuration File for a Virtualized Platform
If you want to use the Configurator to create a virtualized platform configuration file before your Oracle Database Appliance system is delivered, then review these topics.

About the Standalone Oracle Database Appliance Configurator

Use the standalone Oracle Database Appliance Configurator to create an Oracle Database Appliance Virtualized Platform offline deployment plan and validate your network settings before the actual deployment.

If you prefer to configure your system at the time you deploy the virtualized platform, then you can wait and use the online Configurator that is part of virtualization image for Oracle Database Appliance.

The standalone Oracle Appliance Manager Configurator is a Java-based tool that enables you to generate your virtualized platform deployment plan and validate your network settings before the actual deployment. If you want to use this tool before deployment, then you must download and run the Configurator on a local client system. The local client can be a Linux, UNIX, MAC, or Windows system, and must be on the same network as the appliance.

The Configurator provides two types of configuration: Typical and Custom. The Typical configuration is recommended in most cases. Choose the Custom configuration option if you want to configure additional or alternate network interfaces, or if you want to override the default values for one or more of the following:

  • Database block size, language, territory, backup file location, or disk redundancy level for the DATA and RECO disk groups

  • Oracle Integrated Lights Out Manager (Oracle ILOM) server.

  • Oracle Auto Service Request (Oracle ASR) configuration. You can configure Oracle ASR after deployment.

  • Oracle Cloud File System mount point and file system size. Configure a Cloud FS if you want a non-database file location accessible by both nodes.

  • Network Time Protocol service server.

To see the default values for your version of Oracle Database Appliance software before choosing the Typical or Custom option, run the Configurator using the Custom option.

Oracle recommends that you use the Network Validation page in the Configurator to test your network settings. To test the network settings, you must run the Configurator on a client server that is connected to same network subnet that you intend to use for Oracle Database Appliance. If you do not do this, then the validation fails, regardless of whether or not you have completed required configuration.

At the end of an offline Configurator session, you can save your deployment plan in a configuration file. You can use the Configurator to edit your settings. When you are ready to deploy Oracle Database Appliance, copy this configuration file to the appliance, and run the online Oracle Appliance Manager Configurator to import and deploy your saved plan. You can also print the file's content and use the printout to review your configuration entries for deployment planning purposes and as a checklist for setting up your external network configuration.

Running the Standalone Oracle Database Appliance Configurator

Download and run the standalone Oracle Database Appliance Configurator to create a configuration file for the Oracle Database Appliance Virtualization Platform.

In most cases, Oracle recommends that you select the typical configuration. Select the custom option if you want to configure additional or alternate network interfaces, or if you want to override the default values. To see the default values for your version of Oracle Database Appliance software before choosing the Typical or Custom option, run the Configurator using the Custom option.

The steps described here enable you to create a typical virtualized platform configuration file.

  1. Download the standalone Oracle Database Appliance Manager Configurator software to a client.
    1. Go to the following URL http://www.oracle.com/technetwork/database/database-appliance/overview/index.html
    2. Click the Downloads tab.
    3. Review the License Agreement, then select Accept License Agreement.
    4. Download the latest version of the Oracle Database Appliance Manager Configurator zip file to a client.
    5. Extract the files from the zip.
  2. Start the Configurator using the command config.bat on a Windows client, or the command ./config.sh on a Linux or UNIX client. When the Oracle Database Appliance Manager Welcome page appears, click Next.
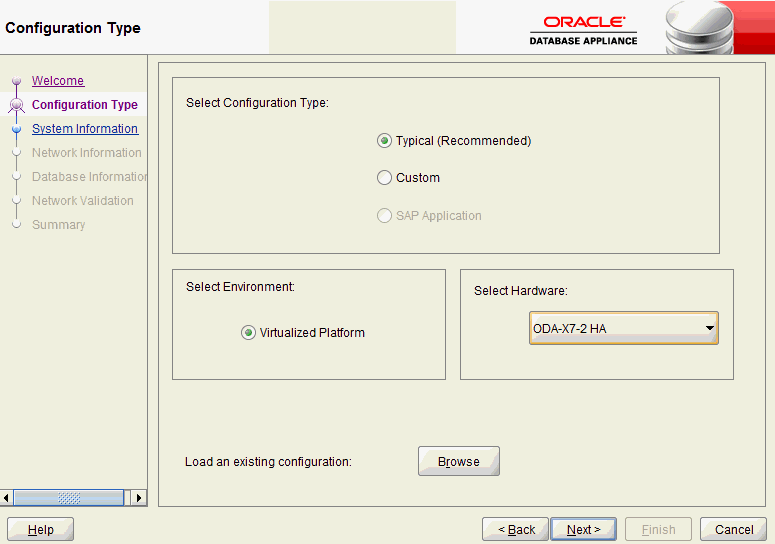
  3. Select the Custom configuration type and select the hardware model from the menu. Click Next.

    The Browse option is not useful during the initial run, because there are no configuration files to load. If you have an existing configuration file created with this version of the Configurator that you want to load and edit, then click Browse and locate the file on your client.

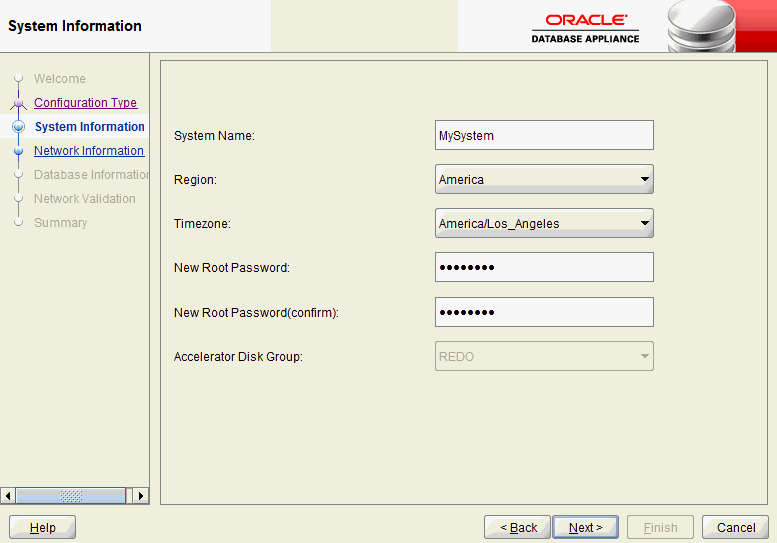
  4. On the System Information page, provide the system name, and select the correct value from the lists for your region and time zone. In the New Root Password and New Root Password (confirm) fields, enter a new password for the root user. Click Next.

    The password is encrypted in the configuration file. It is temporarily decrypted to reset the password during deployment.

    .
  5. On the Network Information page, provide your domain name, DNS server addresses, public and VIP addresses for your two nodes, SCAN name and addresses, and netmask and Gateway addresses. Click Next.

    As you enter data on this page, some fields are automatically filled with values derived from earlier entries. For example, if the address that you provide for the Node 0 public IP address is 192.0.2.18, then the default node addresses generate as follows:

    • Node 0 public IP address: 192.0.2.18

    • Node 1 public IP address: 192.0.2.19

    • Node 0 virtual IP (VIP) address: 192.0.2.20

    • Node 1 virtual IP (VIP) address: 192.0.2.21

    • SCAN addresses (two addresses resolving to the SCAN VIP name): 192.0.2.22, 192.0.2.23

  6. (Optional) On the Database Information page, determine if you want to create an initial database.
    • If you do not want to configure an initial database, then click Next. Go to Step 7.
    • If you want to configure an initial database, select the check box for Create Initial Database, complete the fields, then click Next.

    To configure an initial database, provide the following database details:

    • Database Name. Enter a name for the database.

    • Is Container Database. The default is false. If you leave the default value, then the Configurator builds a non-container database.

    • Database Type. The default type is OLTP. You can also select DSS, or select In-Memory.

    • Database Class. Select the database class that you want to deploy. Not all options are available for all models of Oracle Database Appliance; the default class is odb-06.

    • Database Language. The default language is AMERICAN

    • Database Deployment. Select one of the following, where RAC is the default:

      • Oracle RAC

      • Oracle RAC One Node

      • Oracle Database Enterprise Edition (no Oracle RAC)

    • Data File Size (GB). If you indicate that you want to build a container database, then provide a database data file size in the final field on this page. (This field does not accept input unless the Is Container Database selection is True.)

    • Data Files on Flash Storage. This option is only available if you have configured for High-Capacity storage.

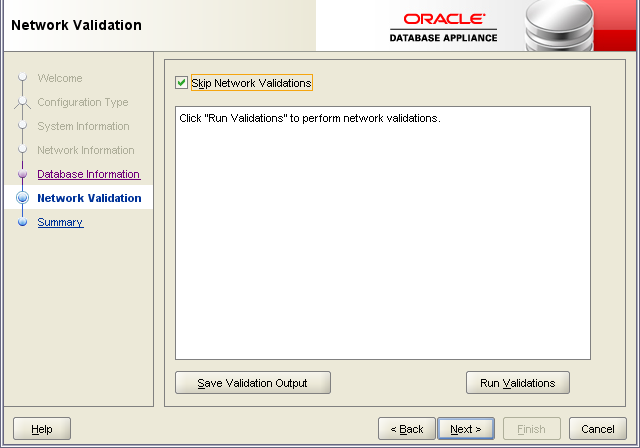
  7. On the Network Validation page, validate your network settings and save the validation output in a file, or bypass the validation step, then click Next to go to the next step.
    The following options are available:
    • Click Run Validations to perform network validation.

      Note:

      Oracle recommends that you validate your network before you use the configuration file to configure an appliance. However, you must run Oracle Database Appliance Manager Configurator on a server attached to the network subnet that is configured for your appliance. If you do not do this, then the validation fails, regardless of whether or not you have completed required configuration.
    • Click Save Validation Output to save the validation output. If the validation fails, it is useful to save the output to review with your network administrator later.
    • Select Skip Network Validations to by-pass the validation step. If the network validation fails, and you want to continue with the configuration, then select this option.
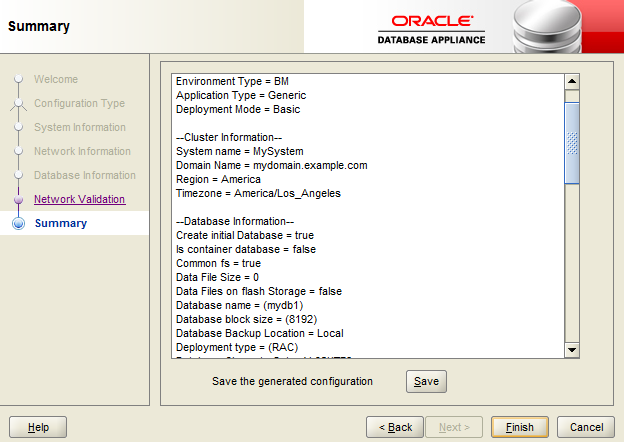
  8. On the Summary page, review the configuration options that you have selected. Click Save to save the configuration file. Click Finish.

    Note the name and location of the configuration file. You can copy this configuration file to your Oracle Database Appliance for deployment. If you need to make corrections before deployment, then rerun the standalone Oracle Database Appliance Manager Configurator, load your configuration file, make the changes, and save the file again.

If you are running the Configurator on Oracle Database Appliance, and you have completed the preliminary steps to configure your initial network and install the software or deploy ODA_BASE, then you can click Install to deploy the configuration.