3 Servicing CRUs That Do Not Require System Power Off

Perform tasks for servicing hot plug components in the Oracle Database Appliance.

Hot-pluggable components can be replaced with the system powered on.

Note:

Hot-pluggable components can also be replaced with the system powered off. If you choose this method, first power off the system as described in Preparing Oracle Database Appliance for Service.

Oracle Database Appliance X10 Server Hot Pluggable Components

Provides instructions on how to perform hot plug tasks on an Oracle Database Appliance server.

Replacing hot plug components does not require you to power off the Oracle Database Appliance X10-S/X10-L server or an Oracle Database Appliance X10-HA server node.

Note:

In certain storage expansion scenarios (explained in the following procedures), adding optional storage might require that the appliance be powered off.

If you are servicing storage shelf hot plug components, see Oracle Database Appliance Storage Shelf Hot-Pluggable Components.

Hot-pluggable components are those that can be removed and installed while the system is running. These are designated as Customer Replaceable Units (CRUs).

Note:

After a physical insertion or removal action of a storage component (such as a disk or SAS cable), you should wait before performing the next action to allow the system software to fully process the event. This could take up to 3 minutes to complete.

For instructions on servicing NVMe front-mounted storage devices, see Servicing NVMe Storage Drives. Note that front mounted storage drives are not supported in the Oracle Database Appliance X10-HA server nodes.

Caution: An NVMe drive must first be powered off before removal. If you do not power off the NVMe drive before removal you can crash the operating system. Oracle Database Appliance uses special commands to remove or add NVMe storage.

Servicing NVMe Storage Drives (CRU)

Perform tasks for servicing front-mounted NVMe drives in an Oracle Database Appliance X10-S/X10-L system. The Oracle Database Appliance X10-HA does not support front-mounted drives in server nodes.

Replacing an NVMe Storage Drive

Replace a front-mounted NVMe drive in an Oracle Database Appliance X10-S/X10-L system.

Before removing an NVMe drive it must be powered off. After installing an NVMe drive it must be powered on. Failed drives are automatically powered off after 5 minutes.

Caution:

If you remove an NVMe drive without first powering it off, you can crash the operating system. Oracle Database Appliance uses special commands to add or remove NVMe storage.

The instructions describe how to replace an NVMe drive using the odaadmcli power on/off commands for an Oracle Database Appliance server.

The odaadmcli commands listed here must be run as the root user.

  1. Identify the NVMe drive to be replaced. Type the following command at the host:
    # odaadmcli show disk

    For example, the drive names pd_00 and pd_01 are seen by the host as NVMe0 and NVMe1 and correspond to front drive slots 0 and 1, respectively.

  2. Unmount and power off the drive to be replaced. Do one of the following:
    1. If you are replacing a failed drive, check to see if its blue ready-to-remove light is lit.
      If a drive has failed, it should power off automatically and light its blue ready-to-remove indicator after 5 minutes.
    2. If the drive being replaced doesn't already have its blue ready-to-remove indicator lit, type the following command from the host to unmount and turn off power to the drive:
      # odaadmcli power disk off pd_xx
      Where pd_xx is the name of the disk to be replaced as described in step 1.
      Before proceeding to the next step confirm that the blue ready-to-remove indicator on the drive is lit.
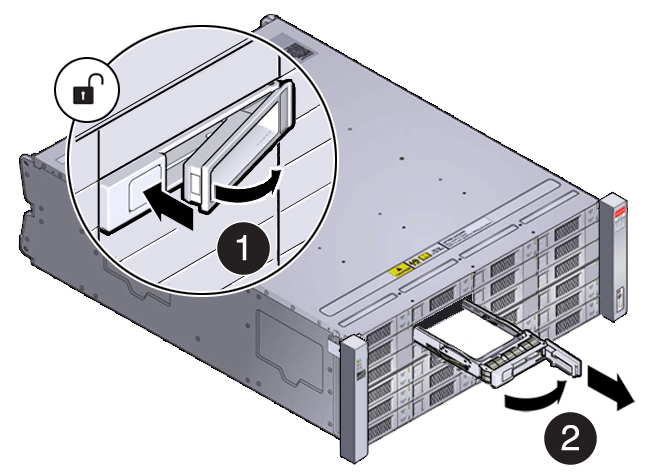
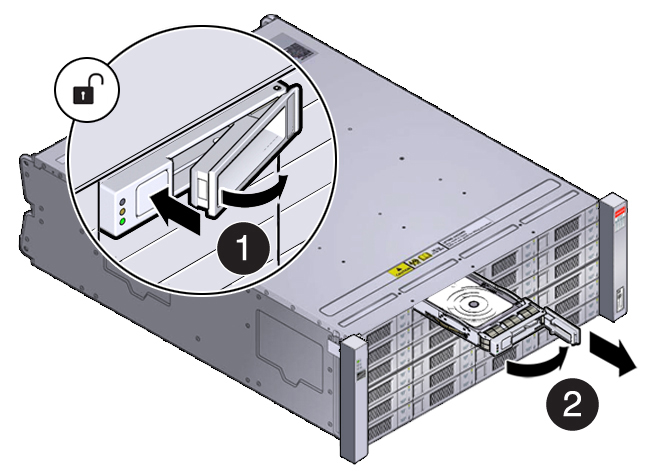
  3. Push the latch release button on the front of the drive to open the drive latch [1], grasp the latch, and pull the drive out of the drive slot [2] as shown in the following figure.
  4. Align the replacement drive with the drive slot.
    The drive is physically addressed according to the slot in which it is installed. It is important to install a replacement drive in the same slot as the drive that was removed.
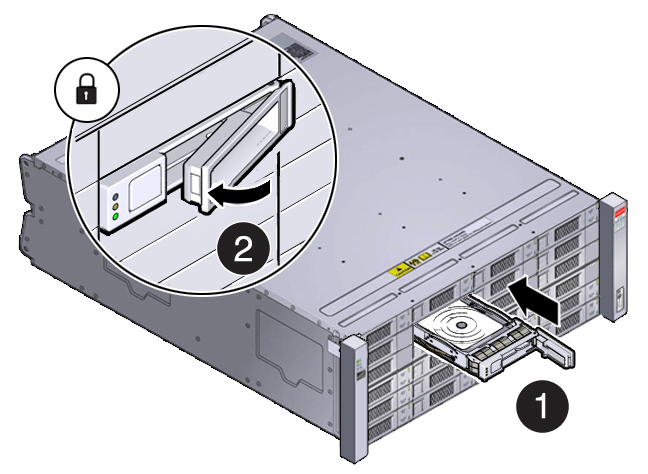
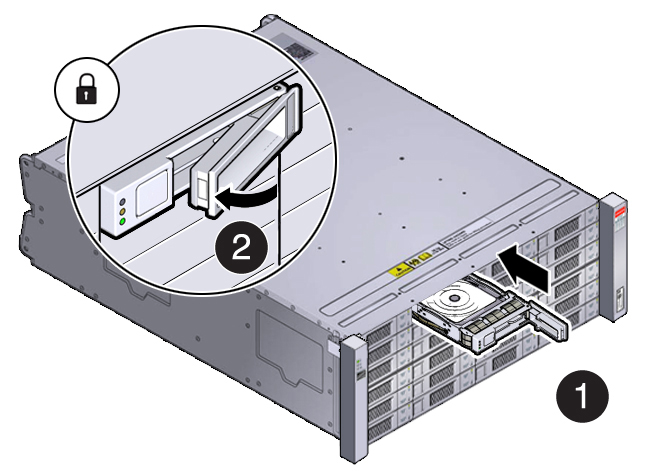
  5. With the drive latch in the open position, slide the drive into the slot until the drive is fully seated [1] and then close the drive latch to lock the drive in place [2] as shown in the following figure.
  6. Power on and remount the replacement drive. Type the following command from the host:
    # odaadmcli power disk on pd_xx

    Where pd_xx is the name of the disk being replaced as described in step 1.

    It can take a few minutes for the power-on operation to complete. Once complete, the drive's green OK indicator will light.

  7. To check the status of the replacement disk, type the following command from the host:
    # odaadmcli show disk

    For additional information, refer to the Oracle Database Appliance Deployment and User's Guide.

Adding NVMe Expansion Storage

Add NVMe storage to an Oracle Database Appliance X10-L. Note that the Oracle Database Appliance X10-S does not support additional storage.

  • The Oracle Database Appliance X10-L supports two expansion slots for NVMe drives. These are slots labeled 2 through 3 as seen from the front of the system. Storage drives can be added in sets of two. For information about supported optional storage drives, refer to the Owner's Guide.


  • When expanding storage, populate slots starting with the lowest numbered available slot (for example, slot 2 as seen on the front panel).

  • The drive power-up and storage expansion odaadmcli commands listed here should only be run after all new disk drives have been physically installed. Once you expand storage, you cannot revert to a previous storage configuration (for example, the default installation with only two NVMe drives).

  1. Remove the drive filler panel of an unpopulated slot by using your finger to pry open the panel release latch and pulling the filler out of the drive slot.

    Note:

    Replace filler panels with drives one at a time to ensure proper system cooling.

  2. Open the latch of the new drive by pressing the release button on the drive.

    Caution:

    Do not over-rotate the latch outwards when opening. Doing so can damage it.

  3. Insert the new drive by sliding the drive into the slot until the drive is fully seated. Then close the drive latch to lock the drive in place.
  4. Repeat steps 1 - 3 for each new drive.

    For the Oracle Database Appliance X10-L, the name for these drives to the host will be pd_02 and pd_03.

  5. Power on each of the new drives by entering the appropriate commands from the host using the following command format:

    # odaadmcli power disk on pd_##

    Where ## is the number of the drive being powered on (02 and 03).

    It can take a few minutes for the power-on operation to complete. Once complete, the green OK indicators will light for the newly installed drives.

    Note:

    Do not attempt to power on and expand storage on one new disk and then power on and expand storage on the next new disk. Before you can expand storage, all the new disks must be powered on with their green OK indicators lit.

  6. Expand the system storage to include the new drives. Type the following command from the host:
    # odaadmcli expand storage -ndisk number_of_disks

    Where number_of_disks is the number of disks being added. The system will then detect and use the new storage.

    For additional information, refer to the Oracle Database Appliance Deployment and User's Guide.

Servicing Fan Modules (CRU)

Perform tasks for servicing the fan modules and the fan tray.

Fan modules are located inside the server chassis near the front of the server. They do not require you to power off the server before servicing.

Remove a Fan Module

You do not have to power off the server to service fan modules.

Caution:

When replacing a fan module, you must complete the entire procedure within 60 seconds (including top cover replacement) to maintain adequate cooling in the system. Otherwise, the system might shutdown due to over-temperature which could potentially damage components. Remove and replace only one fan module at a time. Ensure that you have obtained the replacement fan module and that is it is ready for installation before starting the replacement procedure.

  1. Extend the server to the maintenance position.
  2. To access the fan modules, remove the server top cover.
  3. Identify the faulty fan module.

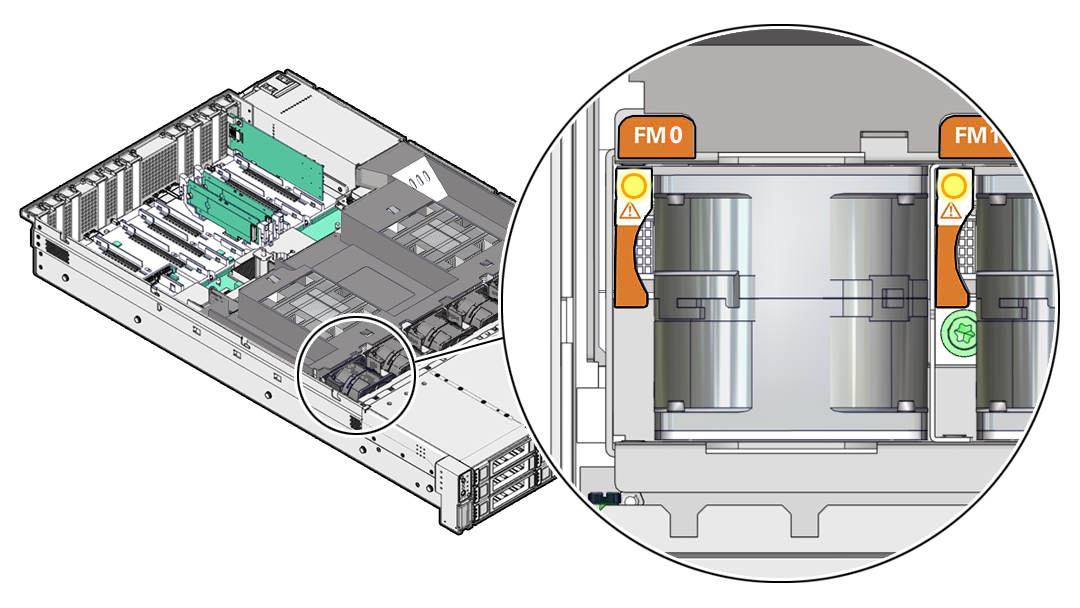
    Each fan module has a fan service action required status indicator (LED) that is located next to the module. If the LED is amber, the fan has failed. The front Top Fan LED and the front and back panel Fault-Service Required LEDs are also lit if the system detects a fan module fault. The location of the fan status LED is shown in the following figure.

    Description of mm-10511_fan-status-indicators.png follows
    Description of the illustration mm-10511_fan-status-indicators.png
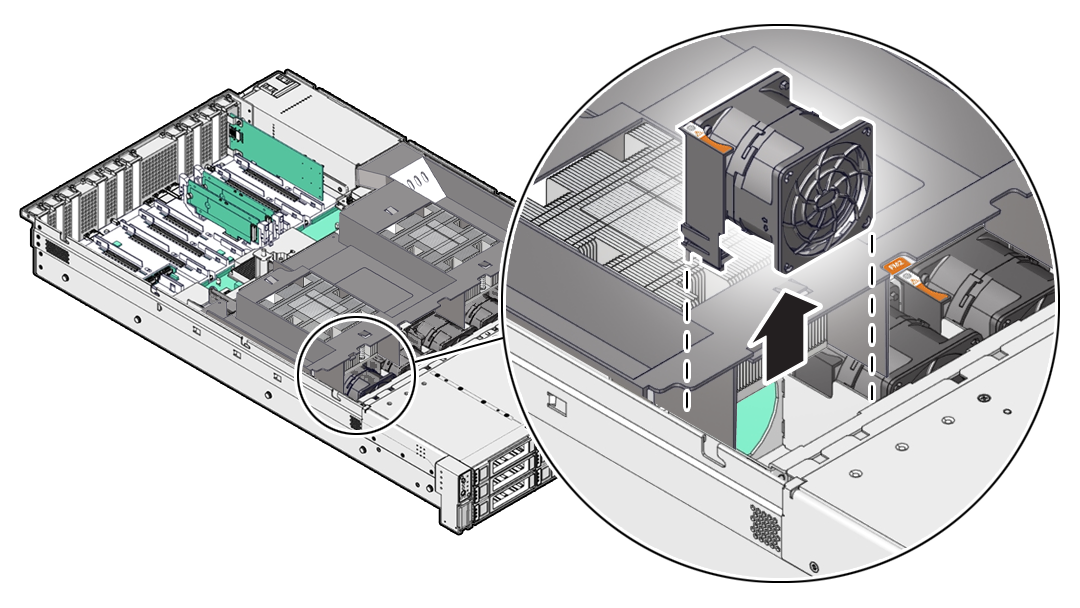
  4. Using your forefinger and thumb, lift the fan module straight up and out of the chassis and set it aside on an antistatic mat.
Install a Fan Module
  1. Remove the replacement fan module from its packaging, and place it on an antistatic mat.
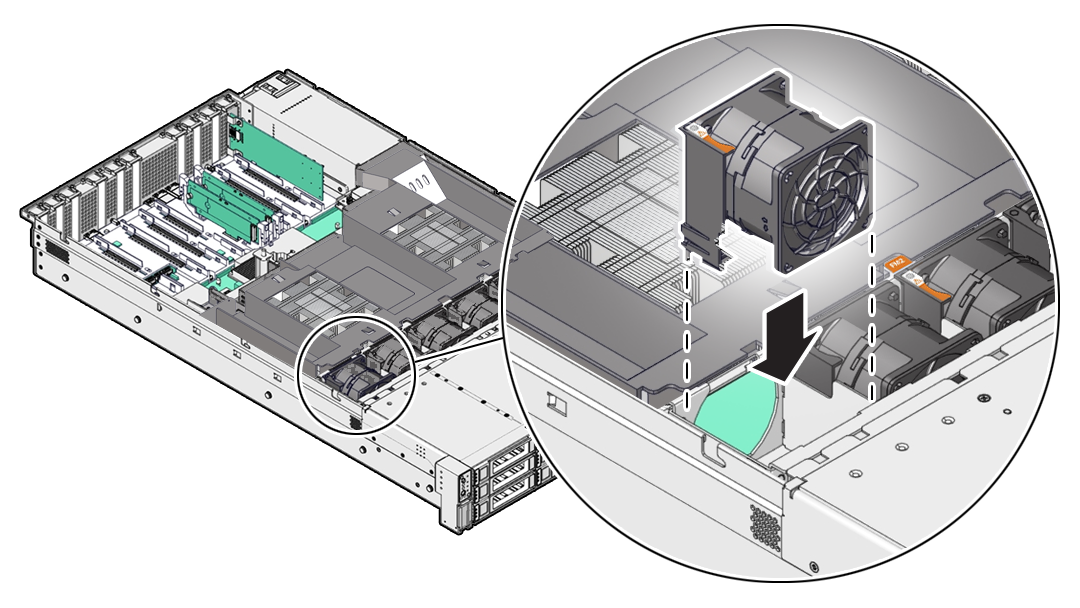
  2. With the server top cover removed, install the replacement fan module into the server.

    The fan modules are keyed to ensure that they are installed in the correct orientation.

    Description of mm-10513_fan-install.png follows
    Description of the illustration mm-10513_fan-install.png
  3. Press down on the fan module to fully seat the fan module.
  4. Verify that the fan module status indicator (LED) for the replacement fan module is not illuminated.
  5. Install the server top cover.
  6. Verify that the Top Fan Fault LED on the front of the server and the Fault-Service Required LEDs on the front and back of the server are not illuminated.

Servicing Power Supply Modules (CRU)

Perform tasks for servicing system chassis fan modules in an Oracle Database Appliance.

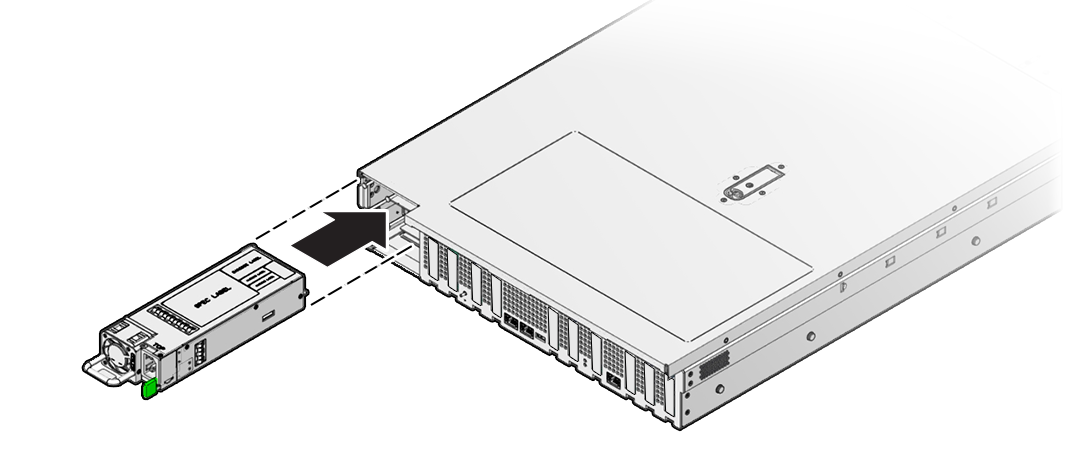
Power supplies are are located at the back of the server and do not require you to power off the server before servicing.

The server supports model A271 and A271A 1400 watt power supplies. The system requires high line 200 - 240 volts AC (VAC) line input. The power supply (PS) converts AC power to lower DC voltages used by internal system components. The power supplies are hot-pluggable and provide “1+1” redundancy, allowing the system to suffer the loss of a power supply or an AC line with no loss to system availability.

Remove a Power Supply
  1. Prepare the system for power supply removal.
  2. Identify which power supply requires replacement.
    Description of mm-10506_ps-locations-1.png follows
    Description of the illustration mm-10506_ps-locations-1.png
    Callout Description

    1

    Power supply 0 (PS0)

    2

    Power supply 1 (PS1)

    A lit amber Fault-Service Required LED on a power supply indicates that a failure was detected. You also can log in to Oracle ILOM and use the show faulty command to identify a failed power supply.

    To list all known faults in the server, launch the Oracle ILOM Fault Management Shell and issue the fmadm faulty command. For more information about how to use the Oracle ILOM Fault Management Shell and supported commands, refer to the Oracle ILOM User's Guide for System Monitoring and Diagnostics at Oracle ILOM Documentation.

    Note:

    The fans of a failed power supply still might be spinning when the system is powered on. You can remove a power supply while the fans are still spinning.
  3. Gain access to the rear of the server where the failed power supply is located.
  4. If the cable management arm (CMA) is installed, disconnect both CMA left-side connectors and move the CMA out of the way.

    See Remove the Cable Management Arm for additional CMA information.

    Caution:

    When disconnecting the CMA left-side connectors, be sure to use your arm to support the CMA so that it does not hang down under its own weight and stress the right-side connectors. Otherwise, the CMA might be damaged. You must continue to support the CMA until you reconnect both left-side connectors.
  5. Disconnect the power cord from the failed power supply.
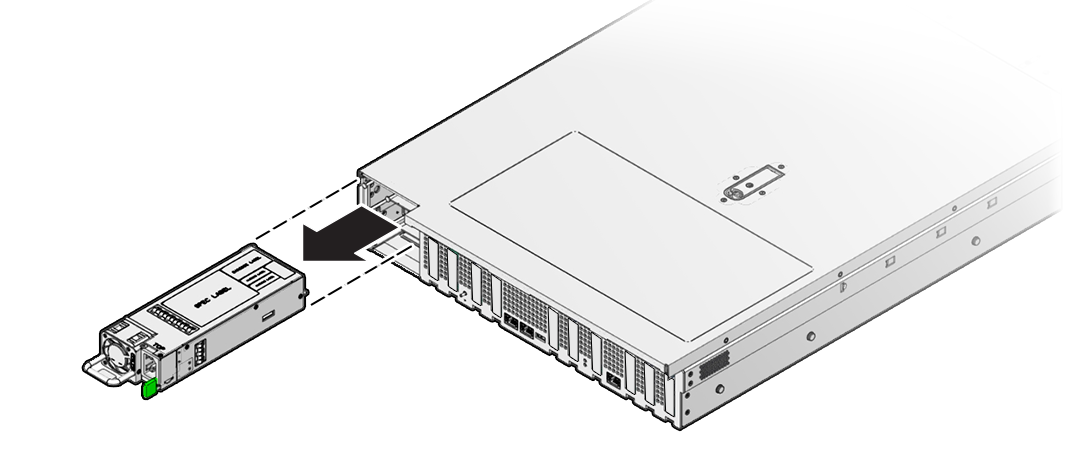
  6. Grasp the power supply handle and push the power supply latch to the left.
    Open the power supply handle if the handle is folded flush. Open the velcro straps if present. Description of mm-10507_remove-ps.png follows
    Description of the illustration mm-10507_remove-ps.png
  7. Pull the power supply out of the chassis.

    Caution:

    When you remove a power supply, be sure to replace it with another power supply within 60 seconds; otherwise, the server might overheat due to improper airflow.
  8. Continue to Install a Power Supply.
Install a Power Supply

Caution:

Always replace the failed power supply with the same model of power supply. For this product, note that both the A271 and A271A power supplies are supported and are considered interchangeable.
  1. Remove the replacement power supply from its packaging, and place it on an antistatic mat.
  2. Align and orient the replacement power supply with the empty power supply slot.
  3. Slide the power supply into the slot until it is fully seated.

    You will hear an audible click when the power supply fully seats.

    Description of mm-10507_install-ps.png follows
    Description of the illustration mm-10507_install-ps.png
  4. Reconnect the power cord to the power supply.
  5. Verify that the amber Fault-Service Required LED on the replaced power supply and the Fault-Service Required LEDs are not lit on the front and back panels.

    Note:

    If you are replacing Power Supply 0, you must additionally log into Oracle ILOM and use the reset /SP command to reset the service processor to propagate the key identity properties (KIP) data to the new power supply. For more information on resetting the SP, refer to the Oracle Integrated Lights Out Manager (ILOM) Configuration and Maintenance Guide at Oracle ILOM Documentation. Power Supply 1 does not contain KIP data, and therefore does not require an SP reset after replacement.
  6. If you disconnected the two CMA left-side connectors, reconnect the connectors or straps.

Oracle Database Appliance X10-HA Storage Shelf Hot Pluggable Components

Perform hot plug tasks on an Oracle Database Appliance storage shelf.

Under most circumstances, Oracle Database Appliance X10-HA storage shelf components can all be replaced while the storage shelf is powered-on and running. Any exceptions will be described in the following procedures.

Adding Optional Storage Shelf Drives (CRU)

Add disk storage in an Oracle Database Appliance X10-HA storage shelf.

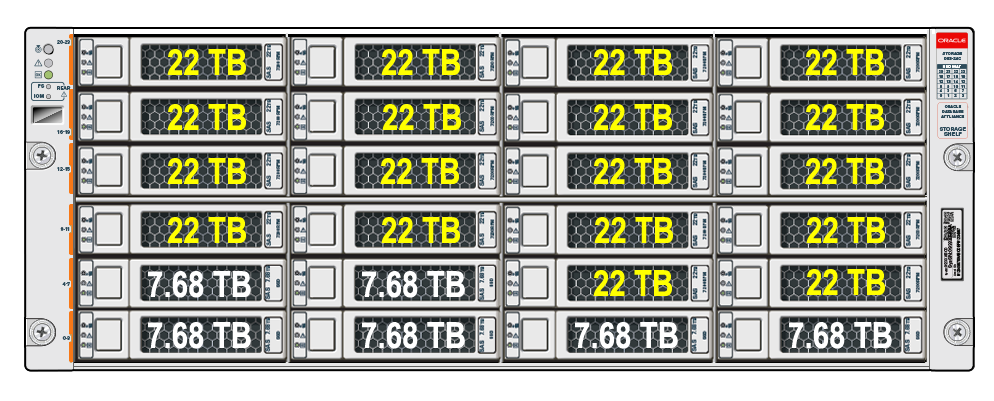
The Oracle Database Appliance X10-HA storage shelf partially-populated base configuration supports storage expansion with either 7.68 TB SSDs (available in six-packs) or 22 TB HDDs (available in an eighteen-pack). Depending on your initial base storage shelf configuration, there can be up to eighteen expansion slots. These slots are labeled 6-23 as seen from the front of the system (callouts 6 through 23 in the following illustration).
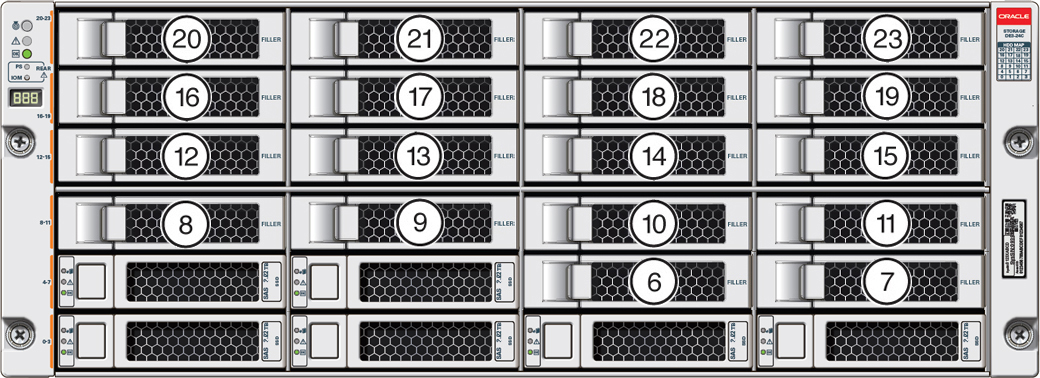

Description of gxxxx-x8-2ha_optional_shelf_drives_top.jpg follows
Description of the illustration gxxxx-x8-2ha_optional_shelf_drives_top.jpg
  • Upgrade options:

    • For a high performance shelf, you can add up to eighteen 7.68 TB SSDs (available in six-packs). You can add storage with the system running and use the appliance CLI software commands to expand the storage configuration.

    • For a high capacity shelf, you can add eighteen 22 TB HDDs (available in an eighteen-pack). You must power off the appliance, add storage, then re-image and redeploy the appliance software. This is required to reconfigure the appliance from the default high performance mode to high capacity mode.

  • Expanding the base configuration storage shelf with 7.68 TB SSDs for high performance. The base configuration has slots 0-5 with 7.68 TB drives for DATA/RECO. Expansion SSDs are available in six-packs and are populated in shelf storage slots from the bottom up to also be used for DATA/RECO, as follows:

    • The first six expansion drives go into slots 6-11.
    • The second six expansion drives go into slots 12-17.
    • The third six expansion drives go into slots 18-23.

    The following illustration shows the expanded drive configuration for 7.68 TB SSDs.
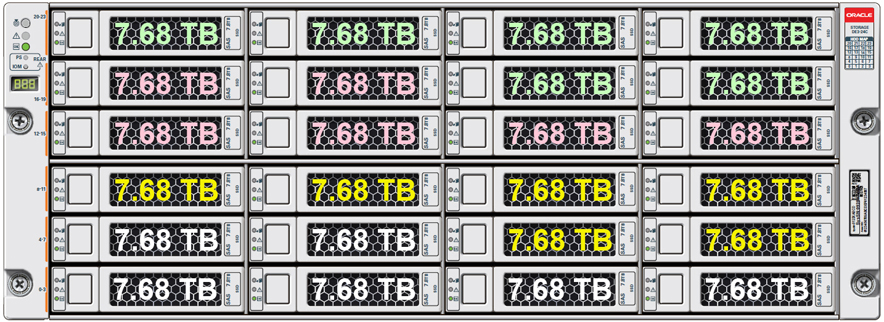

    Description of oda_x8-2-ha_shelf_ssds.jpg follows
    Description of the illustration oda_x8-2-ha_shelf_ssds.jpg
  • Expanding the base configuration storage shelf with 22 TB HDDs for high capacity. When expanding the storage shelf with HDDs, the base configurations SSDs will be used for FLASH and the HDDs will be used for DATA/RECO. Expansion HDDs are available in an eighteen-pack and populate the empty shelf storage slots (slots 6-23).

    The following illustration shows the expanded drive configuration for 22 TB HDDs.


  • Once you expand storage to support additional disks, you cannot revert to the base configuration (no drives in slots 6-23).

  • If you plan on adding another storage shelf, it must be populated identically to your first storage shelf.

  • The odaadmcli commands listed here must be run as the root user.

  1. Do one of the following:
    • If you are adding 7.68 TB SSDs to the storage shelf, leave the appliance powered on and proceed to the next step.

    • If you are adding 22 TB HDDs to the storage shelf, power off the appliance and proceed to the next step. The storage shelf can be powered off by unplugging its AC power cords.

  2. To install the new drives into the storage shelf, do the following:
    1. Remove one of the empty slot drive filler panels by pressing its release button [1] and removing it from the drive slot [2] as shown in the following figure.

      Note:

      Replace filler panels with drives one at a time to ensure proper storage shelf chassis cooling.

    2. Open the drive lever of the new drive by pressing the release button on the drive.
    3. Slide the new drive into the drive slot [1] until it engages with the backplane connector and then close the lever to fully seat the drive and lock it into place [2] as shown in the following figure.

      Check that the drive is locked in place and flush with the other drives.

    4. Repeat steps a through c until all of the new drives are installed in the storage shelf.
  3. Do one of the following:
    • If you added 7.68 TB SSDs to the storage shelf, check that the OK indicator on each new drive is steady green to indicate that it is ready. Then expand the system storage to include the new drives by typing the following command from the primary server node (node 0):

      # odaadmcli expand storage -ndisk number_of_disks -enclosure 0

      Where number_of_disks is the number of disks being added. The system will then detect and use the new storage. It can take up to 12 minutes to update the configuration. For additional storage commands, refer to the Deployment and User's Guide.

    • If you added 22 TB HDDs to the storage shelf, power on the appliance, then re-image and redeploy the appliance software as described in the Deployment and User's Guide. The storage shelf will power on as soon as its AC power cords are plugged in.

  4. If you are also adding a storage expansion shelf (can only be added to a system with an identically and fully populated storage shelf), you can do so after successfully completing the previous step.

    Refer to the Oracle Database Appliance Owner's Guide for information on installing a storage expansion shelf into a rack.

    Refer to the Oracle Database Appliance Deployment and User's Guide for information on cabling and storage expansion commands for a storage expansion shelf.

Replace a Storage Shelf HDD or SSD (CRU)

Replace a storage disk in an Oracle Database Appliance storage shelf.

Note:

After a physical insertion or removal action of a storage component (such as a disk or SAS cable), you should wait before performing the next action to allow the system software to fully process the event. This could take several minutes to complete.

  1. Locate the failed drive on the front of the storage shelf.

    Look for the drive with its Service Required indicator and/or Ready-to-Remove indicator lit.

    Caution:

    Equipment damage. Do not remove a drive unless you have an immediate replacement.

  2. Remove the drive by pressing the release button [1] to release the drive lever and then, rotate the lever open and, grasping the drive body, slide the drive out of the storage shelf [2] as shown in the following figure.
  3. Install the replacement drive by opening the drive lever on the replacement drive. Slide the new drive into the drive slot [1] until it engages with the backplane connector and then close the lever to fully seat the drive and lock it into place [2] as shown in the following figure.

    Check that the drive is locked in place and flush with the other drives.

  4. Once installed, the system should automatically detect and use the replacement drive. Ensure that the green OK indicator for the replacement drive lights to show that the drive is ready.

    This can take a few minutes to complete.

Replace a Storage Shelf Power Supply (CRU)

Replace a power supply in an Oracle Database Appliance storage shelf.

The storage shelf and the storage expansion shelf each have two power supplies. Indicators (LEDs) on the power supplies indicate their operation state.

The power supplies are redundant and one can be replaced while the appliance is running.

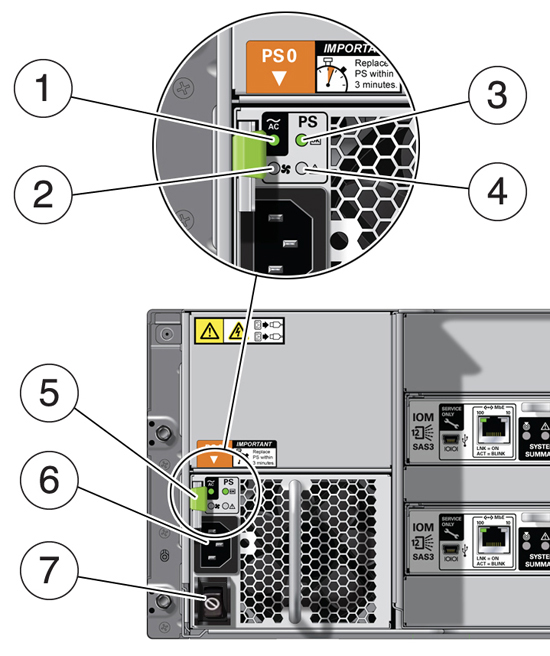
Example figure showing a DE3-24C power supply:

Callout Description

1

AC power fail indicator

2

Fan fail indicator

3

Power supply status indicator

4

DC power fail indicator

5

Release lever

6

AC connector

7

This switch is non-functional in this product. The AC power cord is used to apply or disconnect power to the power supply.

If any of the indicators are amber, or if the power supply status indicator does not light, replace the power supply.

Caution:

Equipment damage. Do not remove a power supply unless you have an immediate replacement.

  1. Disconnect the power cord tie strap from the power cord, and unplug the power cord from the power supply.

    This removes power from the power supply.

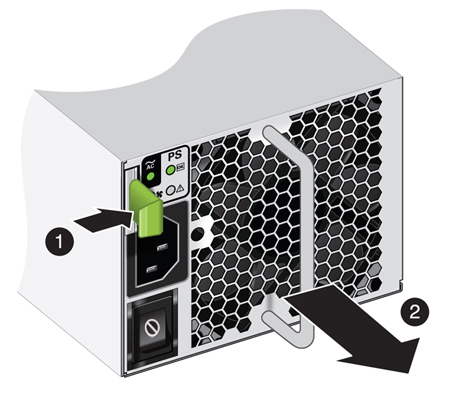
  2. Remove the power supply unit by grasping the power supply handle, push the release button [1], and slide the power supply out of the chassis [2] as shown in the following figure.
  3. Slide the replacement power supply module into the chassis.

    When fully installed, you should hear a click of the release lever returning to the locked position.

  4. Plug the power cord into the new power supply and attach the power cord tie strap to the power cord.

    The Power/OK status LED should be a steady green, and all other indicators should be off.

Replace a Storage Shelf I/O Module (CRU)

Replace an IO module in an Oracle Database Appliance storage shelf.

Storage Shelf SAS I/O modules are fully redundant and can be replaced while the appliance is running.

Note:

After a physical insertion or removal action of a storage component (such as a disk or SAS cable), you should wait before performing the next action to allow the system software to fully process the event. This could take up to 3 minutes to complete.

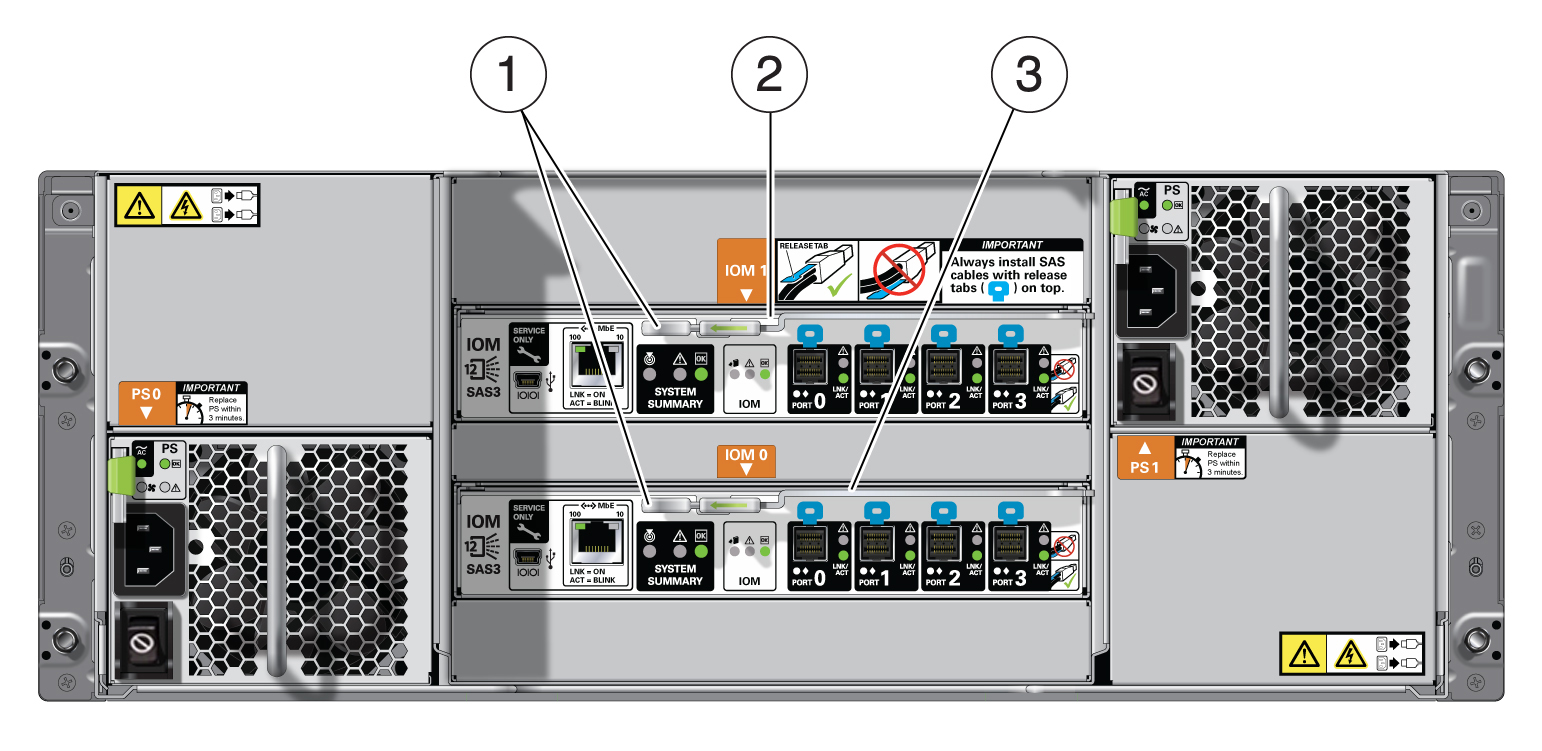
Example figure showing the DE3-24C:

Callout Description

1

I/O module locking levers

2

I/O module 1 (top)

3

I/O module 0 (bottom)

Caution:

Equipment damage. Do not remove an I/O module unless you have an immediate replacement.

  1. Disconnect the cables from the I/O module. Be sure to mark the cables so you can return them to their proper connectors.
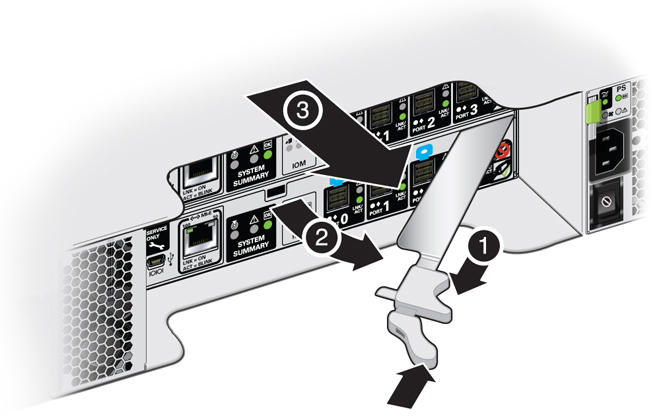
  2. Remove the I/O module using your thumb and forefinger, pinch the release buttons [1] together to release the locking lever [2] as shown in the following figure. Grasp the lever and remove the I/O module from the chassis [3] as shown in the following figure.
  3. Open the lever in the new I/O module if it is not already open.
  4. Slide the new I/O module into the disk shelf and close the locking lever.

    Caution:

    Equipment damage. Be careful not to damage the connector pins at the back of the I/O module.

  5. Reconnect the cables.
  6. Verify that the new I/O module is working correctly.
    • After approximately 60 seconds, the power LED should be solid green and the Fault/Locate LED should be off.

    • For each port that has a cable connected, all four activity LEDs should be solid green.