Chapter 4 Installing Oracle Private Cloud Appliance
This chapter explains how to prepare for the installation of your Oracle Private Cloud Appliance and how to install the system at your site.
4.1 Installation Task Map
Table 4.1 describes the steps for installing an Oracle Private Cloud Appliance at your site.
|
Step |
Description |
Links |
|---|---|---|
|
1 |
Review the safety precautions, guidelines, site checklists, and site requirements. |
|
|
2 |
Ensure that the site is prepared for the installation of the system. |
|
|
3 |
Remove all packaging from the system. |
|
|
4 |
Install the system in its allocated place. |
Section 4.3, “Install Oracle Private Cloud Appliance in Its Allocated Space” |
4.2 Prepare to Install Oracle Private Cloud Appliance
This section describes the preparation steps to perform before installing your Oracle Private Cloud Appliance.
4.2.1 Before You Begin
Before installing your Oracle Private Cloud Appliance, or installing any server equipment into the rack, read the Important Safety Information for Oracle's Hardware Systems (7063567) document that is shipped with the system.
Observe all safety notices printed on the packaging and listed in the Oracle Rack Cabinet 1242 Safety and Compliance Guide (Part No: E87279) and the Oracle Rack Cabinet 1242 Power Distribution Units User's Guide (Part No: E87281). Go to https://docs.oracle.com/cd/E85660_01/index.html to download these guides.
4.2.2 Review Safety Guidelines
Before your Oracle Private Cloud Appliance arrives, review the following safety precautions to ensure that the site is safe, as well as ready for delivery. Failure to observe these precautions can result in personal injury, equipment damage, or malfunction.
-
Do not block ventilation openings.
-
Do not install the system in a location that is exposed to direct sunlight or near a device that may become hot.
-
Do not install the system in a location that is exposed to excessive dust, corrosive gases, or air with high salt concentrations.
-
Do not install the system in a location that is exposed to frequent vibrations. Install the system on a flat, level surface.
-
Use a power outlet that uses proper grounding. When using shared grounding, the grounding resistance must not be greater than 10 ohms. Ensure that your facility administrator or a qualified electrical engineer verifies the grounding method for the building, and performs the grounding work.
-
Ensure that each grounding wire used for the system is used exclusively for the Oracle Private Cloud Appliance. Also observe the precautions, warnings, and notes about handling that appear on labels on the equipment.
-
Do not place cables under the equipment or stretch the cables too tightly.
-
Do not disconnect power cords from the equipment while its power is on.
-
Do not place anything on top of the system or perform any work directly above it.
-
If you cannot reach the connector lock when disconnecting LAN cables, then press the connector lock with a flathead screwdriver to disconnect the cable. You could damage the system board if you force your fingers into the gap rather than using a flathead screwdriver.
-
Do not let the room temperature rise sharply, especially in winter. Sudden temperature changes can cause condensation to form inside the system. Allow for a sufficient warm-up period prior to server operation.
-
Do not install the system near a photocopy machine, air conditioner, welding machine, or any other equipment that generates loud, electronic noises.
-
Avoid static electricity at the installation location. Static electricity transferred to the system can cause malfunctions. Static electricity is often generated on carpets.
-
Confirm that the supply voltage and frequency match the electrical ratings indicated on your Oracle Private Cloud Appliance.
-
Do not insert anything into any Oracle Private Cloud Appliance opening, unless doing so is part of a documented procedure. The system contains high-voltage parts. If a metal object or other electrically conductive object enters an opening in the system, then it could cause a short circuit. This could result in personal injury, fire, electric shock, and equipment damage.
4.2.3 Prepare the Installation Site
The following procedure describes how to prepare the site prior to unpacking and situating your Oracle Private Cloud Appliance.
-
Thoroughly clean and vacuum the area in preparation for the installation.
-
Note problems or peculiarities at the site that require special equipment.
-
Verify that the installation site flooring has a strength rating to withstand the combined weight of the Oracle Private Cloud Appliance and any other installed equipment.
For more information, see Section 2.1, “Space Requirements”.
-
Install all necessary electrical equipment and ensure that sufficient power is provided.
See also the Oracle Rack Cabinet 1242 Power Distribution Units User's Guide for the system Power Distribution Unit (PDU) power requirements.
-
Ensure that the installation site provides adequate air conditioning.
For details, see Chapter 2, Site Requirements.
-
Operate the air conditioning system for 48 hours to bring the room temperature to the appropriate level.
4.2.4 Tools Required for Unpacking and Installation
The following tools and equipment are required for installation and service:
-
Unpacking tools (provided in rack ship kit)
-
17mm and 13mm open-ended double-sided wrench
-
Allen L-key 6mm hex wrench, 5-3/4 inches in length
-
Allen L-key 8mm hex wrench, 6-3/8 inches in length
-
-
Rack setup tools and accessories (provided in rack ship kit)
-
32 M6 cage nuts and washers
-
32 M6 pan head screws
-
8 M5 screws
-
8 self-tapping Torx screws
-
4 PDU brackets
-
4 M5 cage nuts
-
4 grounded power cables
-
18mm and 16mm open-ended double-sided wrench
-
T-40 Torx screwdriver
-
T-25 Torx screwdriver
-
T-15 Torx screwdriver
-
8mm and 6mm Allen wrench
-
Cage nut tool
-
Keys to the front door, rear door, and side panel locks
-
17mm and 13mm open-ended double-sided wrench
-
-
Customer-supplied tools (not provided in rack ship kit)
-
No. 2 Phillips screwdriver
-
Diagonal cutter
-
Antistatic wrist strap
-
4.2.5 Unpack the System
Before unpacking the rack from the shipping carton, refer to the labels on the carton and to the instructions that they provide. After unpacking the rack, follow local laws and guidelines to recycle the packaging properly.
Carefully unpack the rack from the packaging and shipping pallet. Rocking or tilting the rack can cause it to fall over and cause serious injury or death. You should always use professional movers when unpacking and installing this rack.
After unpacking the rack from the packaging, save the shipping brackets used to secure the rack to the shipping pallet. You can use these shipping brackets to secure the rack permanently to the installation site floor. Do not dispose of these brackets, because you cannot order replacement brackets.
Shipping brackets are not for use for bracing or anchoring the rack during seismic events.
4.3 Install Oracle Private Cloud Appliance in Its Allocated Space
This section describes each phase of the hardware installation procedure for the Oracle Private Cloud Appliance.
4.3.1 Move the System
The following procedure describes how to move the Oracle Private Cloud Appliance:
-
Ensure that the rack doors are closed and secured.
-
Ensure that the leveling and stabilizing feet on the rack are raised and out of the way.
-
Push the system from the back of the rack to the installation site.
WarningNever attempt to move an Oracle Private Cloud Appliance by pushing on the rack side panels. Pushing on the rack side panels can tip over the rack. This action can cause serious personal injury or death, as well as damage to the equipment.
The front casters of the rack are fixed; they do not pivot. When moving your Oracle Private Cloud Appliance to the installation site, you must steer the unit using the rear casters. You can safely maneuver the system by carefully pushing it from behind. See Figure 4.1.
It is preferred that at least three people push and guide the rack: one person in front and two persons in back to help guide the rack and keep people out of the path of the moving rack. When transporting configured racks from one location to another, take care to move them slowly, 0.65 meters per second (2.13 feet per second) or slower.
Carefully examine the transportation path. Avoid obstacles such as doorways or elevator thresholds that can cause abrupt stops or shocks. Go around obstacles by using ramps or lifts to enable smooth transport.
CautionNever tip or rock the Oracle Private Cloud Appliance because the rack can fall over.
Figure 4.1 Carefully Push the Oracle Private Cloud Appliance From the Back of the Rack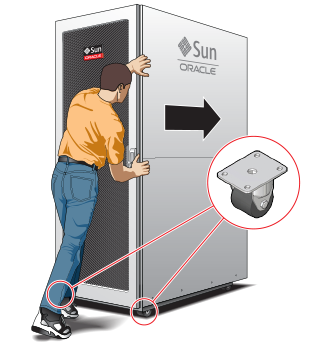
-
When the rack is at the installation site, verify that no components or connections have become dislodged or disconnected during transport. If necessary, re-attach components and cables properly.
4.3.2 Stabilize the Appliance Rack
After moving the Oracle Private Cloud Appliance to the installation site, stabilize the rack to ensure that it does not move or tip over. You can stabilize the rack permanently by extending the rack leveling feet, and optionally using the shipping brackets to secure the rack permanently to the floor.
Shipping brackets are not for use for bracing or anchoring the rack during seismic events.
To secure the rack to the installation floor using the shipping brackets, you must drill the appropriate holes in the floor, re-attach the shipping brackets to the rack, position the rack over the mounting holes, and attach the shipping brackets to the floor firmly with bolts and washers that suit the specific environment. Oracle does not provide mounting bolts and washers for the shipping brackets, because different floors require different bolt types and strengths.
(Optional) If you plan to route data or power distribution unit (PDU) power cords down through the bottom of the rack, you will need to cut a hole in the installation site floor. Cut a rectangular hole below the rear portion of the rack, between the two rear casters and behind the RETMA (Radio Electronics Television Manufacturers Association) rails.
Do not create a hole where the rack casters or leveling feet brackets will be placed.
When the rack is in position, the leveling feet must be deployed. The rack contains four leveling feet that can be lowered to share the load with the casters. This increases the footprint of the rack, which improves stability and helps prevent rack movement. The leveling feet must be used even when the rack is permanently secured to the floor. To adjust the leveling feet, do the following:
-
Locate the four leveling feet at the bottom four corners of the rack. See Figure 4.2.
Figure 4.2 Location of Leveling Feet on Rack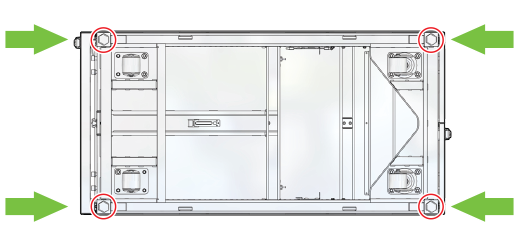
-
Using a 6mm hex wrench, lower the leveling feet to the floor. See Figure 4.4.
Figure 4.3 Lowering the Leveling Feet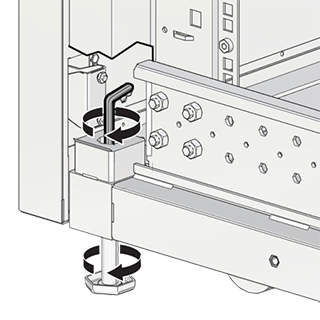
-
Lock the four leveling feet using an 18mm open wrench. See Figure 4.4.
Figure 4.4 Locking the Leveling Feet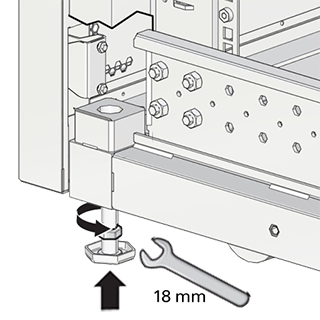
When lowered correctly, the four leveling feet share the load with the casters to increase footprint, improve stability, and help support the full weight of the Oracle Private Cloud Appliance.
When the rack needs to be moved to a different location, including repacking, verify that the leveling feet have been retracted before moving the rack. Otherwise the leveling feet may become bent, or the rack could tip over.
4.3.3 Attach a Ground Cable (Optional)
Oracle Private Cloud Appliance power distribution units (PDUs) achieve earth ground through their power cords. Final chassis ground is achieved by way of the ground prong when you connect the power cord to a socket. For additional grounding, attach a chassis earth ground cable to the system. The additional ground point enables electrical current leakage to dissipate more efficiently.
The PDU power input lead cords and the ground cable must reference a common earth ground. If they do not, then a difference in ground potential can be introduced. If you are unsure of your facility's PDU receptacle grounding, then do not install a ground cable until you confirm that there is a proper PDU receptacle grounding. If a difference in ground potential is apparent, then you must take corrective action.
A grounding cable is not shipped with the Oracle Private Cloud Appliance.
-
Ensure that the installation site has a properly grounded power source in the data center. The facility PDU must have earth ground.
-
Ensure that all grounding points, such as raised floors and power receptacles, reference the facility ground.
-
Ensure that direct, metal-to-metal contact is made for this installation. During manufacturing, the ground cable attachment area might have been painted or coated.
-
Attach the ground cable to one of the attachment points located at the bottom rear of the system frame. See Figure 4.5.
The attachment point is an adjustable bolt that is inside the rear of the system cabinet on the right side.
Figure 4.5 Earth Ground Attachment Bolt Location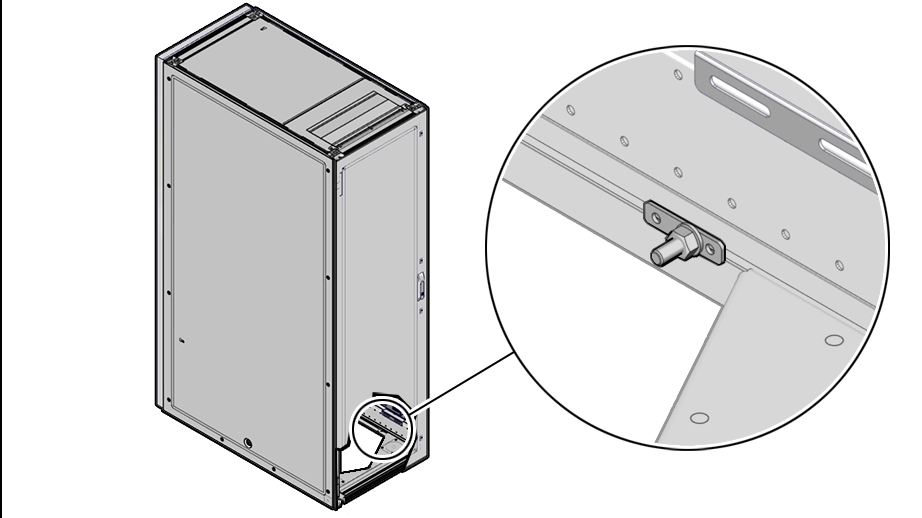
4.4 What's Next?
After installing the Oracle Private Cloud Appliance rack at your site, continue the installation process by powering on the system and performing the initial configuration. For instructions, see Chapter 5, Powering On Oracle Private Cloud Appliance.