6 Configuring Recovery Appliance for Protected Database Access
This chapter contains the following topics:
About Protected Database Access
This section contains the following topics:
See Also:
Purpose of Protected Database Access
A database is not protected by a Recovery Appliance until it can access the database backups.
Overview of Protected Database Access
Performing necessary configuration so that a protected database can send backups to Recovery Appliance is called enrolling a database. Enrolling is a one-time task that must be performed the first time you set up a protected database to use Recovery Appliance. This task requires configuration on both the Recovery Appliance and the protected database.
The basic enrollment steps are as follows:
-
Adding the database
The process of adding a database to a Recovery Appliance adds metadata for the database to the Recovery Appliance metadata database, and assigns this database to the specified protection policy. The result of running
DBMS_RA.ADD_DBis that a non-protected database attains the status of a protected database. -
Granting access to the database to a Recovery Appliance user account
After you create a virtual private catalog account (the Recovery Appliance user) in the metadata database, run
DBMS_RA.GRANT_DB_ACCESSon the Recovery Appliance to associate this account with the protected database. -
Registering the database with the virtual private catalog
On the protected database host, create an Oracle wallet, and then add the credentials of the virtual private catalog account. Register the protected database with the recovery catalog using the RMAN
REGISTER DATABASEcommand.Note:
If you choose to configure real-time redo transport, then you must execute several SQL statements on the protected database (see Zero Data Loss Recovery Appliance Protected Database Configuration Guide).
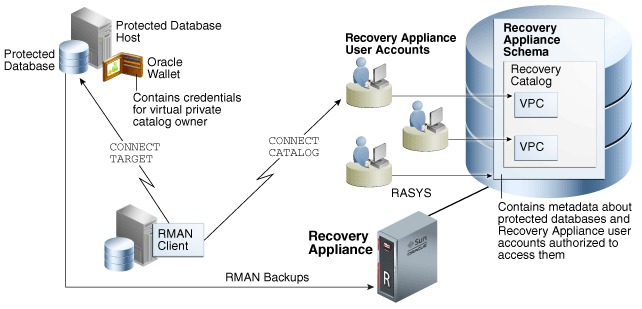
Figure 6-1 shows an RMAN client connecting to a protected database (CONNECT TARGET) and to the virtual private catalog (CONNECT CATALOG). For backup and restore operations to be possible, the credentials for the virtual private catalog owner must exist in the Oracle wallet on the protected database host.
It is possible for a database to store metadata in the Recovery Appliance catalog without backing up files to Recovery Appliance. In this case, the databases do not have the status of protected databases, and thus are not enrolled with Recovery Appliance. Future enrolling of such databases is simplified because the virtual private catalog owner already exists, and thus does not need to be created.
User Interfaces for Configuring Protected Database Access
This section contains the following topics:
Accessing the Protected Databases Page in Cloud Control
The Protected Databases page in Oracle Enterprise Manager Cloud Control (Cloud Control) is the recommended interface for starting the database enrollment process.
The Protected Databases page lists all databases under the management of this Recovery Appliance, whether they back up directly to the Recovery Appliance or are configured for downstream Recovery Appliance replication. From this page, you can add protected databases by selecting an individual database, selecting multiple databases, or selecting a previously defined Enterprise Manager group.
To access the Protected Databases page:
-
Access the Recovery Appliance Home page, as described in "Accessing the Recovery Appliance Home Page".
-
From the Recovery Appliance menu, select Protected Databases.
The Protected Databases page appears, as shown in Figure 6-2.
See Also:
-
Cloud Control online help for more information about the Protected Databases page
DBMS_RA Procedures Relating to Protected Database Access
You can use the DBMS_RA package to configure protected database access. Table 6-1 describes the principal program units relating to protected databases.
Table 6-1 DBMS_RA Protected Database Access Procedures
| Program Unit | Description |
|---|---|
|
Adds metadata for the specified database to Recovery Appliance, and assigns a protection policy to the database. Note that you must set the |
|
|
Removes metadata for the specified database from Recovery Appliance. All metadata and backups of this database are deleted, from both disk and SBT. |
|
|
Grants Recovery Appliance privileges to a user for a specified database. |
|
|
Revokes Recovery Appliance privileges from a user for a specified database. |
|
|
Modifies the parameters for an existing protection policy. |
See Also:
Recovery Catalog Views for Protected Database Access
You can monitor database access using the Recovery Appliance catalog views. Table 6-2 summarizes the most relevant views.
Table 6-2 Recovery Catalog Views for Protected Database Access
| View | Description |
|---|---|
|
This view describes databases protected by this Recovery Appliance. |
|
|
This view describes the user account that can access specific protected databases. |
See Also:
Basic Tasks for Configuring Protected Database Access
This section explains the basic tasks involved in configuring protected database access. Figure 6-3 shows the overall workflow described in Recovery Appliance Workflow, with the configuration tasks on the Recovery Appliance highlighted.
Figure 6-3 Database Access Configuration Tasks in the Recovery Appliance Workflow

Description of "Figure 6-3 Database Access Configuration Tasks in the Recovery Appliance Workflow"
Typically, you configure protected database access in the following sequence:
-
During the planning phase, decide which databases will be protected by the Recovery Appliance.
"Task 4: Determine access requirements for Recovery Appliance" describes this task.
-
During the configuration phase (see "Setup and Configuration for Recovery Appliance"), do the following:
-
Create virtual private catalog accounts.
"Creating Virtual Private Catalog Accounts" describes this task.
-
Enroll the protected database with the Recovery Appliance.
Note:
With Cloud Control, you can perform all enrollment steps in a single page except registering the database in the recovery catalog.
"Enrolling Protected Databases" describes this task.
-
-
During the ongoing maintenance phase (see "Maintenance Tasks for Recovery Appliance"), you can do the following:
-
Update the properties of an existing protected database using
DBMS_RA.UPDATE_DB(see "Updating Protected Database Properties") -
Remove metadata for protected databases from the Recovery Appliance using
DBMS_RA.DELETE_DB -
Revoke access to a specific protected database from a specific virtual private catalog owner by using
DBMS_RA.REVOKE_DB_ACCESS
-
Creating Virtual Private Catalog Accounts
RMAN must connect to the Recovery Appliance catalog when backing up to a Recovery Appliance. In this step, you create a virtual private catalog user for a specific protected database or set of protected databases.
Prerequisites
Log in to the metadata database as SYSTEM.
Assumptions
Assume that you are a Recovery Appliance administrator with the following requirements:
To create a virtual private catalog account:
-
Log in to the Recovery Appliance as
root. -
Change to the
bindirectory:# cd /opt/oracle.RecoveryAppliance/bin -
Run the command to add the new virtual private catalog account.
The following command adds a virtual private catalog account named
ravpc1:# ./racli add vpc_user -username=ravpc1When prompted, enter the password for the
ravpc1user.
See Also:
-
Oracle Database Security Guide to learn how to create database user accounts
-
Oracle Database 2 Day + Security Guide to learn how to create database user accounts using Cloud Control
-
Oracle Database Backup and Recovery User's Guide to learn about virtual private catalogs
Enrolling Protected Databases
This section explains how to enroll a protected database using either Cloud Control (recommended) or the DBMS_RA command-line interface.
See Also:
My Oracle Support Note Doc ID 1995866.1 (http://support.oracle.com/epmos/faces/DocumentDisplay?id=1995866.1) for main prerequisites for enrolling a database with Recovery Appliance
Enrolling Protected Databases Using Cloud Control
This section describes how to start the database enrollment process from the Protected Databases page in Cloud Control.
Prerequisites
The databases to be enrolled with Recovery Appliance must already be discovered as Database Instance targets by Cloud Control.
Assumptions
Assume that you have the following business requirements:
-
You want to enroll databases
ORCL11andORCL12. -
You want to assign these databases to the protection policy named
GOLD. -
You want each of the newly enrolled databases to have 6355 GB of reserved space (the amount of disk space guaranteed to each protected database).
To enroll protected databases:
-
Access the Protected Databases page, as described in "Accessing the Protected Databases Page in Cloud Control".
-
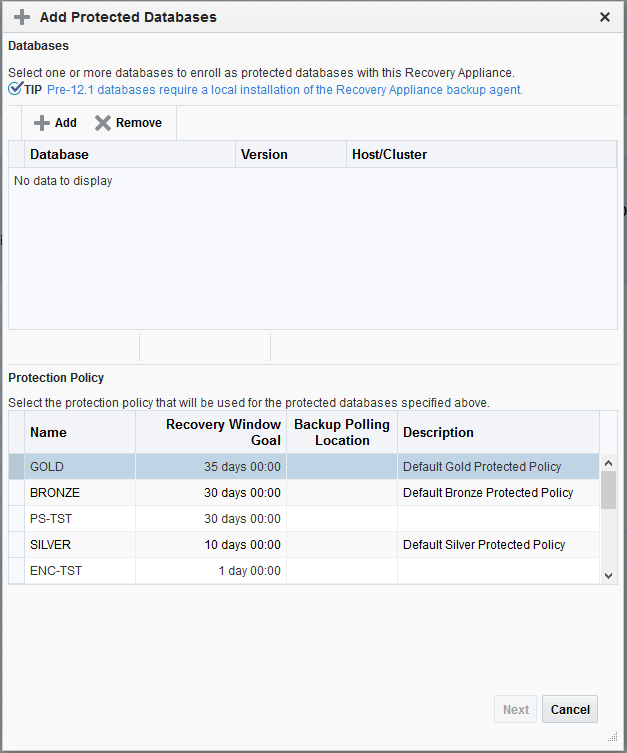
Click Add.
The Add Protected Databases page appears.
-
Click Add
The Select Targets page appears.
-
In Target Type, select Database Instance.
The page refreshes to list only database instances.
-
Optionally, narrow the database instances by entering values in the Target Name and On Host fields.
In this example, leave the fields blank so that you can multi-select databases in the next step.
-
In the table of targets, click the desired databases while pressing the Ctrl key.
For example, from the target list, select
ORCL11andORCL12. -
Click Select.
The Add Protected Database page appears, listing the databases to be enrolled.
-
In the Protection Policy section, click the policy to which you want to add the databases, and then click Next.
For example, click
GOLD, and then click Next.The Add Protected Databases page appears.
-
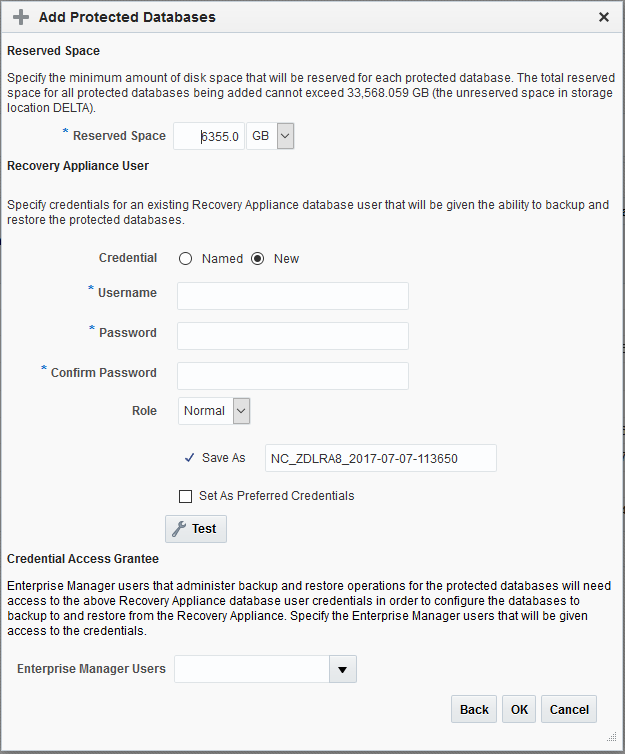
Set required attributes of the protected database:
-
In the Reserved Space field, enter the minimum amount of disk space to be reserved for each protected database.
Note:
When you add a database to a Recovery Appliance using Cloud Control, the Recovery Appliance allocates a default reserved space of 2.5X the database size. You can accept or change this amount.
The Reserved Space is not a hard limit. The actual amount of space consumed changes as backups of varying sizes are received and old ones purged. The consumed space can exceed for a time the allocated space without issues, providing the Recovery Appliance has space available. However, when the Recovery Appliance is totally out of space and putting in danger the recovery windows of all databases, the Reserved Space determines which database has backups purged first. For this reason, more important databases should have a larger Reserved Space than lesser important databases.
-
In the Recovery Appliance User section, enter the credentials for the appropriate virtual private catalog account.
-
In the Credential Access Grantee section, in Enterprise Manager Users, select the Enterprise Manager user accounts that need access to the Recovery Appliance user credentials.
For example, select All.
-
-
Click OK.
A confirmation window appears.
-
Click Close to return to the Protected Databases page.
The newly added databases appear in the table of protected databases.
At this stage, the databases have been added and granted access, but not yet registered in the virtual private catalog.
-
See Zero Data Loss Recovery Appliance Protected Database Configuration Guide to learn how to complete the database enrollment.
See Also:
Cloud Control online help for more information about the Add Protected Databases page
Enrolling Protected Databases Using the Command Line
When enrolling databases using the DBMS_RA command-line interface, you must perform the following tasks:
-
"Granting Database Access to a Recovery Appliance Account Using DBMS_RA"
-
Configuring the protected database for access (see Zero Data Loss Recovery Appliance Protected Database Configuration Guide)
Adding Protected Database Metadata Using DBMS_RA
For a database to be protected, you must add metadata for this database to the Recovery Appliance using DBMS_RA.ADD_DB. This procedure requires you to specify an existing protection policy and the amount of reserved space for the database.
Prerequisites
Assumptions
Assume that you are a Recovery Appliance administrator with the following requirements:
-
You want to make
orclda protected database. -
You want to add this database to the existing
bronzeprotection policy, and provide it with 200 GB of reserved space.
To add metadata for a protected database to the Recovery Appliance:
-
With SQL*Plus or SQL Developer, connect to the Recovery Appliance metadata database as
RASYS. -
Use the
ADD_DBprocedure to add database metadata to the Recovery Appliance and assign a protection policy.For example, the following anonymous block adds database
orcld:BEGIN DBMS_RA.ADD_DB ( db_unique_name => 'orcld', protection_policy_name => 'bronze', reserved_space => '200G'); END; -
Optionally, query the recovery catalog to see information about the newly added database.
For example, execute the following query to show details about
orcld(sample output included):COLUMN PROT_DB FORMAT a10 COLUMN POLICY_NAME FORMAT a11 SELECT DB_UNIQUE_NAME AS PROT_DB, DB_KEY, DBID, POLICY_NAME FROM RA_DATABASE WHERE DB_UNIQUE_NAME = 'ORCLD'; PROT_DB DB_KEY DBID POLICY_NAME ---------- ---------- ---------- ----------- ORCLD 301 3210984255 BRONZE
Note:
In an Oracle Data Guard environment, add the db_unique_name of whichever database (primary or standby) that you registered with the Recovery Appliance catalog.
See Also:
"ADD_DB"
Granting Database Access to a Recovery Appliance Account Using DBMS_RA
You must grant the necessary privileges to a Recovery Appliance user account—which is also a virtual private catalog account—so that protected databases that authenticate with this account can perform backup and restore operations. The DBMS_RA.GRANT_DB_ACCESS procedure associates a protected database with a virtual private catalog.
Prerequisites
This task has the following prerequisites:
Assumptions
Assume that you want to enable RMAN to CONNECT CATALOG as ravpc1 when backing up protected database orcld.
To grant access to a virtual private catalog account to a protected database:
-
With SQL*Plus or SQL Developer, connect to the Recovery Appliance database as
RASYS. -
Run the
GRANT_DB_ACCESSprocedure to grant backup and restore privileges on the database for the user.The following PL/SQL anonymous block grants access to protected database
orcldto virtual private catalog accountravpc1:BEGIN DBMS_RA.GRANT_DB_ACCESS ( db_unique_name => 'orcld', username => 'ravpc1'); END; -
Optionally, query the recovery catalog to see information about the database access.
For example, execute the following query to show details about
orcldand catalog ownerravpc1(sample output included):COLUMN PROT_DB FORMAT a10 COLUMN POLICY_NAME FORMAT a11 COLUMN USERNAME FORMAT a15 COLUMN DB_KEY FORMAT 999999 SELECT d.DB_UNIQUE_NAME AS PROT_DB, d.DB_KEY, d.DBID, d.POLICY_NAME, a.USERNAME FROM RA_DATABASE d, RA_DB_ACCESS a WHERE d.DB_UNIQUE_NAME = 'ORCLD' AND a.DB_KEY = d.DB_KEY; PROT_DB DB_KEY DBID POLICY_NAME USERNAME ---------- ------- ---------- ----------- --------------- ORCLD 301 3210984255 BRONZE RAVPC1 -
Send the virtual private catalog user name and password to the DBA for each protected database that must authenticate using this account.
-
To complete the enrollment procedure, see Zero Data Loss Recovery Appliance Protected Database Configuration Guide.
See Also:
Updating Protected Database Properties
This section explains how to update protected database properties using either Cloud Control (recommended) or the DBMS_RA command-line interface.
Updating Protected Database Properties Using Cloud Control
Assumptions
Assume that you have the following business requirements:
-
You want to change the protection policy for protected database
ORCL11fromGOLDtoBRONZE. -
You want change the reserved space from 6355 GB to 7000 GB.
-
You want to change the Recovery Appliance user account associated with this protected database from
rauser11torauser12.
To update the properties of a protected database:
-
Access the Protected Databases page, as described in "Accessing the Protected Databases Page in Cloud Control".
-
Click Edit.
The Edit Protected Databases page appears.
-
Change the desired attributes of the protected database, and then click OK:
-
In the Protection Policy section, select the row for the policy named
BRONZE.For example, select All.
-
In the Reserved Space field, enter the new minimum amount of disk space to be reserved for this protected database.
For example, enter
7000, and then select GB for the units. -
In the Recovery Appliance User section, enter the credentials for the database user
rauser12.
The newly updated database appears in the table of protected databases.
-
See Also:
Cloud Control online help for more information about the Edit Protected Databases page
Assigning a Database to a Different Protection Policy Using DBMS_RA
To update the properties of a protected database, use the DBMS_RA.UPDATE_DB procedure. Unspecified parameters retain their existing values. This section shows how to update a protected database to use a different protection policy.
Prerequisites
You must log in to the metadata database as RASYS.
Assumptions
This tutorial assumes that the existence of the protection policy named bronze that you created in "Creating a Protection Policy Using DBMS_RA". Your goal is to change the protection policy for database zdlrac from silver to bronze.
To assign a database to a different protection policy:
-
Start SQL*Plus or SQL Developer, and then log in to the metadata database as
RASYS. -
Query the existing protection policies.
For example, execute the following query (sample output included):
COL POLICY_NAME FORMAT a11 COL DESCRIPTION FORMAT a35 SELECT POLICY_NAME, DESCRIPTION, TO_CHAR(EXTRACT(DAY FROM RECOVERY_WINDOW_GOAL),'fm00')||':'|| TO_CHAR(EXTRACT(HOUR FROM RECOVERY_WINDOW_GOAL),'fm00')||':'|| TO_CHAR(EXTRACT(MINUTE FROM RECOVERY_WINDOW_GOAL),'fm00')||':'|| TO_CHAR(EXTRACT(SECOND FROM RECOVERY_WINDOW_GOAL),'fm00') AS "DD:HH:MM:SS" FROM RA_PROTECTION_POLICY; POLICY_NAME DESCRIPTION DD:HH:MM:SS ----------- ----------------------------------- --------------- BRONZE For protected dbs in bronze tier 01:00:00:00 SILVER For protected dbs in silver tier 07:00:00:00 GOLD For protected dbs in gold tier 14:00:00:00 -
Determine which protected databases are associated with which protection policies.
For example, execute the following query (sample output included):
SELECT d.DB_UNIQUE_NAME, d.POLICY_NAME
FROM   RA_PROTECTION_POLICY p, RA_DATABASE d
WHERE  p.policy_name=d.policy_name
ORDER BY d.DB_UNIQUE_NAME;

DB_UNIQUE_NAME                   POLICY_NAME
-------------------------------- -----------
ZDLRA                            BRONZE
ZDLRAC                           SILVER
.
.
.
-
Run the
DBMS_RA.UPDATE_DBprocedure to associate a database with a new policy.For example, execute the following PL/SQL anonymous block to associate the database named
zdlrac, which hassilveras its current policy, with the protection policy namedbronze:BEGIN DBMS_RA.UPDATE_DB( db_unique_name => 'zdlrac', protection_policy_name => 'bronze'); END;
-
Optionally, confirm that the database is associated with the correct policy.
For example, execute the following query (sample output included):
SELECT d.DB_UNIQUE_NAME, d.POLICY_NAME
FROM   RA_PROTECTION_POLICY p, RA_DATABASE d
WHERE  p.POLICY_NAME=d.POLICY_NAME
ORDER BY d.DB_UNIQUE_NAME;

DB_UNIQUE_NAME                   POLICY_NAME
-------------------------------- -----------
ZDLRA                            BRONZE
ZDLRAC                           BRONZE
.
.
.
See Also:


