14 Replicating Backups with Recovery Appliance
This chapter explains the purpose for replication of Recovery Appliance for disaster recovery, provides examples of replication topologies, and concludes with sections on how to configure replication using Cloud Control and alternatively using DBMS_RA. This chapter contains the following major sections:
About Recovery Appliance Replication
As part of a disaster recovery strategy, Recovery Appliance can replicate backups to other Recovery Appliances. Also, you can offload tape archival to a replicated Recovery Appliance, thereby freeing resources on the primary Recovery Appliance. Replication is driven by protection policy, which means that all databases associated with the policy are replicated, and it is fully automatic after the initial setup.
Oracle requires that you create a replication user account exclusively for use with Recovery Appliance replication, and that you create a unique replication user account for each upstream appliance within the organization.
Oracle recommends that the replication user account takes the form of REPUSER_FROM_[ZDLRA_DB_NAME or ZDLRA_DB_LOCATION]_TO_.
[ZDLRA_DB_NAME or ZDLRA_DB_LOCATION]
For example, if two Recovery Appliances have the DB_UNIQUE_NAME of ZDLRA1 and ZDLRA2, then the replication user accounts could be REPUSER_FROM_ZDLRA1_TO_ZDLRA2 and REPUSER_FROM_ZDLRA2_TO_ZDLRA1. Or if those same Recovery Appliances were in Florence and Vienna, then the replication user accounts could be REPUSER_FROM_FLORENCE_TO_VIENNA and REPUSER_FROM_VIENNA_TO_FLORENCE.
The replication user account should not be used as a regular VPC user employed by protected databases to connect and send backups to the Recovery Appliance.
This section contains the following topics:
See Also:
Overview of Recovery Appliance Replication
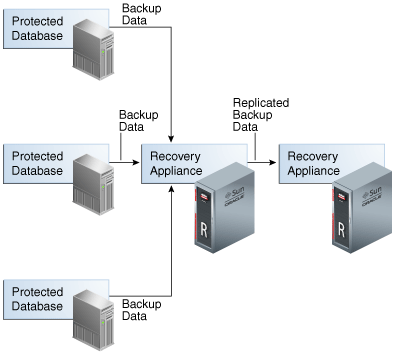
In the simple replication topology in Figure 14-1, a protected database sends backups to one Recovery Appliance, which passes the backups on to another Recovery Appliance. This topology is called one-way Recovery Appliance replication. The first Recovery Appliance is the upstream Recovery Appliance and the second is the downstream Recovery Appliance.
This section contains the following topics:
Protection Policies for Replication
Replication for a protected database occurs when the following conditions are met:
-
On the upstream Recovery Appliance, a replication server configuration specifies a Recovery Appliance acting as a downstream replication Recovery Appliance (
CREATE_REPLICATION_SERVER). -
On the upstream Recovery Appliance, a protection policy is associated with the replication server configuration (
ADD_REPLICATION_SERVER). -
On the upstream Recovery Appliance, a protected database is assigned (
ADD_DB) to the protection policy associated with the replication server configuration. -
On the downstream Recovery Appliance, a protection policy for the replicated backups must exist (
CREATE_PROTECTION_POLICY), and the protected databases must be added to it (ADD_DB).
When you complete configuration of the protection policy on the upstream Recovery Appliance, the Recovery Appliance immediately replicates only the last full backup for each database protected by the policy. The backup can be either the most recent level 0 backup received, or a virtual full backup based on the most recent level 1 backup received, whichever is more recent. The upstream Recovery Appliance replicates new backups as it receives them.
Replication Topology Examples
Replication topologies can be as complex as required. The primary variables are as follows:
-
The total number of Recovery Appliances in the replication environment, and their relationships to one another
-
The protection policies (
CREATE_PROTECTION_POLICY) on the upstream Recovery Appliance that manage the outgoing replicated backups, and the policies on the downstream Recovery Appliance that manage the incoming replicated backups -
The replication server configurations (
CREATE_REPLICATION_SERVER) that exist on each Recovery Appliance in the replication environment -
The association between a replication server configuration and a protection policy (
ADD_REPLICATION_SERVER)
You can chain replication so that an upstream Recovery Appliance replicates to multiple downstream Recovery Appliances, while a downstream Recovery Appliance receives backups from multiple upstream Recovery Appliances. A downstream Recovery Appliance can receive both backups from both its own protected databases and replicated backups. Any Recovery Appliance in the replication topology can simultaneously perform the upstream and downstream replication roles.
Note:
If a Recovery Appliance is both upstream and downstream, then you must configure it for both roles.
Replication to One Downstream Recovery Appliance
Figure 14-2 shows three databases associated with the reppolicy_us_bronze protection policy (orcl08, orcl09, and orcl10), and three databases associated with the reppolicy_us_gold protection policy (orcl11, orcl12, and orcl13). Only reppolicy_us_gold is associated with a replication server configuration, which is named us_bost_ds_desm. In this topology, the upstream ZDLRA Boston only transfers backups from databases protected by the reppolicy_us_gold policy to the downstream ZDLRA Des Moines.
Figure 14-2 Databases Replicating to One Recovery Appliance
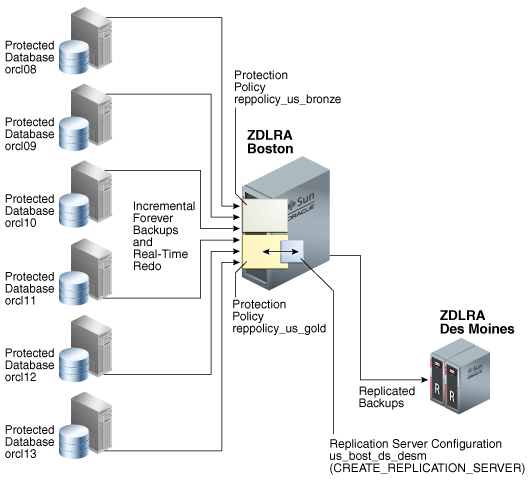
Description of "Figure 14-2 Databases Replicating to One Recovery Appliance"
Replication to Multiple Downstream Recovery Appliances
Because each protected database has its own protection policy, each policy can be associated with a different replication server configuration. For example, in Figure 14-3, the reppolicy_us_bronze policy is associated with replication server configuration us_bost_ds_sf, which replicates backups for databases protected by reppolicy_us_bronze (orcl08, orcl09, and orcl10) to the downstream Recovery Appliance named ZDLRA San Francisco. The reppolicy_us_gold policy is associated with replication server configuration us_bost_ds_desm, which replicates backups for databases protected by reppolicy_us_gold (orcl11, orcl12, and orcl13) to the downstream Recovery Appliance named ZDLRA Des Moines.
Figure 14-3 Databases Replicated to Multiple Recovery Appliances
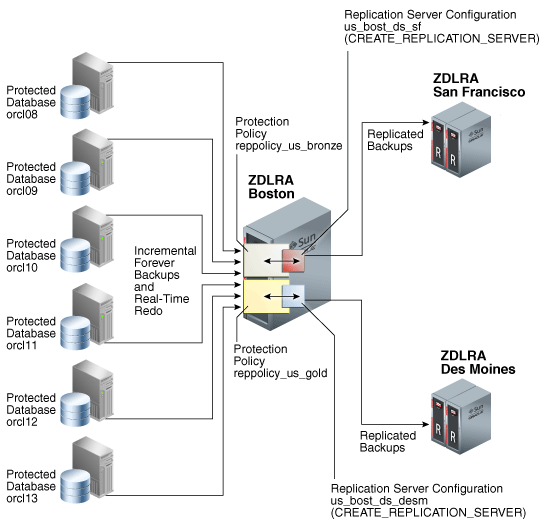
Description of "Figure 14-3 Databases Replicated to Multiple Recovery Appliances"
Replication Using Different Policies on Downstream Recovery Appliances
At each downstream Recovery Appliance in a replication scheme, the protection policy defines a disk recovery window goal and tape retention policy for received backups. The downstream configuration is completely independent of the upstream configuration. Thus, you have the flexibility to configure a downstream Recovery Appliance with more storage and longer recovery windows than its upstream Recovery Appliances, for example, using the downstream Recovery Appliance as a longer-term retention backup repository.
Figure 14-4 shows that reppolicy_us_bronze backups up on the upstream Recovery Appliance are protected by the reppolicy_ds_bronze policy on ZDLRA San Francisco. The reppolicy_us_gold backups up on the upstream Recovery Appliance are protected by the reppolicy_ds_gold policy on ZDLRA Des Moines.
Figure 14-4 Different Protection Policies on Each Recovery Appliance
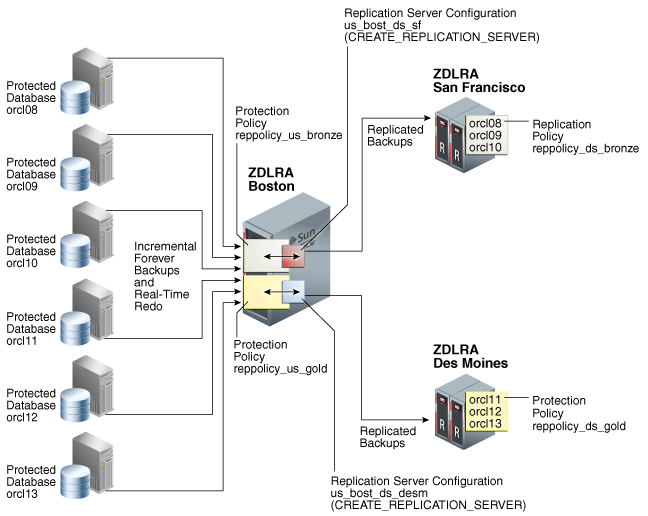
Description of "Figure 14-4 Different Protection Policies on Each Recovery Appliance"
Cascaded Replication
Figure 14-5 shows a more complicated topology. Databases orcl11, orcl12, and orcl13 are protected by the reppolicy_us_gold protection policy on ZDLRA Boston, which is furthest upstream. The reppolicy_us_gold policy replicates the backups for these databases to ZDLRA Des Moines, which is immediately downstream. However, two separate protection policies exist on ZDLRA Des Moines: reppolicy_ds_gold1, which protects databases orcl11 and orcl12, and reppolicy_ds_gold2, which protects only database orcl13.
Figure 14-5 Cascaded Replication, with Different Protection Policies on Each Recovery Appliance
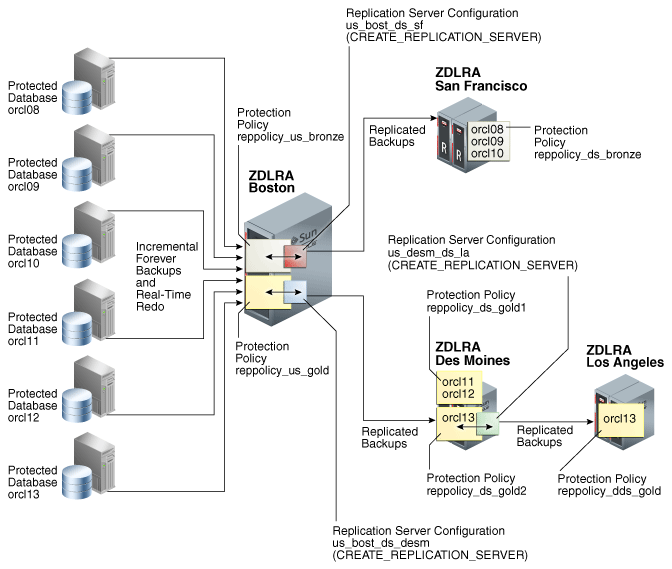
Description of "Figure 14-5 Cascaded Replication, with Different Protection Policies on Each Recovery Appliance"
In Figure 14-5, the reppolicy_ds_gold2 protection policy is associated with the replication server configuration us_desm_ds_la. ZDLRA Des Moines then replicates backups of orcl13, which is the only database protected by reppolicy_ds_gold2, to ZDLRA Los Angeles, which is the Recovery Appliance that is farthest downstream. The backups of orcl13 that reside on ZDLRA Los Angeles are protected by the reppolicy_dds_gold policy. This configuration, in which three or more Recovery Appliances are linked in a chain, is called cascaded replication.
Backup Anywhere Replication between Recovery Appliances
Backup Anywhere replication allows two Recovery Appliances RA-x and RA-y to replicate between each other for the same (or different) protected databases. Thus, both Recovery Appliances have a full set of backups.

Description of the illustration rep_backupanywhere.png
Two Recovery Appliances RA-x and RA-y replicate between each other, and are the upstream and downstream of each other. Backups from protected databases DB-a and DB-b flow to their upstream Recovery Appliance, RA-x and RA-y respectively. New backups are replicated to the other (downstream) Recovery Appliance to synchronize the backup state across the Recovery Appliances.
For examples of how this works in a High Availability / Disaster Recovery (HADR) configuration, refer to Replication Mode for HADR.
Replication Request-Only Mode
Request-only mode replication is useful for planned maintenance and reduces the amount of database backups, redo logs, and archive logs that must be transmitted between Recovery Appliances to re-establish its full recoverability of its databases at the conclusion of maintenance.
In request_only mode replication, the upstream (RA-x) Recovery Appliance receives the primary database backups while the downstream (RA-y) receives the standby database backups, redo logs, and archive logs. When the upstream RA-x is offline for planned maintenance as one example, the primary database redo and archive logs are redirected to the downstream RA-y, where new archived log backups are created in order to preserve database recoverability.
RA-y is not affected by RA-x outage and still receives level 1 backups from standby database as normal. Standby backups on RA-y can be used for primary database restores. When RA-x comes back online, all previously redirected backups are replicated from the downstream RA-y to the upstream RA-x to re-establish its full recoverability of its databases.

Description of the illustration rep_request.png
Request mode can be thought of as "Read only replication with the ability to request backups that it missed while not running". Request mode is built on top of the technologies that enabled Backup Anywhere, but it is not Backup Anywhere.
Redo and archived logs are the more critical data to retrieve from the upstream databases, because the database can hang if the local archived log directory fills up. Therefore, they are transmitted to RA-y so that they can be safely deleted by RMAN on DB-a.
The command RMAN CONFIGURE ARCHIVELOG DELETION POLICY BACKED UP 1 TIMES establishes that when redo has been shipped and backed up on RA-y, then RA-x can safely delete the local archived logs to reclaim space. With this policy configured, the command RMAN DELETE ARCHIVELOG can also be used to safely reclaim local archived log space.
Read-Only Replication between Recovery Appliances
The read_only replication mode is useful when changing the destination Recovery Appliance for database backups from the original RA-x to a different RA-y while backups remain available on RA-x to RA-y for restore operations as needed. A replication server for read_only mode can be configured in the protection policy for RA-y and designates RA-x as the downstream. All backups for the databases in the policy that exist on the downstream are retrievable when and if needed from the upstream. After the old backups on the original RA-x have expired according to the protection policy, RA-y will have no need for the backups on RA-x allowing RA-x to be transitioned out of the backup scenario.

Description of the illustration rep_readonly.png
The important use-case for read_only replication is when a different Recovery Appliance is to be used as the destination for database backups, such as when commissioning new Recovery Appliances in order to balance the load or to de-commission old Recovery Appliances. This allows for the graceful transfer of backup / restore between Recovery Appliances.
How Recovery Appliance Replicates Backups: Basic Process
Assume that a protected database backs up to a Recovery Appliance using the incremental-forever policy. When an protected database sends a backup to a Recovery Appliance configured for replication, the following basic steps occur:
-
The upstream Recovery Appliance ingests the backup, checking the protection policy to determine whether it is associated with a replication server configuration.
-
If a replication server configuration exists for the protection policy, then the upstream Recovery Appliance replicates the backup. The replication process includes:
-
Creating metadata records to track the replicated records
Note:
When real-time redo transport is enabled, incoming redo changes are not replicated in real time by Recovery Appliance. When an archived redo log backup is created, the Recovery Appliance automatically replicates this backup along with the data file backups.
-
Transferring the data blocks over the network to each specified downstream Recovery Appliance
-
-
The downstream Recovery Appliance ingests the backup, creating a virtual backup.
Note:
The ingest phase on the downstream is the same as the ingest phase described in Step 1. Thus, if the downstream Recovery Appliance is also configured to replicate the backup, then it assumes the role of an upstream Recovery Appliance, and then replicates the backup to the Recovery Appliances that are directly downstream, and so on.
-
Shortly afterward, the upstream Recovery Appliance sends a reconcile request to the downstream Recovery Appliance, which in turn sends metadata about the backup to the upstream Recovery Appliance.
In Recovery Appliance replication, reconciling is the process by which a Recovery Appliance receives metadata from the Recovery Appliances that are immediately downstream.
Thus, after the backup is replicated, both the upstream and downstream recovery catalog have a record of the protected database backup.
How RMAN Restores Backups in a Replication Environment
To restore a protected database, RMAN typically connects AS CATALOG to the same Recovery Appliance to which it originally sent backups. For example, in Figure 14-2, if RMAN needed to restore orcl11, then RMAN would connect to the catalog on the upstream Recovery Appliance.
If backups exist on any Recovery Appliances in the replication scheme, then the upstream Recovery Appliance can retrieve and restore the backups from the other Recovery Appliances. For example, in Figure 14-2, if RMAN needed to restore orcl11, but the backup had been purged from the upstream Recovery Appliance, then the downstream Recovery Appliance could provide the backups to the upstream Recovery Appliance, which could then restore them.
If necessary, RMAN can also restore a backup directly from a downstream Recovery Appliance. RMAN connects AS CATALOG to the downstream Recovery Appliance, and then restores the backup. For example, in Figure 14-2, if RMAN needed to restore prod3, but the upstream Recovery Appliance was temporarily inaccessible, then RMAN could connect directly to the catalog on the downstream Recovery Appliance, and then restore the backups directly to the protected database host.
Note:
When using either Oracle Enterprise Manager Cloud Control (Cloud Control) or the command line, restoring backups from a downstream Recovery Appliance requires additional configuration. See Zero Data Loss Recovery Appliance Protected Database Configuration Guide.
User Interfaces for Recovery Appliance Replication
This section contains the following topics:
Accessing the Replication Page in Cloud Control
The Replication page in Cloud Control is the recommended interface for configuring Recovery Appliance replication.
To access the Replication page:
-
Access the Recovery Appliance Home page, as described in "Accessing the Recovery Appliance Home Page".
-
From the Recovery Appliance menu, select Replication.
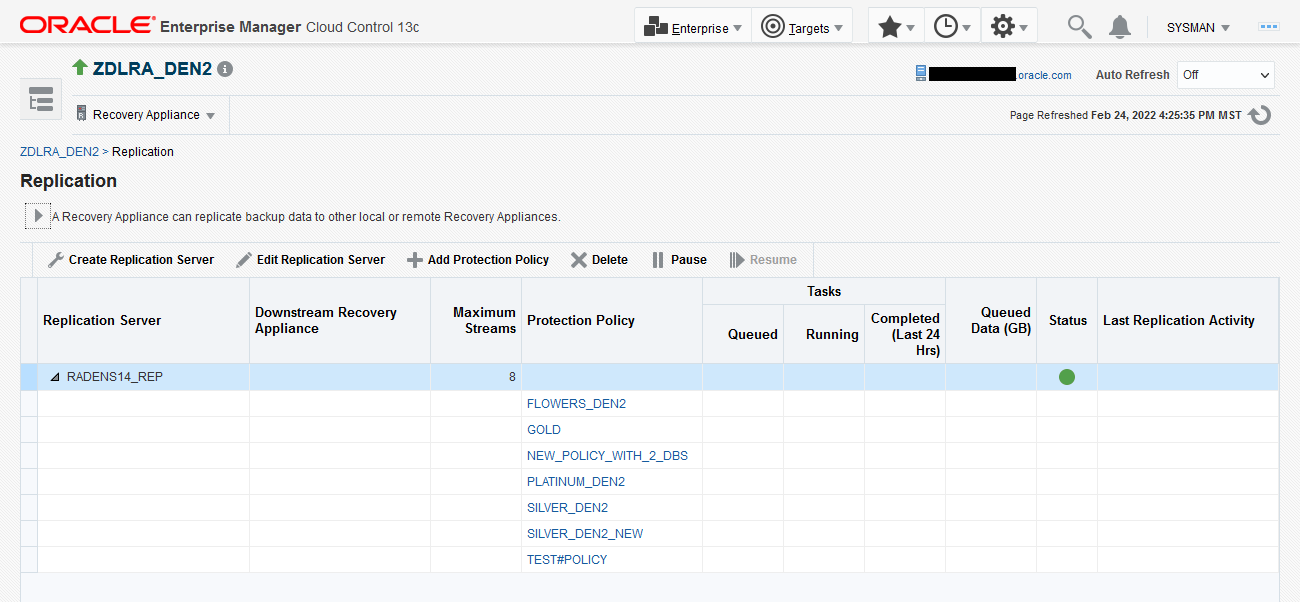
The Replication page appears, as shown in Figure 14-6.
In the figure above, the replication server named
RADENS14_REPis already configured. The Status column shows that it is available.
DBMS_RA Procedures Relating to Replication
You can use the DBMS_RA package to create and manage replication. Table 14-1 describes the principal program units relating to replication.
Table 14-1 Principal Procedures Relevant for Replication
| Program Unit | Description |
|---|---|
|
Creates a replication server configuration that specifies a downstream Recovery Appliance to which this Recovery Appliance replicates backups. |
|
|
Deletes a replication server configuration. |
|
|
Adds a replication server configuration to the protection policy that was created by the |
|
|
Removes a replication server configuration from the protection policy that was created by the |
|
|
Adds a database to the protection policy. |
|
|
Creates a protection policy. To enable replication for databases assigned to this policy, you must associate a replication server configuration with this policy by running |
|
|
Updates the properties of a protected database. |
See Also:
Recovery Catalog Views for Replication
You can monitor replication using the Recovery Appliance catalog views. Table 14-2 summarizes the views that are most useful for replication.
Table 14-2 Views for Replication
| View | Description |
|---|---|
|
This view lists the replication server configurations. |
|
|
This view lists information on replication servers and protected databases. |
|
|
This view lists replication information for replicating protection policies. |
|
|
This view lists the association of replication servers to protection policy. |
|
|
The |
|
|
This view describes the defined protection policies. |
See Also:
Basic Tasks for Configuring Recovery Appliance Replication
Figure 14-7 shows the basic workflow for configuring replication. "Planning for Recovery Appliance" describes the stage in the workflow in which you decide the recovery requirements for each service tier of databases.
You can perform the configuration using either Cloud Control or the command-line interface. Oracle recommends that you use Cloud Control because the steps are considerably less complicated.
Configuring Recovery Appliance Replication Using Cloud Control
This section describes how to configure Recovery Appliance replication using the Replication page in Cloud Control.
Prerequisites
Your environment must meet the following prerequisites:
-
The upstream and downstream Recovery Appliance can communicate with each other over the network.
-
Every protected database whose backup data will be replicated must be enrolled with the upstream Recovery Appliance.
-
The downstream Recovery Appliance must be started and configured to receive backups.
Assumptions
Assume that the following statements are true of your Recovery Appliance environment:
-
The protected databases
orcl11andorcl12back up to upstream Recovery ApplianceZDLRA Boston. -
You want
ZDLRA Bostonto replicate to downstream Recovery ApplianceZDLRA_DEN2. -
A replication user account named
repuser_from_bostonexists on the downstream Recovery Appliance (ZDLRA_DEN2). -
A virtual private catalog account named
vpc_boston1exists on the upstream Recovery Appliance (ZDLRA Boston). -
You know the credentials for the operating system user who owns the upstream Recovery Appliance (
ZDLRA Boston) database installation.
To configure Recovery Appliance replication:
-
Access the Recovery Appliance Home page on the upstream Recovery Appliance. Refer to "Accessing the Recovery Appliance Home Page".
-
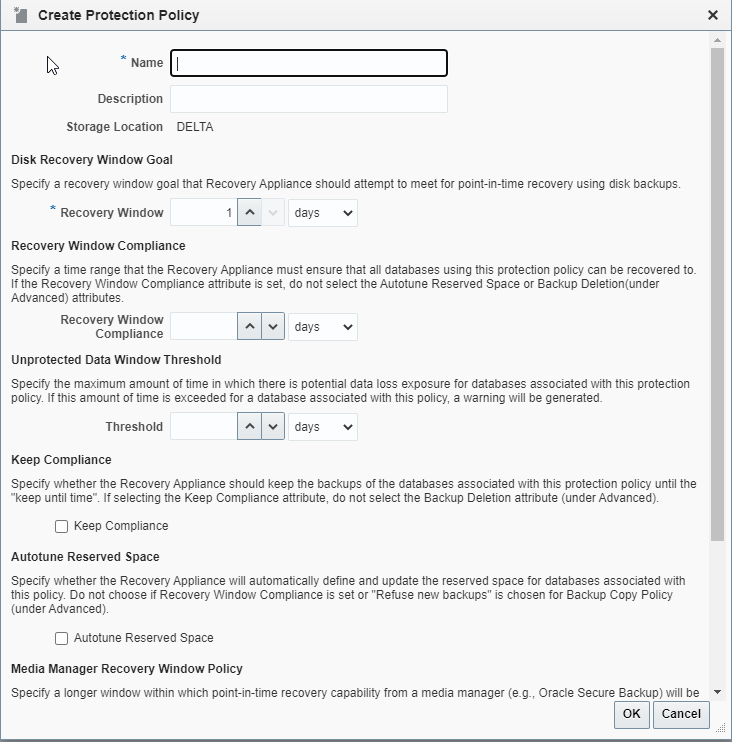
From the Recovery Appliance menu on the upstream Recovery Appliance, select Protection Policies to create one for replication.
In this example, you access the Create Protection Policy page for
ZDLRA Boston, which is the upstream Recovery Appliance.If required, enter your login credentials, and then click Login.
The Protection Policies page appears.
-
Create a replication protection policy. This is a normal protection policy that is later tied to replication, and is presented in Creating a Protection Policy.
Figure 14-9 Protection Policy Advanced Parameters
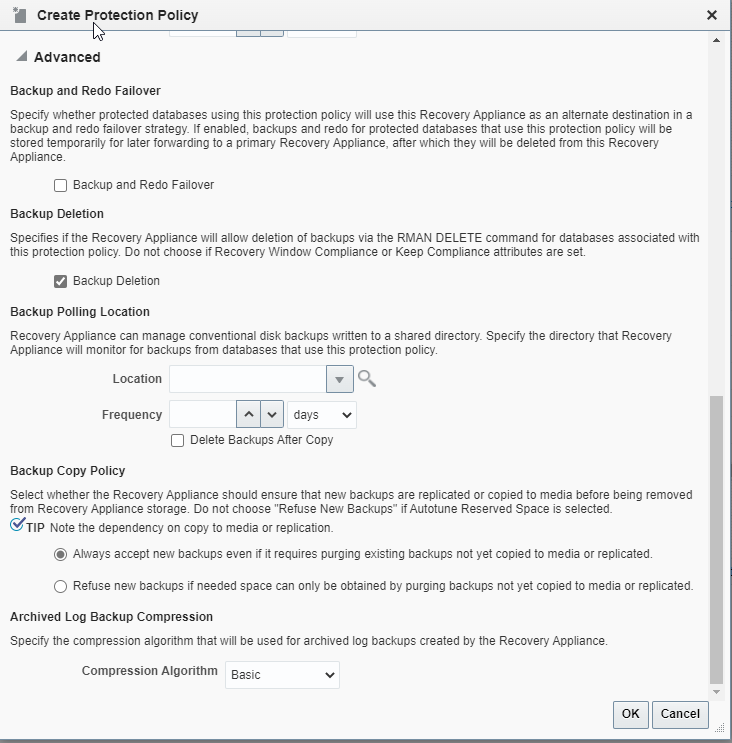
Description of "Figure 14-9 Protection Policy Advanced Parameters"In this example, you create a policy named
reppolicy_ds_gold. -
From the Recovery Appliance drop-down menu on the upstream Recovery Appliance, select Protected Database.
Select Add from the Protected Database tool bar. It shows the Add Protected Databases dialog box.
-
Select Add from this dialog box, which provides a Select Targets tool to Search for databases.
After a database is selected, it appears in the Database table. You can repeat this for other databases.
-
After the databases have been selected in Add Protected Databases dialog box, select the appropriate replication policy, such as
reppolicy_ds_goldin this example.When finished, select Next creates a job for the databases in the replication protection policy.
-
From the Recovery Appliance drop-down menu on the upstream Recovery Appliance, select Replication.
If the Recovery Appliance Login page appears, enter your login credentials and then click Login.
The Replication page appears, as shown in Figure 14-6.
In the preceding example, the replication server was named
ZDLRA9_REP. -
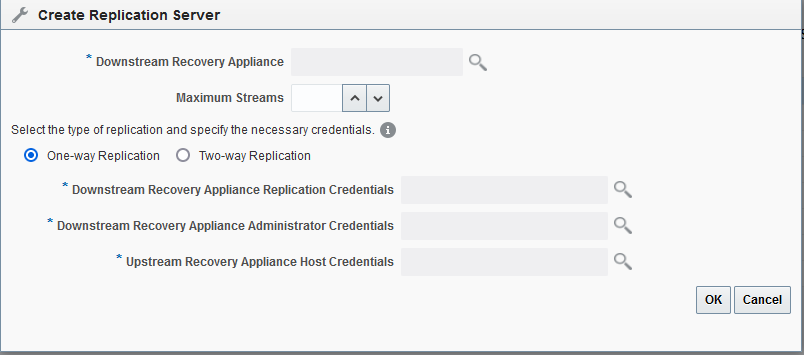
Select Create Replication Server on the Replication page.
The Create Replication Server page appears.
Figure 14-10 Create Replication Server Page
Description of "Figure 14-10 Create Replication Server Page" -
Enter values as follows, and then click OK:
-
In the Downstream Recovery Appliance field, click the magnifying glass, and then from the list of discovered targets, select the Recovery Appliance that you want to configure in the downstream role.
For example, select ZDLRA_DEN2.
-
In the Downstream Recovery Appliance Database Credentials section, specify credentials for a virtual private catalog account on the downstream Recovery Appliance.
Note:
This catalog account must have been granted permission to manage the replicated backups on the downstream Recovery Appliance. See racli add db_user.
For example, enter
vpc_den2. -
In the Upstream Recovery Appliance Database Credentials section, specify credentials for the operating system user who owns the upstream Recovery Appliance database installation.
An Information message appears showing the job submission ID.
-
-
After the new Replication Server appears in the list on the Replication page, select Add Protection Policy.
In this example, you created a policy named
reppolicy_ds_goldto be added to the replication server.
Once the replication server is configured on the upstream Recovery Appliance, the policies and configuration are handled for the downstream Recovery Appliance.
Configuring Recovery Appliance for Replication Using DBMS_RA
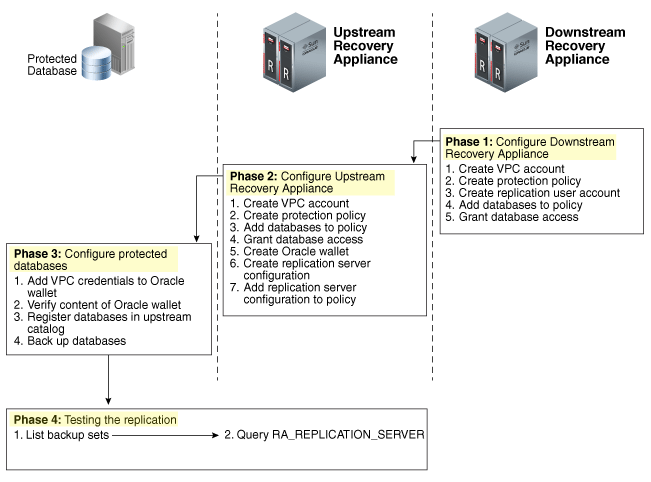
This section explains how to configure replication using command-line tools. The basic work flow is as follows:
-
Configure the downstream Recovery Appliance, as described in "Configuring a Downstream Recovery Appliance for Replication Using DBMS_RA".
-
Configure the upstream Recovery Appliance, as described in "Configuring an Upstream Recovery Appliance for Replication Using DBMS_RA".
-
Configure the protected databases involved in the replication, as described in "Configuring a Protected Database for Recovery Appliance Replication".
-
Test the replication, as described in "Testing a Recovery Appliance Replication Server Configuration".
Figure 14-11 is a graphic illustration of the configuration phases.
Figure 14-11 Overview of Manual Configuration for Replication
Description of "Figure 14-11 Overview of Manual Configuration for Replication"
Assumptions for the Replication Examples
In the replication tasks that follow, assume that the following conditions are true:
-
You back up databases
orcl11andorcl12to a Recovery Appliance namedZDLRA Bostonthat you want to configure in the upstream replication role. -
You intend to use
ZDLRA Des Moinesas the downstream Recovery Appliance. -
On the downstream Recovery Appliance, you intend to create a Recovery Appliance user account named
repuser_from_boston. This account is the replication user account.Note:
The naming convention for this account uses the Recovery Appliance from where the backups will be replicated—in this case,
ZDLRA Boston. In names of the protection policies in our examples, we useusfor upstream anddsfor downstream. -
On the downstream Recovery Appliance, you intend to create a protection policy named
reppolicy_ds_gold. This policy is exclusively for use by replication. -
On the downstream Recovery Appliance, you intend to create a virtual private catalog account named
vpc_des_moines1. RMAN uses this account to back up and restore databasesorcl11andorcl12. -
On the upstream Recovery Appliance, you intend to create a protection policy named
reppolicy_us_gold. This policy is exclusively for use by replication. -
On the upstream Recovery Appliance, you intend to create a virtual private catalog account named
vpc_boston1. RMAN uses this account to back up and restore databasesorcl11andorcl12.
Configuring a Downstream Recovery Appliance for Replication Using DBMS_RA
This section explains how to configure a downstream Recovery Appliance.
Note:
When a Recovery Appliance has both the upstream and downstream roles, these instructions pertain to the role of a downstream Recovery Appliance only.
Task 1: Create a virtual private catalog account on the downstream Recovery Appliance
When backing up or restoring protected databases, RMAN uses this account to connect to the recovery catalog on the downstream Recovery Appliance.
This task assumes that you want to create a virtual private catalog account named vpc_des_moines1 on the downstream Recovery Appliance.
To create virtual private catalog account:
-
Follow the instructions in racli add db_user.
For example, execute the following statement to create user account
vpc_des_moines1:# ./racli add db_user --user_name=vpc_des_moines1 --user_type=vpcEnter the password for
vpc_des_moines1user when prompted.
See Also:
Oracle Database Backup and Recovery User's Guide to learn more about virtual private catalogs
Task 2: Create a replication protection policy on the downstream Recovery Appliance
To create a protection policy specifying recovery windows and other properties of backups replicated to this downstream Recovery Appliance, execute DBMS_RA.CREATE_PROTECTION_POLICY.
This task assumes that you create a reppolicy_ds_gold policy to protect the orcl11 and orcl12 databases. You will later associate this policy with a Recovery Appliance.
To create a replication protection policy:
-
With SQL*Plus or SQL Developer, connect to the downstream Recovery Appliance database as
RASYS. -
Create a protection policy with the
DBMS_RA.CREATE_PROTECTION_POLICYprocedure.For example, execute the following PL/SQL program:
BEGIN
  DBMS_RA.CREATE_PROTECTION_POLICY (
    protection_policy_name => 'reppolicy_ds_gold',
    description            => 'For protected dbs in gold tier',
    storage_location_name  => 'delta',
    recovery_window_goal   => INTERVAL '28' DAY,
    guaranteed_copy        => 'NO');
END;
See Also:
-
"CREATE_PROTECTION_POLICY" for definitions of procedure arguments
Task 3: Create a replication user account on the downstream Recovery Appliance
When you configure a downstream Recovery Appliance to replicate backups for a protected database, you must create a replication user account that the upstream Recovery Appliance uses to log in to this downstream Recovery Appliance. The credentials for the user on the downstream Recovery Appliance are stored in the Oracle wallet of the upstream Recovery Appliance (see "Task 5: Create an Oracle wallet on the upstream Recovery Appliance").
Note:
For ease of administration, Oracle recommends that you create a replication user account exclusively for use with Recovery Appliance replication, and that you create a separate replication user account for each upstream appliance.
This task assumes that you want to create an account named repuser_from_boston that the upstream Recovery Appliance uses to authenticate on this Recovery Appliance.
To create a replication user account:
-
With SQL*Plus or SQL Developer, connect to the downstream Recovery Appliance database as
SYSTEMor any user with theDBArole. -
Create the replication user account.
For example, execute the following SQL statements to create the
repuser_from_bostondatabase user account and grant itCREATE SESSIONprivileges:# ./racli add db_user --user_name=repuser_from_boston --user_type=vpcNote:
Oracle recommends that you use a highly complex password to enhance security. You add this password and user name to the Oracle wallet in a subsequent step. After you save these credentials in the wallet, you will not need to enter the password manually again.
See Also:
Oracle Database Security Guide to learn how to create database user accounts
Task 4: Add databases to the protection policy on the downstream Recovery Appliance
To add the protected databases to the replication protection policy, execute DBMS_RA.ADD_DB. You must also specify the amount of disk space reserved for each protected database.
This task assumes that you want to add databases orcl11 and orcl12 to the reppolicy_ds_gold protection policy that you created in Task 2: Create a replication protection policy on the downstream Recovery Appliance and allocate 128 GB of reserved space for each protected database.
To add databases to a protection policy:
-
With SQL*Plus or SQL Developer, connect to the downstream Recovery Appliance database as
RASYS. -
Add metadata for each protected database using the
DBMS_RA.ADD_DBprocedure.For example, execute the following PL/SQL programs:
BEGIN
  DBMS_RA.ADD_DB (
    db_unique_name         => 'orcl11',
    protection_policy_name => 'reppolicy_ds_gold',
    reserved_space         => '128G');
END;
BEGIN
  DBMS_RA.ADD_DB (
    db_unique_name         => 'orcl12',
    protection_policy_name => 'reppolicy_ds_gold',
    reserved_space         => '128G');
END;
See Also:
"ADD_DB"
Task 5: Grant database access on the downstream Recovery Appliance
Execute DBMS_RA.GRANT_DB_ACCESS to grant protected database access to the following database accounts:
-
The virtual private catalog account created in "Task 1: Create a virtual private catalog account on the downstream Recovery Appliance"
-
The replication user account created in "Task 3: Create a replication user account on the downstream Recovery Appliance"
To grant protected database access to the replication and catalog accounts:
-
With SQL*Plus or SQL Developer, connect to the downstream Recovery Appliance database as
RASYS. -
For each protected database that will send backups to the upstream Recovery Appliance that must authenticate with this account, grant privileges to the replication user.
The following example grants the replication user
repuser_from_bostonthe required privileges on protected databasesorcl11andorcl12:BEGIN DBMS_RA.GRANT_DB_ACCESS ( username => 'repuser_from_boston', db_unique_name => 'orcl11'); END; BEGIN DBMS_RA.GRANT_DB_ACCESS ( username => 'repuser_from_boston', db_unique_name => 'orcl12'); END; -
For each protected database on each upstream Recovery Appliance that will authenticate with this account, grant privileges to the virtual private catalog account.
The following example grants the recovery catalog account
vpc_des_moines1the required privileges on protected databasesorcl11andorcl12:BEGIN DBMS_RA.GRANT_DB_ACCESS ( username => 'vpc_des_moines1', db_unique_name => 'orcl11'); END; BEGIN DBMS_RA.GRANT_DB_ACCESS ( username => 'vpc_des_moines1', db_unique_name => 'orcl12'); END;
See Also:
Configuring an Upstream Recovery Appliance for Replication Using DBMS_RA
This section explains how to configure an upstream Recovery Appliance. This section assumes that you have completed the steps in "Configuring a Downstream Recovery Appliance for Replication Using DBMS_RA".
Note:
When a Recovery Appliance has both the upstream and downstream roles, these instructions pertain to the upstream role only.
Task 1: Create a virtual private catalog account on the upstream Recovery Appliance
When backing up protected databases, RMAN uses this account to connect to the recovery catalog on the upstream Recovery Appliance.
This section assumes that you want to create a virtual private catalog account named vpc_boston1 on the upstream Recovery Appliance.
To create virtual private catalog account:
-
Follow the instructions in "racli add db_user".
For example, execute the following statement to create user account
vpc_boston1:# ./racli add db_user --user_name=vpc_boston1 --user_type=vpcEnter the password for
vpc_boston1user when prompted.
See Also:
Oracle Database Backup and Recovery User's Guide to learn more about virtual private catalogs
Task 2: Create a protection policy on the upstream Recovery Appliance
Execute DBMS_RA.CREATE_PROTECTION_POLICY to create a protection policy to specify the disk recovery windows and other properties of backups to this upstream Recovery Appliance. The upstream Recovery Appliance replicates these backups to its downstream Recovery Appliance.
This task assumes that you create a reppolicy_us_gold policy to protect the orcl11 and orcl12 databases. In the next task, you associate this protection policy with the protected databases.
To create a protection policy for Recovery Appliance replication:
-
With SQL*Plus or SQL Developer, connect to the upstream Recovery Appliance metadata database as
RASYS. -
Create each protection policy with the
DBMS_RA.CREATE_PROTECTION_POLICYprocedure.For example, execute the following PL/SQL program:
BEGIN
  DBMS_RA.CREATE_PROTECTION_POLICY (
    protection_policy_name => 'reppolicy_us_gold',
    description            => 'For protected dbs in gold tier',
    storage_location_name  => 'delta',
    recovery_window_goal   => INTERVAL '28' DAY,
    guaranteed_copy        => 'NO');
END;
See Also:
-
"CREATE_PROTECTION_POLICY" for definitions of procedure arguments
Task 3: Add databases to the protection policy on the upstream Recovery Appliance
To add the protected databases to the replication protection policy, execute the DBMS_RA.ADD_DB procedure. You must also specify the amount of disk space reserved for each protected database.
This task assumes that you want to add databases orcl11 and orcl12 to the reppolicy_us_gold protection policy that you created in "Task 2: Create a protection policy on the upstream Recovery Appliance", and allocate 128 GB of reserved space for each protected database.
To add databases to a protection policy:
-
With SQL*Plus or SQL Developer, connect to the upstream Recovery Appliance metadata database as
RASYS. -
Add metadata for each protected database using the
DBMS_RA.ADD_DBprocedure.For example, execute the following PL/SQL programs:
BEGIN
  DBMS_RA.ADD_DB (
    db_unique_name         => 'orcl11',
    protection_policy_name => 'reppolicy_us_gold',
    reserved_space         => '128G');
END;
BEGIN
  DBMS_RA.ADD_DB (
    db_unique_name         => 'orcl12',
    protection_policy_name => 'reppolicy_us_gold',
    reserved_space         => '128G');
END;
See Also:
Task 4: Grant database access to the virtual private catalog account on the upstream Recovery Appliance
To grant protected database access to the upstream catalog account created in "Task 1: Create a virtual private catalog account on the upstream Recovery Appliance", execute DBMS_RA.GRANT_DB_ACCESS. This step makes it possible for RMAN to connect to the recovery catalog when it backs up or restores the protected databases.
To grant protected database access to the virtual private catalog:
-
With SQL*Plus or SQL Developer, connect to the upstream Recovery Appliance metadata database as
RASYS. -
For each protected database whose backups will be replicated, grant privileges to the virtual private catalog account.
The following example grants the catalog account
vpc_boston1the required privileges on protected databasesorcl11andorcl12:BEGIN DBMS_RA.GRANT_DB_ACCESS ( username => 'vpc_boston1', db_unique_name => 'orcl11'); END; BEGIN DBMS_RA.GRANT_DB_ACCESS ( username => 'vpc_boston1', db_unique_name => 'orcl12'); END;
See Also:
Task 5: Create an Oracle wallet on the upstream Recovery Appliance
On the upstream Recovery Appliance, use the mkstore utility to create an Oracle auto-login wallet and add the replication user credentials created in "Task 3: Create a replication user account on the downstream Recovery Appliance". The upstream Recovery Appliance requires these credentials when it logs in to a downstream appliance. Each stored credential contains the name and verifier of a Recovery Appliance user account.
Note:
If an existing wallet is an auto-login wallet (one that does not require you to enter a password each time the wallet is accessed), then you may use it. An Oracle wallet has a file extension of *.sso. To use an existing Oracle wallet, skip Step 2 below.
This task assumes the following:
-
You want to create the Oracle wallet used for replication in the
/dbfs_repdbfs/REPLICATIONdirectory on the upstream Recovery Appliance host. -
You want to add credentials for replication user
repuser_from_boston.
To create an Oracle Wallet on the upstream Recovery Appliance:
-
Log in to the upstream Recovery Appliance host as the operating system user who installed Recovery Appliance or as a member of that user's operating system group.
-
To create the Oracle wallet, run the following command, where
wallet_locationis an existing directory on the upstream Recovery Appliance in which to store the wallet:mkstore -wrl wallet_location -createALOFor example, the following command creates an auto-login wallet in the
/dbfs_repdbfs/REPLICATIONdirectory:mkstore -wrl file:/dbfs_repdbfs/REPLICATION -createALO
The
mkstoreutility creates a file namedcwallet.ssoin the designated location. -
To add the credentials, run the following command:
mkstore -wrl wallet_location -createCredential serv_name ds_rep_user pwd
The placeholders are defined as follows:
-
wallet_locationis the directory in which to create the wallet. The directory must exist. -
serv_nameis an Oracle network service name that you use in an EZ Connect descriptor to identify the downstream Recovery Appliance on an Oracle network. -
ds_rep_useris the user name of the replication user account on the downstream Recovery Appliance. -
pwdis the secure password of the replication user on the downstream Recovery Appliance.
For example, the following command adds credentials for the net service name
radsm01repl-scan.acme.comusing port1522and a database name ofzdlradsm, and the replication user namerepuser_from_boston:mkstore -wrl file:/dbfs_repdbfs/REPLICATION -createCredential \ "radsm01repl-scan.acme.com:1522/zdlradsm" "repuser_from_boston" "pwd" -
-
Verify that credentials were properly added for all users by running the following command, which lists the credentials in the Oracle wallet (no passwords or verifiers are displayed):
mkstore -wrl wallet_location -listCredentialFor example, the following command lists the credentials in the Oracle wallet stored in
/dbfs_repdbfs/REPLICATION:mkstore -wrl file:/dbfs_repdbfs/REPLICATION -listCredential Oracle Secret Store Tool : Version 12.1.0.1 Copyright (c) 2004, 2012, Oracle and/or its affiliates. All rights reserved. List credential (index: connect_string username) 1: radsm01repl-scan1.acme.com:1522/zdlradsm repuser_from_boston
See Also:
-
Oracle Database Net Services Administrator's Guide for the location of
tnsnames.ora -
Oracle Database Net Services Administrator's Guide to learn more about net service names
Task 6: Create the replication server configuration on the upstream Recovery Appliance
For each downstream Recovery Appliance to which this upstream Recovery Appliance will replicate, create a replication server configuration by executing DBMS_RA.CREATE_REPLICATION_SERVER.
Caution:
If you run CREATE_REPLICATION_SERVER on the upstream Recovery Appliance before the downstream Recovery Appliance has added the databases to a protection policy (ADD_DB) and granted database access (GRANT_DB_ACCESS), then an ORA-* error can result.
This task assumes the following:
-
You want to create a replication server configuration named
zdlradsm_rep.Note:
The replication server configuration name is arbitrary. However, Oracle recommends that you use the service name of the downstream Recovery Appliance, which is also the database name (
zdlradsmin this example) followed by_rep. -
You want the upstream Recovery Appliance to log in to its downstream Recovery Appliance using the replication account
repuser_from_boston. You created this account in "Task 3: Create a replication user account on the downstream Recovery Appliance". -
The configuration uses the net service name
radsm01repl-scan.acme.com:1522/zdlradsmthat you stored in the Oracle wallet created in "Task 5: Create an Oracle wallet on the upstream Recovery Appliance". -
The Oracle wallet is stored in
/dbfs_repdbfs/REPLICATION. -
The file name of the Recovery Appliance Backup Module, which is preinstalled on every Recovery Appliance, is
libra.so. The module functions as an SBT media management library. RMAN references this module when allocating or configuring a channel for backup to the Recovery Appliance (see "Configuring a Protected Database for Recovery Appliance Replication").
To create a replication server configuration:
-
With SQL*Plus or SQL Developer, connect to the upstream Recovery Appliance metadata database as
RASYS. -
Run the
DBMS_RA.CREATE_REPLICATION_SERVERprocedure for each downstream Recovery Appliance.The following example creates the replication server configuration named
zdlradsm_repfor the downstream Recovery Appliance namedZDLRA Des Moines:BEGIN DBMS_RA.CREATE_REPLICATION_SERVER ( replication_server_name => 'zdlradsm_rep', sbt_so_name => 'libra.so', catalog_user_name => 'RASYS', wallet_alias => 'radsm01repl-scan.acme.com:1522/zdlradsm', wallet_path => 'file:/dbfs_repdbfs/REPLICATION'); END; -
Confirm the creation of the replication server configuration.
For example, run the following query:
SELECT COUNT(*) should_be_one
FROM   RA_REPLICATION_CONFIG
WHERE  REPLICATION_SERVER_NAME = 'ZDLRADSM_REP';

SHOULD_BE_ONE
-------------
1
If the configuration was created correctly, then the return value is
1.
See Also:
-
"CREATE_REPLICATION_SERVER" for procedure argument descriptions
-
Zero Data Loss Recovery Appliance Protected Database Configuration Guide to learn more about the Recovery Appliance Backup Module
-
Oracle Database Backup and Recovery User's Guide for a list of valid client configuration file parameters and their definitions
Task 7: Associate the upstream Recovery Appliance with a protection policy
Specify the downstream Recovery Appliances to which each protected database replicates by assigning the replication server configuration to a protection policy. When this task is completed, Recovery Appliance replication is enabled.
Note:
You can assign multiple replication server configurations to a protection policy.
This task assumes the following:
-
You want to use the replication server configuration named
zdlradsm_rep, which you created in "Task 6: Create the replication server configuration on the upstream Recovery Appliance". -
You want to add the replication server configuration to protection policy
reppolicy_us_gold, which you created in "Task 2: Create a protection policy on the upstream Recovery Appliance".
To associate a replication server configuration with a protection policy:
-
Ensure you are connected to the Recovery Appliance metadata database as the Recovery Appliance administrator.
-
Run the
DBMS_RA.ADD_REPLICATION_SERVERprocedure for each combination of protection policy and replication server configuration.For example, execute the following PL/SQL program:
BEGIN
  DBMS_RA.ADD_REPLICATION_SERVER (
   replication_server_name => 'zdlradsm_rep',
   protection_policy_name  => 'reppolicy_us_gold');
END;
See Also:
Configuring a Protected Database for Recovery Appliance Replication
Each protected database that participates in a Recovery Appliance replication environment must be correctly configured. For example, for each protected database, you must:
-
Add the Oracle wallet credentials for the virtual private catalog owner on the upstream and downstream Recovery Appliances to the Oracle wallet.
Note:
The replication configuration does not require you to add the downstream credentials. However, if the upstream Recovery Appliance were inaccessible, and if RMAN tried to restore backups from the downstream Recovery Appliance, then RMAN would need to connect directly to the virtual private catalog in the downstream Recovery Appliance. In this case, the Oracle wallet would require the downstream credentials.
-
Verify the content of the Oracle wallet.
-
Register the database in the virtual private catalog of the upstream Recovery Appliance.
-
Back up the protected database, making sure to specify the correct Oracle wallet location when allocating the RMAN channel.
To learn how to configure protected databases, see Zero Data Loss Recovery Appliance Protected Database Configuration Guide.
Testing a Recovery Appliance Replication Server Configuration
For every protected database involved in a replication scheme, use the following procedure to test replication from an upstream Recovery Appliance to all downstream Recovery Appliances. You can repeat this procedure to test each replication path of a complex replication topology.
This section assumes the following:
-
You want to test the replication of backups of
orcl11fromZDLRA Boston, which is the upstream Recovery Appliance, toZDLRA Des Moines, which is the downstream Recovery Appliance. -
ZDLRA Bostonalso backs up to tape.
To test the replication of a protected database:
Configuring Recovery Appliance Replication with TLS Using DBMS_RA
This section describes how to configure Recovery Appliance replication when TLS is in use on one or both Recovery Appliances.
Prerequisites and Assumptions
Your environment must meet the following prerequisites:
-
The upstream and downstream Recovery Appliance can communicate with each other over the network.
-
The downstream Recovery Appliance must be started and configured to receive backups.
The following replication cases are provided.
Case 1: One-Way Replication; TLS disabled on Downstream
The upstream Recovery Appliance (RA1) has one-way replication to the downstream Recovery Appliance (RA2).
-
The upstream Recovery Appliance can be in the mode: TLS enabled, TLS only, or TLS disabled.
-
The downstream Recovery Appliance has TLS disabled.
No action is required.
Case 2: One-Way Replication; TLS enabled on Downstream
The upstream Recovery Appliance (RA1) has one-way replication to the downstream Recovery Appliance (RA2).
-
The upstream Recovery Appliance (RA1) can be in the mode: TLS enabled, TLS only, or TLS disabled.
-
The downstream Recovery Appliance (RA2) has TLS enabled or TLS only.
Perform these steps with RA2 as the downstream.
-
Update
tnsnames.orawith the new TCPS information.-
On the downstream Recovery Appliance
cat /u01/app/oracle/product/19.0.0.0/dbhome_1/network/admin/tnsnames.ora -
On the upstream Recovery Appliance, add a new entry or update the existing entry with the TCPS information from the downstream Recovery Appliance. For example:
(ADDRESS = (PROTOCOL = TCPS)(HOST = <FULL_SCAN_NAME>)(PORT = 2484)
-
-
Update the trusted certificate, which has the
pemextension, like<NAME>.pem-
Copy the trusted cert from the downstream Recovery Appliance to the upstream Recovery Appliance
tmpdirectory.Note:
Use either a different location or a different name if the upstream Recovery Appliance is TLS enabled so that the certificate on the upstream Recovery Appliance is not overwriteen.scp DS_RA:<trusted_cert> US_RA:/tmp/<different_name_trusted_cert> -
Prepare the password for the RA wallet.
Note:
Use the same password for the RA wallet and the replication wallet.mkstore --wrl /raacfs/raadmin/config/awallet/wallet/ --viewEntry oracle.security.client.password<NUMBER>-
If the upstream Recovery Appliance is also TLS enabled, then the RA wallet already supports the certificates.
orapki wallet add --wallet /raacfs/raadmin/config/ra_wallet/wallet
--trusted_cert --cert /tmp/<different_name_trusted_cert>
If the replication is bi-directional, perform the same operation but treat the local Recovery Appliance as a downstream Recovery Appliance.
-
If the upstream Recovery Appliance is not TLS enabled, then the RA wallet needs to be migrated to support the certificates.
-
List all of the current credentials.
mkstore -–wrl /raacfs/raadmin/config/ra_wallet/wallet -–listCredential -
Back up the wallet.
mv /raacfs/raadmin/config/ra_wallet/wallet /raacfs/raadmin/config/ra_wallet/wallet_old -
Create a new RA wallet.
orapki wallet create --wallet /raacfs/raadmin/config/ra_wallet/wallet -
Import copied trusted certificate into the wallet.
orapki wallet add --wallet /raacfs/raadmin/config/ra_wallet/wallet --trusted_cert --cert /tmp/<different_name_trusted_cert> -
Update wallet to auto login.
orapki wallet create -–wallet /raacfs/raadmin/config/ra_wallet/wallet --auto_login -
Recover all credentials into the new RA wallet. For each credential in the old wallet, perform:
mkstore -–wrl /raacfs/raadmin/config/ra_wallet/wallet
--createCredential <alias> <user>  <pw>
-
-
-
Check to see that the replication wallet supports certificates.
ls -lart /raacfs/raadmin/replication/orapkiThis is the replication wallet standard that RACLI recommends and supports certificates.
-
If the replication wallet exists, perform:
orapki wallet add --wallet /raacfs/raadmin/replication/orapki --trusted_cert -cert /tmp/<different_name_trusted_cert> -
If the replication wallet does not exist, perform:
-
List credentials in current replication wallet.
mkstore -–wrl /raacfs/raadmin/replication -–listCredential -
Create a new replication wallet.
orapki wallet create --wallet /raacfs/raadmin/replication/orapki -
Import copied trusted certificate into new replication wallet.
orapki wallet add --wallet /raacfs/raadmin/replication/orapki --trusted_cert --cert /tmp/<different_name_trusted_cert> -
Update wallet with auto login.
orapki wallet create -–wallet /raacfs/raadmin/replication/orapki --auto_login -
Recover all credentials into new replication wallet
mkstore -–wrl /raacfs/raadmin/replication/orapki --createCredential <tns_alias> <repl_user> <repl_user_pw>
-
-
-
-
Update the replication server parameters.
-
Pause the replication server.
dbms_ra.pause_replication_server() -
Update the replication parameters.
-
wallet_pathshould be the new replication wallet location. -
wallet_aliasshould be the alias updated intnsnames.orain step 1
dbms_ra.update_replication_server() wallet_path => 'file:/raacfs/raadmin/replication/orapki/’ wallet_alias => ‘TNS_ALIAS’ -
-
Resume the replication server
dbms_ra.resume_replication_server()
-
Case 3: Two-Way Replication; TLS disabled on Downstream
The upstream Recovery Appliance (RA1) has two-way replication with the downstream Recovery Appliance (RA2).
-
The upstream Recovery Appliance can be in the mode: TLS enabled or TLS only.
-
The downstream Recovery Appliance has TLS disabled.
Perform this step but with RA1 as the downstream. on the downstream Recovery Appliance.
-
Update
tnsnames.orawith the new TCPS information.-
On the downstream Recovery Appliance
cat /u01/app/oracle/product/19.0.0.0/dbhome_1/network/admin/tnsnames.ora -
On the upstream Recovery Appliance, add a new entry or update the existing entry with the TCPS information from the downstream Recovery Appliance. For example:
(ADDRESS = (PROTOCOL = TCPS)(HOST = <FULL_SCAN_NAME>)(PORT = 2484)
-
-
Update the trusted certificate, which has the
pemextension, like<NAME>.pem-
Copy the trusted cert from the downstream Recovery Appliance to the upstream Recovery Appliance
tmpdirectory.Note:
Use either a different location or a different name if the upstream Recovery Appliance is TLS enabled so that the certificate on the upstream Recovery Appliance is not overwriteen.scp DS_RA:<trusted_cert> US_RA:/tmp/<different_name_trusted_cert> -
Prepare the password for the RA wallet.
Note:
Use the same password for the RA wallet and the replication wallet.mkstore --wrl /raacfs/raadmin/config/awallet/wallet/ --viewEntry oracle.security.client.password<NUMBER>-
If the upstream Recovery Appliance is also TLS enabled, then the RA wallet already supports the certificates.
orapki wallet add --wallet /raacfs/raadmin/config/ra_wallet/wallet
--trusted_cert --cert /tmp/<different_name_trusted_cert>
If the replication is bi-directional, perform the same operation but treat the local Recovery Appliance as a downstream Recovery Appliance.
-
If the upstream Recovery Appliance is not TLS enabled, then the RA wallet needs to be migrated to support the certificates.
-
List all of the current credentials.
mkstore -–wrl /raacfs/raadmin/config/ra_wallet/wallet -–listCredential -
Back up the wallet.
mv /raacfs/raadmin/config/ra_wallet/wallet /raacfs/raadmin/config/ra_wallet/wallet_old -
Create a new RA wallet.
orapki wallet create --wallet /raacfs/raadmin/config/ra_wallet/wallet -
Import copied trusted certificate into the wallet.
orapki wallet add --wallet /raacfs/raadmin/config/ra_wallet/wallet --trusted_cert --cert /tmp/<different_name_trusted_cert> -
Update wallet to auto login.
orapki wallet create -–wallet /raacfs/raadmin/config/ra_wallet/wallet --auto_login -
Recover all credentials into the new RA wallet. For each credential in the old wallet, perform:
mkstore -–wrl /raacfs/raadmin/config/ra_wallet/wallet
--createCredential <alias> <user>  <pw>
-
-
-
Check to see that the replication wallet supports certificates.
ls -lart /raacfs/raadmin/replication/orapkiThis is the replication wallet standard that RACLI recommends and supports certificates.
-
If the replication wallet exists, perform:
orapki wallet add --wallet /raacfs/raadmin/replication/orapki --trusted_cert -cert /tmp/<different_name_trusted_cert> -
If the replication wallet does not exist, perform:
-
List credentials in current replication wallet.
mkstore -–wrl /raacfs/raadmin/replication -–listCredential -
Create a new replication wallet.
orapki wallet create --wallet /raacfs/raadmin/replication/orapki -
Import copied trusted certificate into new replication wallet.
orapki wallet add --wallet /raacfs/raadmin/replication/orapki --trusted_cert --cert /tmp/<different_name_trusted_cert> -
Update wallet with auto login.
orapki wallet create -–wallet /raacfs/raadmin/replication/orapki --auto_login -
Recover all credentials into new replication wallet
mkstore -–wrl /raacfs/raadmin/replication/orapki --createCredential <tns_alias> <repl_user> <repl_user_pw>
-
-
-
-
Update the replication server parameters.
-
Pause the replication server.
dbms_ra.pause_replication_server() -
Update the replication parameters.
-
wallet_pathshould be the new replication wallet location. -
wallet_aliasshould be the alias updated intnsnames.orain step 1
dbms_ra.update_replication_server() wallet_path => 'file:/raacfs/raadmin/replication/orapki/’ wallet_alias => ‘TNS_ALIAS’ -
-
Resume the replication server
dbms_ra.resume_replication_server()
-
Case 4: Two-Way Replication; TLS enabled on Downstream
The upstream Recovery Appliance (RA1) has two-way replication with the downstream Recovery Appliance (RA2).
-
The upstream Recovery Appliance can be in the mode: TLS enabled or TLS only.
-
The downstream Recovery Appliance has TLS enabled or TLS only.
Perform this step twice: once with RA1 as the downstream, and once with RA2 as the downstream.
-
Update
tnsnames.orawith the new TCPS information.-
On the downstream Recovery Appliance
cat /u01/app/oracle/product/19.0.0.0/dbhome_1/network/admin/tnsnames.ora -
On the upstream Recovery Appliance, add a new entry or update the existing entry with the TCPS information from the downstream Recovery Appliance. For example:
(ADDRESS = (PROTOCOL = TCPS)(HOST = <FULL_SCAN_NAME>)(PORT = 2484)
-
-
Update the trusted certificate, which has the
pemextension, like<NAME>.pem-
Copy the trusted cert from the downstream Recovery Appliance to the upstream Recovery Appliance
tmpdirectory.Note:
Use either a different location or a different name if the upstream Recovery Appliance is TLS enabled so that the certificate on the upstream Recovery Appliance is not overwriteen.scp DS_RA:<trusted_cert> US_RA:/tmp/<different_name_trusted_cert> -
Prepare the password for the RA wallet.
Note:
Use the same password for the RA wallet and the replication wallet.mkstore --wrl /raacfs/raadmin/config/awallet/wallet/ --viewEntry oracle.security.client.password<NUMBER>-
If the upstream Recovery Appliance is also TLS enabled, then the RA wallet already supports the certificates.
orapki wallet add --wallet /raacfs/raadmin/config/ra_wallet/wallet
--trusted_cert --cert /tmp/<different_name_trusted_cert>
If the replication is bi-directional, perform the same operation but treat the local Recovery Appliance as a downstream Recovery Appliance.
-
If the upstream Recovery Appliance is not TLS enabled, then the RA wallet needs to be migrated to support the certificates.
-
List all of the current credentials.
mkstore -–wrl /raacfs/raadmin/config/ra_wallet/wallet -–listCredential -
Back up the wallet.
mv /raacfs/raadmin/config/ra_wallet/wallet /raacfs/raadmin/config/ra_wallet/wallet_old -
Create a new RA wallet.
orapki wallet create --wallet /raacfs/raadmin/config/ra_wallet/wallet -
Import copied trusted certificate into the wallet.
orapki wallet add --wallet /raacfs/raadmin/config/ra_wallet/wallet --trusted_cert --cert /tmp/<different_name_trusted_cert> -
Update wallet to auto login.
orapki wallet create -–wallet /raacfs/raadmin/config/ra_wallet/wallet --auto_login -
Recover all credentials into the new RA wallet. For each credential in the old wallet, perform:
mkstore -–wrl /raacfs/raadmin/config/ra_wallet/wallet
--createCredential <alias> <user>  <pw>
-
-
-
Check to see that the replication wallet supports certificates.
ls -lart /raacfs/raadmin/replication/orapkiThis is the replication wallet standard that RACLI recommends and supports certificates.
-
If the replication wallet exists, perform:
orapki wallet add --wallet /raacfs/raadmin/replication/orapki --trusted_cert -cert /tmp/<different_name_trusted_cert> -
If the replication wallet does not exist, perform:
-
List credentials in current replication wallet.
mkstore -–wrl /raacfs/raadmin/replication -–listCredential -
Create a new replication wallet.
orapki wallet create --wallet /raacfs/raadmin/replication/orapki -
Import copied trusted certificate into new replication wallet.
orapki wallet add --wallet /raacfs/raadmin/replication/orapki --trusted_cert --cert /tmp/<different_name_trusted_cert> -
Update wallet with auto login.
orapki wallet create -–wallet /raacfs/raadmin/replication/orapki --auto_login -
Recover all credentials into new replication wallet
mkstore -–wrl /raacfs/raadmin/replication/orapki --createCredential <tns_alias> <repl_user> <repl_user_pw>
-
-
-
-
Update the replication server parameters.
-
Pause the replication server.
dbms_ra.pause_replication_server() -
Update the replication parameters.
-
wallet_pathshould be the new replication wallet location. -
wallet_aliasshould be the alias updated intnsnames.orain step 1
dbms_ra.update_replication_server() wallet_path => 'file:/raacfs/raadmin/replication/orapki/’ wallet_alias => ‘TNS_ALIAS’ -
-
Resume the replication server
dbms_ra.resume_replication_server()
-
Case 5: Two-Way Replication; TLS disabled on Upstream
The upstream Recovery Appliance (RA1) has two-way replication with the downstream Recovery Appliance (RA2).
-
The upstream Recovery Appliance has TLS disabled.
-
The downstream Recovery Appliance has TLS enabled or TLS only.
Perform this step with RA2 as the downstream.
-
Update
tnsnames.orawith the new TCPS information.-
On the downstream Recovery Appliance
cat /u01/app/oracle/product/19.0.0.0/dbhome_1/network/admin/tnsnames.ora -
On the upstream Recovery Appliance, add a new entry or update the existing entry with the TCPS information from the downstream Recovery Appliance. For example:
(ADDRESS = (PROTOCOL = TCPS)(HOST = <FULL_SCAN_NAME>)(PORT = 2484)
-
-
Update the trusted certificate, which has the
pemextension, like<NAME>.pem-
Copy the trusted cert from the downstream Recovery Appliance to the upstream Recovery Appliance
tmpdirectory.Note:
Use either a different location or a different name if the upstream Recovery Appliance is TLS enabled so that the certificate on the upstream Recovery Appliance is not overwriteen.scp DS_RA:<trusted_cert> US_RA:/tmp/<different_name_trusted_cert> -
Prepare the password for the RA wallet.
Note:
Use the same password for the RA wallet and the replication wallet.mkstore --wrl /raacfs/raadmin/config/awallet/wallet/ --viewEntry oracle.security.client.password<NUMBER>-
If the upstream Recovery Appliance is also TLS enabled, then the RA wallet already supports the certificates.
orapki wallet add --wallet /raacfs/raadmin/config/ra_wallet/wallet
--trusted_cert --cert /tmp/<different_name_trusted_cert>
If the replication is bi-directional, perform the same operation but treat the local Recovery Appliance as a downstream Recovery Appliance.
-
If the upstream Recovery Appliance is not TLS enabled, then the RA wallet needs to be migrated to support the certificates.
-
List all of the current credentials.
mkstore -–wrl /raacfs/raadmin/config/ra_wallet/wallet -–listCredential -
Back up the wallet.
mv /raacfs/raadmin/config/ra_wallet/wallet /raacfs/raadmin/config/ra_wallet/wallet_old -
Create a new RA wallet.
orapki wallet create --wallet /raacfs/raadmin/config/ra_wallet/wallet -
Import copied trusted certificate into the wallet.
orapki wallet add --wallet /raacfs/raadmin/config/ra_wallet/wallet --trusted_cert --cert /tmp/<different_name_trusted_cert> -
Update wallet to auto login.
orapki wallet create -–wallet /raacfs/raadmin/config/ra_wallet/wallet --auto_login -
Recover all credentials into the new RA wallet. For each credential in the old wallet, perform:
mkstore -–wrl /raacfs/raadmin/config/ra_wallet/wallet
--createCredential <alias> <user>  <pw>
-
-
-
Check to see that the replication wallet supports certificates.
ls -lart /raacfs/raadmin/replication/orapkiThis is the replication wallet standard that RACLI recommends and supports certificates.
-
If the replication wallet exists, perform:
orapki wallet add --wallet /raacfs/raadmin/replication/orapki --trusted_cert -cert /tmp/<different_name_trusted_cert> -
If the replication wallet does not exist, perform:
-
List credentials in current replication wallet.
mkstore -–wrl /raacfs/raadmin/replication -–listCredential -
Create a new replication wallet.
orapki wallet create --wallet /raacfs/raadmin/replication/orapki -
Import copied trusted certificate into new replication wallet.
orapki wallet add --wallet /raacfs/raadmin/replication/orapki --trusted_cert --cert /tmp/<different_name_trusted_cert> -
Update wallet with auto login.
orapki wallet create -–wallet /raacfs/raadmin/replication/orapki --auto_login -
Recover all credentials into new replication wallet
mkstore -–wrl /raacfs/raadmin/replication/orapki --createCredential <tns_alias> <repl_user> <repl_user_pw>
-
-
-
-
Update the replication server parameters.
-
Pause the replication server.
dbms_ra.pause_replication_server() -
Update the replication parameters.
-
wallet_pathshould be the new replication wallet location. -
wallet_aliasshould be the alias updated intnsnames.orain step 1
dbms_ra.update_replication_server() wallet_path => 'file:/raacfs/raadmin/replication/orapki/’ wallet_alias => ‘TNS_ALIAS’ -
-
Resume the replication server
dbms_ra.resume_replication_server()
-
Case 6: Two-Way Replication; TLS disabled on Upstream and Downstream
The upstream Recovery Appliance (RA1) has two-way replication with the downstream Recovery Appliance (RA2).
-
The upstream Recovery Appliance has TLS disabled.
-
The downstream Recovery Appliance has TLS disabled.
No action is required.
