12 Setting Up the Infrastructure for Oracle Compute
This chapter describes how to set up and configure an Oracle Compute Site for self service users in Enterprise Manager. It contains the following sections:
Oracle Compute Cloud Service Workflow
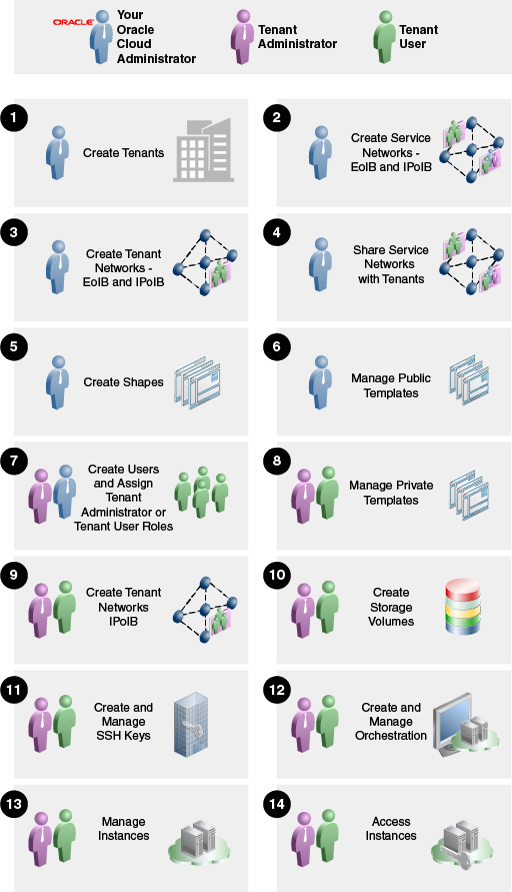
Oracle Compute Cloud Service is the infrastructure service provided with the Oracle Public Cloud Machine. You must follow the workflow to set up the cloud infrastructure and provide the services to your users.
A typical workflow for setting up the infrastructure and using the Compute Cloud Service is shown below:
Figure 12-1 Oracle Compute Cloud Service Workflow
Terminology
The following table lists some important Oracle Compute terms and definitions.
Table 12-1 Terms and Definitions
| Term | Definition |
|---|---|
|
Node |
A node is a physical server (Hypervisor) in an Oracle Compute cluster. |
|
Cluster |
The Oracle Compute infrastructure is modeled around server pools or cluster. A cluster can contain three or more nodes. |
|
Site |
A site is a location running one or more Oracle Compute clusters. |
|
Instance |
An instance is a guest virtual machine. |
|
Tenant |
Every client organization or customer that participates in Multi-Tenancy enabled server or service as consumer is called as Tenant. A tenant is the context within which system objects such as users and machine images are created. A tenant can be an organization, a department within an organization, or even a single person. At least one tenant needs to be created per site. |
|
User |
A user is an entity that can make requests. Each user is associated with one tenant. User names are unique for a tenancy, and tenant names are unique within the system as a whole. |
|
Shape |
A virtual machine's shape refers to a definition of the number of CPUs assigned to the virtual machine, the amount of RAM made available to it, and the relative amount of I/O it processes. Shapes are used to characterize combinations of these resources so that end-users can specify resource requirements for placement of their instances. |
|
Image List |
An image list is a list of machine images. Machine images can be added to an image list to create a versioned selection of related machine images recording the versions of the image over its lifetime. |
|
Infiniband |
InfiniBand offers point-to-point bidirectional serial links intended for the connection of processors with high-speed peripherals such as disks. On top of the point to point capabilities, InfiniBand also offers multicast operations. In an Oracle Public Cloud Machine, all the components are inter-connected by Infiniband network. |
|
Oracle Compute Template |
An Oracle Compute template is a copy of a virtual hard disk with an installed operating system used to launch a virtual machine instance. It is a whole disk image (including a partition table and a kernel) stored in a tar archive, compressed with gzip. |
|
Orchestration |
Orchestration is the automated management of your system components for high availability, monitoring, and persistence. An orchestration is comprised of a set of identical VMs, storage, and other required components that are tied together to create into a single, manageable collection. |
|
Launch Plan |
A launch plan defines the configuration settings for one or more VM instances. |
Setting Up the Oracle Compute Site
After you have discovered the Oracle Compute site as an Enterprise Manager target, you must configure it for self service users by defining tenants, configuring shapes, quota, templates, and so on.
To set up the Oracle Compute site, follow these steps:
-
Create tenant administrators and users. See Creating a Tenant for details.
-
Configure shapes. See Creating a Shape for details.
-
Define quotas. See Defining Quotas for details.
-
Upload Oracle Compute templates. See Managing Oracle Compute Templates for details.
-
Set up an orchestration template. See Creating an Orchestration Template for details.
-
Configure request settings. See Configuring Request Settings for details
Creating a Tenant
A tenant (or a customer) is the context or framework within which system objects such as users and templates are created. In an enterprise, a tenant can be an organization, a department within an organization, or even a single person. Each Oracle Compute site must contain at least one tenant.
Before you create a tenant, you must do the following:
-
Estimate the resource quotas to be allocated for the tenant
-
Identify the tenant users and tenant administrators
The quota for the vCPUs, memory, and storage resources can be defined during the tenant creation process. If the tenant does not have the required resources, then the Tenant Users cannot create and run instances in the tenant.
The cloud administrator can create one or more tenants in a selected Oracle Compute site. Each tenant can be associated with one or more tenant administrators and tenant users.
To create a tenant, follow these steps:
-
Log in to Enterprise Manager as a user with the
EM_CLOUD_ADMINISTRATORrole. -
From the Enterprise menu, select Cloud, then select Cloud Home.
-
From the Oracle Cloud menu, select Getting Started, then click on the Setup link next to the Infrastructure - Oracle Compute service family in the left panel.
-
Click Tenancy Management and select an Oracle Compute Site from the drop down list. Tenants that have already been created for the selected site are listed.
-
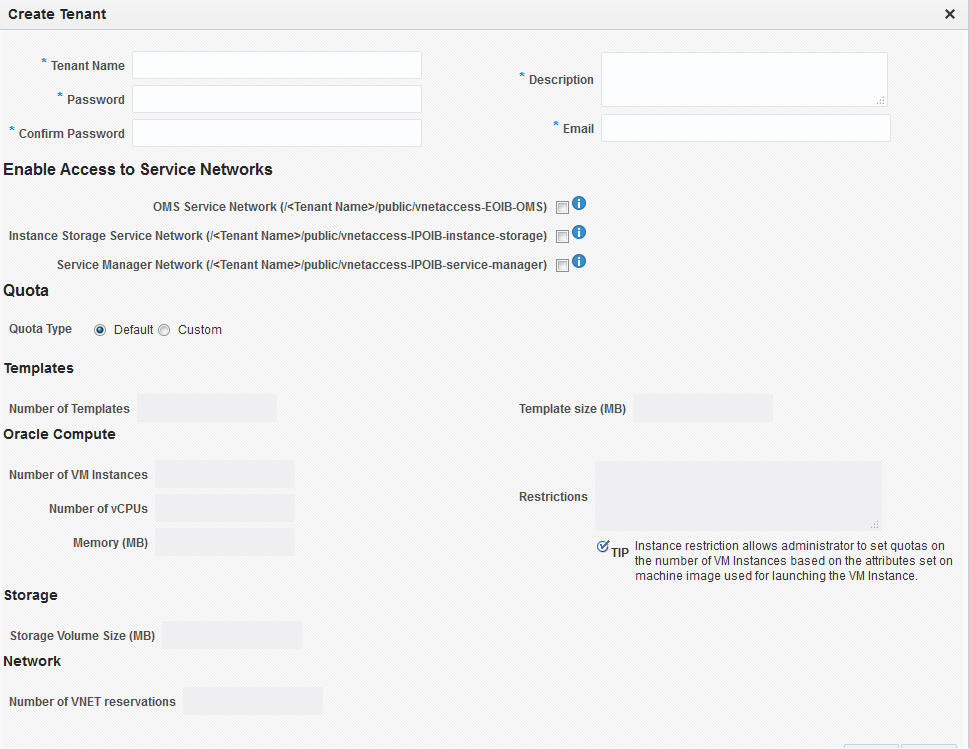
Click Create. The Create Tenant window appears.
Figure 12-2 Create Tenant
Add image Create Tenant
-
Enter the name, password, description, and e-mail address of the tenant administrator.
-
In the Enable Access to Service Networks region, select one or all of the following:
-
OMS Service Name: Select this option to enable VM instances created by the tenant to be monitored by Enterprise Manager.
-
Instance Storage Service Network: Select this option to enable VM instances created by the tenant to access the ZFS storage pool.
-
Service Manager Network: Select this option to enable access to the Platform Service Manager network.
-
-
In the Quota region, you can select:
-
Default: If you select this option, the default quota will be assigned to this tenancy.
-
Custom: If you select this option, you can define a custom quota that will be available to the tenancy. You can specify the following criteria:
-
Templates: Specify the number of images and the size.
-
Oracle Compute: Specify the number of VM instances, number of vCPUs, and total memory that will be available to all users in this tenancy. You can also set quotas on the number of instances allowed by specifying restrictions which can be comma separated key value pairs. For example, if you specify
os_license=20, the number of VM instances launched off machine images withos_licenseas attribute key cannot be greater than 20. -
Storage: Specify the storage volume size that will be available to all users in this tenancy.
-
Network: Specify the number of IP addresses that can be reserved from the VNET that is available to the tenancy.
-
-
-
Click Create. The newly created tenant will appear on the Tenancy Management page and the quota created for the tenant will appear on the User Management: Quotas page. See Defining the Quota for details. After the tenant has been created, the cloud administrator or the self service administrator can create tenant administrators and tenant users under each tenancy.
Creating a Shape
A shape refers to the characteristics of a virtual machine that include the number of CPUs assigned to the virtual machine, the amount of RAM available, and the relative number of I/O processes. Each shape is combination of these characteristics and can be used by tenant users while requesting virtual machines. While defining a shape, you need to consider the capacity of your machines and the anticipated workload of the instances.
To create a shape, follow these steps:
-
Log in to Enterprise Manager as a user with the
EM_CLOUD_ADMINISTRATORrole. -
From the Enterprise menu, select Cloud, then select Cloud Home.
-
From the Oracle Cloud menu, select Getting Started, then click on the Setup link next to the Infrastructure - Oracle Compute service family in the left panel.
-
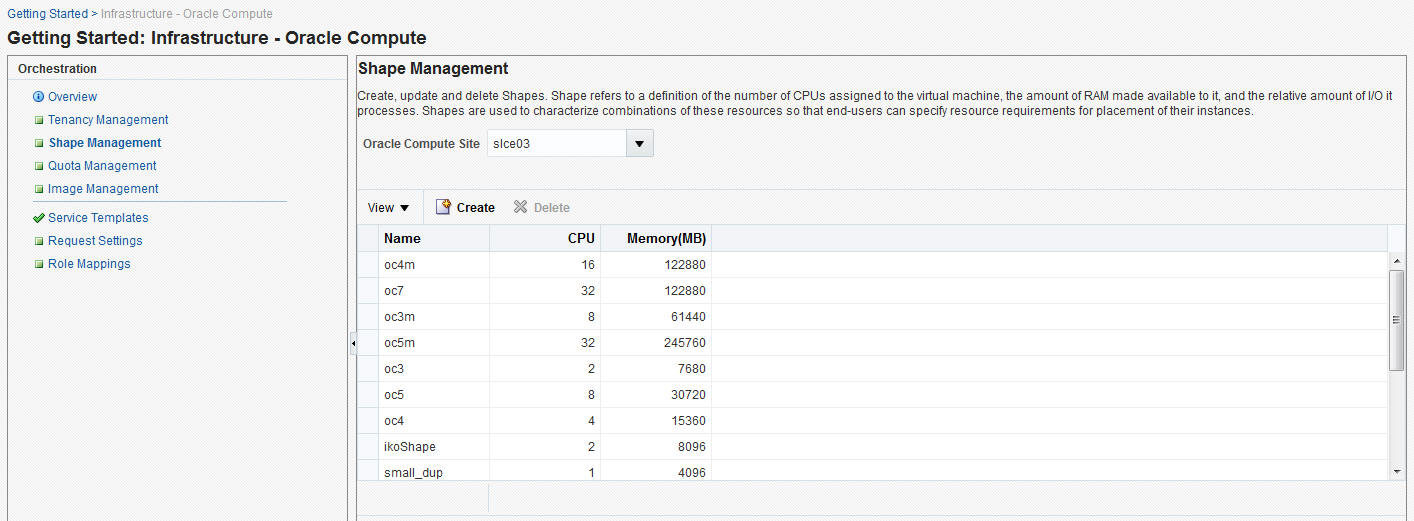
Click Shape Management and select an Oracle Compute Site from the drop down list. Shapes that have already been created for the selected site are listed.
Figure 12-3 Creating a Shape
-
Click Create. The Create Compute Machine window appears. Enter the name, description, number of CPUs, memory, and the relative number of IO processes that can be allocated to the virtual machine.
-
Click Create. The newly created shape will appear on the Shape Management page.
Defining Quotas
The administrator (cloud administrator or self service administrator) can define quota on system resources such as templates, instances, storage and networks. Quotas on system resources are enforced only when the administrator explicitly sets them. When a tenant is created, if a custom quota setting is not defined, the default quota setting is assigned to the tenant. Any quota settings defined while creating the tenant can be modified on the User Management: Quotas page.
To edit a quota setting, follow these steps:
-
Log in to Enterprise Manager as a user with the
EM_CLOUD_ADMINISTRATORrole. -
From the Enterprise menu, select Cloud, then select Cloud Home and navigate to the Oracle Compute Site Home page.
-
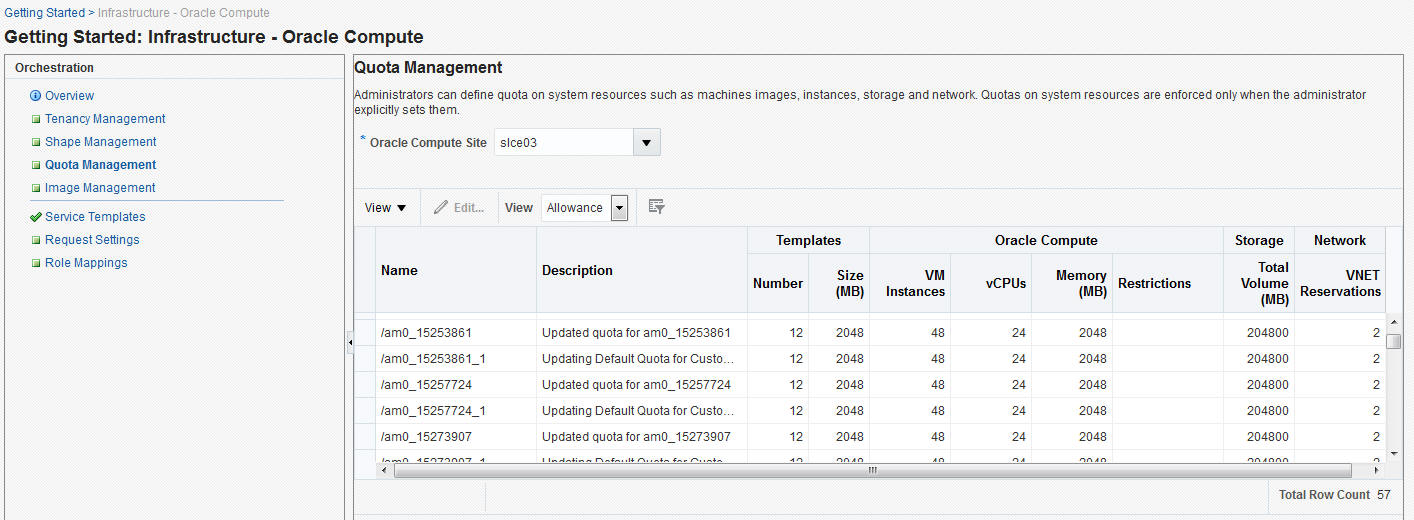
From the Oracle Compute Site menu, select User Management, then select Quota. The User Management: Quotas page appears. The quota settings assigned to each tenant are displayed. You can choose to view the quota by Usage or by Allowance by selecting the appropriate option from the View drop down list.
Figure 12-4 Managing Quota
-
Select a quota that you wish to modify and click Edit. The Edit Quota window appears.
-
You can modify the description of the quota and the following criteria:
-
Templates: Specify the number of images and the size.
-
Oracle Compute: Specify the number of VM instances, number of vCPUs, and total memory that will be available to all users in this tenancy. You can also set quotas on the number of instances allowed by specifying restrictions which can be comma separated key value pairs. For example, if you specify
os_license=20, the number of VM instances launched off machine images withos_licenseas attribute key cannot be greater than 20. -
Storage: Specify the storage volume size that will be available to all users in this tenancy.
-
Network: Specify the number of IP addresses that can be reserved from the VNET that is available to the tenancy.
-
-
Click Edit to modify the quota and return to the User Management: Quotas page.
Managing Oracle Compute Templates
An Oracle Compute template is a copy of a virtual hard disk with an installed operating system used to launch a virtual machine instance. It is a whole disk image (including a partition table and a kernel) stored in a tar archive, compressed with gzip. Templates can be versions of Linux (such as Red Hat or Ubuntu), Microsoft Windows, or other operating systems.
To upload a template, follow these steps:
-
Log in to Enterprise Manager as a user with the
EM_CLOUD_ADMINISTRATORrole. -
From the Enterprise menu, select Cloud, then select Cloud Home and navigate to the Oracle Compute Site Home page.
-
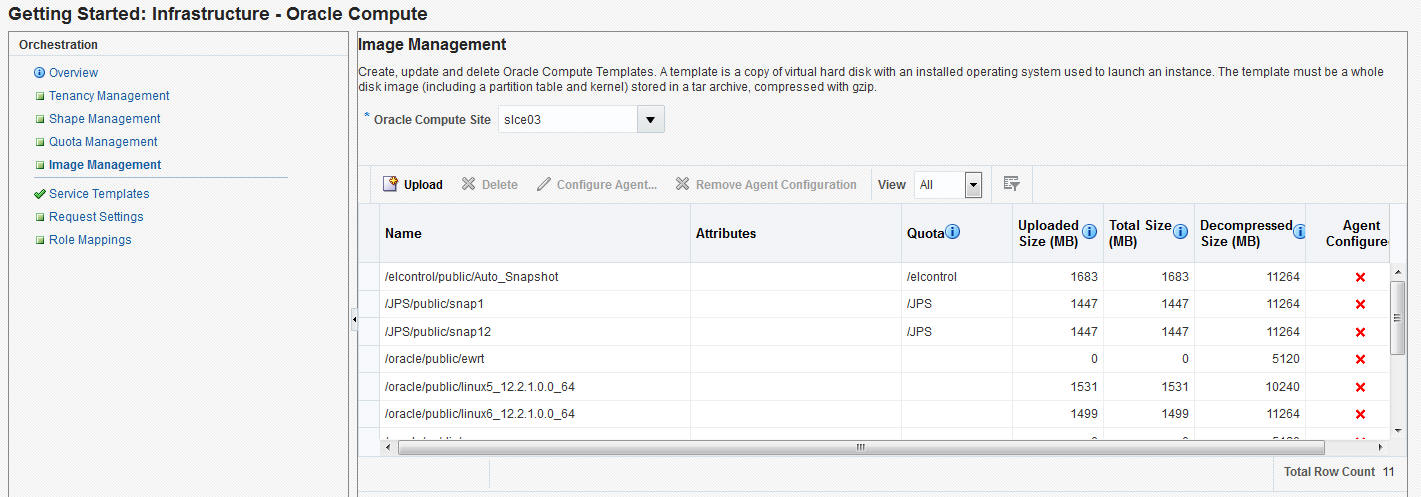
From the Oracle Compute Site menu, select Image Management. You will see a list of templates that have been uploaded either from the Software Library or from a local disk.
Figure 12-5 Image Management
-
Click Upload. The Template Management: Upload Template window appears. While uploading the image, the Template Scope can be:
-
Public: The image will be available to all the users. If you select this option, enter the name of the image in the Name field.
-
Tenant: The image will be available only to users belonging to the selected tenancy. If you select this option, select the Tenant in the Name drop down field and specify the name of the template. The image will be available to all users in the selected tenancy.
-
-
Specify any additional attributes that will be used when the service instance is provisioned.
-
In the Select Template field, select the image that is to be uploaded. The image you upload can either be present in your local disk or from the Software Library.
-
Click Upload to upload the template. The newly uploaded image will appear on the Image Management: Compute Templates page with the following details:
-
Name: The name of the image. If the image is available to all users, the format of the name is
/oracle/public/<image_name>. If the image is available only to users belonging a selected tenancy, the format is<tenant_name>/public/<image_name>. -
Attributes: Any user defined attributes that were specified when the image was uploaded.
-
Quota: The quota specified for the image.
-
Uploaded Size: The size of the image that has been uploaded.
-
Total Size: The total size of the image.
-
Decompressed Size: the size of the image in its decompressed state.
-
Agent Configured: Indicates if the Management Agent has been configured for this image. See Configuring the Management Agent.
-
Configuring the Management Agent
You can specify the details of the Management Agent that is to be associated with an image list. To configure the agent, follow these steps:
-
Log in to Enterprise Manager as a user with the
EM_CLOUD_ADMINrole. -
From the Enterprise menu, select Cloud, then select Compute Home. The Compute Cloud page appears.
-
From the Oracle Compute Cloud menu, select Resource Providers and click on an Oracle Compute Site from the list.The Oracle Compute Cloud page appears.
-
From the Oracle Compute Cloud menu, select Image Management. The Image Management page with a list of templates is displayed.
-
Select a template from the list and click Configure Agent. Specify the following details:
-
Agent Configuration Type: Select Fresh or Shared.
-
Installation Base Directory: If you selected Fresh, specify the base directory on the host machine on which the Management Agent is to be installed.
-
Shared Agent: If you selected Shared as the Agent Configuration Type, enter the name of the shared agent.
-
Oracle Home: If you have selected Shared as the Agent Configuration Type, specify the location of the shared Oracle Home of the existing Management Agent.
-
Platform: Select the platform on which it is be installed.
-
Instance Directory: Specify the Instance Directory for the Oracle Home.
-
Username & Password: Specify the credentials required to access the agent.
-
SSH Timeout: The SSH timeout period for Guest Virtual Machine communication during deployment.
-
Privilege Delegation Settings: Specify any privilege delegation settings.
-
-
Click OK to configure the agent and return to the previous page.
Creating an Orchestration Template
Prerequisites
-
One or more Oracle Compute sites must have been discovered.
-
One or more Oracle Compute templates must be available.
Orchestration is the automated management of your system components for high availability, monitoring, and persistence. An orchestration ties together the components you create into a single, manageable collection. For example, with orchestration you can associate networks, network security, and storage with the instantiation of a virtual machine. The administrator can create one or more orchestration service templates. These orchestration templates can then be used by tenant users to create Oracle Compute service instances. Each orchestration template can contain one or more launch plans (See Creating a Launch Plan). To create an orchestration template, follow these steps:
-
Log in as a user with the
EM_CLOUD_ADMINISTRATORrole. -
From the Enterprise menu, select Cloud, then select Cloud Home.
-
From the Oracle Cloud menu, select Getting Started, then click on the Setup link next to the Infrastructure - Oracle Compute service family in the left panel.
-
Click Service Templates, then click Create. The Create Service Template window appears.
-
Select the Orchestration service type, then select Orchestration Custom Service Template and click Create to launch the Create Orchestration Custom Service Template wizard.
-
Enter the name and description for the template and click Next.
-
In the Characteristics page, enter the target properties such as contact, cost center, lifecycle status, and so on. These properties or characteristics will be applied to the instance as target properties when the service instance is created. Click Next.
-
In the Resource Providers page, click Add and select an Oracle Compute Site into which the service instances are to be provisioned.
-
Click Next. The Configuration page appears.
Figure 12-6 Creating an Orchestration Template
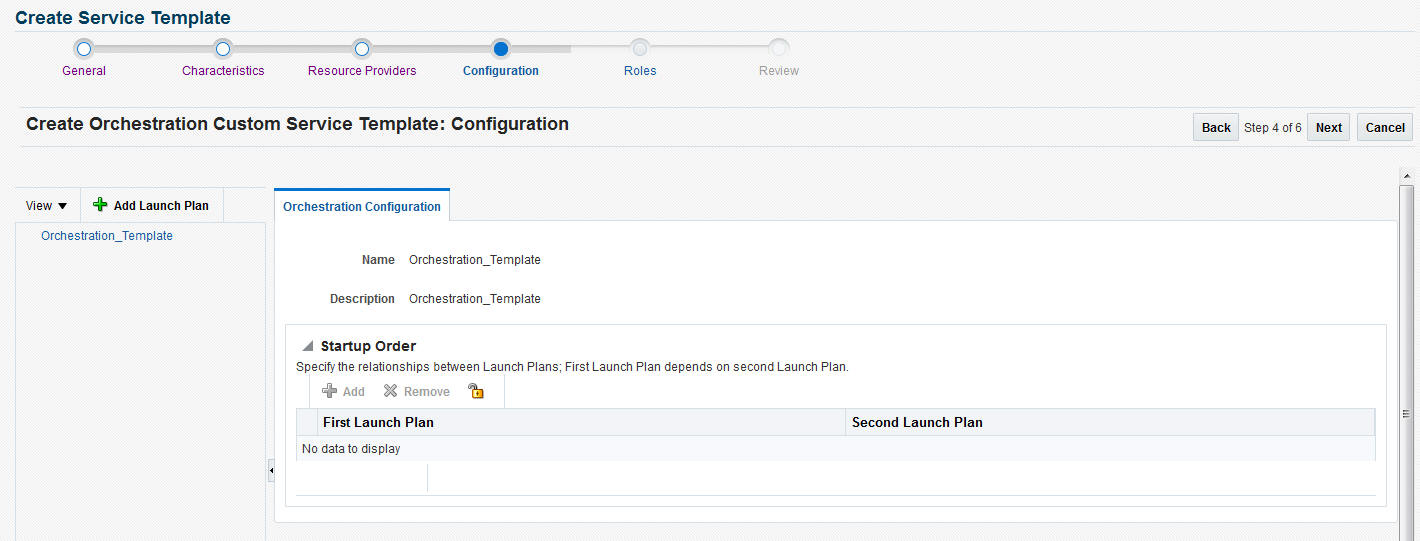
An Orchestration Template can be associated with one or more launch plans. Click Add Launch Plan to create a new launch plan. See Creating a Launch Plan for details.
-
After defining one or more launch plans, you can configure the relationship between the launch plans by selecting the order in which the launch plans are to be executed. Select the Orchestration Template link on the left panel. In the Orchestration Configuration page, click Add in the Startup Order region and select the order for the launch plans. Click Next.
-
In the Roles page, click Add and select the roles to which the service template is to be available. Click Next.
-
In the Review page, review the template details and click Submit to create the Orchestration template.
Creating a Launch Plan
A launch plan defines the configuration settings for one or more VM instances. To create a launch plan, follow these steps:
-
In the Launch Plan window, enter a name for the launch plan and click Add. The launch plan name you entered appears under the Orchestration Template header in the launch panel. Click on the launch plan name to specify the configuration details.
-
Click the Launch Plan Configuration tab and enter the following details:
-
High Availability: You can specify a high availability policy for an orchestration, which affects how the orchestration is managed by the system. This can be:
-
No High Availability: If you choose this option, the orchestration components are neither restarted nor monitored.
-
Active: The components defined by the orchestration are restarted if they stop unexpectedly due to causes such as power failure and node disconnection.
Note:
A component will not be restarted if it is stopped due to an operator error such as an instance relaunch or an invalid image list or shape. In this case, the status of an orchestration will reflect the error, but the components will not be recreated. The reported operator error must be fixed and the orchestration restarted. -
Monitor: The components are not restarted, they are only monitored.
-
-
Deploy on Different Nodes: Select this check box to deploy the launch plan on different nodes.
-
-
Click the Common Settings tab to define the default settings that will be used for all VM instances in this launch plan. The default setting can be overridden at the VM instance level.
Figure 12-7 Common Settings
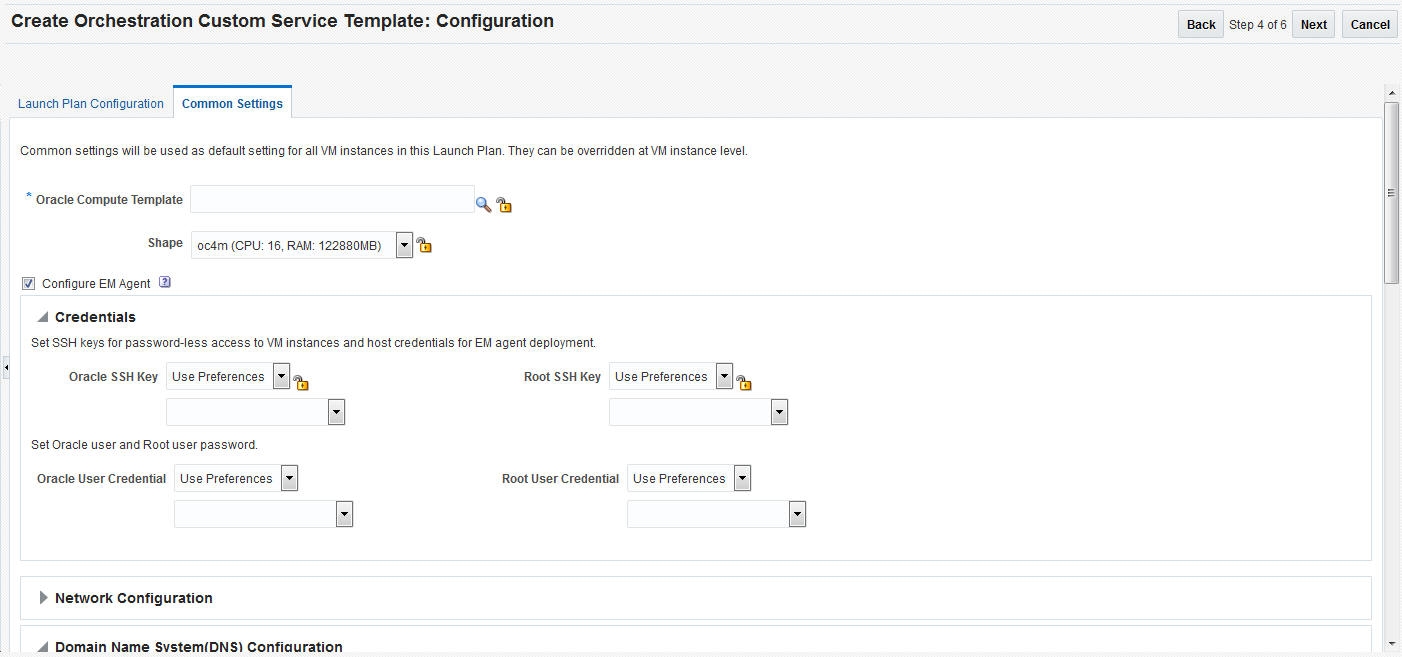
Specify the following details:
-
Oracle Compute Template: A template is a copy of virtual hard disk with an installed operating system used to launch an instance. The template must be a whole disk image (including a partition table and kernel) stored in a tar archive, compressed with gzip. Click the Search icon and select a template from the list. If you click the Lock icon to lock the template, the tenant administrator or tenant user cannot change the template while provisioning the service instance.
-
Shape: A shape is a combination of CPU, memory, and IO which define the characteristics of a virtual machine. Select a shape from the drop down list. If you click the Lock icon to lock the shape, the shape cannot be changed by the tenant administrator or tenant user while provisioning the service instance.
-
Configure EM Agent: Select this checkbox to add EoIB and IPoIB storage networks to the network table.
-
Credentials: You can set the SSH key credentials for password-less access to VM instances and host credentials for deploying the Management Agent. You can use:
-
Oracle SSH Key: If SSH key credentials have been set, and can be used as preferred credentials, select Use Preferences and choose the credential set from the drop down box. If you select Enter Key, you must specify the SSH public and private key pair required to access the VM instances. If you select Key is in a file, click Browse and select the public / private key from a file.
-
Root SSH Key: If SSH key credentials have been set for the host, and can be used as preferred credentials, select Use Preferences and choose the credential set from the drop down box. If you select Enter Key, you must specify the SSH public and private key pair required to access the VM instances. If you select Key is in a file, click Browse and select the public / private key from a file.
-
Oracle User: If you select Use Preferences, choose the preferred credentials from the drop down box. If you select Enter Password, you must enter the password for the Oracle user.Root User: If you select Use Preferences, choose the preferred credentials from the drop down box. If you select Enter Password, you must enter the password for the root user.
-
-
Network Configuration: Click Add to select one or more network interfaces that will be associated with the VM instances. A network can be an IPoIB or EoIB network. In the Select Network window, you can choose:
-
Tenant Networks: These are networks configured for each tenant to communicate with other servers.
-
Service Networks: These are networks configured to communicate with other service providers such as ZFSSA or Exadata systems.
-
-
For external network interfaces, you can select one or all of the following:
-
Default Gateway: The selected network will be configured as the default gateway network.
-
Symmetric Routing: If this option is selected, the reply packets are routed through the same network interface on which the vNet IP packets were received.
-
After adding the network, select the network and click the Lock icon to lock the network configuration.
-
-
Domain Name System (DNS) Configuration: Specify the DNS configuration for the network.
-
Servers: Enter a comma separated list of DNS servers for the selected network.
-
Search Domains: Enter a comma separated list of DNS Search Domains for the selected network.
-
-
Network Information Service (NIS) Configuration
-
NIS Domain Name: Enter the NIS Domain Name for the selected VM instance.
-
Network Information Services (NIS) Server: Click Add to add an NIS server. Enter the name and IP address of the NIS server and click Add to add the NIS server.
-
-
Storage Configuration: You can associate one or more storage volumes to the VM instances that are to be created. Click Create. In the Create Storage Volumes window, enter the name of the storage volume, size, the number of volumes to be created and click Add. You can then click the Lock icon and lock of the storage volume.
-
Advanced Configuration: You can optionally specify additional attributes for the VM instances. Click Add to add a key and value for the attribute.
-
-
After you have created the launch plan, you can add one or more VM instances that can use the launch plan. Select the launch plan you have created and click Add VM Instance. In the Add VM Instance window, specify the name and number of VM instances to be created. If you are adding more than one instance, the name you specify will be used as a prefix to generate a unique name for each VM instance.
-
You can define configuration settings at the instance level and override the settings defined at the launch plan level. To define instance level specific configuration settings, select the VM instance from the left panel. The Oracle VM Instance Configuration page appears. To define instance level settings, select the Override Common Settings checkbox to override the default launch plan level settings. Select the Oracle Compute Template, Shape, and specify the Network, and Storage Configuration.
-
In the Advanced Configuration region, you can optionally specify additional attributes. Click Add. In the Add Attributes window, specify the key and value for the attribute. In the Tags field, you can enter tags to identify the instance deployment request.
-
In the Optional Network Configuration region, you can specify additional configuration parameters for the network defined in the Network Configuration region. You can specify a list of DNS servers, configure the network as the default gateway network, and configure the VM instance as a provider on the underlying selected service network.
Configuring Request Settings
You can configure the request settings by specifying when a request can be made, its duration, and so on. To configure request settings, follow these steps:
-
Log into Enterprise Manager as a user with the
EM_SSA_ADMINISTRATORrole. -
From the Enterprise menu, select Cloud, then select Cloud Home. The Cloud Home page appears. From the Oracle Cloud menu, select Setup, then select Request Settings.
-
You can specify the following settings:
-
Future Reservation: How far in advance can a request be made.
-
Request Archive Retention: Period for which archived requests are stored before they are automatically deleted by the system.
-
Request Duration: Maximum duration for which requests can be made.
-
Service Instance Share Settings: You can choose to share the service instance with other users or roles by selecting either of the following checkboxes.
-
Enable SSA User to share service instances with other Users
-
Enable SSA User to share service instances with Roles
-
Note:
By default, service instances are not shared with users or roles. -
-
Click Apply.
Request settings can be defined for all services or a specific service family, service type or role. The most restrictive value of request settings is taken from all matched values. "No Restriction" on a level means the setting is not applied at this level and will not be considered in evaluating final value.
Share Service Instance Settings are taken from the highest enabled level. For example, if sharing is enabled for All Services, then sharing is allowed for all users regardless of any lower level settings. To turn off sharing for the Middleware family, you must first disable sharing at the All Services level, then disable sharing for the Middleware family and enable sharing for the other families.Any modified settings must be saved before making another selection. Any changes not yet applied will be discarded.
Creating Networks
This section covers the following:
Introduction to Networks
An Oracle Public Cloud Machine includes compute nodes, a storage appliance, switches, and other equipment needed to connect the compute nodes to your network. The network connections allow the servers to be administered remotely, enable clients to connect to the compute nodes, and enable client access to the storage appliance.
In this release, Oracle Compute Service is extended to support InfiniBand networking. The network isolation is brought in by the following ways in the cloud infrastructure:
-
Network isolation within the tenants. When you create tenants, private and public security domains are created. The private security domain is used for isolated communication within the tenant of the OPCM rack. The public security domain is used for isolated communication between the tenant and the Ethernet infrastructure outside the OPCM rack through NM2 Gateway. In both the public and private security domain, the communication is isolated only within that particular tenant and the security domain of that tenant.
-
The service network created for instances to access the service provider ensures that the communication is allowed only between the service provider and the service consumer or between the service providers. The service network connectivity is not allowed for communication between the service consumers.
The networking formats that are supported are virtual Ethernets (vEthernets), flat networks, Network Address Translation (NAT), and network services cluster. A vEthernet is a virtual OSI Layer 2 network with VLAN support. vEthernets can facilitate isolation for networks for instances run by specific departments or business units. vEthernets in Oracle Compute have a one-to-one mapping with VLANs on the switching infrastructure and are typically associated with business units or departments.A flat network is a single IP routed domain, where any IP address is routable to any other. Protection of instances comes from security lists – software firewall on the Hypervisor. For isolation between virtual machines on such a network, Oracle Compute enforces security policy on the hypervisors themselves using security lists.
You can create the following types of networks:
-
Tenant networks
-
Service networks
Creating and Managing Service Networks
Service networks are created in Oracle Public Cloud Machine to provide shared services across multiple tenants. The shared services include access to storage, network, and other engineered systems. An example of external service provider is a ZFS storage appliance that provides storage shared across tenants.
An InfiniBand partition is allocated for a service network. The compute nodes of the cluster can be defined as Providers or Consumers. The providers are given full membership to the InfiniBand partition. Whereas, the consumers are given limited membership to the InfiniBand partition. Through this service network, the consumers can communicate with the providers but cannot communicate with each other. Providers are usually common services such as storage whose services must be available to more than one tenant.
Each service network is automatically allocated with an InfiniBand partition and no two service networks share the partition. Service networks are created by cloud administrators.
There are two types of service networks:
-
IPoIB Service Networks: The IPoIB service network is used for communication with a service provider within OPCM or connected directly to the InfiniBand fabric such as Exadata. For example, shared storage from the Oracle ZFS Storage Appliance.
-
EoIB Service Networks: The EoIB service network is used for communication with a service provider located outside OPCM.
Creating an EoIB Service Network
A service network provides a certain service to the user. Service networks are required for a common service that needs to be available to more than one tenant. For example, ZFS appliance providing an access to shared storage. An InfiniBand Partition key (pkey)is allocated to the service network. The partition key is allocated from the range of available pkeys specified in the site.conf properties file during installation. Service network partition is always provisioned with Full membership for the service providers and a limited membership for the service consumers.
To create a EoIB service network, follow these steps:
-
Log in to Enterprise Manager as a user with the EM_CLOUD_ADMINISTRATOR role.
-
From the Enterprise menu, select Cloud, then select Cloud Home.
-
Click on the Oracle Compute Site link in the left panel. The list of Oracle Compute sites that have been registered are displayed. Click on an Oracle Compute Site to drill down to the Oracle Compute Site Home page.
-
From the Oracle Compute Site menu, select Networking, then select Service Networks. From the Actions menu, select Create Service and enter the following details:
-
Name of the network: The network is automatically created in the /cloud/public/tenant namespace
-
Select the network type as EoIB
-
Select whether you want to add all the compute nodes as provider nodes for this service network.
-
Provider Nodes: Select the checkbox to add all existing nodes to the list of provider nodes for the service network.
If selected, you can share the service network with provider true in the vnet access object, allowing instances to be provider on the service network in the specific tenant.
-
Description: Enter a description of the service network.
-
-
You can optionally provide a description of the network for your reference..
-
Click Create to create the service network and return to the Networks page.
Creating an EoIB vEthernet for Service Network
The EoIB vEthernet is always created in the /<tenant>/public/ namespace of the tenant. The vEthernet uses the InfiniBand partition associated with the tenant for the specified service network. vEthernet describes the Ethernet level configuration for the selected service network. You must provide the tenant name and switchport configuration details to create a vEthernet.
To create an EoIB vEthernet, follow these steps:
-
Log in to Enterprise Manager as a user with the EM_CLOUD_ADMINISTRATOR role.
-
From the Enterprise menu, select Cloud, then select Cloud Home.
-
Click on the Oracle Compute Site link in the left panel. The list of Oracle Compute sites that have been registered are displayed. Click on an Oracle Compute Site to drill down to the Oracle Compute Site Home page.
-
From the Oracle Compute Site menu, select Networking, then select Service Networks. From the Actions menu, select Create EoIB vEthernet and enter the following details:
-
Name of the tenant and a name for the vEthernet. The name of the vEthernet is defined as /<tenant_name>/public/<vethernet_name>. The tenant name is required as to determine which InfiniBand partition must be associated with the service network. EoIB uses the tenant's InfiniBand partition assigned to public security domain.
-
Enter the VLAN identifier that is used to tag the network. The VLAN ID ranges from 2 to 4095.
-
Select the port for the HA pair Switch names.
-
-
You can optionally provide a description of the network for your reference.
-
Click Create to create the EoIB vEthernet for a service network.
Creating an EoIB Subnet
To create an EoIB subnet, follow these steps:
-
Log in to Enterprise Manager as a user with the
EM_CLOUD_ADMINISTRATORrole. -
From the Enterprise menu, select Cloud, then select Cloud Home.
-
Click on the Oracle Compute Site link in the left panel. The list of Oracle Compute sites that have been registered are displayed. Click on an Oracle Compute Site to drill down to the Oracle Compute Site Home page.
-
From the Oracle Compute Site menu, select Networking, then select Tenant Networks.
-
Select the tenant in which you want to create the EoIB network. From the Actions menu, select Create EoIB Subnet. Enter the following details:
-
Name: Enter the name of the tenant administrator user.
-
vEthernet Name: Enter the vEthernet name.
-
CIDR: Enter the IP address for the subnet in the CIDR (Classless Inter-Domain Routing) format. A CIDR address includes the standard 32-bit IP address and it indicates how many bits are used for the prefix.
For example, an address of 206.13.1.48/25 indicates that the first 25 bits are used to identify the unique network. The remaining bits are available to identify the specific host. The network you specify must not be used by another EoIB network.
-
Gateway: Enter the IP address of the gateway.
-
Ethernet Interface Index: Select this checkbox if you want to provide index numbers for vNets created.
-
Description: Enter a description of the EoIB network.
-
IP Ranges: Click Add to add an IP address range in the format IP-IP. For example, 10.242.2.211-10.242.2.215.
-
-
Click Create to create the EoIB subnet and return to the Networks page.
Creating IPoIB Service Networks
IPoIB Service Networks are used to allow communication between service consumers and service providers over InfiniBand within OPCM or between Engineered Systems or external ZFS appliance interconnected using InfiniBand. The IPoIB service network is used for communication with a service provider within OPCM or connected directly to the InfiniBand fabric such as Exadata. For example, shared storage from the Oracle ZFS Storage Appliance.
To create an IPoIB service network, follow these steps:
-
Log in to Enterprise Manager as a user with the
EM_CLOUD_ADMINISTRATORrole. -
From the Enterprise menu, select Cloud, then select Cloud Home.
-
Click on the Oracle Compute Site link in the left panel. The list of Oracle Compute sites that have been registered are displayed. Click on an Oracle Compute Site to drill down to the Oracle Compute Site Home page.
-
From the Oracle Compute Site menu, select Networking, then select Service Networks. From the Actions menu, select Create Service Networks and enter the following details:
-
Name of the network. The network is automatically created in the /cloud/public/tenant namespace.
-
Select the network type as IPoIB.
-
Select whether you want to add all the instances as provider node for this service network. If selected, you can share the service network with provider true in the vnet access object, allowing instances to be provider on the service network in the specific tenant.
-
You can optionally provide a description of the network for your reference.
-
-
Click Create to create the service network.
Creating an IPoIB Subnet
A virtual network represents an IP subnet and defines an IP address range. It is deployed in the scope of a tenant or a service network. Create the IPoIB subnet specifying the IPoIB service or tenant network, IP address of the subnet in CIDR (Classless Inter-Domain Routing) format, and the IP address range.
To create an IPoIB service network, follow these steps:
-
Log in to Enterprise Manager as a user with the
EM_CLOUD_ADMINISTRATORrole. -
From the Enterprise menu, select Cloud, then select Cloud Home.
-
Click on the Oracle Compute Site link in the left panel. The list of Oracle Compute sites that have been registered are displayed. Click on an Oracle Compute Site to drill down to the Oracle Compute Site Home page.
-
From the Oracle Compute Site menu, select Networking, then select Service Networks. Select the corresponding IPoIB network. From the Actions menu, select Create IPoIB Subnet.
-
In the Create IPoIB Subnet page, enter the name and description for the IPoIB subnet.
-
Select the vEthernet from which the IPoIB subnet will be derived.
-
Select whether the CIDR for the IP address is defined directly or it must be derived from the Global IP Pool.
If CIDR/IP Range is selected, then enter the CIDR for the IP address. Click Add under IP Ranges and enter the IP range.
If the IP subnet is derived from the Global IP Pool, then enter the number of I addresses that are required from the IP pool.
-
Click Create to create the IPoIB subnet.
Connecting to an Engineered System
You can connect the Oracle Public Cloud Machine to an Exadata server using the Infiniband fabric. To connect to an engineered system, follow these steps:
-
Log in to Enterprise Manager as a user with the
EM_CLOUD_ADMINISTRATORrole. -
From the Enterprise menu, select Cloud, then select Cloud Home.
-
Click on the Oracle Compute Site link in the left panel. The list of Oracle Compute sites that have been registered are displayed. Click on an Oracle Compute Site to drill down to the Oracle Compute Site Home page.
-
From the Oracle Compute Site menu, select Networking, then select Service Networks. From the Actions menu, select Connect Engineered System and enter the following details:
-
Name: The name of the tenancy.
-
Partition Key: An InfiniBand partition defines a group of InfiniBand nodes that are allowed to communicate with one another. You can use InfiniBand partitions to increase security by implementing network isolation on Oracle Public Cloud Machine's InfiniBand fabric. In addition, you can associate InfiniBand nodes with specific VLANs. A partition key is a unique ID assigned to an InfiniBand partition. Specify an external partition key that is to be associated with the service network. The partition key you specify must not be used by a different service network.
-
Foreign Partition: If this checkbox is selected, a service network that is associated with an externally defined partition key is created.
-
Provider Nodes: Select this checkbox to add provider nodes.
-
Description: Enter a description of the service network.
-
-
Click Create to create the service network and return to the Networks page.
Creating and Managing Tenant Networks
A tenant network provides an isolated or protected environment for deployment of virtual networks and VMs that interact with these virtual networks. In an Oracle Public Cloud Machine, a tenant is a base construct that defines two isolated domains – public and private. Each domain has an InfiniBand partition key assigned to it.
The public domain is used for deploying vlan-tagged virtual networks for enabling communication between the compute nodes and entities external to OPCM that run on Ethernet. The private domain is used for deploying IB private networks for inter-compute node communications. You can create an:
-
EoIB network: Public tenant network
-
IPoIB network: Private tenant network
Creating an EoIB Network
EoIB ((Ethernet over Infiniband) networks are deployed on the public security domain and are associated with a VLAN. EoIB is used for components inside the Oracle Public Cloud Machine machine rack to communicate with components external to the rack. You can deploy multiple EoIB virtual networks on the public security domain of the tenant. These networks are not isolated from each other. Only the cloud administrator can create and manage EoIB networks as these networks subnets are defined outside the Oracle Public Cloud Machine.
To create an EoIB network, follow these steps:
-
Log in to Enterprise Manager as a user with the EM_CLOUD_ADMINISTRATOR role.
-
From the Enterprise menu, select Cloud, then select Cloud Home.
-
Click on the Oracle Compute Site link in the left panel. The list of Oracle Compute sites that have been registered are displayed. Click on an Oracle Compute Site to drill down to the Oracle Compute Site Home page.
-
From the Oracle Compute Site menu, select Networking, then select Tenant Networks.
-
Select the tenant in which you want to create the EoIB network. From the Actions menu, select Create EoIB vEthernet.
-
Enter the following details:
-
Name: Enter the name of the tenant administrator user.
-
vLAN: Specify the VLAN ID (range 2 to 4095) for this network.
-
Description: Enter a description of the EoIB network.
-
Switch Ports: Select the switch port from the drop down list.
-
-
Click Create to create the EoIB network. The newly created network will appear on the Networks page.
Creating an EoIB Subnet
To create an EoIB subnet, follow these steps:
-
Log in to Enterprise Manager as a user with the
EM_CLOUD_ADMINISTRATORrole. -
From the Enterprise menu, select Cloud, then select Cloud Home.
-
Click on the Oracle Compute Site link in the left panel. The list of Oracle Compute sites that have been registered are displayed. Click on an Oracle Compute Site to drill down to the Oracle Compute Site Home page.
-
From the Oracle Compute Site menu, select Networking, then select Tenant Networks.
-
Select the tenant in which you want to create the EoIB network. From the Actions menu, select Create EoIB Subnet. Enter the following details:
-
Name: Enter the name of the tenant administrator user.
-
vEthernet Name: Enter the vEthernet name.
-
CIDR: Enter the IP address for the subnet in the CIDR (Classless Inter-Domain Routing) format. A CIDR address includes the standard 32-bit IP address and it indicates how many bits are used for the prefix.
For example, an address of 206.13.1.48/25 indicates that the first 25 bits are used to identify the unique network. The remaining bits are available to identify the specific host. The network you specify must not be used by another EoIB network.
-
Gateway: Enter the IP address of the gateway.
-
Ethernet Interface Index: Select this checkbox if you want to provide index numbers for vNets created.
-
Description: Enter a description of the EoIB network.
-
IP Ranges: Click Add to add an IP address range in the format IP-IP. For example, 10.242.2.211-10.242.2.215.
-
-
Click Create to create the EoIB subnet and return to the Networks page.
Creating an IPoIB Subnet
IPoIB networks are deployed on the private security domain. Multiple IPoIB virtual networks can be deployed on a security domain of the tenant. These IPoIB networks are not isolated from each other and can be created for each tenant. To create an IPoIB subnet, follow these steps:
-
Log in to Enterprise Manager as a user with the EM_CLOUD_ADMINISTRATOR role.
-
From the Enterprise menu, select Cloud, then select Cloud Home.
-
Click on the Oracle Compute Site link in the left panel. The list of Oracle Compute sites that have been registered are displayed. Click on an Oracle Compute Site to drill down to the Oracle Compute Site Home page.
-
From the Oracle Compute Site menu, select Networking, then select Tenant Networks.
-
Select the tenant in which you want to create the EoIB network. From the Actions menu, select Create IPoIB Subnet.
-
Name: Enter the name of the tenant administrator user.
-
Creation Mode: This can be CIDR / IP Range or Global IP.
-
CIDR: Enter the IP address for the subnet in the CIDR (Classless Inter-Domain Routing) format. A CIDR address includes the standard 32-bit IP address and it indicates how many bits are used for the prefix.
For example, an address of 206.13.1.48/25 indicates that the first 25 bits are used to identify the unique network. The remaining bits are available to identify the specific host. The network you specify must not be used by another EoIB network.
-
Global IP: An IP Pool is a pool of public IP ranges made up of one or more IP Pool entries. If global IP pool is enabled in the site configuration, specify the global IP pool address number. If this number is specified, the IP address is allocated from a global pool of IP addresses.
-
-
Gateway: Enter the IP address of the gateway.
-
Ethernet Interface Index: Select this checkbox if you want to provide index numbers for the vNets created.
-
Description: Enter a description of the EoIB network.
-
IP Ranges: Click Add to add an IP address range in the format IP-IP. For example, 10.242.2.211-10.242.2.215.
-
-
Click Create to create the IPoIB subnet and return to the Networks page.
Editing an IPoIB Subnet
To edit the IPoIB subnet, follow these steps:
-
Log in to Enterprise Manager as a user with the
EM_CLOUD_ADMINISTRATORrole. -
From the Enterprise menu, select Cloud, then select Cloud Home.
-
Click on the Oracle Compute Site link in the left panel. The list of Oracle Compute sites that have been registered are displayed. Click on an Oracle Compute Site to drill down to the Oracle Compute Site Home page.
-
From the Oracle Compute Site menu, select Networking, then select the IPoIB subnet that you wish to edit. The following details are displayed:
-
Name
-
CIDR
-
Number of IP Addresses
-
IP Ranges
-
Total: The total number of usable IP addresses.
-
Reserved: The number of allocated IP addresses.
-
Used: The number of IP addresses that have been used by the instance.
-
Failed Allocations: The number of IP address allocations that have failed since the VNet was created or updated.
-
-
Click Add in the IP Reservation region to add one or more IP reservations. In the Create IP Reservation window, enter the name and IP address for the reservation and click OK.
-
Select Edit from the Actions menu. In the Update IPoIB Subnet page, you can edit the Number of IP Addresses, Ethernet Interface Index, and Description. Click Edit to update the details and return to the previous menu.
Managing Infrastructure Networks
Infrastructure service networks are service networks that are created when the Oracle Public Cloud Machine is configured. These networks are used to provide network access to leverage some of the basic services available on the Oracle Public Cloud Machine. These are the control networks that are jointly used by the customer deployed instances and the Oracle Public Cloud Machine.
The following infrastructure networks are created on the switches and zfs storage (except for the EoIB networks):
-
IPoIB Management: This network is used for Oracle Compute pxe services and flexboot is configured for this partition.
-
IPoIB Storage: Used for all Oracle Compute related ZFS access from Dom0.
-
IPoIB Instance Storage: Used for control VMs (read/write) and client VMs (read only) to access ZFS storage.
-
EoIB Management Network: Used for Oracle Compute API service access and Control VMs.
-
Default: IPoIB default partition (0x7FF).
Creating a Storage Volume
A storage pool represents a single logical storage space (an NFS export) on a storage server. The name of the storage pool, the total size (physical) of the storage pool, the amount of space used, the path and the properties of the storage pool are displayed.
A storage volume object is a single volume that can be attached to an instance. On this page, the name of the storage volume, status, size, Oracle Virtual Servers with which it is associated, and its properties are displayed. To create a storage volume, follow these steps:
-
Log in to Enterprise Manager as a user with the
EM_CLOUD_ADMINISTRATORrole. -
From the Enterprise menu, select Cloud, then select Cloud Home.
-
Click on the Oracle Compute Site link in the left panel. The list of Oracle Compute sites that have been registered are displayed. Click on an Oracle Compute Site to drill down to the Oracle Compute Site Home page.
-
From the Oracle Compute Site menu, select Storage to view the Storage Pool Home page. In the Storage Pool region, the name of the storage pool, size, status, path, and properties or characteristics of the pool are displayed.
-
The storage volumes in the Oracle Compute site are displayed. A storage volume object is a single volume that can be attached to an instance. Each volume has a size that is available to all users in the selected tenancy. The storage volume can be shared across multiple instances. Click Create to create a new storage volume.
-
In the Create Storage Volume window, enter the name (in the format <tenant_name/public/<storage_vol_name>, size, description, and optionally select a template for the volume. Click OK to create the storage volume.
Creating a Storage Volume Snapshot
You can take a snapshot or a copy of a storage volume and make the copy available to users belonging to another tenancy. To create a storage volume snapshot, follow these steps:
-
Log in to Enterprise Manager as a user with the
EM_CLOUD_ADMINISTRATORrole. -
From the Enterprise menu, select Cloud, then select Cloud Home.
-
Click on the Oracle Compute Site link in the left panel. The list of Oracle Compute sites that have been registered are displayed. Click on an Oracle Compute Site to drill down to the Oracle Compute Site Home page.
-
From the Oracle Compute Site menu, select Storage to view the Storage Pool Home page. The name of the storage pool, size, status, path, and properties or characteristics of the pool are displayed.
-
The storage volumes in the Oracle Compute site are displayed. Select a storage volume from the list and click Snapshot.
-
In the Snapshot Storage Volume window, select a target tenant name in the Target Volume drop down field, and enter the name of the snapshot, specify the size, and a description for the snapshot. Click OK to create the snapshot and return to the Storage page.
Monitoring the Oracle Compute Targets
This chapter describes the data that can be viewed and monitored on the Oracle Compute target home pages. It contains the following sections:
Monitoring an Oracle Compute Site
An Oracle Compute Site is a location running Oracle Compute Director with one or more clusters, each containing three or more Oracle Compute nodes.
To view the Oracle Compute Site Home Page:
-
Select All Targets from the Targets menu.
-
In the Search panel on the left hand side, click Oracle Compute Site under Groups, Systems, and Services. The list of Oracle Compute Sites that have been discovered are displayed.
-
Click on the Target Name link to drill down to the target home page.
Figure 12-8 Oracle Compute Site Home Page
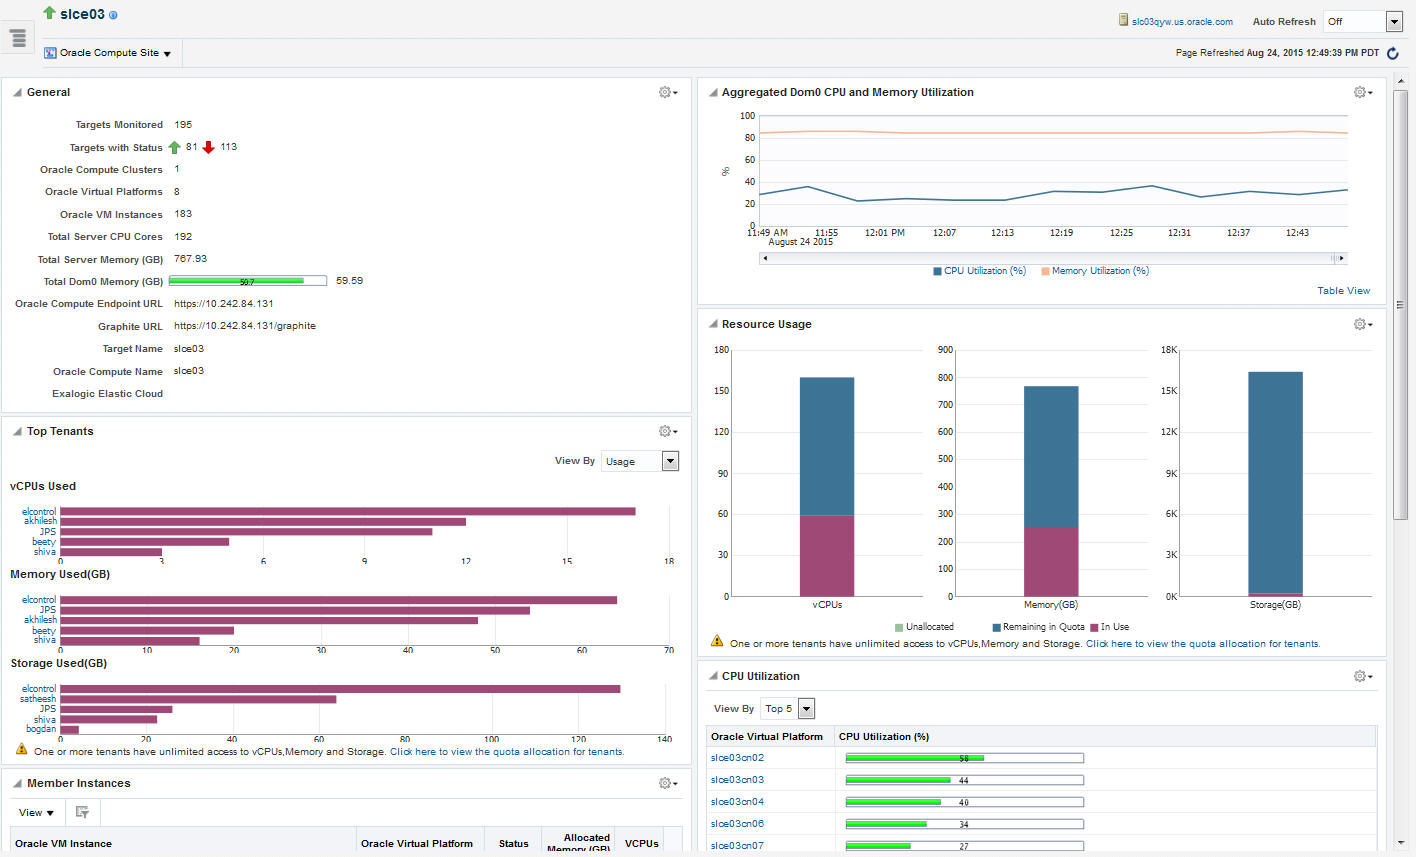
This page contains the following regions:
Note:
This page displays metrics from Domain-0 (Control Domain) only.-
General: This region shows the following details:
-
Number of targets being monitored
-
Aggregated status of all the targets
-
Number of clusters, virtual platforms, VM instances, and total number of CPU cores in the site
-
Total server memory
-
Total Dom0 memory available
-
Oracle Compute Endpoint URL
-
Graphite URL to monitor the Oracle Compute targets.
-
Oracle Public Cloud Machine target if it has been discovered.
-
-
Aggregated Dom0 CPU and Memory Utilization: This region shows the aggregated CPU, and memory utilization of all the targets in the site.
-
Top Tenants: This region shows the top tenants in the site. From the View By drop down list, you can select:
-
Usage: Shows the top usage by tenants in the site across vCPUs, memory, and storage. Click on the Tenant Name link to drill down to the Tenant Home page.
-
Allowance: Shows the number of vCPUs, memory, and storage allocated to the top tenants in the site. Click on the Tenant Name to drill down to the Tenant Home page.
Note:
This region will appear only if you the preferred credentials you specify are for a user with the EM_CLOUD_ADMINISTRATOR role. -
-
Resource Usage: This region shows how the physical resources are allocated to the tenants in terms of quota and the actual usage. Click on the quota allocation link to drill down to the Quota Home page.
-
Member Instances: Lists all the member instances in the Oracle Compute site. For each member instance, the name of the Oracle VM Instance, the Oracle Virtual Platform, status, allocated memory, and number of vCPUs is displayed. You can use the query by example feature to filter the list of members displayed. Click on the Oracle VM Instance or the Oracle Virtual Platform link to drill down to the respective home pages.
-
Aggregated Dom0 CPU and Memory Utilization: This chart shows the aggregate CPU and memory utilization by all targets in this site over the last 24 hours.
-
CPU Utilization: This region shows the relative CPU utilization by each cluster. You can choose to view all the clusters or view the top 1 or 5 clusters.
-
Memory Utilization: This region shows the memory utilization by each cluster. You can choose to view all the clusters or view the top 1 or 5 clusters.
-
Incidents and Problems: This region shows any incidents or problems that have occurred over the last 7 days.
-
Jobs: This region shows a summary of jobs whose start date is within the last 7 days.
From the Oracle Compute Site menu, the following options are available:
-
Networking: See Introduction to Networks
-
Storage: See Creating a Storage Volume
-
User Management
-
Tenants: See Creating a Tenant
-
Users: See Creating Users and Roles
-
Quota: See Defining Quotas
-
-
Image Management: See Managing Oracle Compute Templates
-
Shape Management: See Creating a Shape
Monitoring an Oracle VM Instance
An Oracle VM Instance is an instantiation of a machine image running as a virtual machine. Instances have attributes such as allocated RAM, number of CPUs available, and attached network interfaces. Instances are created via an orchestration that specifies the desired set of hosts, which image lists they are to be launched from and placement relationships that exist between them.
To view the Oracle VM Instance Home page, click on the Oracle VM Instance link on the Oracle Compute Site Home page.
Figure 12-9 Oracle VM Instance Home Page
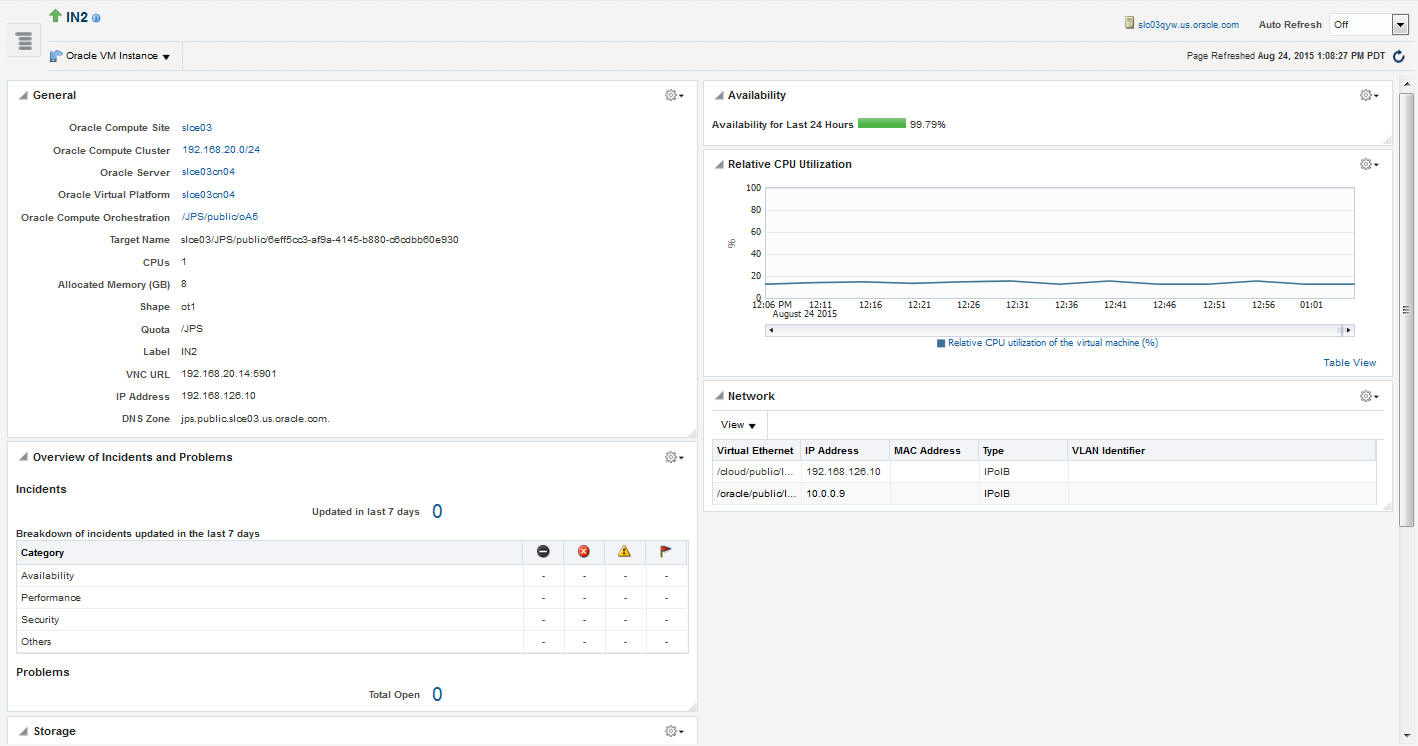
This page contains the following regions:
-
General: This region shows the Oracle Compute Site, Oracle Compute Cluster, Oracle Server, and Oracle Virtual Platform in which the instance is running. You can click on the link to drill down to any of the home pages. It also shows the target name, number of CPUs, allocated memory, shape, quota (if set), VNC URL, IP address, and the DNS zone.
-
Availability: Shows the availability of the instance over the last 24 hours.
-
Relative CPU Utilization: Shows the relative CPU utilization by the virtual machine.
-
Overview of Incidents and Problems: This region lists any incidents and problems that have occurred over the last 7 days.
-
Network: Lists the name of the network interface and the MAC address.
-
Storage: Lists any storage volumes that are present.
Monitoring an Oracle Compute Cluster
An Oracle Compute cluster is a group of at least three physical nodes running Oracle Compute software on the same Ethernet domain. In a typical multi-cluster configuration, a router links two or more subnets and broadcast domains, one per cluster. One or more clusters make a site.
To view the Oracle Compute Cluster Home page, click on an Oracle Compute Cluster link in the Oracle Compute Site Home page.
Figure 12-10 Oracle Compute Cluster Home Page
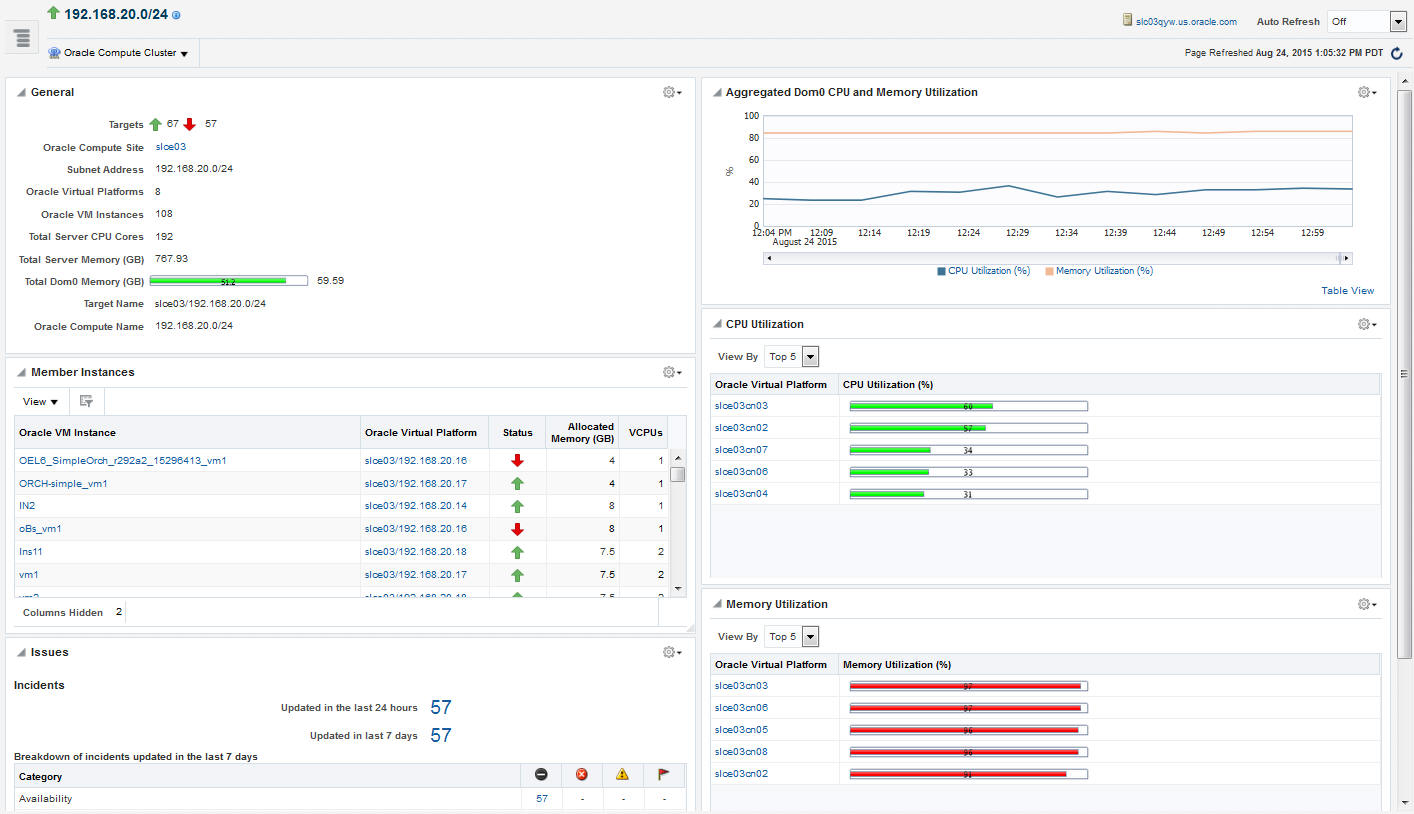
This page contains the following regions:
Note:
This page displays metrics from Domain-0 (Control Domain) only.-
General: This region shows the aggregated status of all the targets in the cluster, the Oracle Compute Site to which this cluster belongs, the number of virtual platforms and VM instances in the cluster, the total number of CPU cores, the total server memory, the total Dom0 memory available, and the target name.
-
Aggregated Dom0 CPU and Memory Utilization: This region shows the aggregated CPU and memory utilization over the last 1 hour.
-
Member Instances: Lists the Oracle VM instances in the cluster. Click on the Oracle VM Instance or Oracle Virtual Platform link to drill down to respective home pages.
-
CPU Utilization: This region shows the CPU utilization by each virtual platform in the cluster. You can choose to view all or the top 5 virtual platforms. Click on the Oracle Virtual Platform link to drill down to the home page.
-
Memory Utilization: This region shows the memory utilization by each virtual platform in the cluster. You can choose to view all or the top 5 virtual platforms. Click on the Oracle Virtual Platform link to drill down to the home page.
-
Incidents and Problems: This region shows any incidents or problems that have occurred over the last 7 days.
Monitoring an Oracle Virtual Platform
Click on an Oracle Virtual Platform link on the Oracle Compute Cluster Home page to drill down to this page.
Figure 12-11 Oracle Virtual Platform Home Page
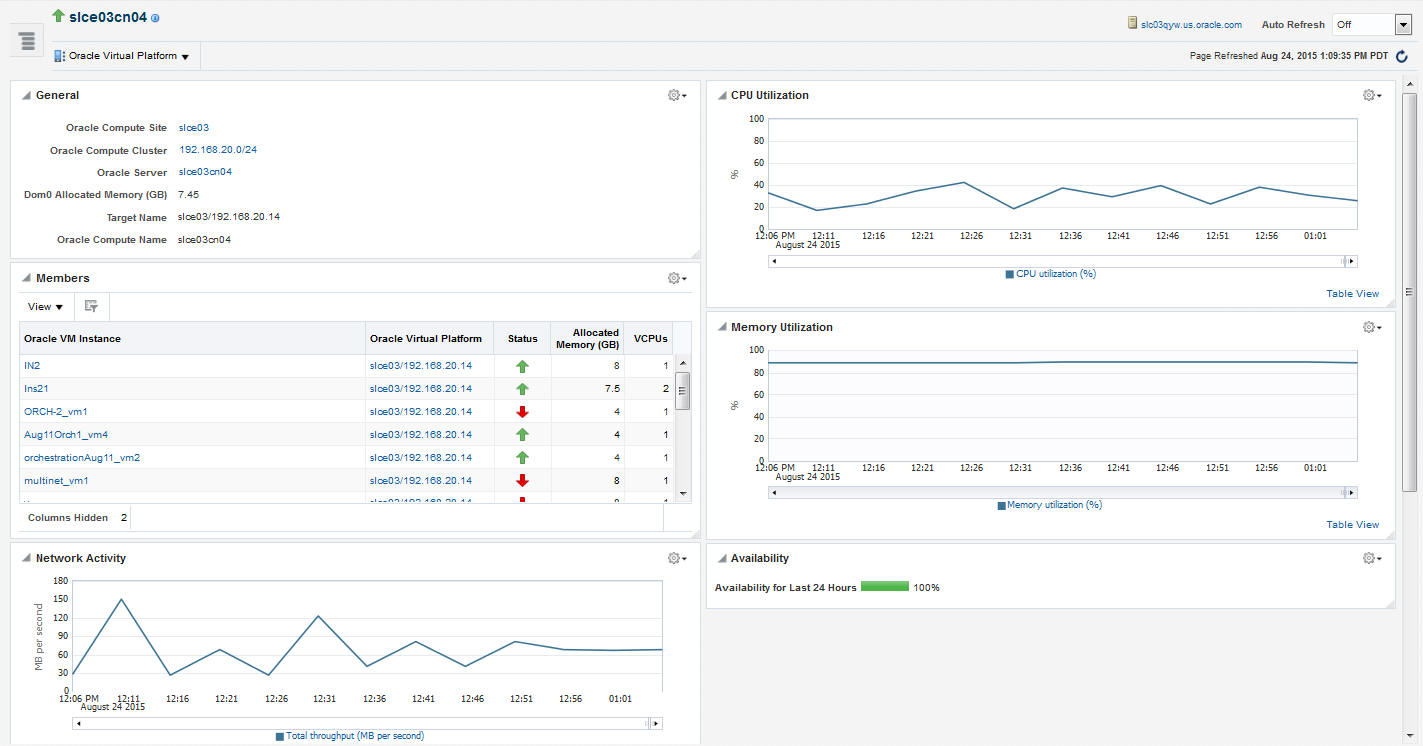
This page contains the following regions:
-
General: This region displays the name of the Oracle Compute Site and Oracle Compute Cluster to which the Oracle Virtual Platform belongs. You can click on any of these links to drill down to the respective home page. It also shows the Dom0 allocated memory, the target name, and the Oracle Compute name.
-
CPU Utilization: This region shows the CPU utilization by the virtual platform over the last 24 hours.
-
Members: This region lists all VM instances that are running on this virtual platform, their status, and the memory allocated to each virtual server. Click on the Oracle VM Instance or Oracle Virtual Platform links to drill down to the respective home pages.
-
Memory Utilization: This region shows the memory utilization by the virtual platform over the last 24 hours.
-
Network Activity: This region shows the network activity by the virtual paltform over the last 24 hours.
-
Overview of Incidents and Problems: This region shows any incidents or problems associated with the Oracle Server target.
-
Availability: The chart in this region shows the status of the target over the last 24 hours.
Monitoring an Oracle Server
Click on an Oracle Server link in the Oracle Virtual Platform Home page to drill down to this page.
Figure 12-12 Oracle Server Home Page
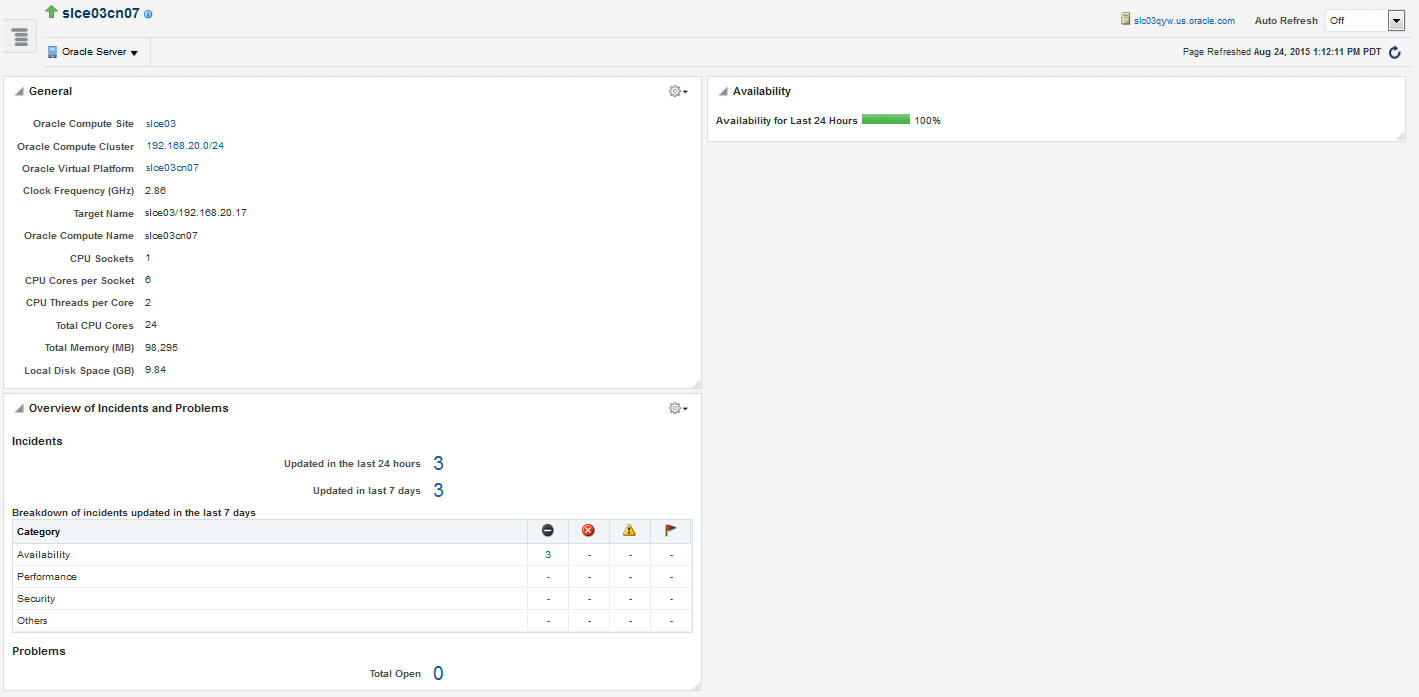
This page contains the following regions:
-
General: This region shows the Oracle Compute Site, Oracle Compute Cluster, and the Oracle Virtual Platform in which the server is present. It also shows the clock frequency, target name, number of CPU sockets, number of CPU cores per socket, number of CPU threads per core, total number of CPU cores, the total memory, and the local disk space.
-
Availability: The chart in this region shows the status of the target over the last 24 hours.
-
Overview of Incidents and Problems: This region shows any incidents or problems associated with the Oracle Server target.