Configuring Software Library Storage Location
System Administrators are responsible for configuring a storage location. Only after the storage location is configured, you can start uploading the entity files.
Note:
Deployment procedures and area-specific jobs in your on-prem Cloud setup may in turn use entities like Components and Directives from the Software Library for managing Oracle Cloud targets. For your procedure to successfully manage the Oracle Cloud targets, Software Library must be configured to use an OMS Shared File system storage for the uploaded files. If these Components and Directives use OMS Agent File system storage, the procedure will fail when attempting to transfer the files to the Oracle Cloud targets.
You can configure the Software Library in one of the following locations:
Note:
Starting with Oracle Enterprise Manager Cloud Control 12c Release 2 (12.1.0.2), in addition to using the GUI as described in this section, you can alternatively use the command line interface tool to Configure the Software Library. To do so, refer to Oracle Enterprise Manager Lifecycle Management Administrator's Guide.
Configuring an OMS Shared File system Location
To configure an OMS Shared File System storage location that can be used for uploading Software Library entity files, perform the following steps:
Configuring an OMS Agent File system Location
Note:
The OMS Agent File system must be set up only when the recommended storage option, which is the OMS Shared File System cannot be set up because of some constraints. For more information, see Upload File Locations.
To configure an OMS Agent location, perform the following steps:
-
From the Setup menu, select Provisioning and Patching, then select Software Library.
-
On the Software Library: Administration page, select OMS Agent File system.

-
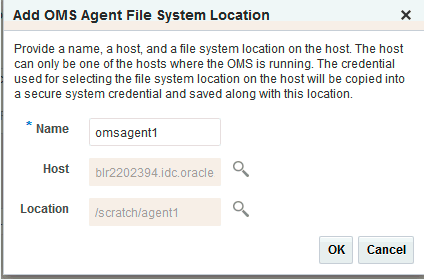
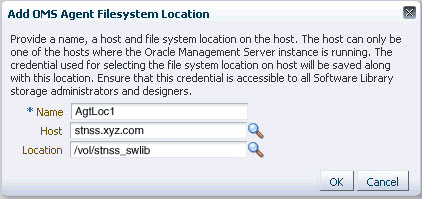
Click +Add, in the Add OMS Agent File System Location dialog box, enter the following details:
-
In the Name field, enter a unique name for the storage.
-
In the Host field, click the magnifier icon. From the Search and Select: Hosts dialog box, select a host where the OMS is running, and click Select.
For example,
xyz.mycompany.com -
In the Location field, click the magnifier icon. In the Remote File Browser dialog box, click Login As to log in to the host machine with either Preferred, Named or New credentials.
Note:
For a user to access and leverage an OMS Agent File system upload location successfully, the owner of the Named Credential (basically, the credential used to connect to the host machine), must grant a View Privilege on the credential chosen to all the Administrators (or users) accessing this OMS Agent File system location.
For more information about granting privileges on a Named Credential, refer to Oracle Enterprise Manager Lifecycle Management Administrator's Guide.
Navigate to the location on the host where you want to create the Agent File System, and click OK.
The selected credential is saved along with the host and selected file system path. The saved credential is used to upload files and stage the uploaded files to a host target as part of some provisioning or patching activity.
Note: The credential is copied into a system owned credential with a generated name that starts with SWLIB. This will appear as the original credential name during Edit Credential flow.
-
-
Click OK to create a new entry for the storage location in the table, with details like Name, Location, Host, Status, and Host Credentials.
In addition to this, you can click Associated Entities to view or search the entities present in the selected upload location.
These newly configured OMS Agent locations are now available for storing entity files.
Configuring a Referenced File Location
To configure storage location that can be used for referring to files from the Software Library entities, perform the following steps:
-
From the Setup menu, select Provisioning and Patching, then select Software Library.
-
On the Software Library: Administration page, click Referenced File Locations tab.
-
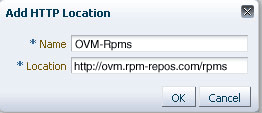
To add an HTTP location that can be accessed through a HTTP URL, select HTTP from the Storage Type list and click +Add.

In the Add HTTP Location dialog box, enter a unique name and a HTTP location for the storage that you want to reference, and click OK.
A new entry for the storage location is created, with details like Name, Location, and Status.
-
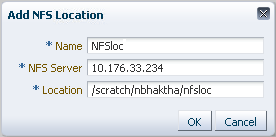
To add an NFS shared location, select NFS from the Storage Type list and click +Add.

In the Add NFS Location dialog box, do the following:
-
Enter a unique name in the Name field for the storage.
-
In NFS server field, provide a fully qualified domain name or the IP address of the hosted machine that has NFS services running on them.
-
In the Location field, provide the shared location or directory path on the NFS server to define a storage location, then click OK.
A new entry for the storage location is created in the table, with details like Name, Location, and Status.
Note:
While creating a procedure, if you have a component step or a directive step that refers to an NFS file location, then you must ensure that you set the preferred privileged credentials for the target host before the procedure is submitted for execution.
-
-
To add an Agent location that has read-only privileges set on it, select Agent from the Storage Type list and click +Add.

In the Add Agent Location dialog box, enter the following details:
-
In the Name field, enter a unique name for the storage.
-
In the Host field, click the magnifier icon to select a target from the list available.
For example,
xyz.mycompany.com -
In the Location field, click Login As to select the credentials and browse the previously selected host.
The credential selected, either Preferred, Named or New, is saved along with the host and selected file system path. The saved credential is used for staging the files to a host target as part of some provisioning or patching activity.
Note: The administrator configuring the Software Library must grant view privilege (at least) on the credential chosen to all designers uploading or staging the files to or from this location.
-
Note: When you create a new entity, these newly configured Referenced File Locations are available as storage options.