Uploading Patches to Oracle Software Library
When patching targets with Enterprise Manager in offline mode you must first manually download from My Oracle Support, the patches and their metadata files. Once downloaded, add them manually into the Software Library so that they can be searched, selected, and added to the Gold Images for patching.
Downloading a Patch from My Oracle Support
To download a patch and its metadata file from My Oracle Support, follow these steps:
- Log in to My Oracle Support (
https://support.oracle.com/), then click the Patches & Updates tab. - On the Patches & Updates page, in the Patch Search section, enter the patch number you want to search for as shown in Figure 17-5, then click Search.
Figure 17-5 Searching for Patches

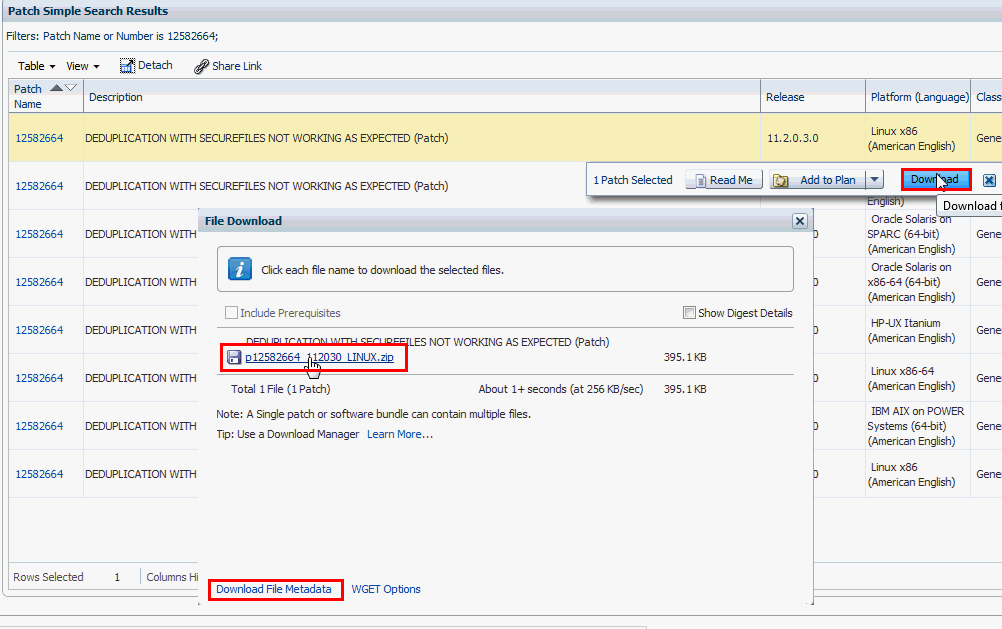
- On the Patch Simple Search Results page, select the row that has the patch that you want to download. Click Download. In the File Download dialog, click the name of the patch zip file to download it to your local host. Click Download Patch Metadata, and then in the Download Patch Metadata dialog, click Download to download the patch metadata file. This step is described in Figure 17-6.
Note:
Oracle recommends that you transfer the patch ZIP file and the metadata XML file to the Management Agent host, where the Management Agent could be an agent on an OMS machine, or on the target host. Upload these files from the Management Agent host to Software Library.
Figure 17-6 Downloading Patches from My Oracle Support

Uploading Patches to Software Library Using the Cloud Control Console
Using this method, you can upload only a single patch at a time. Therefore, use this method only when you want to upload a few patches. Also, use this method when the sizes of the patches that you want to upload are small.
To upload a patch to Software Library using the Cloud Control console, follow these steps:
- From the Enterprise menu, select Provisioning and Patching, then select Saved Patches.
- Click Upload.
- For Patch Zip File, specify the location of the patch zip file you downloaded onto your local host. If the patch zip file you downloaded contains the
PatchSearch.xmlfile (a file containing patch metadata information such as patch ID, product, platform, language etc.), you do not need to specify a value for Patch Metadata. However, if the patch zip file you downloaded does not contain thePatchSearch.xmlfile, and you downloaded the patch metadata file onto your local host separately, for Patch Metadata, specify the location of the patch metadata file.On a Unix based operating system, run the following command to verify whether the
PatchSearch.xmlfile is contained within a patch zip file:unzip -l <patch zip file path> | grep PatchSearch.xmlFor information on how to download the patch metadata file of a patch, see Uploading Patches to Oracle Software Library.
- Click Upload to upload the patch to Software Library.
Note:
If you encounter an error mentioning that the patch could not be uploaded as it is too large, either use EM CLI to upload the patch (as described in Uploading Patches to Oracle Software Library), or run the following command, restart the OMS, then retry the patch upload:emctl set property -name "oracle.sysman.emSDK.ui.trinidad.uploadedfilemaxdiskspace" -sysman_pwd sysman -value 2589934592
Ensure that the value you specify for -value is in bytes, and is larger than the size of the patch that you want to upload.
Uploading Patches to Software Library Using EM CLI
Using this method, you can perform a batch upload of multiple patches. Also, this method is faster than using the Cloud Control console to upload patches. Hence, use this method when you want to upload multiple patches at one time, or the sizes of the patches that you want to upload are large.
To upload patches to Software Library using EM CLI, follow these steps: