1 BRM Installation Overview
Learn about the high-level steps for installing your Oracle Communications Billing and Revenue Management (BRM) system.
Note:
If you are upgrading from an earlier BRM release to BRM 12.0, see "About Upgrading BRM Releases" in BRM Upgrade Guide.
Topics in this document:
Before installing BRM, you must know the following information:
-
Basic BRM concepts. See "BRM System Overview" in BRM Concepts.
-
BRM system architecture. See "BRM System Architecture" in BRM Concepts.
-
Basic database administration concepts. See your database documentation.
About Planning and Installing a BRM System
To install and use BRM, you must plan your system by performing the following tasks:
-
Determine the services you want to provide (for example, email, telephony, and GSM wireless).
-
Determine the type of events you want to rate and how you want to rate them (for example, online rating and offline rating).
-
Determine whether you want your customers to prepay for the service or some services or post-pay for the services.
-
Depending on the services you want to provide, the event types to rate (online or offline), and the payment type (prepaid or postpaid), decide on the BRM system to install and configure.
-
Choose the components you want to install.
-
Install BRM and the optional components.
-
Configure each component to point to its peer on the server side. For example, configure the Connection Managers (CMs) to point to the Data Managers (DMs), and the DMs to point to the database.
Each BRM component includes a configuration file, such as a pin.conf, .reg, or .properties file, which you edit to set the environment variables and connection parameters. The configuration files include instructions for all the entries. See "Using Configuration Files to Connect and Configure Components" in BRM System Administrator's Guide.
By default, the BRM installer stores sensitive information, such as database and account passwords, in the Oracle wallet. BRM applications retrieve the passwords from the Oracle wallet.
Types of BRM Systems
The type of BRM system you install depends on your business needs and the licensing agreement you have with Oracle. For more information about BRM system architecture, see "BRM System Architecture" in BRM Concepts.
Note:
For more information about UNIX platform and software compatibility, see "Overview of Hardware and Software Requirements".
A BRM Demonstration System
For a simple demonstration system or a small application development environment, you can run all of the BRM components, including the database server, on a single computer as shown in Figure 1-1.
Figure 1-1 Simple Demonstration System Configuration
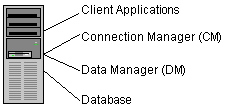
Description of "Figure 1-1 Simple Demonstration System Configuration"
For example, you can use a demonstration system for testing your business policies and product offerings. After you create test accounts, you can generate events to ensure that your product offerings are working correctly. For final preproduction testing, however, you should use a test system that mirrors your production system configuration.
Note:
A single-computer configuration is not adequate for a typical production BRM system.
A BRM Production System
For best performance on a production system, you must distribute the BRM components among several computers as shown in Figure 1-2.
Figure 1-2 Production System Configuration
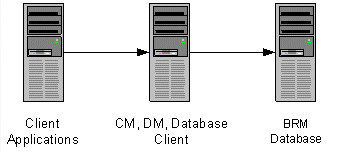
Description of "Figure 1-2 Production System Configuration"
By using this basic production configuration, you can expand your BRM system to meet your production needs. You can also add components while BRM is running.
-
You can set up multiple machines that each run the CM and DM to increase reliability and performance and to ensure that you continuously have at least one copy of the processes running.
-
For additional reliability, you can also set up CM Master Processes (CMMPs) that route requests to an alternate CM when a CM fails. For more information on CMMPs, see "About Connection Manager Master Processes (CMMPs)" in BRM Concepts.
-
You can use redundant subnets for CM and DM systems, and CMs and DMs can share the same subnet. The only access point is the BRM database, which can be replicated as needed.
The following examples show how you can distribute these components across multiple computers.
Small Production System
Figure 1-3 shows the minimum level of distributed components. This is a typical configuration for a small number of customers.
-
All BRM client applications, such as Billing Care or Customer Center, are installed on the same machine.
-
The CM and DM are installed on the same machine to optimize performance.
-
The database client is installed on the DM machine.
Note:
If your database and DM are on separate machines, you must install the database client on the DM machine.
Figure 1-3 Minimum Level of Distributed Components
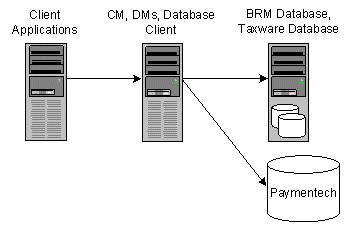
Description of "Figure 1-3 Minimum Level of Distributed Components"
Mid-Size Production System
Figure 1-4 shows a typical mid-size production system that uses multiple machines for the CM and DM. A CMMP is added to route connections from the client applications to the different CMs.
Figure 1-4 Mid-Size Production System Distributed Components
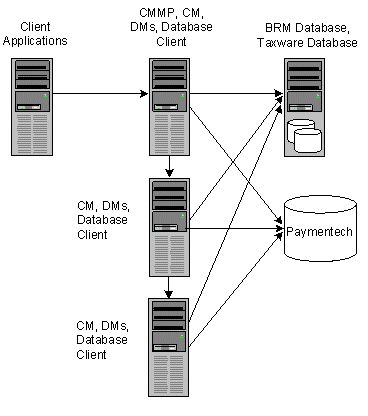
Description of "Figure 1-4 Mid-Size Production System Distributed Components"
A High-Availability Production System
To create a high-availability system, you must install and configure at least two instances of each component and then connect each instance to all instances of the component's server-side peer. This ensures that if one instance of a component fails, another one is available to process data.
A BRM Multischema Production System
Although BRM works well with a single database schema for BRM data, you can improve scalability and support load balancing by distributing BRM data among multiple schemas as shown in Figure 1-5.
Figure 1-5 BRM Multischema Production System
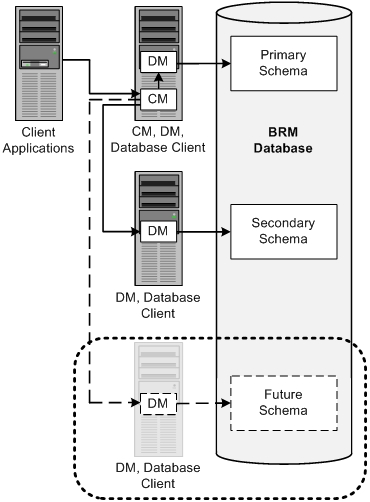
Description of "Figure 1-5 BRM Multischema Production System"
Designing the Optimal Multischema System
To optimize the benefits of a multischema system, you must decide the following when designing your multischema system:
-
How to split BRM applications among multiple schemas
-
How to split subscriber data among multiple schemas
To reduce contention at the primary database schema, Oracle recommends the following:
-
Set every application to connect to the primary schema.
Note:
Any application or utility that directly changes the configuration data, such as PDC, and Developer Center, must be connected to the primary schema.
-
Distribute accounts among the secondary schemas.
In this configuration, all accounts and associated data are stored in the secondary schemas. Configuration, pricing, audit trail, and uniqueness data is stored and updated in the primary schema and then made available to the secondary schemas.
If the primary schema goes down, you can still access accounts in the secondary schemas. However, to ensure data integrity, you cannot make updates to the primary schema when it is down.
Assigning Accounts to a Database Schema
To set up account distribution for your multischema system, you must first understand that the Multidatabase Manager assigns accounts to a particular database schema based on account hierarchy, schema status, and schema priority.
Account Hierarchy
The Multidatabase Manager stores data as follows:
-
All nonpaying child bill units (/billinfo objects) in the same schema as the accounts that own their paying parent bill units
-
All sponsored accounts in the same schema as their sponsor group
-
All accounts associated with a device in the same schema as the device
Therefore, the Multidatabase Manager assigns a child account to the same schema as the parent account, even if the schema has a status of closed or unavailable.
Database Schema Status
Database schemas are either open, closed, or unavailable. Open schemas are always available for account creation. At installation time, only the primary schema is set to open.
Closed schemas are not used for account creation under most circumstances. Accounts are created in a closed schema only if the account's parent, branded, or sponsoring account belongs to that schema or if all schemas are closed. If all schemas are closed, the Multidatabase Manager chooses a closed schema at random in which to create accounts and continues to create accounts in that schema until a schema becomes open. A schema's status can be manually changed to closed to limit the number of accounts created in the schema, or it can be automatically changed by the Multidatabase Manager when the schema reaches a predefined maximum limit.
Unavailable schemas are not used for account creation unless the schema contains the account's parent, sponsoring, or branded account. You can change a schema's status to unavailable at any time to suit your system requirements. You might do this, for example, to prevent accounts from being created in the primary schema.
For information on how to set the schema status, see "Setting Database Schema Status" in BRM System Administrator's Guide.
Database Schema Priority
Database schema priority determines when customer accounts are created on a particular schema relative to other schemas. The Multidatabase Manager assigns accounts to an open schema with the highest priority number. In the example shown in Figure 1-6, the Multidatabase Manager assigns accounts to schema 3 because it has the highest priority number of all open schemas.
Figure 1-6 Multischema Account Creation Based on Status and Priority
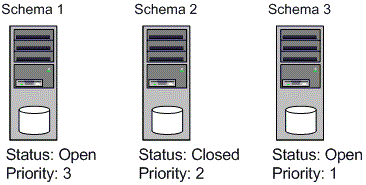
Description of "Figure 1-6 Multischema Account Creation Based on Status and Priority"
If all schemas have the same priority, the Multidatabase Manager chooses an open schema at random each time it assigns an account. This distributes accounts evenly across all schemas.
For information on how to set the schema priority, see "Setting Database Schema Priorities" in BRM System Administrator's Guide.
Installation Overview
The BRM system uses a four-tier architecture. To set up this system, you must ensure that each component of the architecture connects to the other components. This section provides a high-level breakdown of the four-tier installation process.
Note:
This section provides guidance only on configuring the components of a BRM system. It does not discuss processes documented for the Oracle database.
To complete your four-tier BRM installation, follow these general steps:
-
Plan your installation. When planning your installation, you do the following:
-
Determine the scale of your implementation, for example, a small test system or a large production system.
-
Determine how many physical machines you need, and which software components to install on each machine.
-
Plan the system topology, for example, how the system components connect to each other over the network.
-
-
Review system requirements. System requirements include:
-
Hardware requirements, such as disk space
-
System software requirements, such as operating system versions
-
Information requirements, such as IP addresses and host names
-
-
Install and configure your database.
-
Install and configure the BRM software.
See "Installing BRM".
-
Install the BRM client applications.
See "Installing BRM Thick Clients".
-
Tune the BRM software for optimal performance.
See "Improving BRM Performance" in BRM System Administrator's Guide and "Database Configuration and Tuning".
Installing and Configuring a Localized Version of BRM
For general information about using a localized version of BRM, see "Using BRM in International Markets" in BRM Developer's Guide.
Selecting the Database Character Encoding
For new BRM installations, use the appropriate database character sets when setting up your database.
For Oracle, select AL32UTF8 for the standard character set and for the national character set.
Note:
BRM 12.0 supports AL32UTF8 as its default character set. It also continues to support the UTF8 character set for backward compatibility. The unicode character set AL32UTF8 is recommended for all new BRM 12.0 deployments.