4 About Managing Telephone Numbers
This chapter describes how to manage telephone number inventory in your Oracle Communications Billing and Revenue Management (BRM) system by using Number Manager and Number Administration Center.
Before setting up number management, you need to know the following information:
-
Basic BRM concepts. See BRM Concepts.
-
How to create and edit BRM configuration files. See "Using Configuration Files to Connect and Configure Components" in BRM System Administrator's Guide.
Note:
Number Manager and Number Administration Center are optional components.
About Managing Numbers
To manage telephone numbers, you use the following components:
-
Number Manager includes the number management opcodes, utilities, configuration files, and storable classes.
-
Number Administration Center is a GUI application used by operations personnel to manage telephone number inventory.
You use Customer Center to assign and manage numbers in customer accounts. For more information, see information about working with GSM accounts in Customer Center Help.
About Using Number Administration Center
To create an inventory of telephone numbers in the BRM database, you use Number Administration Center to create blocks of numbers. Blocks of numbers usually correspond to geographic regions or business entities. When you create a block of numbers, all the numbers in the block share the block name and the telephone number attributes, such as the network element (also known as home location register, or HLR). See "Creating a Block of Telephone Numbers".
About Managing Blocks and Numbers
After creating the numbers as devices in the BRM database, you can do the following:
-
Modify a block. You can change the block name and prefix (for example, the North American area code) of all the numbers in the block. See "About Modifying a Block".
-
Change the size of an existing number block. See "Changing the Size of the Number Block".
-
Split a block. You can split a block into smaller blocks, but you cannot join blocks. See "Splitting a Block".
-
Change telephone number attributes for one or more numbers. See "Updating Telephone Numbers".
-
Manage how numbers are quarantined after a customer cancels a service. See "About Number Device States".
Getting Information about Number Usage
You can get information about number inventory and status by running the Number Manager reports. See "Number Manager Reports" in BRM Reports.
In addition, you can display the history of a customer's number in Customer Center. See information about displaying telephone number history in Customer Center Help.
You can also display the number inventory in Number Administration Center. See "Displaying the Number Inventory".
About Managing Telephone Numbers in Customer Center
To create accounts and manage telephone numbers in existing accounts, use Customer Center. You can perform the following tasks:
-
Assign telephone numbers to services.
-
Change a customer's telephone number.
-
Display the history of a customer's number.
For more information, see information about working with GSM accounts in Customer Center Help.
About Number Device States
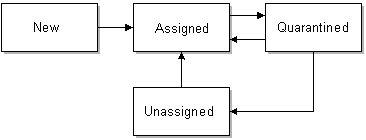
Telephone numbers have the following device states: new, assigned, quarantined, and unassigned.
-
When you create a number, the device state is New.
-
When you assign a number to a customer, the device state is Assigned.
-
When a customer cancels the service associated with the number, the device state is Quarantined.
Note:
By default, you can assign a quarantined number to an account. You can modify the PCM_OP_NUM_POL_DEVICE_ASSOCIATE policy opcode to not allow assigning a quarantined number to an account. You can also write a custom opcode and use it in the device state transition from quarantined to assigned.
-
By default, a number is unquarantined after 90 days. After a number has been unquarantined, the device state changes to Unassigned.
Figure 4-1 shows how number device state changes:
You cannot use Number Administrator to change the number device state. Instead, the number device state is changed automatically when the number is assigned to an account and when an account or service changes status (for example, when a customer cancels the service that the number is associated with).
Note:
You can create your own number device states. See "Defining the Device Life Cycle" in BRM Developer's Guide.
Taking Numbers Out of Quarantine
By default, a number is quarantined for 90 days. You can change the number of days by running the "load_pin_num_config" utility. See "Changing the Default Quarantine Period".
If you run out of new or unassigned numbers, you can use the "pin_change_num_quarantine" utility to unquarantine numbers. See "Changing the Quarantine Status Manually".
Displaying the Number Inventory
By default, Number Administration Center displays the number inventory when you start the application. To display it at any time, choose View - Number Inventory.
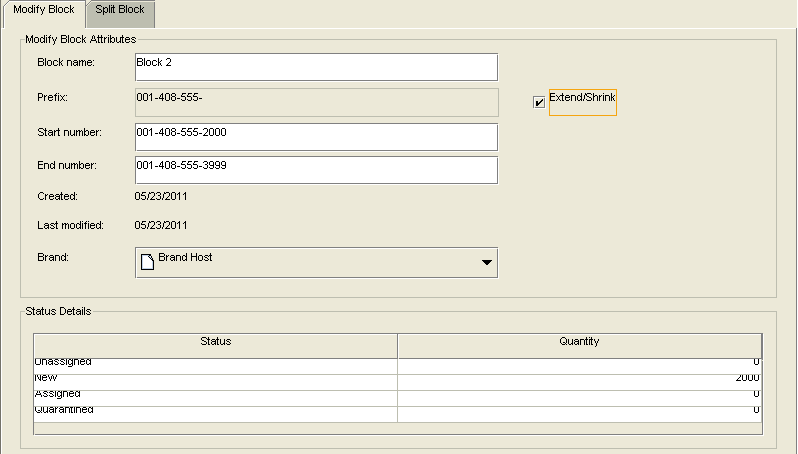
You can also display the number status of the numbers in a single block. See "About Modifying a Block".
Creating a Block of Telephone Numbers
Note:
Before creating numbers, you must define network elements and any other number properties required by your system (for example, number categories). See "Mandatory Configuration Tasks".
To create a block of numbers in the BRM database, start Number Administration Center and choose File - New Block.
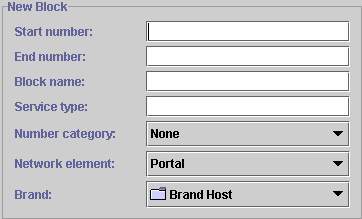
Figure 4-2 shows the block creation screen in Number Administration Center:
Figure 4-2 Block Creation in Number Administration Center
Description of "Figure 4-2 Block Creation in Number Administration Center"
To create a block of numbers, you enter the following information:
-
A start number and an end number that together form the range of numbers in the block. You can use any common format when entering numbers. For example:
-
1-800-555-1212
-
1(800) 555-1212
-
1.800.555.1212
-
18005551212
-
-
A block name. This can be any name you want, but you can only use the same name for one block. The maximum length is 255 characters. You can change the block name at any time.
In addition to the block name and the range of numbers in the block, you assign the following number attributes to all the numbers in the block:
-
The network element. You can change the network element after you create the block.
To specify the network element, you choose from a list. By default, there are no network elements; you must add your own. You can also localize network elements. See "Creating Network Elements".
-
The number category. This is a configurable field that you can use for managing numbers. It is typically used for identifying corporate entities, but it can be used for defining any type of number classification. For example, you can create number categories for business or residential numbers. You can also localize number categories.
You can change the number category after you create the block.
To customize the list of number categories, see "Creating Number Categories". By default, the number categories are None and Reserved.
-
The vanity type. This attribute can be used for customized pricing and rating. Number Manager includes only sample vanity types; if you use vanity types, you must create your own. You can localize vanity types. See "Creating Vanity Types".
When you create a block of numbers, you cannot choose the vanity type for the entire block. By default, the vanity type applied to a new block is the first vanity type defined in the num_vanities.locale file. After creating the numbers, you can apply vanity types to numbers.
-
The service type. You can use the service type to customize business policies. By default, the service type is not applied to any business logic. See "Customizing How Service Types Are Used".
About Customizing Block Creation and Modification
By default, BRM prevents the creation of duplicate numbers. To customize how numbers are created (for example, to prevent numbers or ranges of numbers from being created), edit the PCM_OP_NUM_POL_DEVICE_CREATE source code.
You can change the prefix (for example, the North American area code) for a block of numbers. To allow changing of other parts of the number (for example, country codes), modify the PCM_OP_NUM_POL_DEVICE_SET_ATTR source code.
See BRM Opcode Guide for more information.
About Modifying a Block
To modify a block:
-
In Number Administration Center, choose File - Open a Block.
-
Enter the search criteria. You can search for block name and telephone number. You can use wildcards when searching for numbers:
-
Use the asterisk (*) to match zero or more characters.
-
Use the question mark (?) to match a single character.
-
-
Select the block and click Open.
-
Change the block name or prefix. By default, you can change only the North American area code digits.
-
Choose File - Commit to Database.
Changing the Size of the Number Block
You can extend the block size by specifying a new higher value for the end number. You can shrink the range of an existing block of numbers by doing either of the following:
-
Specifying a new lower value for the end number.
-
Specifying a new higher value for the start number.
To change the size of the number block:
-
In Number Administration Center, choose File - Open a Block.
-
Enter the search criteria.
You can search for block name and telephone number. You can use wildcards when searching for numbers:
-
Use the asterisk (*) to match zero or more characters.
-
Use the question mark (?) to match a single character.
-
-
Select the block and click Open.
-
In the Modify Block tab, select the Extend/Shrink check box as shown in Figure 4-3.
-
Do one of the following:
-
To extend the number block, in the End number field, enter a value that is higher than the previous end number.
Note:
The new end number that you specify must be in a continuous range and not overlap with any other existing blocks.
-
To shrink the number block, in the End Number field, enter a value that is less than the previous end number. Alternatively, in the Start Number field, enter a value that is higher than the previous start number.
-
-
Choose File - Commit to Database.
Splitting a Block
You can split a block into two or more blocks. After you split a block, you can modify the blocks (for example, change the North American area code) of the numbers in the blocks.
-
In Number Administration Center, choose File - Open the block.
-
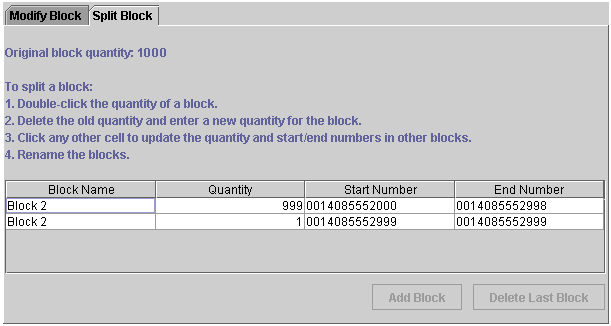
Click the Split Block tab.
By default, two rows are displayed in a table as shown in Figure 4-4:
You can use two methods for splitting a block:
-
Enter a quantity in either of the rows. It must be smaller than the current quantity of the block.
-
Enter an end number. It must be a number within the current block range. You cannot enter a start number.
In either case, the quantity and start and end numbers are updated to match the new block size.
-
-
Enter names for the new blocks.
-
Click Add Block.
-
Click Commit.
Updating Telephone Numbers
You can use Number Administration Center to search for telephone numbers and modify them. You can update all number attributes except the status and the number itself. For information about number attributes, see "Creating a Block of Telephone Numbers".
Note:
-
You can update numbers by updating a block of numbers. For example, you can change the prefix (by default, the North American area code) for a block of numbers.
-
Changing a telephone number or changing any of its attributes does not create a new /device/number object in the database. Instead, the existing number is updated.
-
It is possible to delete numbers by using opcodes, but it is not recommended. You could reduce data integrity, or accidentally delete a number that is in use.
To update a number:
-
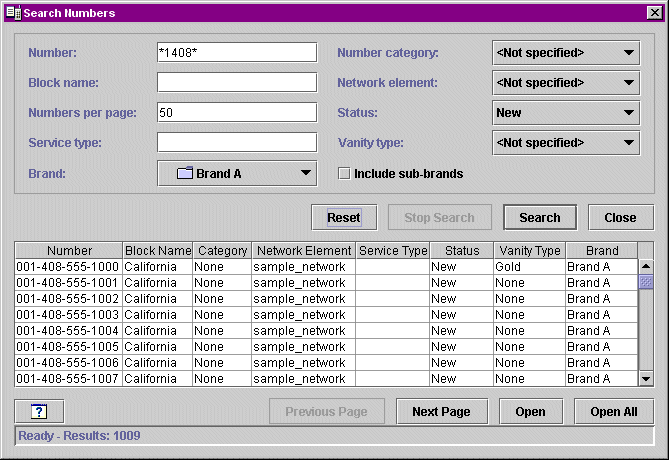
In Number Administration Center, choose File - Search Numbers.
The Search window opens.
-
Enter the search criteria.
You can search on any number attribute. You can use wildcards when searching for numbers and number category:
-
Use the asterisk (*) to match zero or more characters.
-
Use the question mark (?) to match a single character.
-
Number Administration Center ignores all other punctuation. For example, searching for *8-5* is the same as searching for *85*.
Figure 4-5 shows the Search Numbers dialog after a search:
-
-
Open the numbers that you want to modify.
-
To open all numbers found in the search, click Open All.
-
To open the page of numbers that is currently displayed, click Open. Click Next Page and Previous Page to display different numbers.
-
Select one or more numbers and click Open.
-
Choose File - Search Numbers to return to the search results.
To select numbers:
-
To select one number, click it.
-
To select all numbers, click Select All.
-
To select a range of numbers, press SHIFT and click the first and last numbers in the range.
-
To select multiple numbers not in a range, press CTRL and click the numbers.
Note:
If the quantity of numbers found is the same or less than the quantity of numbers per page, the Open and Open All buttons open the same set of numbers. For example, if you specify 100 numbers per page, and only 50 numbers are found, both buttons open 50 numbers.
-
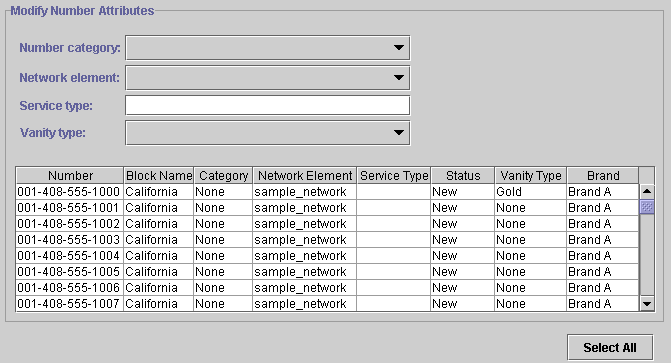
Figure 4-6 shows the Modify Number Parameters dialog box:
Figure 4-6 Modify Number Parameters Dialog Box
Description of "Figure 4-6 Modify Number Parameters Dialog Box" -
-
Select the numbers that you want to modify.
-
Enter the new number attributes.
-
Click Commit.
About Number Customization Options
See BRM Opcode Guide for information about customize number management. You can customize how you manage number inventory as follows:
-
You can customize network elements.
Note:
By default, there are only sample network elements; you must add your own. See "Creating Network Elements".
-
You can customize number device and service associations.
-
You can customize number device states.
-
You can customize how numbers are quarantined.
-
You can create number categories.
-
You can create vanity types.
-
You can customize how service types are used.
-
You can customize how Number Administration Center works.
