4 Executing NF Test Cases using ATS
In this chapter, you will learn to execute NF (NRF, PCF and SCP) Test Cases using ATS.
Executing NRF Test Cases using ATS
To execute NRF Test Cases using NRF ATS 1.6.1, you need to ensure that following prerequisites are fulfilled.
Prerequisites
- The user should create certificates/keys (public and private) for AccessToken micro-service before deploying NRF.
- The user MUST copy the public keys (RSA and ECDSA) created in the above step to the ATS pod at the /var/lib/jenkins/ocnrf_tests/public_keys location.
- Deploy NRF 1.6.1 with default helm configurations using helm charts.
- All micro-services of NRF should be up and running including Accesstoken micro-service.
- Deploy ATS using helm charts.
- Deploy Stub using helm charts.
- Deploy ATS and Stub in the same namespace as of OCNRF.
- Ensure Prometheus service is up and running.
- For NRF ATS 1.6.1, you need to deploy two stub servers for executing SLF and Forwarding functionality test cases. The service name for both the STUB servers should be notify-stub-service and notify-stub-service02.
Logging into ATS
Figure 4-1 Verifying ATS Deployment

There are two ways to login to ATS Jenkins GUI.
- When an external load balancer (metalLB in case of
OCCNE) is available and an external IP is provided to the ATS service, user can
login to ATS GUI using
<External-IP>:8080. - When an external IP is not provided to the ATS
service, user can open the browser and provide the external IP of the worker node
and nodeport of the ATS service to login to ATS GUI.
<Worker-Node-IP>:<Node-Port-of-ATS>Note:
In the Verifying ATS Deployment screen, ATS nodeport is highlighed in red as 32660. For more details on ATS deployment, refer to NRF ATS Installation Procedure.Open a browser and provide IP and port details as <Worker-Node-IP>:<Node-Port-of-ATS> (As per above example: 10.75.224.92:32660). The ATS login screen appears.
Executing ATS
- Enter the username as "Oracle" and
password as
"Welcome@123". Click Sign
in. A sample screen is shown below.
Figure 4-2 Sample Screen: Logging into ATS GUI

- Following screen appears showing pre-configured
pipelines for NRF, PCF and SCP individually (9 Pipelines).
- New-Features
- Performance
- Regression
Figure 4-3 ATS First Logged-in Screen
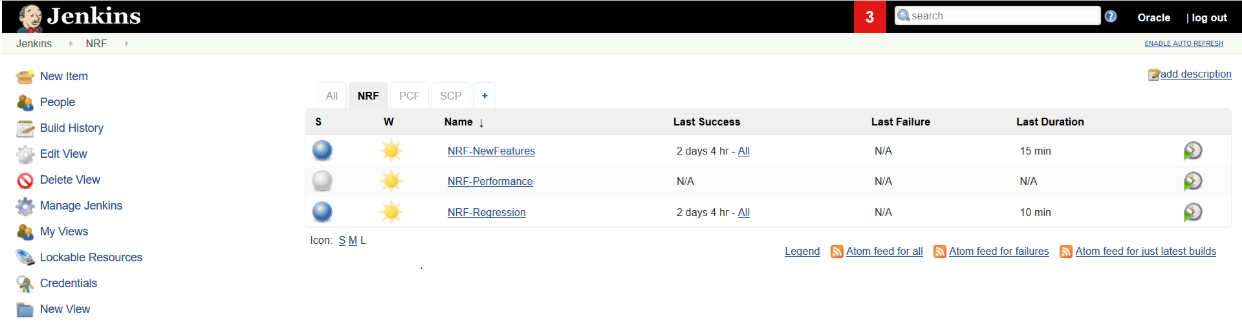
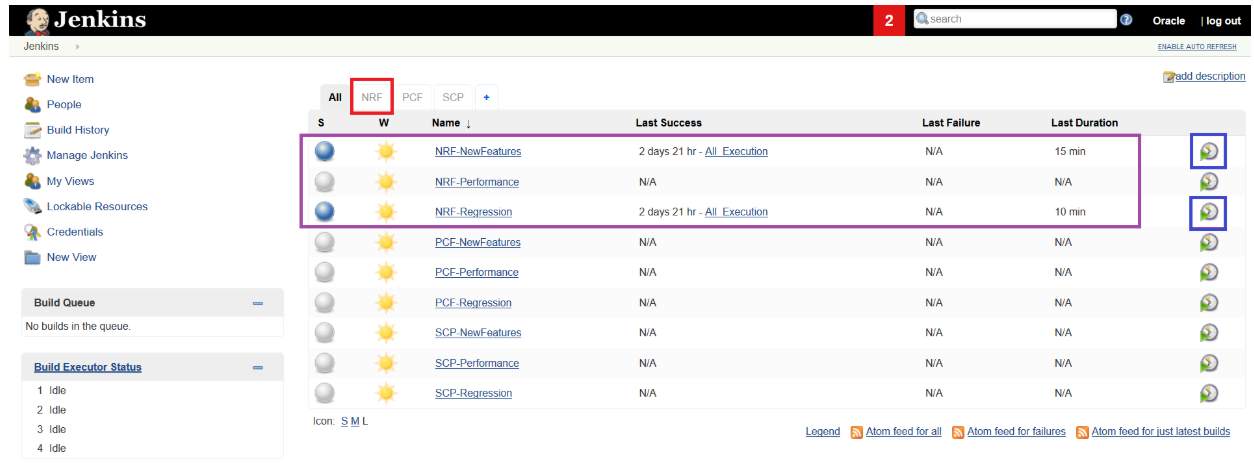 By default, you are in the All tab. To test the NRF test cases, click the NRF tab. The NRF tab displays the pipelines related to NRF only.
Figure 4-4 NRF Tab - Pre-Connfigured pipelines
Jenkins ATS Pre-configured Pipelines
- NRF-NewFeatures: This pipeline has all the test cases, which are delivered as part of NRF ATS - 1.6.1
- NRF-Performance: This pipeline is not operational as of now. It is reserved for future releases of ATS.
- NRF-Regression: This pipleine has all the test cases, which were delivered in NRF ATS - 1.0.0
They are explained below:
NRF-NewFeatures Pipeline
After identifying the NRF pipelines, the user needs to do one-time configuration in ATS as per their SUT deployment. In this pipeline, all the new testcases related to NRF are executed. To configure its parameters:
- Click NRF-NewFeatures in the Name column. Following screen appears:
Figure 4-5 NRF-NewFeatures-Configure
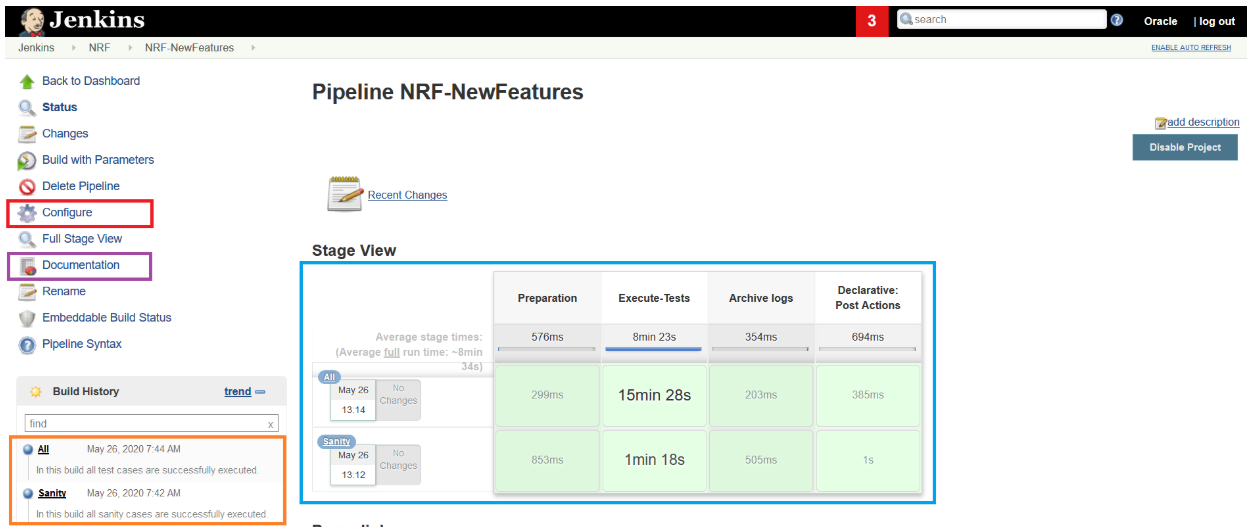 In the above screen:
- If you click Configure, you are navigated to the screen where configuration needs to be done.
- If you click Documentation, you are navigated to the screen that has documented test cases, which are part of this NRF release.
- If you click on blue dots inside Build History box, you are redirected to the success console logs of the "All" and "Sanity" respectively.
- The Stage View represents the already executed pipeline for the customer reference.
- Click Configure. The following screen appears:
Figure 4-6 NRF-NewFeatures - On Configure

- User MUST wait for the page to load completely. Once the page loads
completely, click the Pipeline tab to reach the Pipeline configuration as
shown below:
MAKE SURE THAT THE SCREEN SHOWN ABOVE LOADS COMPLETELY BEFORE YOU PERFORM ANY ACTION ON IT. ALSO, DO NOT MODIFY ANY CONFIGURATION OTHER THAN DISCUSSED BELOW.
Figure 4-7 Pipeline Script
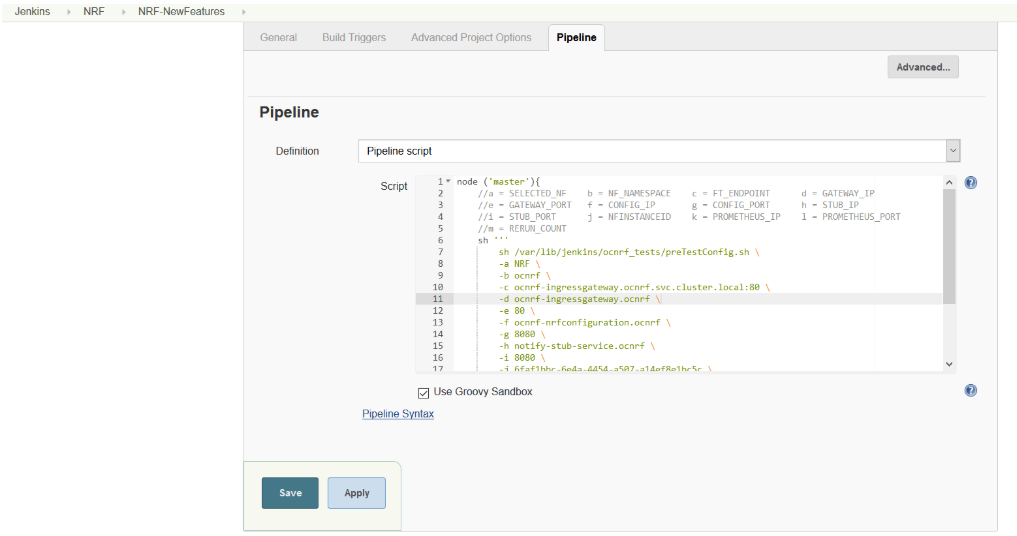 In the above screen, the values of the 'Pipeline script' needs to be changed. The content of the pipeline script is as follows:
node ('master'){
    //a = SELECTED_NF    b = NF_NAMESPACE    c = FT_ENDPOINT      d = GATEWAY_IP
    //e = GATEWAY_PORT   f = CONFIG_IP       g = CONFIG_PORT      h = STUB_IP
    //i = STUB_PORT      j = NFINSTANCEID    k = PROMETHEUS_IP    l = PROMETHEUS_PORT
    //m = RERUN_COUNT
    sh '''
        sh /var/lib/jenkins/ocnrf_tests/preTestConfig.sh \
        -a NRF \
        -b ocnrf \
        -c ocnrf-ingressgateway.ocnrf.svc.cluster.local:80 \
        -d ocnrf-ingressgateway.ocnrf \
        -e 80 \
        -f ocnrf-nrfconfiguration.ocnrf \
        -g 8080 \
        -h notify-stub-service.ocnrf \
        -i 8080 \
        -j 6faf1bbc-6e4a-4454-a507-a14ef8e1bc5c \
        -k occne-prometheus-server.occne-infra \
        -l 80 \
        -m 2
    '''
    load "/var/lib/jenkins/ocnrf_tests/jenkinsData/Jenkinsfile-NewFeatures"
}
Note:
The User MUST NOT change any other value apart from line number 8 to line 20.The parameters marked as "a" to "m" are only that you need to change as per the user requirement. The details about these parameters are provided as comments in line number 2 - to -5.- a - Name of the NF to be tested in capital (NRF).
- b - Namespace in which the NRF is deployed
- c - endPointIP:endPointPort value used while deploying the NRF using the helm chart
- d - Name_of_NRF_ingressgateway_service.namespace (ocnrf-nrfconfiguration.ocnrf) - this is also known as as cluster_domain.
- e - Port of ingressgateway service (80)
- f - Name_of_NRF_configuration_service.namespace (ocnrf-nrfconfiguration.ocnrf)
- g - Port of configuration service (8080)
- h - Name_of_stub_service.namespace (notify-stub-service.ocnrf)
- i - Port of stub service (8080)
- j - NRF_Instance ID (6faf1bbc-6e4a-4454-a507-a14ef8e1bc5c)
- k - Name_of_Prometheus_service.namespace (occne-prometheus-server.occne-infra)
- l - Port of Prometheus service (80)
- m - Number of times the re-run of failed case is allowed (default as 2).
Note:
You do not have to change any value if OCCNE cluster is used and NRF, ATS and STUB are deployed in ocnrf namespace.Click Save after making neccesary changes. You are navigated back to the NRF-NewFeatures screen. Click Build with Parameters. Following screen appears:Figure 4-8 NRF-NewFeatures - Build with Parameters
Executing NRF Test Cases
- Click the Schedule a Build with parameters for NRF-NewFeatures icon
present in extreme right column corresponding to NRF-NewFeatures row as
shown below.
Figure 4-9 New-Features Pipeline Icon

- The following screen appears.
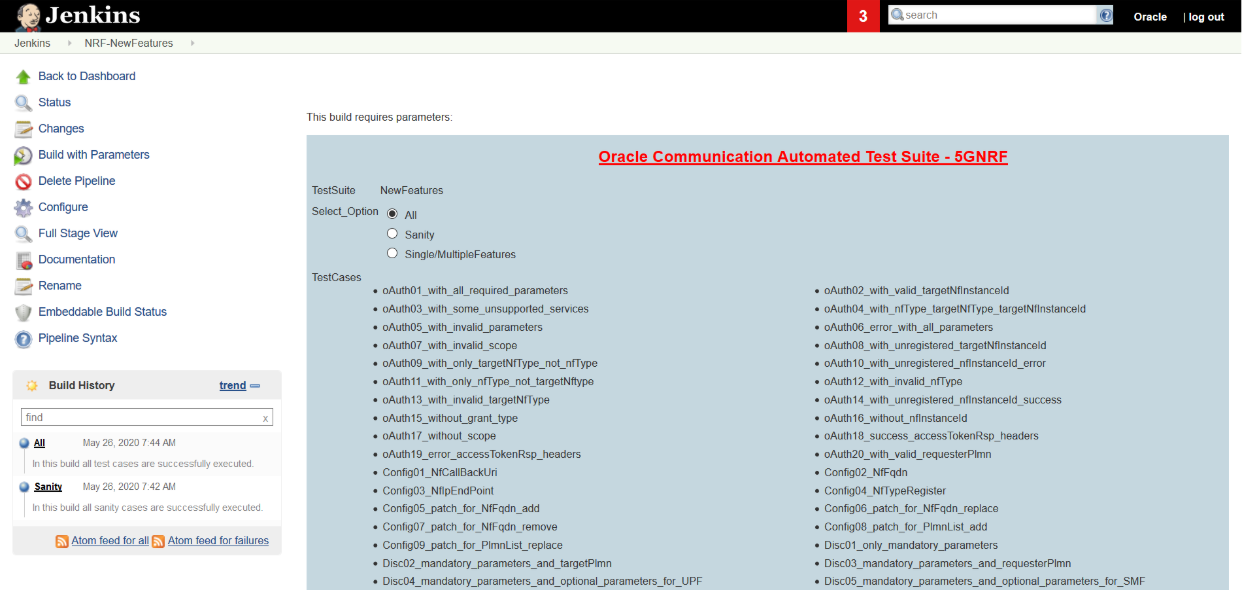
Figure 4-10 Build Requires Parameters
 In the above screen, there are three Select_Option(s), which are:
- All: By default, all the NRF test cases are selected for execution. User just need to scroll down and click Build to execute all the test cases.
- Sanity: It is recommended to execute Sanity before executing any test
case. This helps to ensure that all the deployments are done
properly or not. When you select Sanity, the following screen
appears:
Figure 4-11 Build Requires Parameters - Sanity

Click Build to execute all the sanity test cases.
- Single/MultipleFeatures: This option allows you to select any number of test cases that you want to execute from the list of total test cases available for execution. After selecting the test cases, scroll-down and click Build. The selected NRF test cases are executed.
The NRF testcases are divided into NRF Service operations as follows:- AccessToken - These feature files are listed with a prefix as "oAuth".
- Configuration - These feature files are lited with a prefix as "Config".
- Discovery - These feature files are lited with a prefix as "Disc".
- NRF Forwarding - These feature files are lited with a prefix as "Forwarding".
- Registration - These feature files are lited with a prefix as "Upd". These are related to update operation of registered profiles.
- NRF SLF - These feature files are lited with a prefix as "SLF".
- NRF Sanity - This feature file contains all the basic sanity cases for NRF ATS 1.6.1.
- Subscription - These feature files are lited with a prefix as "Subs".
NewFeatures - Documentation
Figure 4-12 NRF-NewFeatures - Documentation
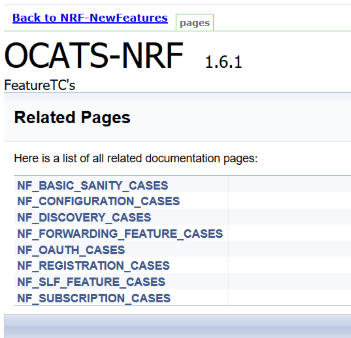
- NF_BASIC_SANITY_CASES - Lists all the sanity cases, which are useful to identify whether all the NRF functionality works fine.
- NF_CONFIGURATION_CASES - Lists all the cases related to NRF configuration.
- NF_DISCOVERY_CASES - Lists all the discovery microservice related cases.
- NF_FORWARDING_FEATURE_CASES - Lists all the forwarding related cases.
- NF_OUTH_CASES - Lists all the accesstoken related cases.
- NF_REGISTRATION_CASES - Lists all the registration related cases.
- NF_SLF_FEATURE_CASES - Lists all the SLF related cases.
- NF_SUBSCRIPTION_CASES - Lists all subscription related cases.
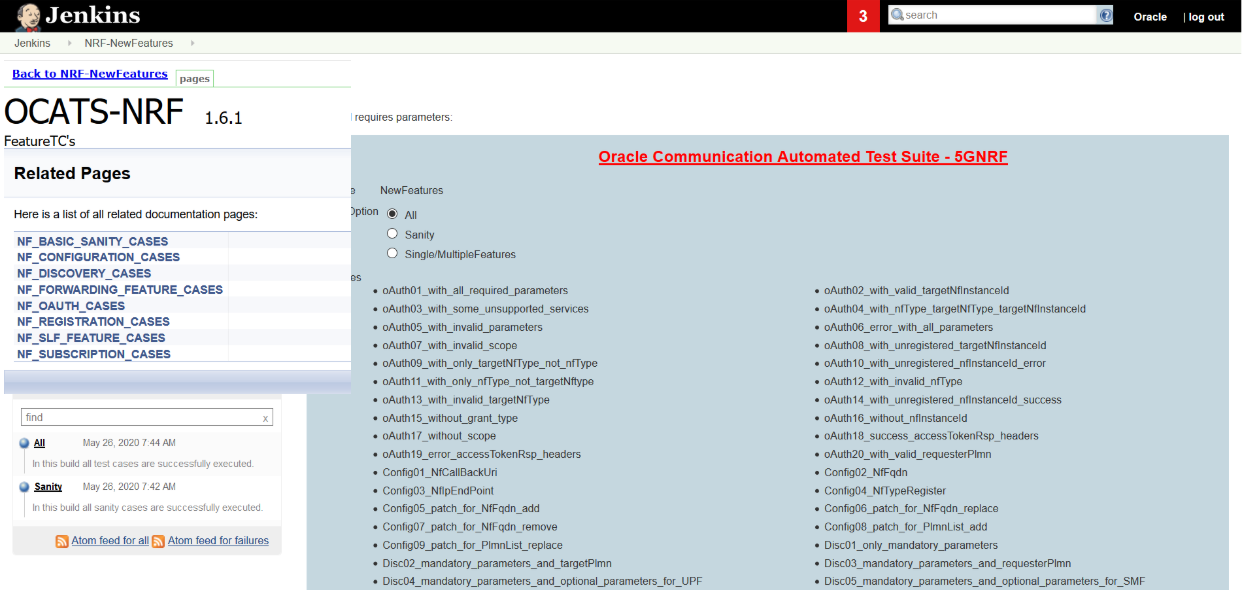
Figure 4-13 NRF - Feature Detail
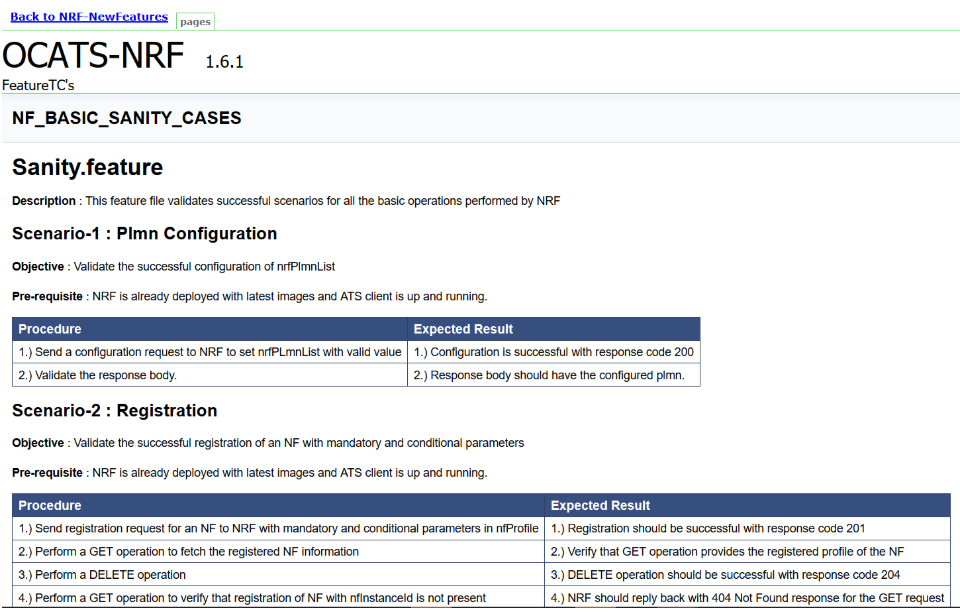
Figure 4-14 Build Requires Parameters in sync with Documentation
- oAuth01 to 0Auth20: These 20 feature files belong to the NF_OAUTH_CASES functionality.
- Config01 to Config09: These 9 feature files belong to the NF_CONFIGURATION_CASES functionality.
- Disc01 to Disc20: These 20 feature files belong to the NF_DISCOVERY_CASES functionality.
- Forwarding01 to Forwarding05: These 5 feature files belong to the NF_FORWARDING_FEATURE_CASES functionality.
- Upd01 to Upd20: These 20 feature files belong to the NF_REGISTRATION_CASES functionality.
- SLF01 to SLF02: These 2 feature files belong to the NF_SLF_FEATURE_CASES functionality.
- Sanity: This feature file belongs to the NF_BASIC_SANITY_CASES functionality.
- Subs21 to Subs39: These 19 feature files belong to the
NF_SUBSCRIPTION_CASES functionality.
Note:
Here, the initials starts from Subs21 because the first 20 feature files covering Subs01 to Subs20 were delivered in ATS Release 1.0.0 - SubsPatch01 to SubsPatch04: These 4 test cases also belong to the NF_SUBSCRIPTION_CASES functionality.
NRF-Regression Pipeline
This pre-configured pipeline has all the test cases of previous releases like ATS Release 1.0.0. The configuration method and parameters are same as the NewFeatures pipeline. Only difference in this pipeline is that it does not have "Sanity" option. This is so because these cases are already executed as part of previous release.
To view Regression pipeline details, click Build with Parameters in the left navigation pane. The following screen appears:
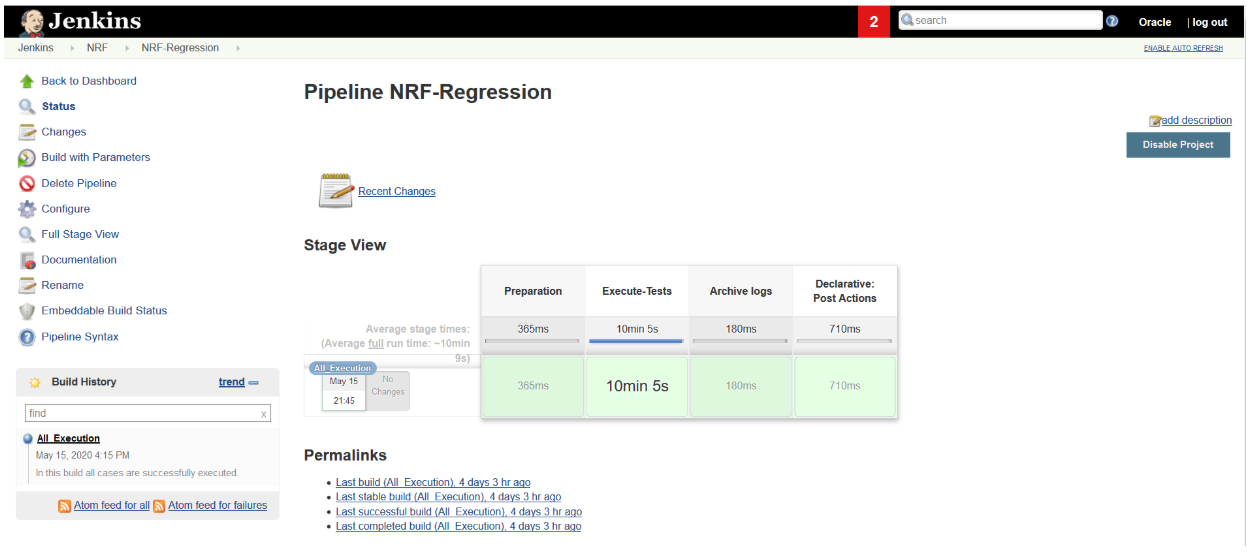
Figure 4-15 Regression - Build with Parameters

Figure 4-16 NRF Regression
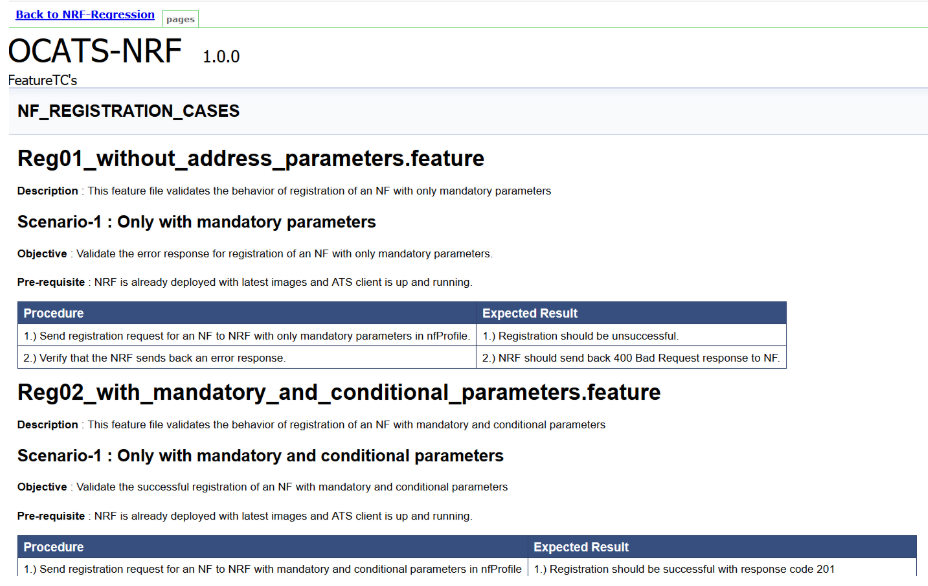
Regression - Documentation
Click Documentation in the left navigation pane of the NRF-Regression pipeline.
Following screen appears:
This screen shows only those functionalities whose test cases were released in previous releases.
Figure 4-17 Sample Screen: Documentation for NRF ATS
Executing PCF Test Cases using ATS
To execute PCF Test Cases, you need to ensure that following prerequisites are fulfilled.
Prerequisites
- ATS 1.1.0 is compatible with PCF 1.6.0 and 1.6.1 for both TLS (only server side)
enabled and disabled.
- PCF with TLS disabled. In the PCF's custom values file, check if
the following parameters are configured with the respective
values:
ingress-gateway: enableIncomingHttps: false egress-gateway: enableOutgoingHttps: false - If TLS is enabled, then you first need to enable the Https support for Egress and Ingress gateway. For more details, refer to the Enabling Https support for Egress and Ingress Gateway section in this topic.
- PCF with TLS disabled. In the PCF's custom values file, check if
the following parameters are configured with the respective
values:
- ATS is deployed using helm charts in the same namespace where PCF is deployed.
- Prometheus server is installed with Loadbalancer as the pod type.
- To get all configmaps in your namespace, execute the following command.
In the application-config configmap, configure the following parameters with the respective values:kubectl get configmaps -n <pcf_namespace>primaryNrfApiRoot=http://nf1stub.<stub_namespace>.svc:8080Example: If stubs are deployed in "ocats" namespace,primaryNrfApiRoot=http://nf1stub.ocats.svc:8080nrfClientSubscribeTypes=UDR,CHF - Database cluster should be in a running state with all the required tables. You need to ensure that there are no previous entries in database before executing test cases.
Enabling TLS in ATS Pod
- Execute the following command to copy the caroot.cer generated while
PCF deployment to ATS pod in "cert"
directory.
kubectl cp  <path_to_file>/caroot.cer <namespace>/<ATS-Pod-name>:
/var/lib/jenkins/cert/ -n <namespace>
Example:
kubcetl cp cert/caroot.cer ocpcf/ocpcf-ocats-pcf-56754b9568-rkj8z: /var/lib/jenkins/cert/ - Execute the following command to login to your ATS
Pod.
kubectl exec -it <ATS-Pod-name> bash -n <namespace> - Execute the following commands from cert directory to create private key and
certificates:
-
openssl req -x509 -nodes -sha256 -days 365 -newkey rsa:2048 -keyout
rsa_private_key_client -out rsa_certificate_client.crt
Figure 4-18 Command 1
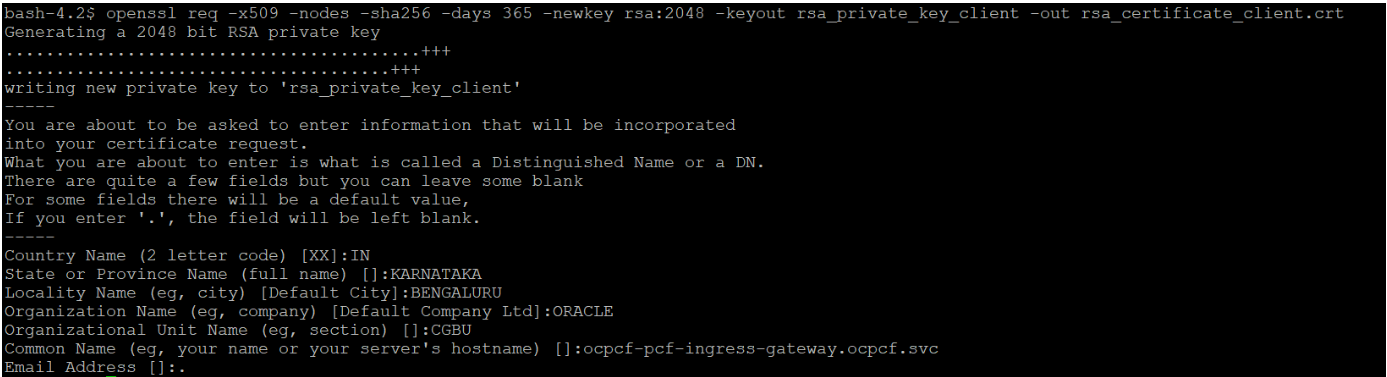
Note:
You need to provide appropriate values and specify fqdn of PCF Ingress Gateway service i.e. <ingress-servicename>.<pcf_namespace>.svc in Common Name. -
openssl rsa -in rsa_private_key_client -outform PEM -out
      rsa_private_key_pkcs1_client.pem
Figure 4-19 Command 2

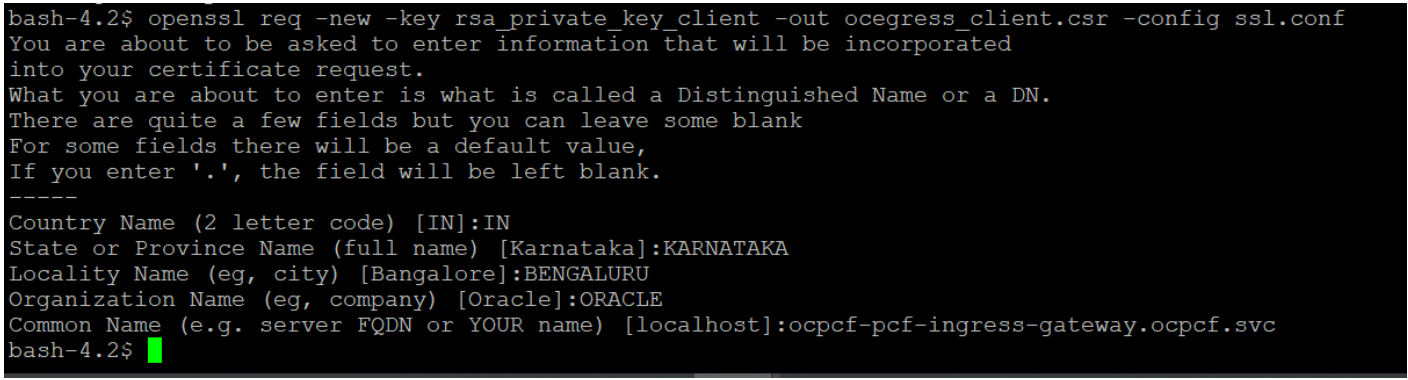
-
openssl req -new -key rsa_private_key_client -out ocegress_client.csr -config
ssl.conf
Note:
You can either use or copy the ssl.conf file, which was used while deploying PCF to ATS pod for this step.Figure 4-20 Command 3
-
- Execute the following command to copy the ocegress_client.csr to the
bastion.
openssl x509 -CA caroot.cer -CAkey cakey.pem -CAserial serial.txt -req
      -in ocegress_client.csr -out ocegress_client.cer -days 365 -extfile
	ssl.conf -extensions req_ext
Figure 4-21 Copying ocegress_client.csr to bastion

- Copy the ocegress_client.cer from Bastion to the ATS Pod.
- Restart the ingress and egress gateway pods from the Bastion.
Logging into ATS
Figure 4-22 Sample Screen: Verifying ATS Deployment

There are two ways to login to ATS Jenkins GUI.
- When an external load balancer is available
and an external IP is provided to the ATS service, user can login to ATS GUI using
<External-IP>:8080. - When an external IP is not provided to the ATS
service, user can open the browser and provide the external IP of the worker node
and nodeport of the ATS service to login to ATS GUI.
<Worker-Node-IP>:<Node-Port-of-ATS>Note:
In the Verifying ATS Deployment screen, the nodeport, '32732' is highlighted in red. For more information on ATS deployment in PCF, refer to Policy ATS Installation Procedure.
Executing ATS
To execute ATS:
- Enter the username as "Oracle" and password as "Welcome@123".
Click Sign in. A sample screen
is shown below.
Figure 4-23 Sample Screen: Logging into ATS GUI
- Following screen appears showing pre-configured pipelines for NRF, PCF and SCP
individually (9 Pipelines).
- New-Features
- Performance
- Regression
Figure 4-24 Jenkins First Screen on Login

By default, you are in the All tab. To test the PCF test cases, click the PCF tab. The PCF tab displays the pipelines related to PCF only.
Figure 4-25 PCF Tab
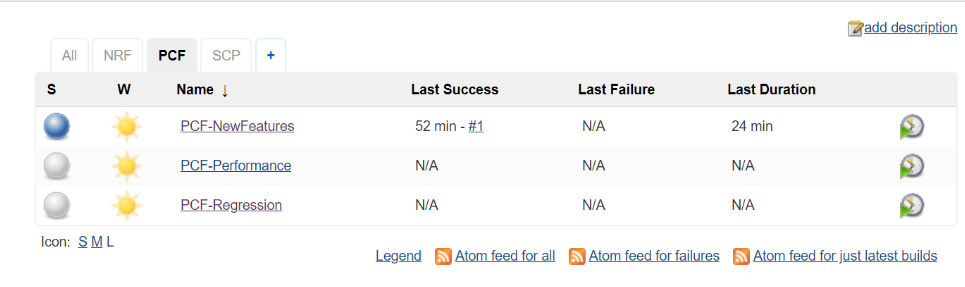
Jenkins ATS Pre-configured Pipelines
- PCF-NewFeatures
- PCF-Performance: This pipeline is not operational as of now. It is reserved for future releases of ATS.
- PCF-Regression
They are explained below:
PCF-New Features Pipeline
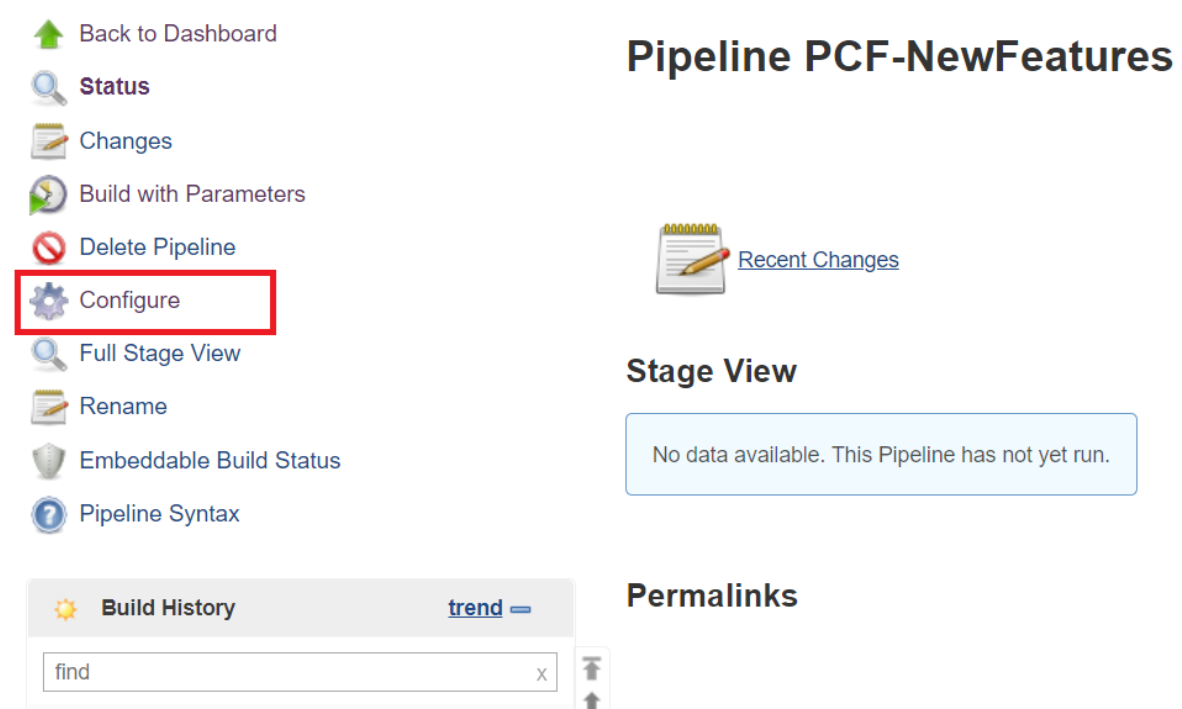
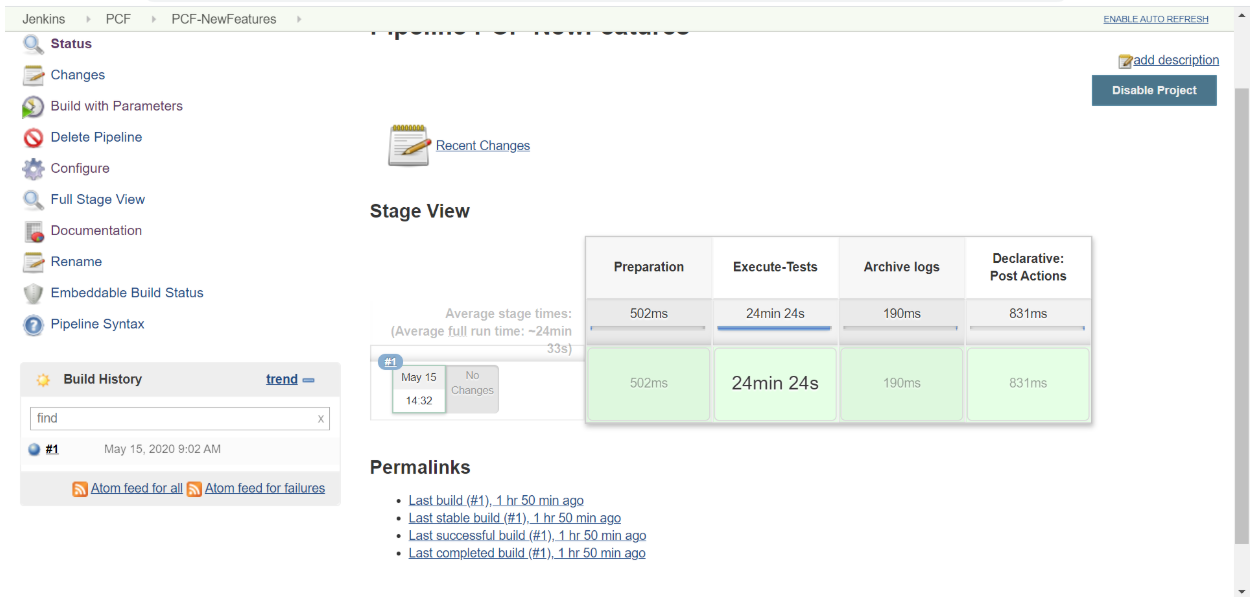
- Click PCF-NewFeatures in the Name column and then, click Configure
in the left navigation pane as shown below:
Figure 4-26 PCF-NewFeatures - Configure
- The PCF-NewFeatures, General tab appears. Make sure that the screen loads completely.
- Scroll-down to the end. The control moves from General tab to
the Advanced Project Options tab as shown below:
Figure 4-27 Advanced Project Options
 In the Script area of the Pipeline section:
- Change parameter "b" to update the namespace where PCF was deployed in the bastion.
- Change parameter "c" for prometheus server service name.
- Change parameter 'd' option for gostub namespace.
- If you intend to run ATS in TLS disabled mode, then you need to set parameter "e" as "unsecure", else set parameter e as "secure".
- Parameter "f" is to set nfInstanceId provided in application configmap of PCF.
- Parameter "g" should not be set less than 20 secs. This is because the default time for the nrf-client-management pod to come up on restart is set to 20 secs and every TC requires nrf-client-management pod to be restarted.
- Parameter "h" should not be set less than 60 secs. This is the default wait time given for the configured policy to be added to the Database.
- Parameter "i" should not be set less than 140 secs. The default wait time for Nf_Notification Test Cases is set to 140 secs. You can modify this as per requirement.
- DO NOT MODIFY ANYTHING OTHER THAN PARAMETERS VALUE.
- Press Save after updating the parameters value.
Note:
It is recommended to save the pipeline scipt in your local machine. This would be helpful in the event of ats pod restarts.
Executing PCF Test Cases
- Click the Build with Parameters. The following screen appears.
Figure 4-28 PCF - Build with Parameters
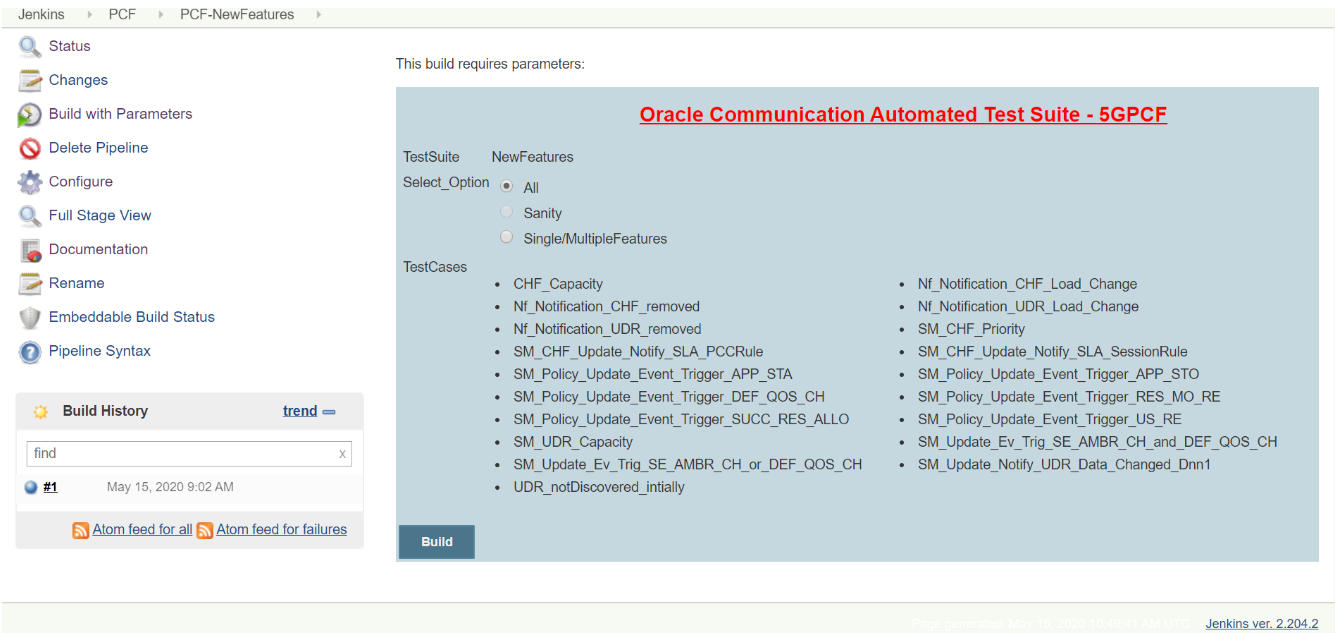 In the above screen, there are three Select_Option(s), which are:
- All: By default, all the PCF test cases are selected for execution. User just need to scroll down and click Build to execute all the test cases.
- Sanity: This option is NOT AVAILABLE for PCF.
- Single/MultipleFeatures: This option allows you to select any number of test cases that you want to execute from the list of total test cases available for execution. After selecting the test cases, scroll-down and click Build. The selected PCF test cases are executed.
Figure 4-29 Sample Test Output in Console
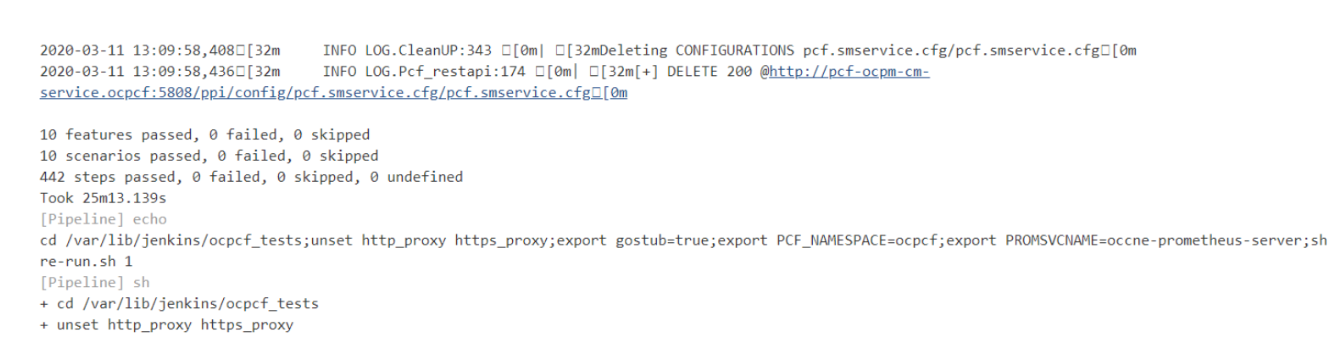
Figure 4-30 Sample output of build status - Jenkins PCF-NewFeatures Pipeline
NewFeatures - Documentation
Figure 4-31 PCF Documentation Option
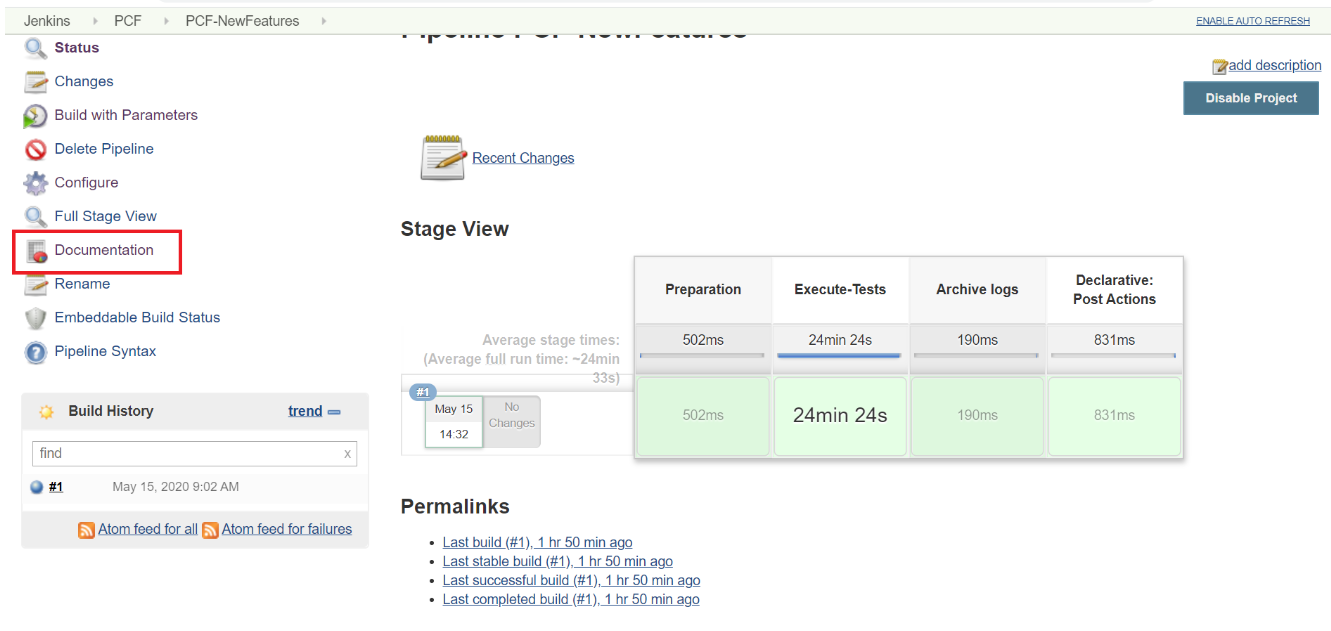
The following screen appears:
Figure 4-32 PCF-NewFeatures - Documentation
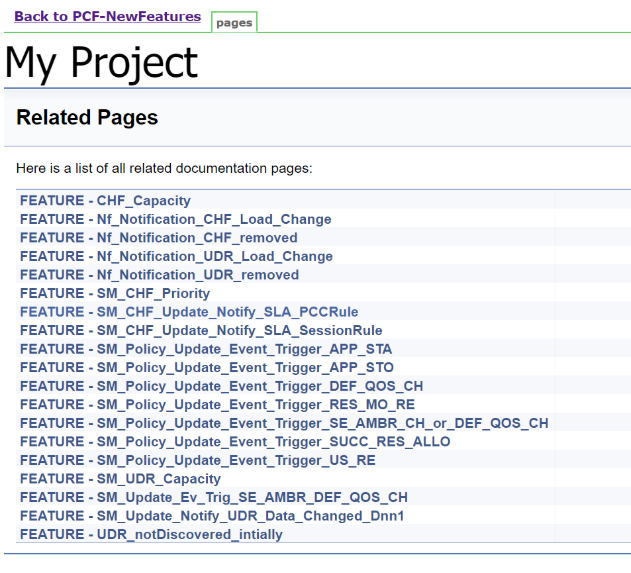
Figure 4-33 SM_Update_Event_Trigger_APP_STA Description
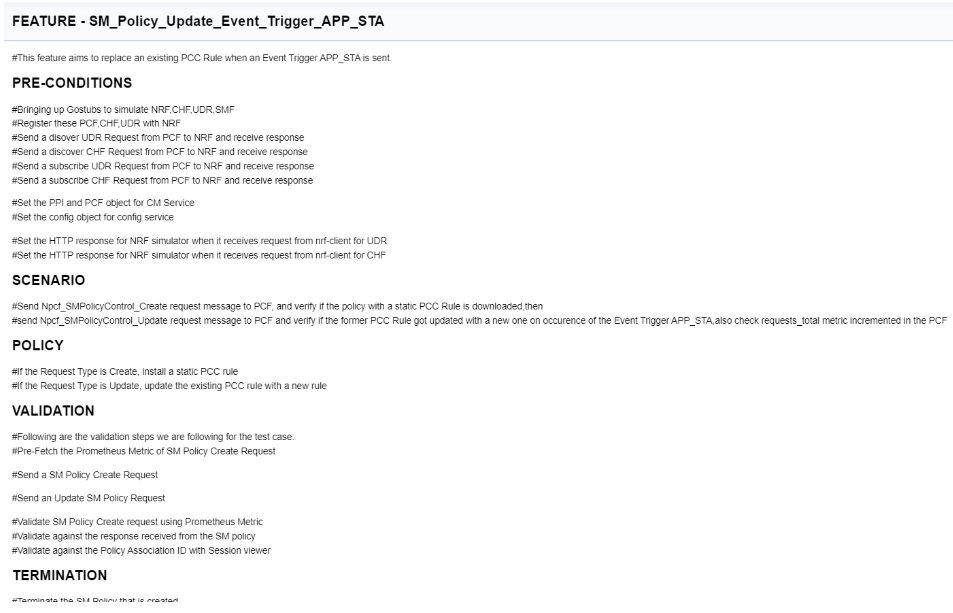
Figure 4-34 Build Requires Parameters in sync with Documentation
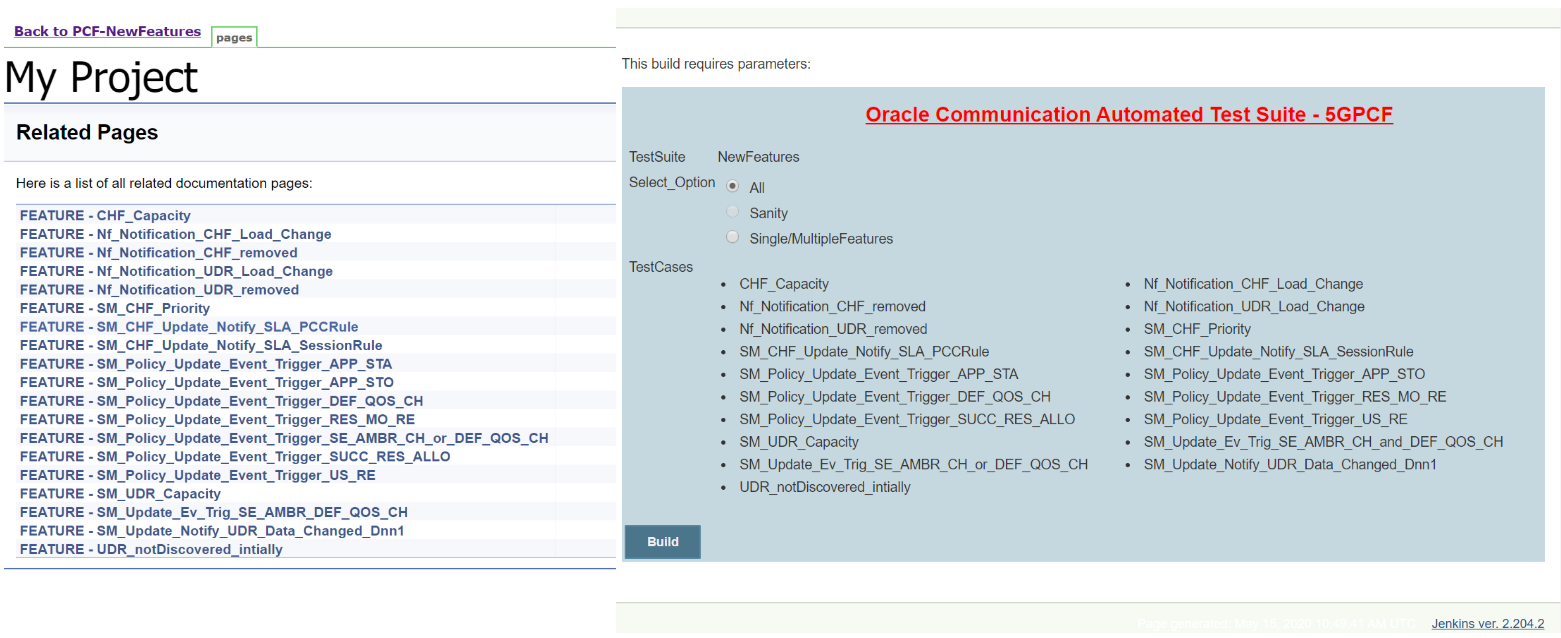
In the above screen, you can notice that the initials of test cases are similar to the functionalities listed in the contents of Documentation screen.
PCF-Regression Pipeline
This pre-configured pipeline has all the test cases of previous releases. For example, as part of Release 1.1.0, this pipeline has all the test cases that were released as part of release 1.0.0
Figure 4-35 PCF - Regression
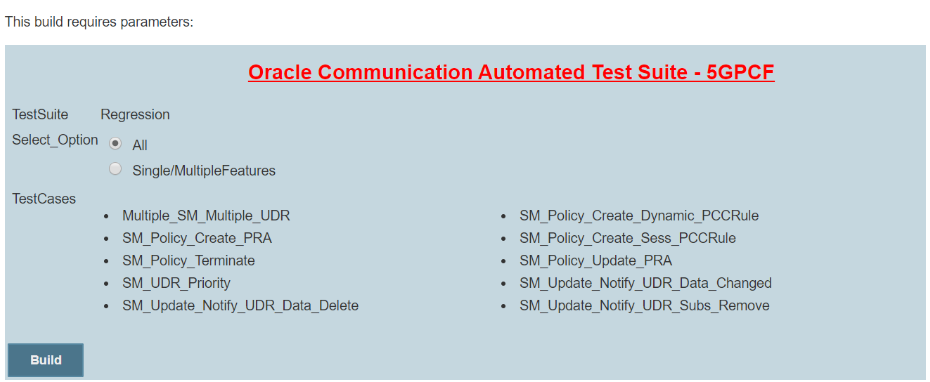
Note:
The regression pipeline does not have any sanity option. However, you should perform all the steps as performed in NewFeatures pipeline. Configure the pipeline script changes to provide environment variables.Regression - Documentation
Figure 4-36 PCF Regression Documentation
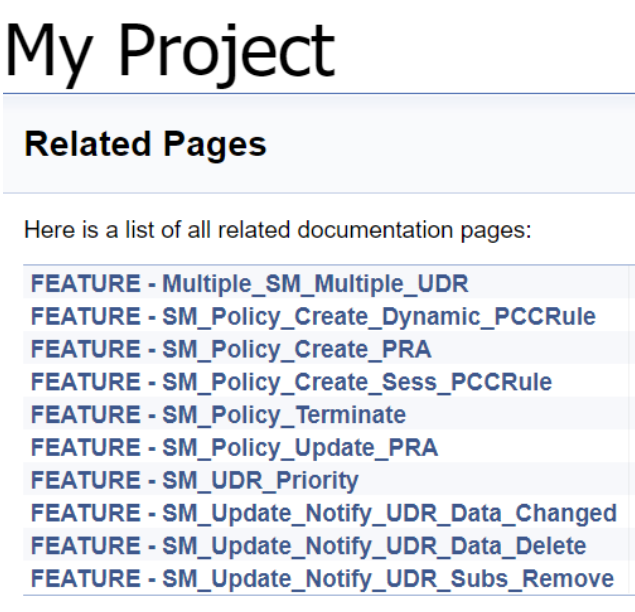
This screen shows only those functionalities whose test cases were released in previous releases.
Executing SCP Test Cases using ATS
To execute SCP Test Cases, you need to ensure that following prerequisites are fulfilled.
Prerequisites
- Deploy SCP 1.6.0 with following custom values in deployment
file.
- As you can provide NRF information only at time of deployment, Stub NRF details like nrf1svc and nrf2svc should also be provided at the time of deployment before executing these cases. For Example: If teststub namespace is ocats then SCP should have been deployed with primary nrf as nrf1svc.ocats.svc.<clusterDomain> and secondary nrf as nrf2svc.ocats.svc.<clusterDomain> for NRF test cases to work.
- In the SCP deployment file, servingScope must have Reg1 and servingLocalities must have USEast and Loc9. In addition, the recommended auditInterval is 120 and guardTime is 10.
- For ATS executio, you should deploy SCP with SCP-Worker replicas set to 1.
- Deploy ATS using helm charts.
Logging into ATS
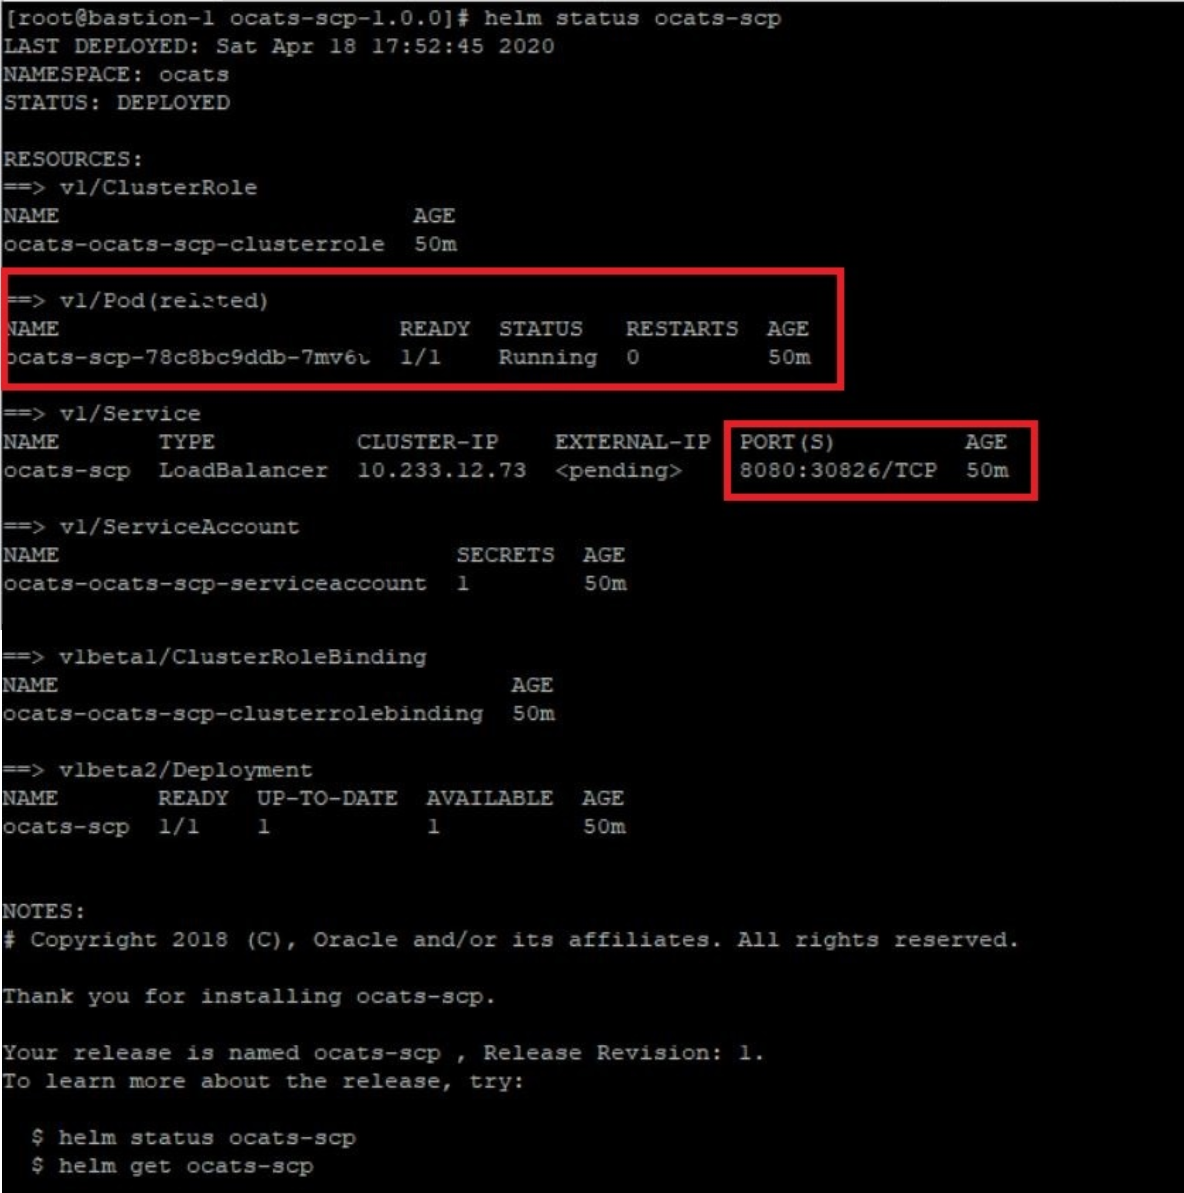
Figure 4-37 Verifying ATS Deployment
There are two ways to login to ATS Jenkins GUI.
- If a metalLB server is available and an external IP is provided to ATS service, user can login to ATS GUI using <External-IP>:8080
- When an external IP is not provided to the ATS service, user can open
the browser and provide the external IP of the worker node and nodeport of the ATS
service to login to ATS GUI.
<Worker-Node-IP>:<Node-Port-of-ATS>Note:
In the Verifying ATS Deployment screen, the ATS nodeport is highlighed in red as 30826. For more details on ATS deployment, refer to SCP ATS Installation Guide.Open a browser and provide IP and port details as <Worker-Node-IP>:<Node-Port-of-ATS> to get the ATS login page.
Executing ATS
- Enter the username as "Oracle" and password as "Welcome@123".
Click Sign in. A sample screen is shown below.
Figure 4-38 Sample Screen: Logging into ATS GUI
- Following screen appears showing pre-configured pipelines for NRF, PCF and SCP
individually (9 Pipelines).
- New-Features
- Performance
- Regression
Figure 4-39 Jenkins Logged-in First Screen
By default, you are in the All tab. To test the SCP test cases, click the SCP tab. The SCP tab displays the pipelines related to SCP only.
Jenkins ATS Pre-configured Pipelines
- SCP-NewFeatures
- SCP-Performance: This pipeline is not operational as of now. It is reserved for future releases of ATS.
- SCP-Regression
They are explained below:
SCP-NewFeatures Pipeline
- Click SCP-NewFeatures in the Name column. The following
screen appears:
Figure 4-40 SCP-NewFeatures
- Click Configure in the left navigation pane to provide input
parameters. The SCP-NewFeatures Configure - General tab
appears.
Make sure that the screen shown above loads completely before you perform any
action on it.
- Scroll-down to the end. The control moves from General tab to
the Advanced Project Options tab as shown below:
Figure 4-41 Advanced Project Options

Note:
The description of each parameter is as follows:- -a - Selected NF
- -b - NameSpace in which SCP is Deployed
- -c - K8s Cluster Domain where SCP is Deployed
- -d - Test Stubs NameSpace
- -e - Docker registry where test stub image is available
- -f - Audit Interval provided in SCP Deployment file
- -g - Guard Time provided SCP Deployment file
- -h - Audit Interface SCP is deployed with - nnrf-nfm or nnrf-disc
- -i - Flag for SCP to Register with NRF in default region Reg1 - true/false
- -j - re-run count
You can modify script pipeline parameters on the basis of your deployment environment and click Save.Note:
DO NOT MODIFY ANYTHING OTHER THAN THESE PARAMETERS.
Executing SCP Test Cases
- Click the Schedule a Build with parameters for
SCP-NewFeatures icon present in extreme right column corresponding to
New-Features row. Following screen appears:
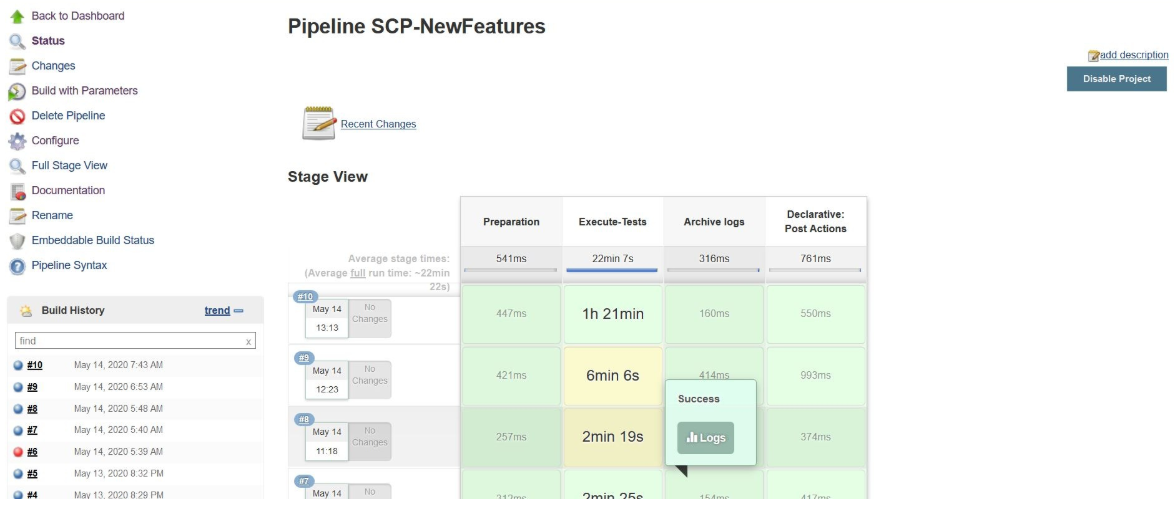
Figure 4-42 SCP TestCases
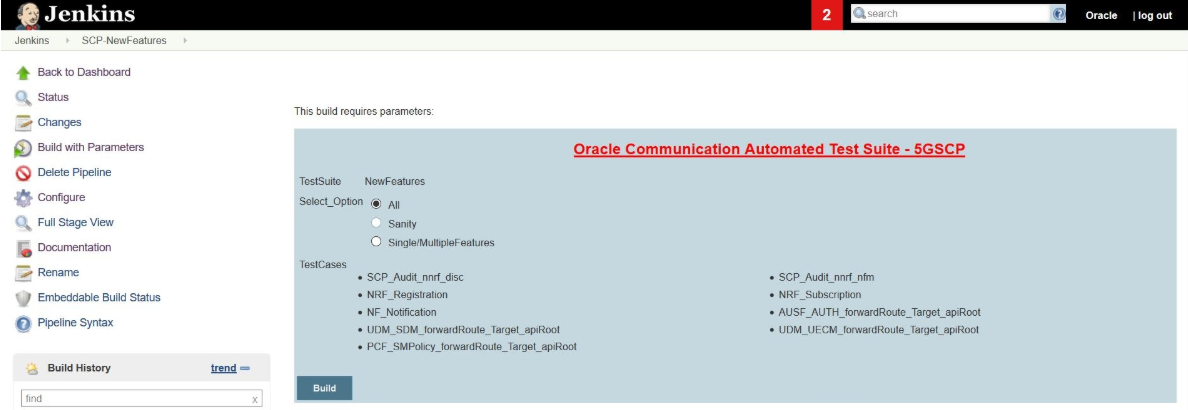 In the above screen, there are three Select_Option(s), which are:
- All: By default, all the SCP test cases are
selected for execution. User just need to scroll down and click
Build to execute all the test cases.
Note:
There is an exception to All option. Test cases, SCP_Audit_nnrf_disc and SCP_Audit_nnrf_nfm are based on the input provided for AUDITINTERFACE parameter and NRF_Registration test case executes only if SCPREGISTRATION flag is set to true in input parameters of configure pipeline. - Sanity: This option is NOT AVAILABLE for SCP.
- Single/MultipleFeatures: This option allows you to select any number of test cases that you want to execute from the list of total test cases available for execution. After selecting the test cases, scroll-down and click Build. The selected SCP test cases are executed.
- All: By default, all the SCP test cases are
selected for execution. User just need to scroll down and click
Build to execute all the test cases.
NewFeatures - Documentation
Figure 4-43 SCP-NewFeatures Documentation
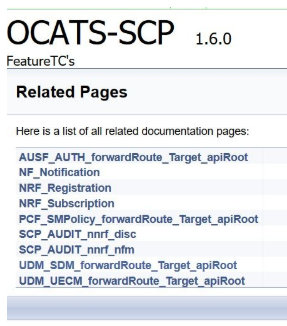
Figure 4-44 Sample: SCP Functionality

Figure 4-45 Build Requires Parameters in sync with Documentation
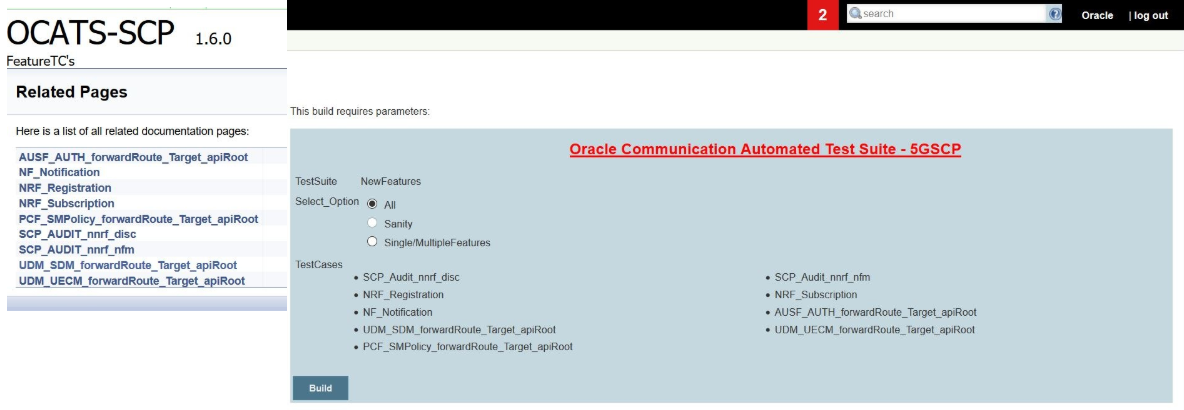
In the above screen, you can notice that the initials of test cases are similar to the functionalities listed in the contents of Documentation screen.
SCP-Regression Pipeline
This pre-configured pipeline has all the test cases of previous releases. As this is the first release of SCP-ATS, this pipeline does not show any previous release testcases.