3 NF ATS Installation Procedure
- NRF
- PCF
- SCP
NRF ATS Installation Procedure
- Locating and downloading ATS and Simulator Images
- Deploying ATS and Stub Pod in K8s Cluster as per NRF
Locating and Downloading ATS Images
The steps to locate and download ATS Images are as follows:
- Login to My Oracle Support using the appropriate credentials.
- Select Patches & Updates tab.
- In Patch Search console, select Product or Family (Advanced) tab.
- Enter Oracle Communications Cloud Native Core - 5G in Product field and select the product from the Product drop-down.
- Select Oracle Communications Cloud Native Core Network Repository Function <release_number> in Release field.
- Click Search. The Patch Advanced Search Results list appears.
- Select the required ATS patch from the list. The Patch Details window appears.
- Click on Download. File Download window appears.
- Click on the <p********_<release_number>_Tekelec>.zip file.
- Extract the ATS release package zip file to download the ATS images to the system where network function must be installed.
- The
ocats-nrfdirectory has following files:ocats-nrf-tools-pkg-1.6.1.0.0.tgzocats-nrf-tools-pkg-1.6.1.0.0-README.txt
- The
ocats-nrf-tools-pkg-1.6.1.0.0-README.txtfile contains all the information required for the package. - The
ocats-nrf-tools-pkg-1.6.1.0.0.tgzfile has following images and charts packaged as tar files:ocats-nrf-tools-pkg-1.6.1.0.0.tgz | |_ _ _ocats-nrf-pkg-1.6.1.0.0.tgz | |_ _ _ _ _ _ ocats-nrf-1.6.1.tgz (Helm Charts) | |_ _ _ _ _ _ ocats-nrf-image-1.6.1.tar (Docker Images) | |_ _ _ _ _ _ Readme.txt | |_ _ _ocstub-python-pkg-1.6.1.0.0.tgz |_ _ _ _ _ _ ocstub-1.6.1.tgz (Helm Charts) |_ _ _ _ _ _ ocstub-python-image-1.6.1.tar (Docker Images) |_ _ _ _ _ _ Readme.txt - The user can copy the tar file from here and copy in their OCCNE/ OCI/k8s cluster where they want to deploy ATS.
Deploying ATS in K8s Cluster
The steps to deploy ATS in K8s Cluster are as follows:
- Execute the following command to extract tar file
content.
tar -xvf ocats-nrf-tools-pkg-1.6.1.0.0.tgzThe output of this command is:
ocats-nrf-pkg-1.6.1.0.0.tgzocstub-python-pkg-1.6.1.0.0.tgz - Execute the given command to extract final helm
charts and docker images of ATS.
tar -xvf
							ocats-nrf-pkg-1.6.1.0.0.tgz
The output of this command is:
ocats-nrf-image-1.6.1.tarocats-nrf-1.6.1.tgzReadme.txt - In your cluster, load the ATS image, '
ocats-nrf-image-1.6.1.tar' and push to your registry.docker load -i ocats-nrf-image-1.6.1.tar - Untar the helm charts,
ocats-nrf-1.6.1.tgztar -xvf ocats-nrf-1.6.1.tgz - Update the image name and
tag in the
ocats-nrf/values.yamlfile as required.For this, you need to open the
values.yamlfile and update theimage.repositoryandimage.tag - Deploy ATS using the updated helm charts after
performing the previous step
5.
helm install ocats-nrf --name <release_name> --namespace
							<namespace_name> -f ocats-nrf/values.yaml
For example:
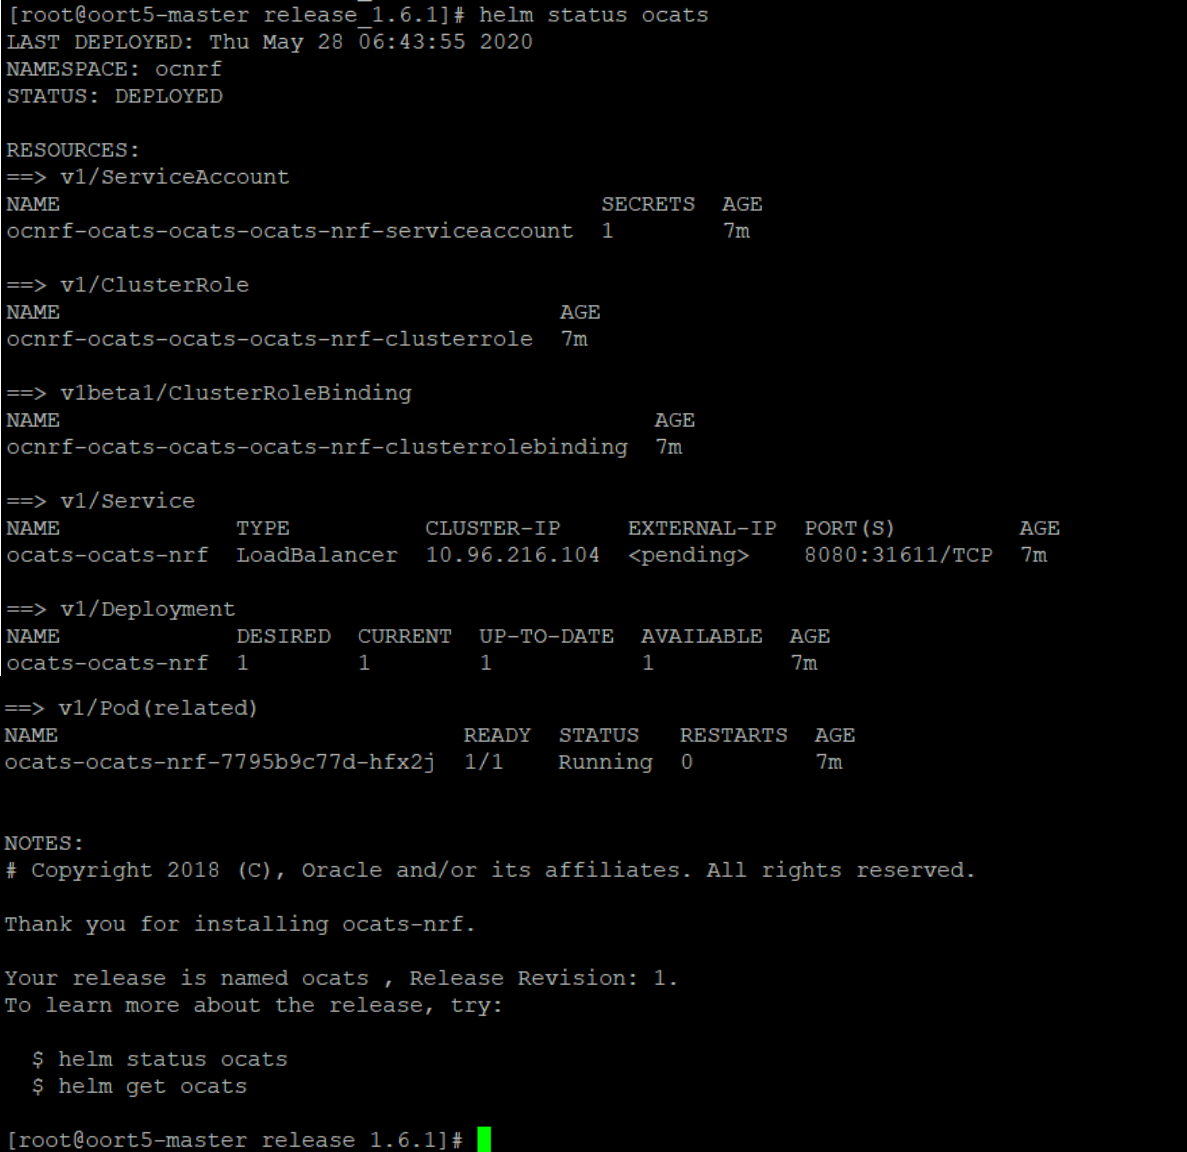
helm install ocats-nrf --name ocats --namespace ocnrf -f ocats-nrf/values.yaml - Verify ATS deployment by executing the following
command.
helm status
							<release_name>
Figure 3-1 Checking ATS Deployment
Deploying Stub Pod in K8s Cluster
The steps to deploy Stub Pod are as follows:
- Execute the command to extract ocstub tar file
content.
tar -xvf ocstub-python-pkg-1.6.1.0.0.tgzThe output of this command is:
ocstub-python-image-1.6.1.tarocstub-python-1.6.1.tgzReadme.txt - In your cluster, load the STUB image,
ocstub-python-image-1.6.1.tarand push to your registry.docker load -i ocstub-python-image-1.6.1.tar - Untar the helm charts,
ocstub-python-1.6.1.tgz.tar -xvf ocstub-python-1.6.1.tgz - Update the image name and
tag in
ocstub/values.yamlfile as required.Open the values.yaml file and update the
image.repositoryandimage.tag - Deploy Stub
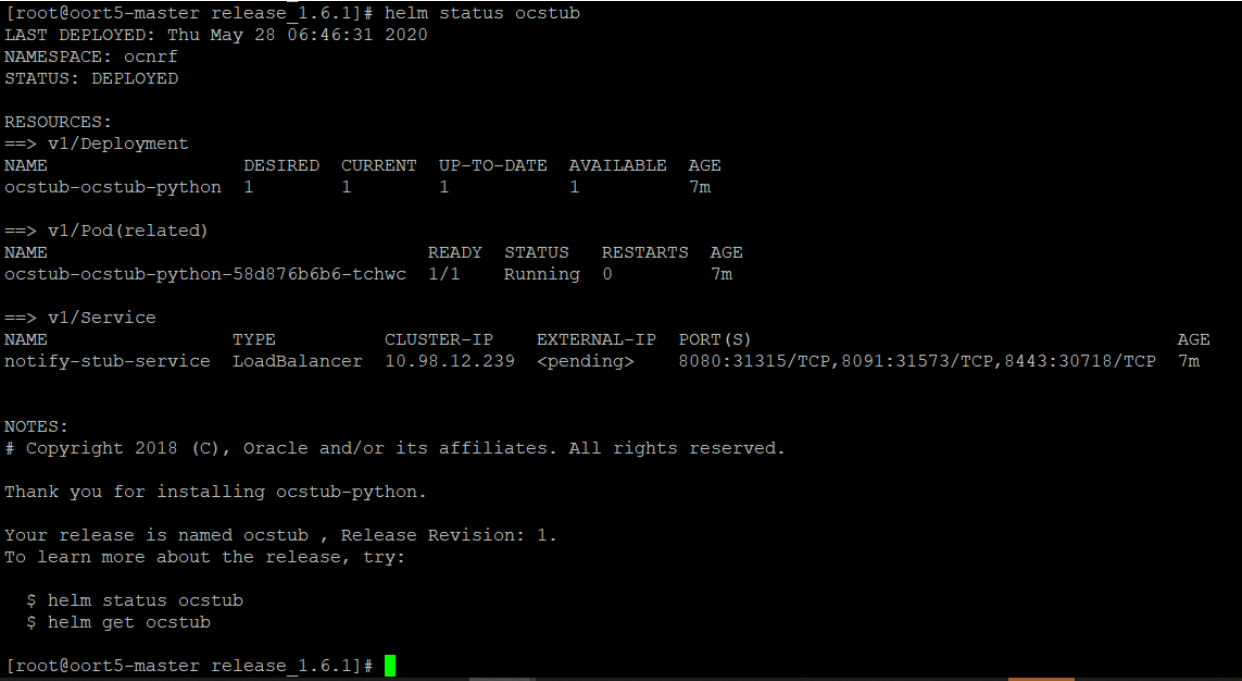
helm install
							ocstub-python --set service.name=<stub-service-name> --name
							<release_name> --namespace <namespace_name> -f
							ocstub-python/values.yaml
For example:helm install ocstub-python --set service.name=notify-stub-service --name ocstub --namespace ocnrf -f ocstub/values.yamlNote:
In this version of ATS, you are provided with SLF and Forwarding functionality cases of NRF, which requires two STUBS to be deployed in the related scenarios. The service name can be updated using the above command. The service name for the STUBS must be "notify-stub-service" and "notify-stub-service02". - Check the Stub deployment using given command.
helm
							status <release_name>
Figure 3-2 Checking Stub Helm Release
PCF ATS Installation Procedure
The PCF ATS installation procedure covers two steps:
- Locating and downloading the ATS images.
- Deploying ATS images.
Note:
The Nrf-client pod of PCF has been restarted for UDR and CHF discovery as part of each test case.Locating and Downloading ATS Images
The steps to locate and download ATS Images are as follows:
- Login to My Oracle Support using the appropriate credentials.
- Select Patches & Updates tab.
- In Patch Search console, select Product or Family (Advanced) tab.
- Enter Oracle Communications Cloud Native Core - 5G in Product field and select the product from the Product drop-down.
- Select Oracle Communications Cloud Native Core Policy <release_number> in Release field.
- Click Search. The Patch Advanced Search Results list appears.
- Select the required ATS patch from the list. The Patch Details window appears.
- Click on Download. File Download window appears.
- Click on the <p********_<release_number>_Tekelec>.zip file.
- Extract the ATS release package zip file to download the ATS images to the system where network function must be installed.
- The
ocats-pcfdirectory has following files:ocats-pcf-tools-1.1.0.0.0.tgz - The
ocats-pcf-tools-1.1.0.0.0.tgzfile has following images and charts packaged as tar files:ocats-pcf-tools-1.1.0.0.0.tgz | |_ _ _ocats-pcf-pkg-1.1.0.0.0.tgz | |_ _ _ _ _ _ ocats-pcf-1.1.0.tgz (Helm Charts) | |_ _ _ _ _ _ ocats-pcf-images-1.1.0.tar (Docker Images) | |_ _ _ocstub-pkg-1.1.0.0.0.tgz |_ _ _ _ _ _ ocstub-go-1.1.0.tgz(Helm Charts) |_ _ _ _ _ _ ocstub-go-image-1.0.0.tar (Docker Images) - The user can copy the tar file from here to their K8s cluster where, they want to deploy ATS.
Deploying ATS in K8s Cluster
- Execute the following command to extract the tar
file content.
tar -xvf
								ocats-pcf-tools-1.1.0.0.0.tgz
The output of this command is:
ocats-pcf-pkg-1.1.0.0.0.tgzocstub-pkg-1.1.0.0.0.tgz - Go to the
ocats-pcf-tools-1.0.0.0.0folder and execute the given command to extract final helm charts and docker images of ATS.tar -xvf ocats-pcf-pkg-1.1.0.0.0.tgzThe output of this command is:
ocats-pcf-1.1.0.tgzocats-pcf-images-1.1.0.tar - In your cluster, execute the given command to load
the ATS image.
docker load --input ocats-pcf-images-1.1.0.tar - Execute the following commands to tag and push the ATS
images
docker tag ocatspcf:1.1.0 <registry>/ocatspcf:1.1.0
	  docker push <registry>/ocatspcf:1.1.0
Example:
docker tag ocatspcf:1.1.0 localhost:5000/ocatspcf:1.1.0 docker push localhost:5000/ocatspcf:1.1.0 - Untar the helm charts,
ocats-pcf-1.1.0.tgztar -xvf ocats-pcf-1.1.0.tgz - Update the image name and
tag in the
ocats-pcf/values.yamlfile as required.For this, you need to open the
values.yamlfile and update theimage.repositoryandimage.tag - Deploy ATS using the updated helm charts after
performing the previous step 5.
helm install
								<chart_directory> --name <release_name> --namespace
								<namespace_name> -f <custom_values_filename>
For example:
helm install ocats-pcf --name ocats --namespace ocpcf -f ocats-pcf/values.yaml - Verify ATS deployment by executing the given
command.
helm status
								<release_name>
Figure 3-3 Helm Status

Deploying Stub Pod in K8s Cluster
The steps to deploy Stub Pod in K8s cluster are as follows:
- Go to the
ocats-pcf-tools-1.1.0.0.0folder and execute the command to extract the ocstub tar file content.tar -xvf ocstub-pkg-1.1.0.0.0.tgzThe output of this command is:
ocstub-1.1.0.tgzocstub-go-image-1.0.0.tar - In your cluster, execute the following command to
load the STUB image and then, push it to your registry.
docker load --input ocstub-go-image-1.0.0.tar - Untar the helm charts,
ocstub-go-1.1.0.tgz.tar -xvf ocstub-go-1.1.0.tgz - Update the registry name, image name and tag (if
required) in the
ocstub/values.yamlfile as required.Open the values.yaml file and update the
image.repositoryandimage.tag - Deploy Stub.
 helm install
							<chart_directory> --set service.name=<service_name> --name
							<release_name> --namespace <namespace_name> -f
							<custom_values_filename>
For example:
helm install ocstub-go --set service.name=nf1stub --name nf1stub --namespace ocats -f ocstub-go/values.yaml - Similarly, execute the following commands to
install all the stubs.
helm install ocstub-go
							--set service.name=nf2stub --name nf2stub --namespace ocats -f
							ocstub-go/values.yaml
helm install ocstub-go --set service.name=nf3stub --name nf3stub --namespace ocats -f ocstub-go/values.yamlFigure 3-4 Stub - Check Helm Status

- Execute the following command to check the Stub
deployment.
helm status
							<release_name>
A sample screen showing stubs deployment is given below:
Figure 3-5 Stubs After Installation

Figure 3-6 Sample Screen: PCF Namespace with PCF and ATS after Installation

SCP ATS Installation Procedure
The SCP ATS installation procedure covers two steps:
- Locating and downloading the ATS images.
- Deploying ATS images.
Locating and Downloading ATS Images
To locate and download ATS Images:
- Login to My Oracle Support using the appropriate credentials.
- Select Patches & Updates tab.
- In Patch Search console, select Product or Family (Advanced) tab.
- Enter Oracle Communications Cloud Native Core - 5G in Product field and select the product from the Product drop-down.
- Select Oracle Communications Cloud Native Core Service Communication Proxy <release_number> in Release field.
- Click Search. The Patch Advanced Search Results list appears.
- Select the required ATS patch from the list. The Patch Details window appears.
- Click on Download. File Download window appears.
- Click on the <p********_<release_number>_Tekelec>.zip file.
- Extract the ATS release package zip file to download the ATS images to the system where network function must be installed.
- The
ocats-scpdirectory has a following files:ocats-scp-pkg-1.9.0.0.0.tgz ocats-scp-pkg-1.9.0.0.0-readme.txt ocats-scp-custom-configtemplates-1.9.0.0.0.zip ocats-scp-custom-configtemplates-1.9.0.0.0-readme.txtNote:
Theocats-scp-custom-configtemplates-1.9.0.0.0-readme.txtfile contains all the information required for the package.Theocats-scp-pkg-1.9.0.0.0.tgzfile has following images and charts packaged as tar files:ocats-scp-pkg-1.9.0.0.0.tgz | |_ _ _ocats-scp-pkg-1.9.0.0.0.tgz | |_ _ _ _ _ _ ocats-scp-1.9.0.tgz (Helm Charts) | |_ _ _ _ _ _ ocats-scp-images-1.9.0.tar (Docker Images) | |_ _ _ _ _ _ Readme.txtTheocats-scp-custom-configtemplates-1.9.0.0.0.zipfile has following images and charts packaged as tar files:ocats-scp-custom-configtemplates-1.9.0.0.0.zip |_ _ _ _ _ _ ocats-scp-custom-serviceaccount-1.9.0.yaml (Template to create custom service account) |_ _ _ _ _ _ ocats-scp-values-1.9.0.yaml (Custom values file for installation) |_ _ _ _ _ ocats-scp-tests-jenkinsjobs.tgz (ocscp_tests and jenkins jobs folder to be copied if persistent volume is deployed)The user can copy the tar file from here to their kubernetes cluster where, they want to deploy ATS.
Deploying ATS in Kuberbetes Cluster
Note:
Deploy ATS and SCP in the same namespace.Note:
ATS is deployed with role binding by default instead of cluster role binding.- Execute the following command to
extract the tar file content:
tar -xvf
                                ocats-scp-pkg-1.9.0.0.0.tgz
The output of this command is:ocats-scp-1.9.0.tgz ocats-scp-images-1.9.0.tar Readme.txtThe
ocats-scp-images-1.9.0.tarfile contains ocats-scp:1.9.0 (ATS Image) and ocats-gostub:1.9.0 (stub image). - In your cluster, execute the given command to load the ATS image
and then, push it to your registry:
docker load
                                --input ocats-scp-images-1.9.0.tar
docker tag ocats/ocats-scp:1.9.0 <local_registry>/ocats/ocats-scp:1.9.0docker push <local_registry>/ocats/ocats-scp:1.9.0 - Execute the following command to extract the zip file
content:
Unzip "ocats-scp-custom-configtemplates-1.9.0.0.0.zip"The output of this command is:ocats-scp-values-1.9.0.yaml ocats-scp-custom-serviceaccount-1.9.0.yaml ocats-scp-tests-jenkinsjobs.tgz - Update the image name and tag in the
ocats-scp-values-1.9.0.yaml file as required:
For this, you need to open the
ocats-scp-values-1.9.0.yamlfile and update theimage.repositoryandimage.tag - ATS supports static port. By default, this feature is not
available. To enable this feature:
- In the ocats-scp-values-1.9.0.yaml file under service section, set the value of staticNodePortEnabled parameter as true and provide a valid nodePort value for staticNodePort.
- A sample screen is given below:
Figure 3-7 ocats-scp-values-1.9.0.yaml- service section

Note:
You can enable static node port at the time of deployment. - Add an appropriate value for the serviceMeshCheck parameter. Its value depends on whether ATS needs to be executed with aspen mesh or not.
- To enable persistence storage, customer should create a PVC and associate
the same to the ATS pod. The steps to enable persistent storage are:
- Set PVEnabled flag to true.
- Set PVClaimName to PVC that user has created for
ATS.
deployment:
  customExtension:
    labels: {}
    annotations: {}
  PVEnabled: true
  PVClaimName: "ocats-scp-1.9.0-pvc"
For more details on Persistent Volume Storage, you can refer to unresolvable-reference.html#GUID-5A0F28BE-DBA8-4123-8806-7D8FD68CBAE1.
- Update the lbDeployments section of the helm deployment
file in SCP ATS with the following annotations, wherein
- 8091 port is added to fetch soothsayer pod metrics
traffic.sidecar.istio.io/excludeOutboundPorts:
                                        "8091"
Note:
This point is applicable only if you are planning to test ATS with service mesh. Also, do not modify this port.
- 8091 port is added to fetch soothsayer pod metrics
- Execute the following command to
deploy ATS:
Using Helm 2:
helm install
                                ocats-scp-1.9.0.tgz --name <release_name> --namespace
                                <namespace_name> -f ocats-scp-values-1.9.0.yaml
Example:
helm install ocats-scp-1.9.0.tgz
                                --name ocats-scp --namespace scpsvc-f
                                ocats-scp-values-1.9.0.yaml
Using Helm 3:
helm3 install <release_name>
                                ocats-scp-1.9.0.tgz -n <namespace_name> -f
                                ocats-scp-values-1.9.0.yaml
Example:
helm3 install ocscp-ats ocats-scp-1.9.0.tgz -n scpsvc -f
                                ocats-scp-values-1.9.0.yaml
Note:
If there are two Helm versions on your system then, specify the version number in the Helm commands. If there is only one Helm version then there is no need to mention the version number. - Verify ATS deployment by executing
the given command:
helm3 status
                                <release_name> -n <namespace_name>
The following sample screen checks ATS helm release.Note:
If ATS is deployed in service mesh environment, the Ready field for pods shows 2/2.Figure 3-8 Checking ATS Helm Release

Figure 3-9 Helm Status Image
