3 Deploying NFs in OCI
The following diagram represents the process for NF deployment in OCI:
Figure 3-1 Process for NF deployment in OCI

The User must perform the given procedures to deploy the NF:
- Ensure the OCI tenancy is available.
- Create an infrastructure layer along with the components. To create an infrastructure layer, see Creating OCI Infrastructure.
- Create Admin and Non-Admin User Groups. To create User and User Groups, see Creating OCI User Management.
- Deploy the OCI Adaptor. The Adaptor acts as a channel to transfer information between the application and OCI observability management. To deploy the OCI Adaptor, see Deploying OCI Adaptor.
- Configure OCI Observability and Management. You can observe analytics and performance through OCI Observability and Management. To configure the OCI Observability and Management, see Configuring OCI Observability and Management.
- Deploy the CNC NFs.
Prerequisites
Before installing and configuring OCI Adaptor, ensure the following:
- The user has OCI tenancy.
- The user has tenancy-admin access.
- A tenancy-admin user runs the Terraform Stack, which is responsible for creating the infrastructure and deploying OCI Adaptors.
OCI Adaptor Resource Requirements
Table 3-1 Consolidated Resource Profile for OCI Adaptor Deployment
| Resource Requirement | Service | |
|---|---|---|
| Min | Max | |
| CPU | 500m | 800m |
| Memory | 1.5Gi | 2.5Gi |
| Ephemeral Storage | 400Mi | 400Mi |
Table 3-2 Resource Profile for OCI Adaptor
| Service Name | CPU | Memory (GB) | POD | Ephemeral Storage | ||||
| Min | Max | Min | Max | Min | Max | Min | Max | |
| oci-adaptor-opentelemetry-collector-agent | 100m | 100m | 500Mi | 500Mi | 1 | * | 100Mi | 100Mi |
| oci-onm-mgmt-agent-0 | 200m | 500m | 500Mi | 1Gi | 1 | 1 | 100Mi | 100Mi |
| sepp-oci-adaptor-logan-8g9fl | 100m | 100m | 250Mi | 500Mi | 1 | * | 100Mi | 100Mi |
| metric-server | 100m | 100m | 250Mi | 500Mi | 1 | 1 | 100Mi | 100Mi |
| Total | 500m | 800m | 1.5Gi | 2.5Gi | 4 | NA | 400Mi | 400Mi |
- * Both OTEL Collector and Fluentd logan are deployed as a daemonset. Thus, the maximum number of pods depends on the number of worker nodes in any cluster.
Terraform Scripts for OCI Deployment
Terraform is an Infrastructure as Code (IaC) tool that allows users to build, change, and version the cloud and on-premise resources safely and efficiently. Following are the Terraform Scripts (Infrastructure Automation Script) provided to automate the OCI deployment steps:
- ocociadaptor_csar_<version>.zip
This package is in the standard CSAR format and contains the Terraform scripts to create the OCI infrastructure and deploy OCI Adaptors. It also includes OCI Adaptor images and Helm charts.
The package is available to download on MOS. Users cannot upload the CSAR package directly to OCI's Resource Manager stack. Therefore, unzip the CSAR package to extract the Terraform scripts and then upload the scripts to the resource manager stack. Within the scripts directory, the following Terraform scripts are present:
For more information on how to download, contact MOS.
- ocociadaptor_infra_create_<version>.zip
This package contains the Terraform scripts responsible for creating the infrastructure.
- ocociadaptor_install_<version>.zip
This package contains the Terraform scripts, Helm charts, and Shell scripts to deploy the OCI Adaptors. Administrators can directly upload this package as the OCI's Resource Manager Stack and deploy the OCI Adaptors.
Note:
The package is available for download at MOS. - ocociadaptor_infra_create_<version>.zip
Installation Sequence
This chapter provides information about deploying the NFs in the OCI environment.
Creating Identity Domain
This section explains how to create the identity domain.
An identity domain is a container for managing users and roles, federating and provisioning users, secure application integration through Oracle Single Sign-On (SSO) configuration, and SAML or OAuth-based Identity Provider administration. It represents a user population in Oracle Cloud Infrastructure and its associated configurations and security settings.
Note:
You can use the default domain or create a new domain (recommended).- Log in to the OCI Console.
For more information, see the "Signing In to the OCI Console" section in Oracle Cloud Infrastructure Documentation.
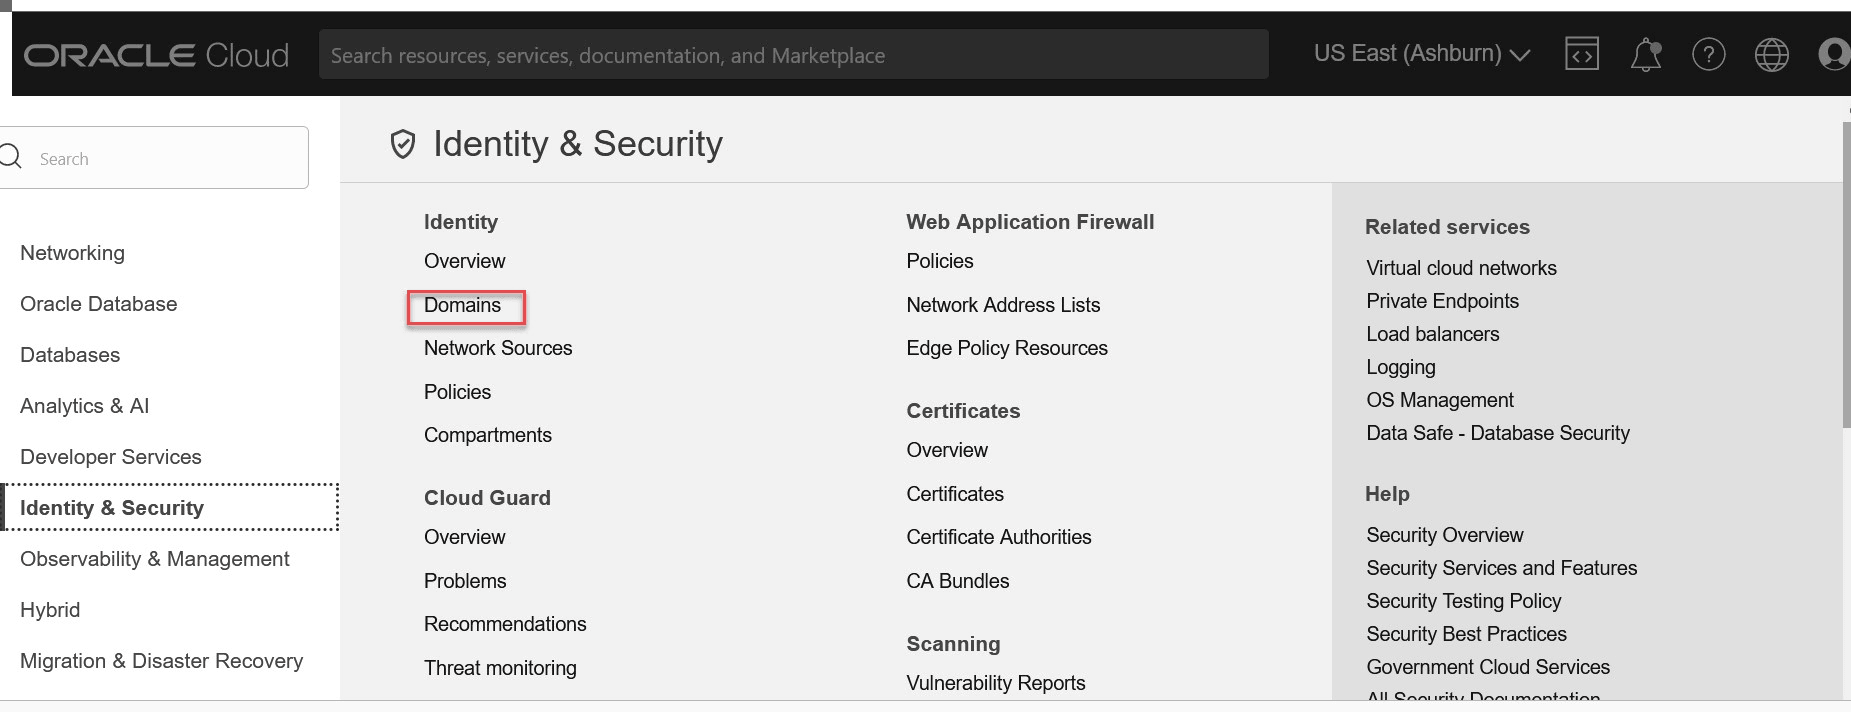
- Open the navigation menu and select Identity and Security. The Identity and Security page appears.
- Under Identity, select Domains. The Domains
page appears.
Figure 3-2 Identity Domain

- Click Create Domain on the right pane.
- On the Create Domain page, assign a name to the domain and enter a description.
- Select Free in Domain Type.
- Enter the details of the Identity Domain Administrator and select the Compartment.
- Click Create Domain.
Creating OCI Infrastructure
Note:
- This procedure creates one OKE Cluster, and all the necessary platform components required to run OCI Adaptor and CNC NFs.
- To create the Oracle Cloud Infrastructure (OCI), it is recommended that first-level subcompartments be created in the root compartment. The creation of OCI infrastructure at the second-level subcompartment is not supported.
- Use the terraform tool to set up the necessary infrastructure
components, including the OKE Cluster, Bastion Service, Compartment,CLI
Server, and Virtual Cloud Network (VCN). Run the appropriate
version-specific script
(ocociAdaptor_infra_create_<version>.zip). - The terraform script does not create the Network Load Balancers (NLB), Dynamic Routing Gateways (DRG), and Remote Peering Connections (RPC). You must create the NLB, DRGs, and RPCs manually.
- Log in to the OCI Console.
For more information, see the "Signing In to the OCI Console" section in Oracle Cloud Infrastructure Documentation.
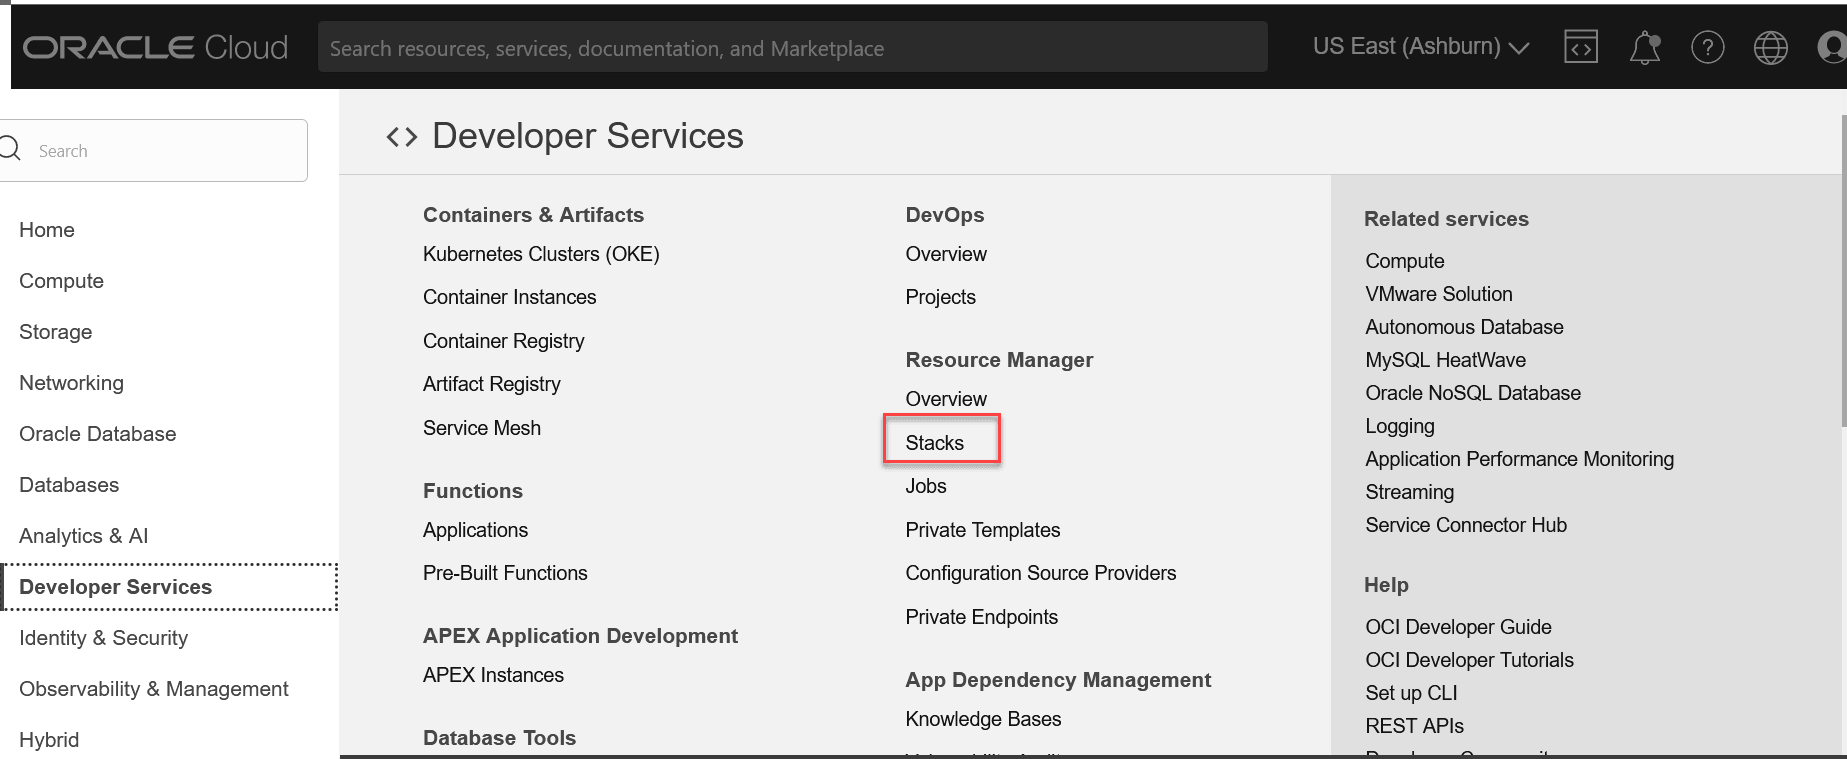
- Open the navigation menu and select Developer Services. The Developer Services window appears in the right pane.
- In Developer Services, select Resource Manager.
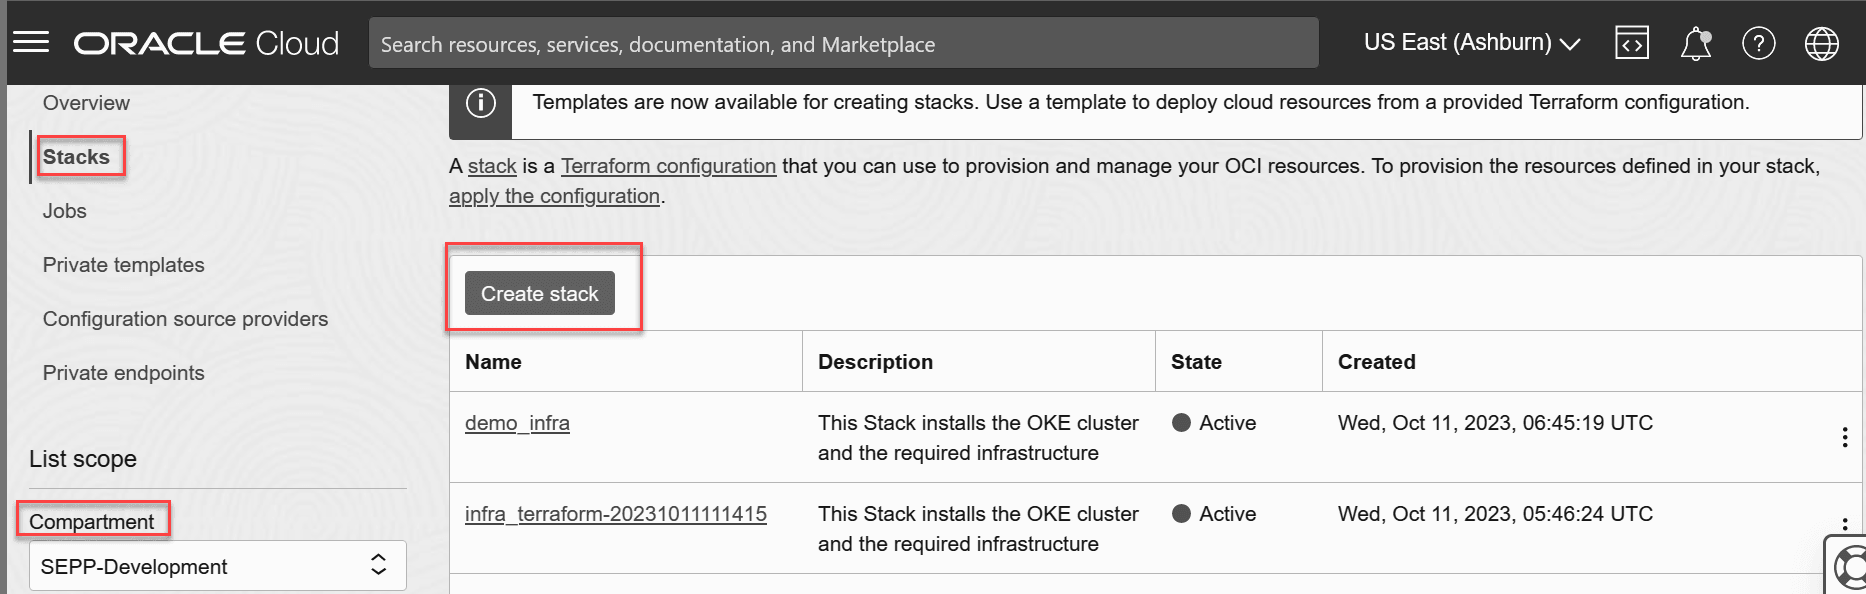
- Under Resource Manager, select Stacks.
Figure 3-3 Create Stack

- In the stack window, select Compartment.
- Click Create stack on the right pane.
Figure 3-4 Create Stack
- Click the default My configuration radio button.
- Under Stack configuration, select the .Zip file radio
button and upload the ocociadaptor_infra_create_<version>.zip
file.
Figure 3-5 Stack Configuration

- Enter the Name and Description and select the compartment.
- Click Next. The Edit stack screen appears.
- Enter the required inputs to create the infrastructure layer
components and click Save and Run apply.
The inputs required are as follows:
- Create Stack
- Name: Enter the name of the Stack.
- Description: Provide a description for your stack.
- Compartment: Specify the compartment name.
- Terraform (Select the latest one).
-
Tenancy Configuration
- Identity Domain Name: Enter the domain name.
- Tenancy Home Region Identifier: Home
Region Identifier of the tenancy. Eg - us-ashburn-1.
For more information, see the "Regions and Availability Domains" section in Oracle Cloud Infrastructure Documentation.
- Enclosing Compartment ID: Specify the ID of the parent compartment.
- Compartment Name: Create a new compartment or select an existing one.
- Compartment tag Namespace: Enter an alphanumeric string to tag your instance.
- Identity Domain URL: Enter the Identity Domain URL where the dynamic groups are to be created. For more information, see the Getting Identity Domain URL.
- VCN Configuration
- VCN Name: Enter the name of your Virtual Cloud Network (VCN).
- CIDR Block: Provide the CIDR (Classless Inter-Domain Routing) block for your VCN.
- Cluster Configuration
- Cluster Name: Enter the name of your OKE Cluster.
- Kubernetes Version: Specify the version of Kubernetes you are using.
- Node Pool Size: Set the size of your Node Pool.
- Node Pool Shape: Choose the shape of your Node Pool.
- Node Pool Image: Select the image for your Node Pool.
- OCPUs: Define the number of Oracle CPUs.
- Memory (GB): Input the memory capacity.
- Node Pool Boot Volume Size: Set the boot volume size for the Node Pool.
- Public Key: Enter the public key.
- CLI Server Configuration
- Public Key: Enter the public key.
- Private Key: Enter the private key.
- Create Stack
- After entering the values, user needs to click next and then click save changes button.
- Plan and apply the terraform stack and it will create the required infrastructure.
Note:
TheRun apply option
is provided along with saving the stack itself, but it is recommended to first execute
plan on your stack and then apply it.
Note:
Important:- To use the OKE Cluster created as a part of the OCI infrastructure
and to deploy the OCI Adaptor, install the following components in the CLI
Server:
kubectlHelm
- Select the kubectl version based on the Kubernetes version installed in the OKE cluster.
Creating OCI User Management
This section describes how to create the users. User and Groups must be created manually. The users can be created and grouped together.
The Tenancy Admin is responsible for creating
Compartment Admins and other users and user
groups.
Note:
Now the infrastructure creation terraform can be executed by bothTenancy Admin and
Compartment Admins.
To enable Compartment Admin, create infrastructure
using provided terraform. Following polices needs to applied on the
Compartment Admins User Groups.
- Allow group
<DOMAIN_NAME>/<COMPARTMENT_ADMIN_USER_GROUP>to manage all-resources in compartment<COMPARTMENT_NAME>. - Allow group
<DOMAIN_NAME>/<COMPARTMENT_ADMIN_USER_GROUP>to manage dynamic-groups in tenancy wheretarget.resource.domain.name=<DOMAIN_NAME>.
Creating User Groups
This section describes the steps to create the user groups.
- Log in to the OCI Console.
For more information, see the "Signing In to the OCI Console" section in Oracle Cloud Infrastructure Documentation.
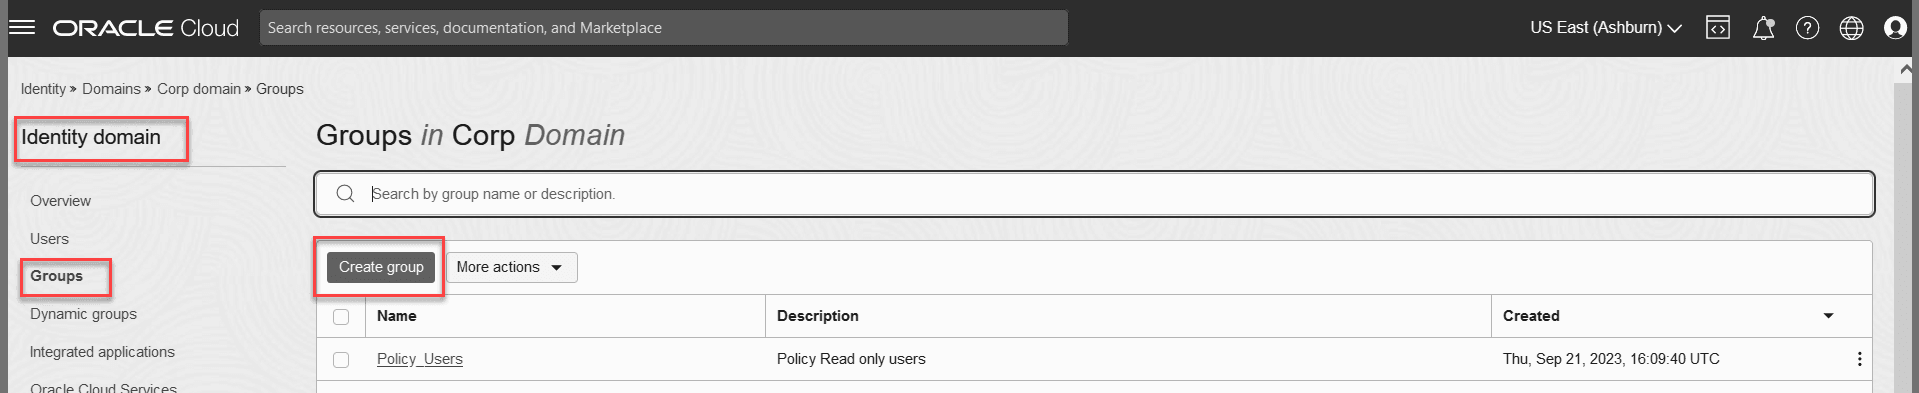
- Open the navigation menu and click Identity and Security. Under Identity, click Domains.
- Select the Identity Domain that you want to work in. Change the compartment to find the required domain. Then, click Groups.
- Click Create Group.
In the Name and Description fields on the Create Group window, enter the Name and Description about the group.
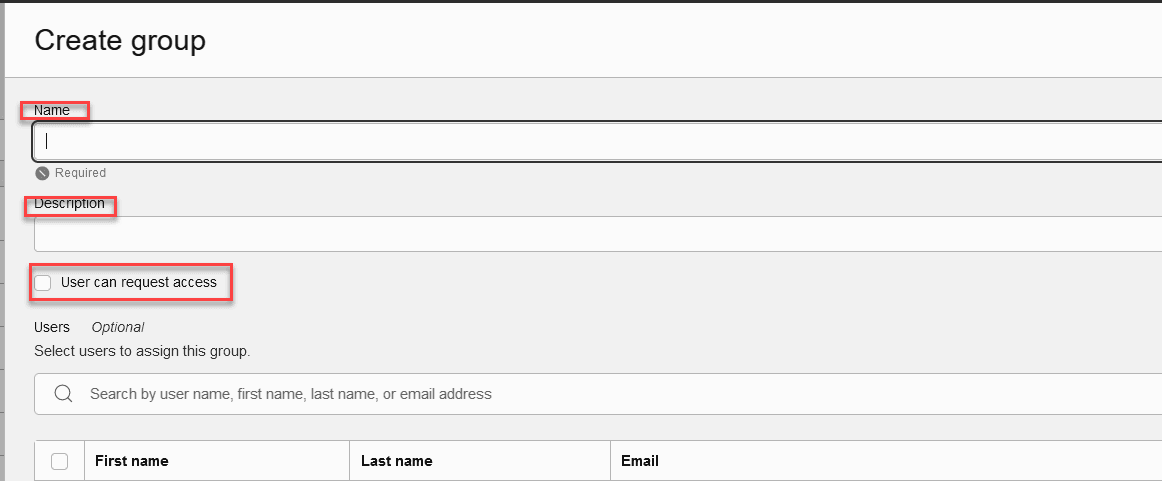
- To allow users to request access to this group, select User can request access.
- To add users to the group, select the check box for each user that you want to add to the group.
- Click Create.
The User Group is created.
Creating the User
The following are the steps to create a user account for a user in an OCI IAM identity domain:
- Open the navigation menu and click Identity and Security. Under
Identity, click Domains.
- Select the Identity domain that you want to work in. Change the
compartment to find the required domain. Then, click Groups.
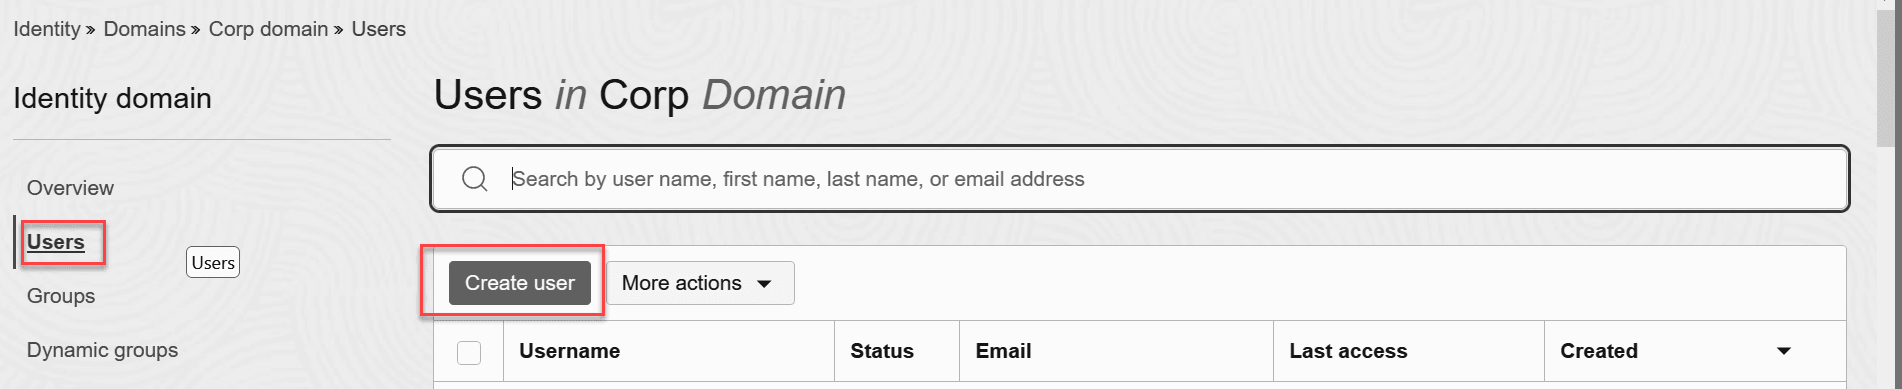
- Click Create user.

- In the First name and Last name fields, enter the user’s name.
- To sign in using email address, follow the following steps:
- In the Username or Email field, enter the email address for the user account.
- Leave the Use the email address as the username check box selected.
- Alternatively, to sign in with the username, follow the steps below:
- In the Username or Email field, enter the username.
- Clear the Use the email address as the username check
box.
The following characters are allowed in the Username or Email field:
- a-z
- A-Z
- 0-9
- Special characters! @ # $ % ^ & * ( ) _ + = - { } [ ] | \ : " ' ; < > ? / . ,
- Blank spaces
- In the Email field, enter the email address.
- To assign the user to a group, select the check box for each group that you want to assign to the user account.
- Click Create. The user account is created.
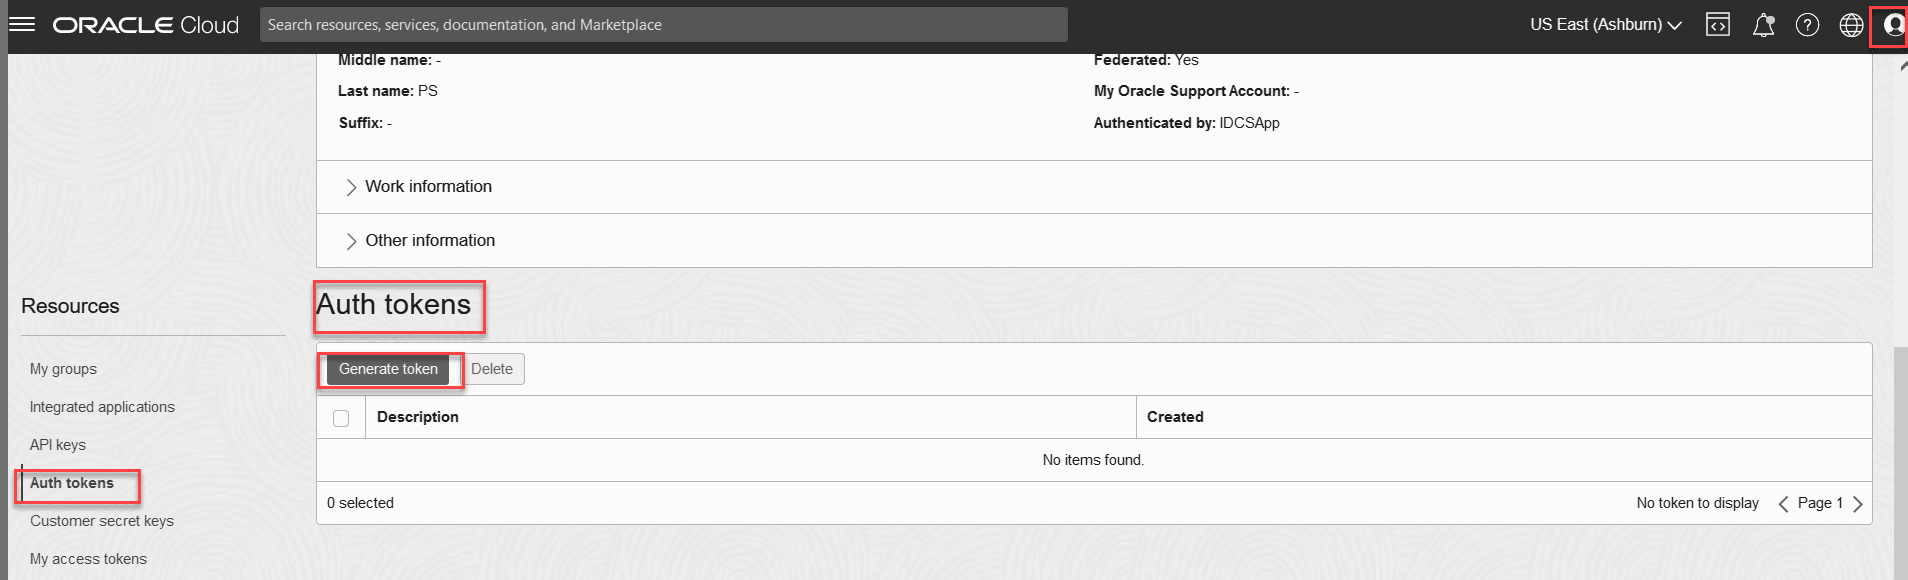
Creating the Auth Token to be Used as Registry Password
This section describes how to create the Auth token to be used as registry password.
- Log in to the OCI console.
For more information, see "Signing In to the OCI Console" section in Oracle Cloud Infrastructure Documentation.
- Click User on the top right corner.
- Click My profile.
- Click Auth tokens.
- Click Generate token.
Figure 3-6 Create Auth Token
- Enter the Description.
- Click Generate token.
Note:
Copy the generated token. Ensure to preserve that as that will not be displayed again.Deploying OCI Adaptor
This section describes how to deploy the OCI Adaptor.
Create the OCI Adaptor components, which are the Fluentd, Management Agent
(Management agent, Scrape Target Discovery Container, and Metrics Server), and OTEL
Collector. This step is automated using the
Terraformoci_adaptor_install_<version>.zip.
Following are the steps to create the components of the OCI Adaptor:
- Move all the tar files in the file's directory of
ocociadaptor_csar_<version>.zipfile to operator instance at /home/<OPERATOR_USER>/oci_adaptor. Create the path if it does not exist.Note:
Since the operator instance is only accessible from Bastion Host, the user needs to copy the tar files to the Bastion Host first, and then from the Bastion Host to the operator instance. The private key to access Bastion Host and operator instance will be the same. - Log in to the OCI Console.
Note:
For more details about logging in to the OCI, refer to Signing In to the OCI Console. - Open the navigation menu and select Developer Services. The Developer Services window appears in the right pane.
- Under the Developer Services, select Resource Manager.
- Under Resource Manager, select Stacks. The Stacks window
appears.
Figure 3-7 Developer Services
- Click Create Stack.
Figure 3-8 Create Stack

- Select the default My Configuration radio button.
- Under Stack configuration, select the .zip file radio button and
upload the
oci_adaptor_install_<version>.zipfile.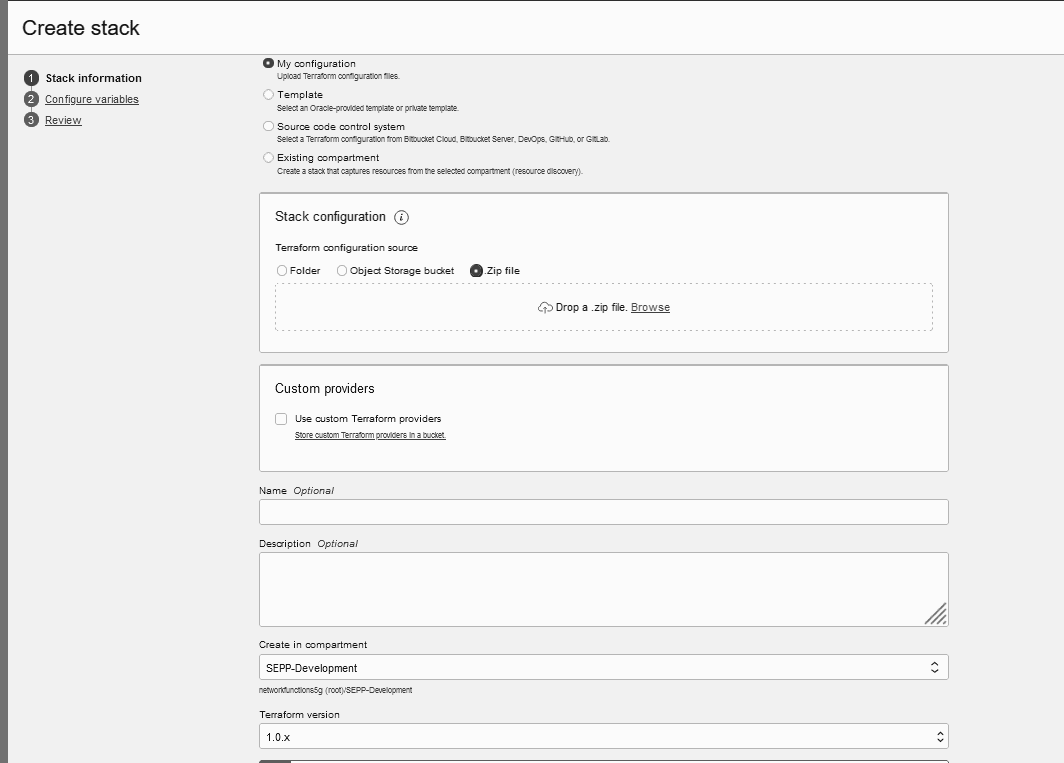
- Enter the Name and Description and select the compartment.
- Select the latest Terraform version from the Terraform version drop-down.
- Click Next. The Edit Stack screen appears.
- Enter the required inputs to create the infrastructure layer components and click Save and Run Apply.
- Verify that the OCI Adaptors have been installed in the namespace
provided.
The required inputs are:
- Tenancy Configuration
- Identity Domain Name - Name of the domain.
- Compartment Name - Name of the Compartment.
- Identifiers
- NF Name - Name of the NF.
- Unique Identifier - Unique identifier for each NF in the timestamp format.
- User Groups
- Admin Group Name - The admin group name.
- Non-Admin Group Name - The non-admin group name.
- Cluster Configuration
- Cluster Name - Name of the OKE Cluster.
- Cluster OCID - All the cluster IDs in the compartment will be displayed in this drop-down.
- Baston Configuration
- IP address - IP address of bastion Instance.
- IP address for the operator instance - IP address for the operator instance.
- Private Key - Private key to login into Bastion. Enter the Key in Base64 encoded format.
- OCIR Registry Configuration
- Registry Name- The name registry name.
- Registry Username- The name registry username.
- Registry Password- The password registry username.
- OCI Adaptors Generic Configuration
- OCI Adaptor Namespace
- Management Agent/Metrics Configuration
- Max Management Agent Install Count - User Configurable (The upper limit is 1000).
- Management Agent Key Expire Time - The time in the specified format.
- NF Metric Path - The metric path will be populated.
- Metric Namespace - The metrics namespace.
The OCI Adaptor component is created.
Note:
The Plan option is provided along with the Run Apply. The (optional) Plan step provides a view of the steps that are going to be performed while creating the stack. This is recommended. - Tenancy Configuration
Configuring OCI Observability and Management
This section describes how to configure OCI Observability and Management.
Note:
By default, sample dashboards for Logging, tracing, and metrics are created as part of OCI Adaptor Terraform scripts. The user can refer to the sample dashboards to create personalized dashboards.- Logging Dashboard: Displays the Kubernetes Workloads, Kubernetes Cluster Summary, Kubernetes Nodes, Kubernetes Pods.
- Metric Dashboard: This is a sample Kubernetes Monitoring dashboard. It is a part of the Logging Analytics dashboard.
- APM/Tracing Dashboard: This is a sample APM/Tracing dashboard. It is part of the APM dashboard.
The sample APM/Tracing dashboard is located as part of APM dashboards. Metric and Logging dashboards are located as part of Logging Analytics dashboards.
Configuring NF Metrics Dashboard on OCI
This section describes about the steps to upload the NF specific json file
(Example: <NF>_oci_dashboard_<version>.json) file on OCI
Logging Analytics Dashboard Service. As OCI doesn't support Grafana, OCI uses the
Logging Analytics Dashboard Service for visualizing the metrics and logs.
- Log in to OCI Console.
Note:
For more information, see the "Signing In to the OCI Console" section in Oracle Cloud Infrastructure Documentation. - Open the navigation menu and click Observability and Management.
- Under Logging Analytics, Click Dashboards. The Dashboards page appears.
- Choose the Compartment in the left pane.
- Click Import dashboards.
- Select and upload the
<NF>_oci_dashboard_<version>.jsonfile. Customize the following three parameters of JSON file before uploading it:- COMPARTMENT_ID: The OCID of the compartment.
- METRIC_NAMESPACE: The metrics namespace that the user provided while deploying OCI Adaptor.
- K8_NAMESPACE: Kubernetes namespace where SEPP is deployed.
- Import dashboard page appears. Click Import button on the page. Users can view the imported dashboard and the metrics on the dashboard.
Configuring NF Alerts on OCI
The following procedure describes how to configure the NF alerts for OCI. OCI supports metric expressions written in MQL (Metric Query Language) and thus requires a new NF alert file to configure alerts in the OCI observability platform.
The following are the steps:
- Run the following command to extract the NF specific alert .zip file:
Example:
unzip <nf>_oci_alertrules_<version>.zip
Depending on the NF, either one or both of the following folders are available in the zip file:unzip ocAdaptor_oci_alertrules_<version>.zip<NF>_oci<NF>_oci_resources
- In SEPP, the following folders are available:
ocsepp_ociocsepp_oci_resources
- In cnDBTier, the following folder is available:
ocsepp_oci
Note:
The zip file is available in the Scripts folder of the NF CSAR package. - Open the
<NF>_ocifolder and look for thenotifications.tffile. - Open the
notifications.tffile and update theendpointparameter with the email ID of the user. - Open the
<NF>_oci_resourcesfolder, in thenotifications.tffile, update the parameterendpointwith the email id of the user. - Log in to the OCI Console.
For more information, see the "Signing In to the OCI Console" section in Oracle Cloud Infrastructure Documentation.
- Open the navigation menu and select Developer Services. The Developer Services window appears in the right pane.
- Under the Developer Services, select Resource Manager.
- Under Resource Manager, select Stacks. The Stacks window appears.
- Click Create stack.
- Select the default My configuration radio button.
- Under Stack configuration, select the folder radio button and
upload the
<NF>_ocifolder. - Enter the Name and Description and select the compartment.
- Select the latest terraform version from the Terraform version drop-down.
- Click Next. The Edit stack screen appears.
- Enter the required inputs to create the SEPP alerts or alarms.
- Click Save and Run apply.
- Verify that the alarms are created in the Alarm Definitions screen
(OCI Console> Observability and Management> Monitoring>Alarm
definitions) provided.
The required inputs are:
- Alarms Configuration
- Compartment name: Choose the compartment's name from the drop-down list.
- Metric namespace: Metric namespace that the user provided while deploying OCI Adaptor.
- Topic name: This is a user-configurable name. It can contain a maximum of 256 characters. Only alphanumeric characters plus hyphens (-) and underscores (_) are allowed.
- Message format: Keep it as ONS_OPTIMIZED (This is pre-populated).
- Alarm is_enabled: Keep it as True (This is pre-populated).
- Alarms Configuration
- Repeat the steps 6 to 17 for uploading the
<NF>_oci_resourcesfolder. Here Metric namespace will be pre-populated.For more information, see the "NF specific alerts" section in NF User Guides.
Deploying CNC Applications
CNC NF deployment on OCI is a manual process performed on the CLI Server.
- On-premise deployment
- It refers to deploying CNC NF and its
components on the customer's private data centre.
The deployment components include
CNC NF,cnDBTier, andCNC Console, deployed on the underlying CNE platform.
- It refers to deploying CNC NF and its
components on the customer's private data centre.
The deployment components include
- OCI deployment
- It refers to the deployment of CNC NF and
its components on the customer's tenancy in the public cloud OCI. The deployment
components include
CNC NF,cnDBTierandCNC Consoledeployed on OCI platform.
- It refers to the deployment of CNC NF and
its components on the customer's tenancy in the public cloud OCI. The deployment
components include
For more information, see the "Deploying CNC Applications" section in CNC NF-specific installation guides.
Uninstalling OCI Adaptor
This section provides information about uninstalling the OCI Adaptor.
Prerequisite:
The user must purge (delete) the logs manually. To delete the logs, go to Observability and Management > Logging Analytics > Administration > Storage. Click Purge Logs and then, click Purge.Uninstalling the OCI Adaptor
To uninstall OCI Adaptor, perform the following procedure:
- Log in to the OCI Console.
Note:
For more details about logging in to the OCI, refer to Signing In to the OCI Console. - Open the navigation menu and select Developer Services. The Developer Services window appears in the right pane.
- Under the Developer Services, select Resource Manager.
- Under Resource Manager, select Stacks. The
Stacks window appears.
Figure 3-9 Developer Services
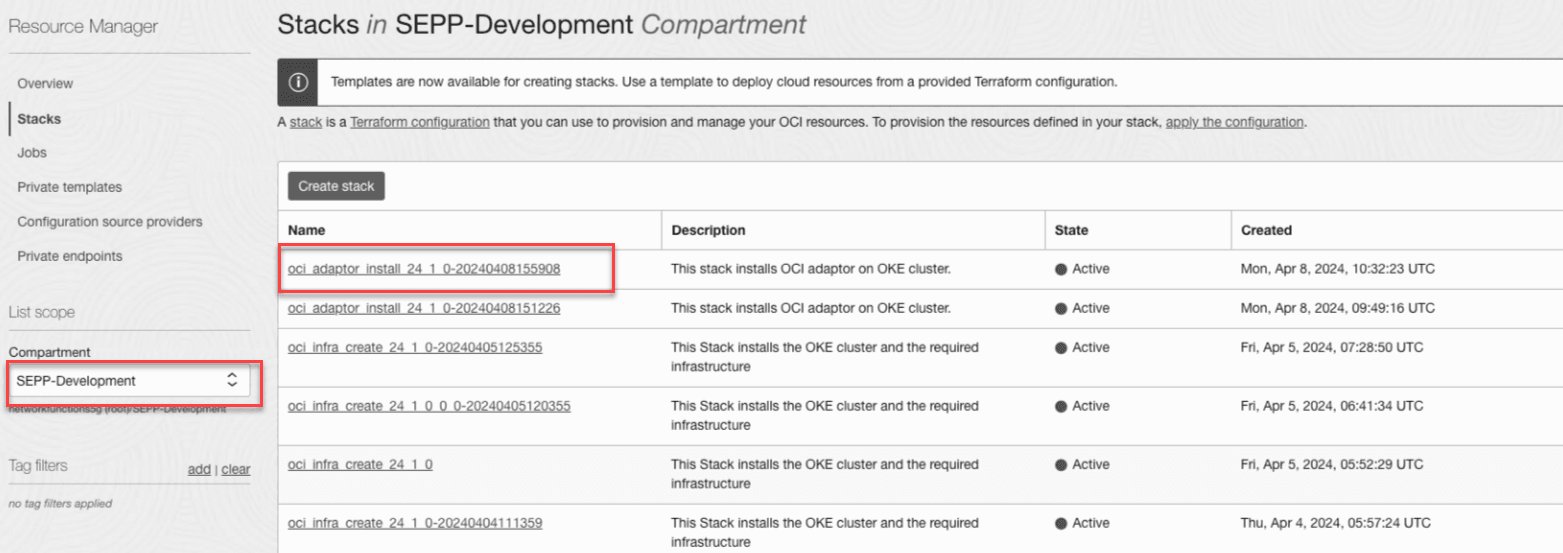
- Select Compartment from the Compartment drop-down list.
Figure 3-10 Compartment
- Select the stack created during OCI Adaptor deployment.
Figure 3-11 Select Stack
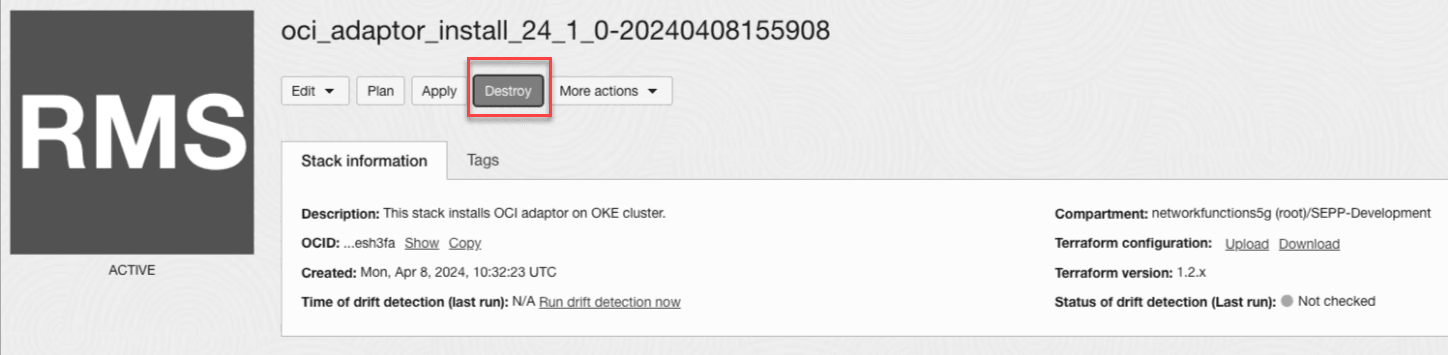
- Click Destroy.
Figure 3-12 Destroy Stack
- The confirmation page appears. Click Destroy to uninstall the OCI Adaptor.
Note:
The sample dashboards created automatically during OCI Adaptor installation are not deleted during OCI Adaptor uninstallation. It is recommended that you delete them manually.Deleting OCI Infrastructure
This section provides information about deleting the OCI infrastructure that was created for deploying the OCI Adaptor and NFs.
Prerequisite:
The user must uninstall the OCI Adaptor.
For more information, see the "Uninstalling OCI Adaptor" section in Oracle Communications Cloud Native Core, OCI Adaptor User Guide.
Deleting the OCI Infrastructure
- Log in to the OCI Console.
For more information, see the "Signing In to the OCI Console" section in Oracle Cloud Infrastructure Documentation.
- Open the navigation menu and select Developer Services. The Developer Services window appears in the right pane.
- Under the Developer Services, select Resource Manager.
- Under Resource Manager, select Stacks. The
Stacks window appears.
Figure 3-13 Developer Services
- Select Compartment from the Compartment drop-down
list.
Figure 3-14 Compartment
- Select the stack which was created for creating the OCI
Infrastructure.
Figure 3-15 Select Stack
- Click Destroy.
Figure 3-16 Destroy Stack
- The confirmation page appears. Click Destroy to delete the OCI Infrastructure.
Note:
Deleting the OCI Infrastructure will not delete the compartment. User can delete it manually.