5 Menu and Status Screens
This chapter explains the contents of the USSD Gateway Menu and Status screens.
This chapter contains the following topics.
USSD Gateway Menu Configuration Screen
Follow these steps to access the USSD Gateway Menu configuration screens.
-
From the Service Management System screen, select the Services menu.
-
Select USSD Gateway, then Menu and Status.
-
Select the screen you want to use.
Menu Wizard
The Menu Wizard allows you to set up menus easily, by allowing you to select and update the Service Interface and Menu Info Entry data, then enter the menu text for MAP 1 and MAP 2. If configuring menus for the User Selection node, you will also define a keyword for each branch.
Setting up menus
Follow these steps to set up a menu.
Note: You can select Previous to go back through the screens and change any values before saving.
-
Select Menu Wizard from the Menu and Status option.
Result: You see Step 1 of the Creating New Menu screens.
-
Select the Language from the drop down list.
-
Select an existing Service Interface from the drop down list. You can click Edit if you need to change the details.
If you require a new Service interface, create a new one by clicking New to the right of the Service field.
Result: You see the Creating new Service Interface screen.
Fill in the fields, as described in Service Interface and click OK.
Result: The database is updated.
-
Select an existing Menu information entry from the drop down list. You can click Edit if you need to change the details.
If you require a new Menu information entry, create a new one by clicking New to the right of the Menu field.
Result: You see the Creating new Menu Info Entry screen.
Fill in the fields, as described in Menu Info Configuration and click OK.
Result: The database is updated, and the step 1 of 6 screen redisplays.
-
Click Next.
Result: You see the Step 2 screen. If this is for a new menu info entry, the screen is blank. Otherwise it will contain the existing menu text.
Note: In this example, the text contains variables (%%). Refer to the description of the MAP 1 and MAP 2 fields for the Menu Language tab. The menu text can also be edited using this tab. See Menu Language Display.
-
Type in the menu display text for MAP 1.
Tip: The percent symbol (%) is not valid. To include a % type \% where the % is required.
For example, If the text was defined as "Your usage is %%.%%\%", the result on the mobile would appear as "Your usage is 23.23%"
-
Click Next.
Result: You see the Step 3 screen.
-
Type in the menu display text for MAP 2.
Tip: The percent symbol (%) is not valid. To include a % type \% where the % is required.
For example, If the text was defined as "Your usage is %%.%%\%", the result on the mobile would appear as "Your usage is 23.23%"
-
Click Next.
Result: You see the following dialog box.
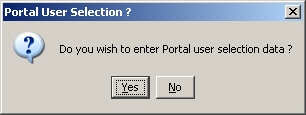
Description of the illustration ussdgportaluserselection_2-4-0.jpg -
The UPC package must be loaded to create menus for the User Selection nodes. If the UPC package is loaded, you can enter Portal Selection data.
To continue, click Yes.
Result: You see the Step 4 screen.
Note: This branch-keyword mapping table is the same as the one accessed on the User Selection screen.
Otherwise, click No to go to the Final Step screen.
-
Select each Keyword cell and type in the selection data for MAP 1.
-
Click Next.
Result: You see the Step 5 screen.
-
Select each Keyword cell and type in the selection data for MAP 2.
-
Click Next.
Result: You see the Final Step screen.
-
To complete the menu creation, click Save.
Status Wizard
The Status Wizard allows you to set up status menus easily, by allowing you to select and update the Service Interface and Status Info Entry data, then enter the status text for a specific language.
Setting up status menus
Follow these steps to set up a status menu.
Note: You can click Previous to go back through the screens and change any values before saving.
-
Select Status Wizard from the Menu and Status option.
Result: You see the Creating New Status Menu - step 1 of 3 screen.
-
Select the Language from the drop down list.
-
Select an existing Service Interface from the drop down list. You can click Edit if you need to change the details.
If you require a new Service interface, create a new one by clicking New to the right of the Service field.
Result: You see the Creating new Service Interface screen.
Fill in the fields, as described in Service Interface and click OK.
Result: The database is updated.
-
Select an existing Status information entry from the drop down list. You can click Edit if you need to change the details.
If you require a new Status information entry, create a new one by clicking New to the right of the Menu field.
Result: You see the Creating new Status Info Entry screen.
Fill in the fields, as described in Status Info Configuration and click OK.
Result: The database is updated.
-
Fill in the fields with the required options from the drop-down boxes and click Next.
Result: You see the Step 2 of 3 screen. If this is for a new status, the screen is blank. Otherwise it will contain the existing status text.
Note: The status text can also be edited using the Status Language tab. See Status Language Display.
-
Type in the status text and click Next.
Result: You see the Step 3 of 3 screen.
-
To complete the status text creation, click Save.
Menu Info Configuration
The Menu Info tab allows you to set up menus with names and values against service interfaces. The menu information is language independent. See Menu Language Display.
Fields - Menu Info tab
Here is a description of the fields.
| Field | Description |
|---|---|
| Service IF |
The list of service interfaces. Note: These are set up on the USSD Gateway Base Configuration Screen Service Interface tab. |
| Name | Name of the menu for that service interface. Alphanumeric field up to 40 characters in length, mandatory field. |
| Value |
The announcement ID in the PA or PACUI received from slee_acs which will be translated into this message. This record must have an announcement with this id specified in an interaction node used in a control plan or it will not ever be used. For more information about how PAs and PACUIs are used in generating menus, see USSD GW Technical Guide. Numeric field up to 7 digits in length, mandatory value. |
| Selections | The number of selections that the menu will have. Numeric field, valid values are 0 to 20, mandatory field. |
| Duration | Specifies the length of time the display will be present to the user. Numeric field, valid values 1 to 99. Optional. |
Note: For example text for each field, refer to the Find screen in this topic.
Buttons and other fields
For information about the buttons and fields at the bottom of the screen, see Common Buttons and Fields.
Clicking Find displays the Find screen.
Data entry - Menu Info tab
Follow these steps to enter a new menu Info.
-
Click Clear to clear the screen of previous data.
-
Enter new data and click Save.
Find Screen - Menu Info tab
Here is an example Find Screen for the Menu Info tab.
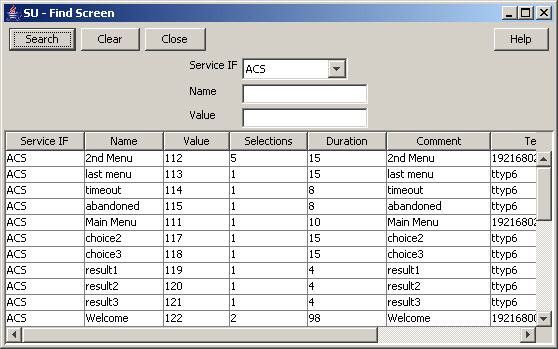
Description of the illustration ussdgfindscreenmenuinfo_2-4-0.jpg
Related topic
Using the find screen - Menu Info tab
You can search on:
-
Service IF
-
Name
-
Value
For more information about searching and editing records, see Using the Find Screens.
Status Info Configuration
The Status Info tab allows you to map status values to more meaningful status messages. The majority of them are created at install time.
Fields - Status Info tab
Here is a description of the fields.
| Field | Description |
|---|---|
| Service IF |
The service interface this status info entry will be used for. Note: These are set up on the USSD Base Configuration Screen Service Interface tab. |
| Name |
Name of this status cause for the selected service interface. Required. Allowed values: Alphanumeric field up to 50 characters in length. |
| Value |
The value that placed in the release cause field of the RELEASE INAP operation sent to the gateway. Required. Allowed values: Numeric field up to 7 digits in length. Note: If a status entry is for a service interface other than “Gateway”, you can only enter values between 0 and 127 for this field. This is the range of value allowed for the release cause within an INAP RELEASE operation. |
Note: For example text for each field, refer to the Find screen in this topic.
Data entry - Status Info tab
Follow these steps to enter a new status info.
-
Click Clear to clear the screen of previous data.
-
Enter new data and click Save.
Buttons and other fields
For information about the buttons and fields at the bottom of the screen, see Common Buttons and Fields.
Clicking Find displays the Find screen.
Find Screen - Status Info tab
Here is an example Find Screen for the Status Info tab.
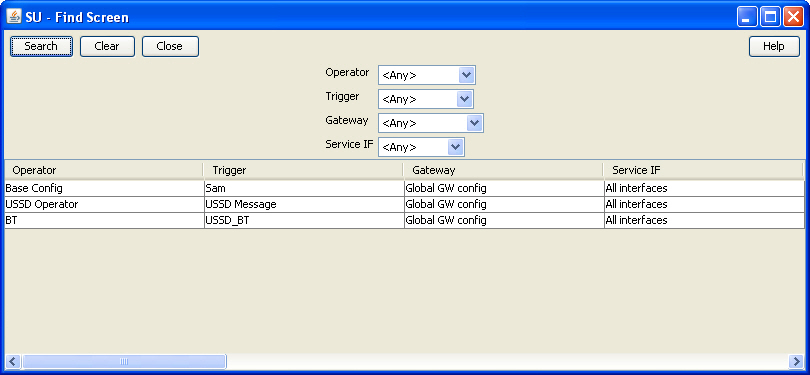
Description of the illustration ussdgfindscreenstatusinfo_2-4-1.jpg
Related topic
Using the find screen - Status Info tab
You can search on:
-
Service IF
-
Name
-
Value
For more information about searching and editing records, see Using the Find Screens.
Menu Language Display
The Menu Language tab allows you to enter language specific text for a given menu. MAP 1 and MAP 2 text can be different.
Fields - Menu Language tab
Here is a description of the fields.
| Field | Description |
|---|---|
| Menu |
The menu selected from the list provided when the button is selected. Text screens for MAP 1 and 2 - text to be sent to the mobile hand set. You cannot edit this field directly. See Menu button below. |
| Language |
The list of available languages. Note: These are set up on the USSD Base Configuration Screen Language tab. |
|
MAP 1 and MAP 2 |
There are separate fields for both MAP 1 and MAP 2. The fields represent the display screen of a mobile phone. The text may contain variable parts, which are assigned using the Variable Part Announcement Dialog (See the User Input node). Enter each variable part as a pair of percentage symbols (%%). Note: The MAP 1 and MAP 2 text may be different, but both must contain the same number of variables. |
| Characters | Displays the number of characters in the MAP 1 and MAP 2 display screens. |
Note: For example text for each field, refer to the Find screen in this topic.
Buttons - Menu Language tab
Here is a description of the buttons.
| Button | Description |
|---|---|
| Menu | Clicking this button displays the Menu Selector screen, allowing you to search for and select a menu value, which will be entered into the Menu field. |
| View |
Clicking this button displays the Text Display Viewer screen, which displays the text and the number of characters. |
Data entry - Menu Language tab
Follow these steps to enter a new menu language.
-
Click Clear to clear the screen of previous data.
-
Enter new data and click Save.
Buttons and other fields
For information about the buttons and fields at the bottom of the screen, see Common Buttons and Fields.
Clicking Find displays the Find screen.
Viewing menu text - Menu Language tab
Follow these steps to view menu text.
-
On the Menu Language tab, click View.
Result: You see the Text Display Viewer.
If this is the first time you have used the text display viewer during the current session, the screen will display the text in the MAP 1 and MAP 2 text fields on the tab. If no menu has been selected, the field will be blank.
If you have already used the text display viewer, you will see the last menu text you viewed before.
-
Click Menu.
Result: You see the Info Selector, displaying the menus.
You can search for menus by entering search criteria in the box and clicking Search.
-
Select the required menu from the list.
Result: The Menu text is displayed in the Text Display Viewer.
-
To close the text display viewer, in the Info Selector, click Close, then in the Text Display Viewer, click Close.
Find Screen - Menu Language tab
Here is an example Find Screen for the Menu Language tab.
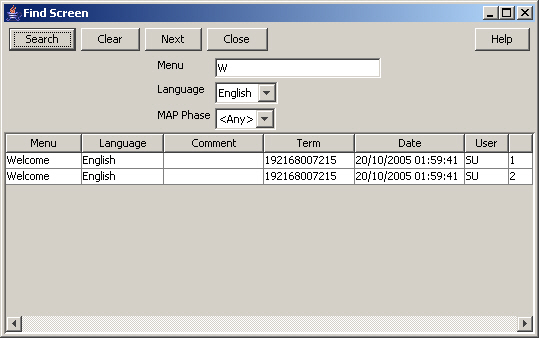
Description of the illustration ussdgfindscreenmenulanguage_2-4-0.jpg
Related topic
Using the find screen - Menu Language tab
You can search on:
-
Menu
-
Language
-
MAP Phase
For more information about searching and editing records, see Using the Find Screens.
Status Language Display
The Status Language tab allows you to set language specific status text for a given status.
Fields - Status Language tab
Here is a description of the fields.
| Field | Description |
|---|---|
| Status |
Displays status info name once selected, created by the USSD Gateway Menu Configuration Screen Status Info Configuration tab. You cannot edit this field directly. See Buttons - Status Language tab for a description of the Status button. |
| Language |
The list of available languages. Note: These are set up on the USSD Base Configuration Screen Language tab. |
| Text box | This represents the display screen of a mobile phone |
| Characters | Displays the number of characters in the message in the field above. |
Note: For example text for each field, refer to the Find screen in this topic.
Buttons - Status Language tab
Here is a description of the buttons.
| Button | Description |
|---|---|
| Status | Clicking this button displays the Status Selector screen, allowing you to search for and select a value, which will be entered into the Status field. |
| View |
Clicking this button displays the Text Display Viewer, which allows you to view the text of a status, its language and number of characters. |
Data entry - Status Language tab
Follow these steps to enter a new status language.
-
Click Clear to clear the screen of previous data.
-
Enter new data and click Save.
Buttons and other fields
For information about the buttons and fields at the bottom of the screen, see Common Buttons and Fields.
Clicking Find displays the Find screen.
Viewing status text - Status Language tab
Follow these steps to view status text.
-
On the Status Language tab, click View.
Result: You see the Text Display Viewer.
If this is the first time you have used the text display viewer during the current session, the screen will display the text in the field in the tab. If no status has been selected, the field will be blank.
If you have already used the text display viewer, you will see the last text you viewed before.
-
Click Menu.
Result: You see the Info Selector, displaying the status info names.
You can search for status info names by entering search criteria in the box and clicking Search.
-
Select the required menu from the list.
Result: The Status text is displayed in the Text Display Viewer.
-
To close the text display viewer, in the Info Selector, click Close, then in the Text Display Viewer, click Close.
Find Screen - Status Language tab
Here is an example Find Screen for the Status Language tab.
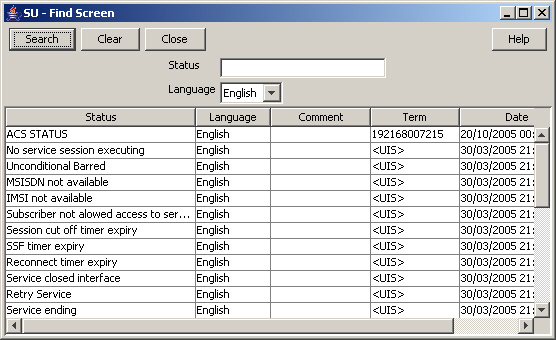
Description of the illustration ussdgfindscreenstatuslanguage_2-4-0.jpg
Related topic
Using the find screen - Status Language tab
You can search on:
-
Status
-
Language
For more information about searching and editing records, see Using the Find Screens.