1 Subscriber and Network
This chapter explains how to define information that is used in an NP/MNP environment using the NP Service Pack Subscriber and Network screens.
This chapter contains the following topics.
Subscriber and Network Screen
The NP/Subscriber and Network screen allows you to define:
-
Logical operator names
-
The network routing numbers associated with operators
-
The operator ranges associated with operators (through prefixes or ranges)
-
Ported subscriber information.
It also allows you to map operator names and ported subscribers to routing numbers. It contains the following tabs:
-
Routing Destination
-
Routing Number
-
PQYZ
-
DN Range
-
Common Find Panel
Using the Routing Destination Search Dialog
You can use the Routing Destination Search Dialog to find an existing Routing Destination record on any tab that has a search button next to the Routing Destination field.
Follow these steps to search for a Routing Destination in the Routing Destination Search Dialog.
-
Click the button to the right of the Routing Destination field.
Result: You see the Routing Destination Search Dialog.
-
Enter the search criteria in the Routing Destination query field and click Find.
If the field is left empty, the search retrieves all Routing Destinations.
Result: All routing destinations that match the search criteria are displayed.
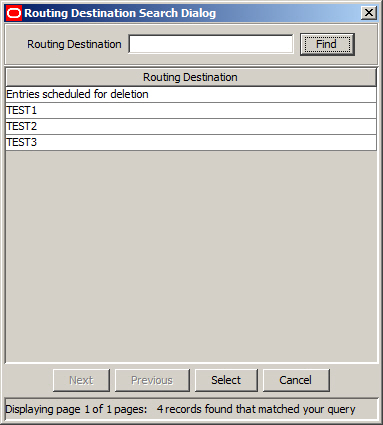
Description of the illustration np-routingdestinationsearchdialogresults_2-5-0.jpg -
To select the Routing Destination you want, highlight it in the table and click Select.
Result: Your selection is inserted into the Routing Destination field.
Using the Routing Number Search Dialog
You can use the Routing Number Search Dialog to find an existing Routing Number record on any tab that has a search button next to the Routing Number field.
Note: If the Routing Destination field is also present on the tab, the available Routing Numbers depend on the Routing Destination selected.
Follow these steps to search for a Routing Number in the Routing Number Search Dialog.
-
Click the button to the right of the Routing Number field.
Result: You see the Routing Number Search Dialog.
-
Enter the search criteria in the query fields and click Find.
If the field is left empty, the search retrieves all instances of that field.
Result: All routing numbers that match the search criteria are displayed.
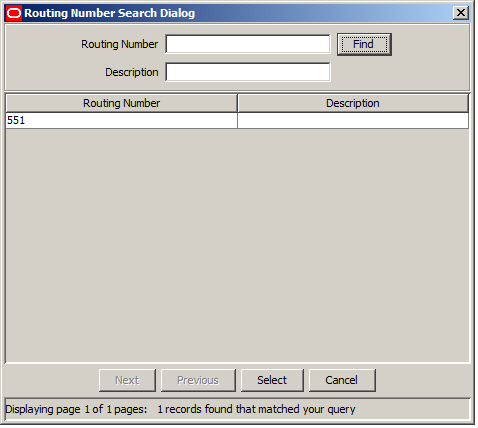
Description of the illustration np-routingnumbersearchdialogresults_2-5-0.jpg -
To select a Routing Number, highlight it in the table and click Select.
Result: Your selection is inserted into the Routing Number field.
Routing Destination
The Routing Destination tab allows you to define the names for operators that are relevant in the operator's environment.
Adding a routing destination
Follow these steps to Add a new routing destination.
-
Select the Routing Destination tab in the NP/Subscriber and Network - Find mode screen, and click New.
Result: You see the Routing Destination tab in New mode.
-
In the Routing Destination field, enter a unique value for the routing destination to add. It can be up to 64 alpha-numeric characters long.
-
Click Save.
-
Repeat steps 2 to 3 for each routing destination to add.
Note: When you click Save, the saved values remain on the screen. You can create another new record by typing over these values and clicking Save again.
-
Click Return to go back to the previous screen.
Deleting a routing destination
Follow these steps to delete a routing destination.
Note: You cannot delete routing destinations that are referenced elsewhere in the system, such as in PQYZ or Routing Number records.
-
In Find mode, on the Routing Destination tab, find and select the record to delete. For more information about finding and selecting routing destinations, see Finding a routing destination.
-
Click Delete.
Result: The Confirm Delete Record screen appears.
-
Click Yes to confirm.
Result: The record is removed from the database.
-
Click Return to return to the previous screen.
Editing a routing destination
Follow these steps to edit a routing destination.
-
In Find mode, on the Routing Destination tab, find and select the record to edit. For more information on finding and selecting routing destination records, see Finding a routing destination.
Result: The selected record appears in Update mode on the Routing Destination tab.
-
Edit the details as described in Adding a routing destination.
-
Click Save, and then Return, to save your changes and return to the previous screen.
Finding a routing destination
Follow these steps to search the database for a specific routing destination.
-
Ensure you are in Find mode on the Routing Destination tab.
-
Enter the selection criteria in one or more query fields and click Find.
If a field is left empty, the search retrieves all instances of that field.
Result: This triggers an Oracle Like% query that returns the first 100 records that begin with the selection criteria. For example, if you enter 123 in a query field, the system returns records such as 123, 1234, 12345.
The search results appear in a table on the Routing Destination tab in Find result mode.
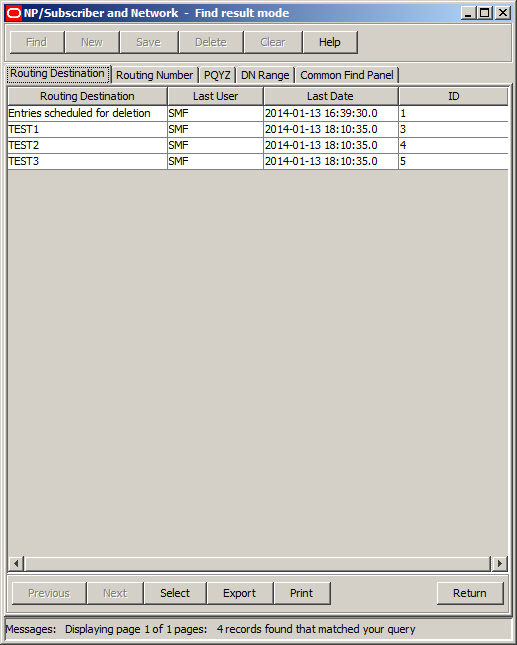
Description of the illustration np-subscriber-networkroutingdestinationfindresult_2-5-0.jpg
Note: The first 100 records entered in the database are displayed in no particular order. If you do not find the record you are searching for, conduct a more specific search.
-
To view a record in Update mode, highlight the record line and click Select.
-
To delete a record, highlight the record line and click Delete.
Related topic
Routing Number
The Routing Number tab allows you to define nationally recognized network routing numbers and logical network element numbers (numbers recognized within a network). You can then assign operator names to the routing numbers by associating them with routing destinations.
Note: The routing destination must have been previously defined on the Routing Destination tab.
DEAD routing number
The 'DEAD' routing number is created automatically during installation. It is a special routing number which when allocated to a subscriber dn range identifies the dn range entry as being scheduled for purging.
Note: The 'DEAD' routing number cannot be modified or deleted.
Adding a routing number
Follow these steps to Add a new routing number.
-
Select the Routing Number tab in the NP/Subscriber and Network - Find mode screen, and click New.
Result: You see the Routing Number tab in New mode.
-
In the Routing Number field, enter a unique value for the routing number to add. It can be up to eight hexadecimal characters long.
-
In the Routing Destination field, enter the routing destination for the routing number. You must enter a valid routing destination (one that already exists in the database).
Note: If you do not know the routing destination, you can click the button to the right of this field to search for it using the Routing Destination Search Dialog. See Using the Routing Destination Search Dialog for details.
-
If required, in the Description field enter a description for the routing number.
-
Click Save.
-
Repeat steps 2 to 5 for each routing number to add.
Note: When you click Save, the saved values remain on the screen. You can create another new record by typing over these values and clicking Save again.
-
Click Return to go back to the previous screen.
Editing a routing number
Follow these steps to edit a routing number.
-
In Find mode, on the Routing Number tab, find and select the record to edit. For more information about finding and selecting routing numbers, see Finding a routing number.
Result: The selected record appears in Update mode on the Routing Number tab.
-
Edit the details as described in Adding a routing number.
-
Click Save and then Return to save your changes and return to the previous screen.
Deleting a routing number
Follow these steps to delete a routing number.
Note: You cannot delete routing numbers that are referenced elsewhere in the system, such as in DN Range records.
-
In Find mode, on the Routing Number tab, find and select the record to delete. For more information about finding and selecting routing numbers, see Finding a routing number.
-
Click Delete.
Result: The Confirm Delete Record screen appears.
-
Click Yes to confirm.
Result: The record is removed from the database.
-
Click Return to return to the previous screen.
Finding a routing number
Follow these steps to search the database for a specific routing number.
-
Ensure you are in Find mode on the Routing Number tab.
-
Enter the selection criteria in one or more query fields and click Find.
If a field is left empty, the search retrieves all instances of that field.
Result: This triggers an Oracle Like% query that returns the first 100 records that begin with the selection criteria. For example, if you enter 123 in a query field, the system returns records such as 123, 1234, 12345.
The search results appear in a table on the Routing Number tab in Find result mode.
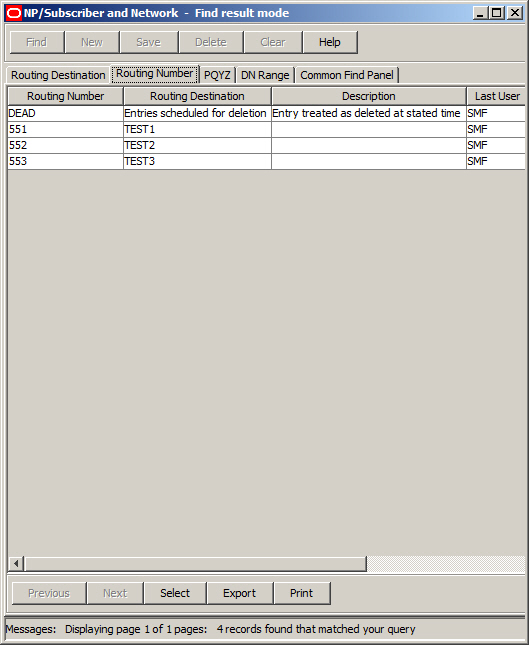
Description of the illustration np-subscriber-networkroutingnumbertabfindresult_2-5-0.jpgNote: The first 100 records entered in the database are displayed in no particular order. If you do not find the record you are searching for, conduct a more specific search.
-
To view a record in Update mode, highlight the record line and click Select.
-
To delete a record, highlight the record line and click Delete.
Related topic
PQYZ
You use the PQYZ tab to map operator range prefixes to the operator names configured in routing destinations.
You can map one or more prefixes to the same routing destination. The routing destination must have been previously defined on the Routing Destination tab.
Adding a PQYZ mapping
Follow these steps to Add a new PQYZ routing destination mapping.
-
On the PQYZ tab in the NP/Subscriber and Network - Find mode screen, click New.
Result: You see the PQYZ tab in the NP/Subscriber and Network screen in New mode.
-
In the PQYZ field, enter the international called number prefix to map to a routing destination.
-
In the Routing Destination field, enter the routing destination for the PQYZ prefix. You must enter a valid routing destination (one that already exists in the database).
Note: If you do not know the routing destination, you can click the button to the right of this field to search for it using the Routing Destination Search Dialog. See Using the Routing Destination Search Dialog for details.
-
If required, click the button to the right of the Routing Number field to search for and select the routing number for the PQYZ prefix. See Using the Routing Number Search Dialog for details.
Note: You cannot enter in the routing number directly.
-
From the Number Type drop down list, select the number type for the PQYZ entry
-
If required, enter a URI to associate with the PQYZ entry.
-
Click Save.
-
Repeat steps 2 to 7 for all the PQYZ routing destination mappings you require.
Note: When you click Save, the saved values remain on the screen. You can create another new record by typing over these values and clicking Save again.
-
Click Return to go back to the previous screen.
Editing a PQYZ mapping
Follow these steps to edit a PQYZ routing destination mapping.
-
In Find mode, on the PQYZ tab, find and select the record to edit. For more information about finding and selecting a PQYZ record, see Finding a PQYZ mapping.
Result: The selected record appears in Update mode on the PQYZ tab.
-
Edit the details as described in Adding a PQYZ mapping.
Tip: To delete the routing number from the PQYZ mapping, you must first delete the current value for the routing destination field.
-
Click Save, and then Return, to save your changes and return to the previous screen.
Deleting a PQYZ mapping
Follow these steps to delete a PQYZ routing destination mapping.
-
In Find mode, on the PQYZ tab, find and select the record to delete. For more information about finding and selecting PQYZ records, see Finding a PQYZ mapping.
-
Click Delete.
Result: The Confirm Delete Record screen appears.
-
Click Yes to confirm.
Result: The record is removed from the database.
-
Click Return to return to the previous screen.
Finding a PQYZ mapping
Follow these steps to search the database for a specific PQYZ record.
-
Ensure you are on the PQYZ tab in Find mode.
-
Enter the selection criteria in one or more query fields and click Find.
If a field is left empty, the search retrieves all instances of that field.
Result: This triggers an Oracle Like% query that returns the first 100 records that begin with the selection criteria. For example, if you enter 123 in a query field, the system returns records such as 123, 1234, 12345, ...
The search results appear in the table on the PQYZ tab in Find result mode.
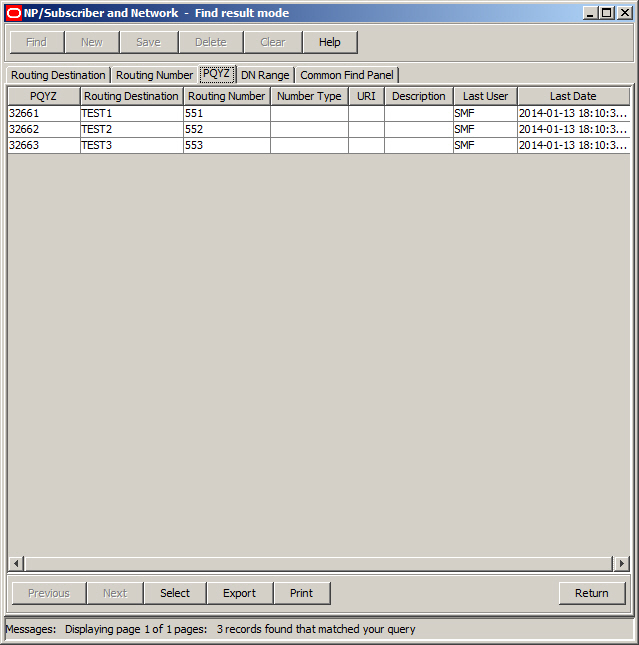
Description of the illustration np-subscriber-networkpqyztabfindresults_2-5-0.jpgNote: The first 100 records entered in the database are displayed in no particular order. If you do not find the record you are searching for, conduct a more specific search.
-
To view a record in Update mode, highlight the record line and click Select.
-
To delete a record, highlight the record line and click Delete.
Related topic
DN Range
You use the DN Range tab to represent an individual ported subscriber or range of ported subscribers (such as PBX users) by entering a DN number range and associating it to a specific routing number. This tab can also be used for stating operator ranges.
Rules
These rules apply to DN Ranges:
-
A DN Range can be either an operator type or a subscriber type
-
Additional Routing Numbers, Donor ID Numbers, and Port ID Numbers may only be defined for subscriber DN Ranges
-
The DN Start and DN End values must be of equal length
-
The DN End value must be greater than or equal to the DN Start value
-
The combination of DN Range and Activation Date must be unique and not overlap an existing DN Range, unless the DN Ranges are equal but there is a different Activation Date
-
The Routing Number and the Additional Routing Number must have been previously defined on the Routing Number tab
-
For a particular subscriber range only the most recent 10 activation date entries will be considered during runtime (enforced in service), therefore when provisioning you should not define more than 10 entries per subscriber range.
Note: Rule 7 is not enforced in the database.
Purging subscriber dn ranges
Periodically a purge facility will run on the database to delete any subscriber DN ranges which are no longer active. The following DN ranges will be deleted:
-
All entries associated with a unique subscriber (that is, entries for the same subscriber but with different activation dates) that are no longer active due to there being an active entry for the subscriber with a more recent activation date.
-
Subscriber entries that are currently active where:
-
The routing number has been set to DEAD
-
There are no entries for the subscriber with activation dates in the future
-
For more information on the purge facility, refer to the Tools and Utilities chapter in Number Portability Service Pack Technical Guide.
Note: The purge facility will not remove operator DN ranges.
Adding a DN range
Follow these steps to add a new DN range.
-
On the DN Range tab in the NP/Subscriber and Network - Find mode screen, click New.
Result: You see the DN Range tab in the NP/Subscriber and Network screen in New mode.
-
If this DN range provides additional routing for external operator ranges then select the Entry Type (Tick for Operator) check box. Leave deselected if this is a subscriber DN range.
Note: When this check box is selected you will not be able to specify an:
-
Additional Routing Number
-
Donor ID Number
-
Port ID Number
-
In the DN Start field, enter the starting number for the DN range. The number must be between four and 18 digits long.
-
In the DN End field, enter the end number for the DN range. The number must be greater than or equal to the DN Start number and must be the same length.
-
In the Activation Date field, enter the activation date using this format: DD/MM/YYYY HH:MM:SS.
Example: "01/15/2008 10:00:00"
-
In the Routing Number field, enter the routing number associated to the recipient network that the subscriber is being ported to. You must enter a routing number that has been previously defined in the database.
Note: If you do not know the routing number, you can click the button to the right of this field to search for it using the Routing Number Search Dialog. See Using the Routing Number Search Dialog for details.
-
If required, in the Additional Routing Number field, specify the additional routing number the DN range maps to. This is the logical routing number for the network element that holds the subscriber information in the recipient network.
Note: You cannot enter in an additional routing number directly. Click the button to the right of this field to search for it using the Additional Routing Number Search Dialog. See Using the Additional Routing Number Search Dialog for details.
-
If required, in the Donor ID Number field specify the donor ID number.
Note: To search for a valid number using the Donor ID Search Dialog, click the button to the right of this field. See Using the Donor ID Search Dialog for details.
-
If required, in the Port ID Number field enter the number of the port ID for the DN range.
Note: This field is used for auditing purposes (if available) to hold the administrative ID for the port request.
-
From the Number Type drop down list, select the number type for the DN range.
-
If required, enter a URI to associate with the DN Range.
-
Click Save.
Note: If the DN range rules are broken, a "Save operation failed" error message detailing the problem will be displayed.
-
Repeat steps 2 to 12 to add all the DN ranges you require.
Note: When you click Save, the saved values remain on the screen. You can create another new record by typing over these values and clicking Save again.
-
Click Return to go back to the previous screen.
Editing a dn range
Follow these steps to edit a DN range.
-
In Find mode, on the DN Range tab, find and select the record to edit. For more information about finding and selecting DN ranges, see Finding a dn range.
Result: The selected record appears in Update mode on the DN Range tab.
-
Edit the details as described in Adding a DN range.
Tips:
-
To remove the additional routing number for a DN range, you must first remove the current value in the Routing Number field. This resets the additional routing number to blank.
-
To mark a DN range for purging, set the Routing Number field to 'DEAD'.
-
-
Click Save and then Return to save your changes and return to the previous screen.
Deleting a dn range
Follow these steps to delete a DN range.
-
In Find mode, on the DN Range tab, find and select the record to delete. For more information about finding and selecting DN ranges, see Finding a dn range.
-
Click Delete.
Result: The Confirm Delete Record screen appears.
-
Click Yes to confirm.
Result: The record is removed from the database.
-
Click Return to return to the previous screen.
Finding a dn range
Follow these steps to search the database for a specific DN range.
-
Ensure you are on the DN Range tab in Find mode.
-
Enter selection criteria in one or more query fields and click Find.
If a field is left empty, the search retrieves all instances of that field.
Result: This triggers an Oracle Like% query that returns the first 100 records that begin with the selection criteria. For example, if you enter 123 in a query field, the system returns records such as 123, 1234, 12345, ...
The results appear in the table on the DN Range tab in Find result mode.
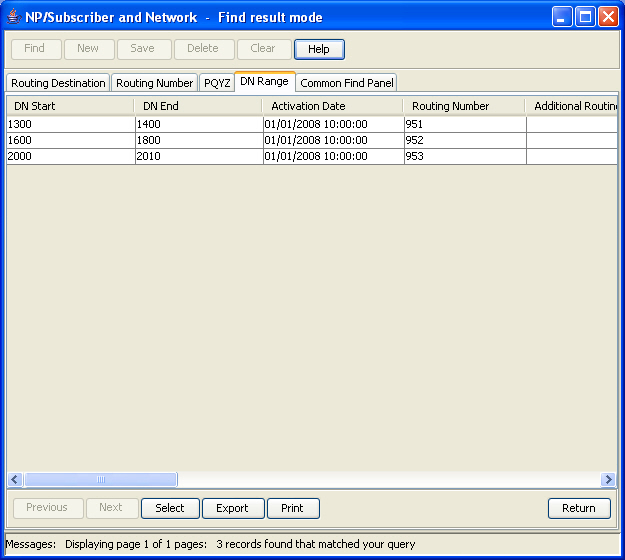
Description of the illustration np-subscriber-networkdnrangetabfindresults_2-5-0.jpgNote: The first 100 records entered in the database are displayed in no particular order. If you do not find the record you are searching for, conduct a more specific search.
-
To view a record in Update mode, highlight the record line and click Select.
-
To delete a record, highlight the record line and click Delete.
Related topic
Using the Additional Routing Number Search Dialog
You can use the Additional Routing Number Search Dialog to find an additional routing number record on any tab that has a search button next to the Additional Routing Number field.
Note: The additional routing numbers listed in the search results will depend on the value previously specified in the Routing Number field.
Follow these steps to search for an additional Routing Number in the Additional Routing Number Search Dialog.
-
Click the button to the right of the Additional Routing Number field.
Result: You see the Additional Routing Number Search Dialog.
-
Enter the search criteria in the query fields and click Find.
If the field is left empty, then the search retrieves all instances of that field.
Result: The search finds all the available additional routing numbers for the previously specified routing number and that match the search criteria. The results are displayed in the grid in the Additional Routing Number Search Dialog.
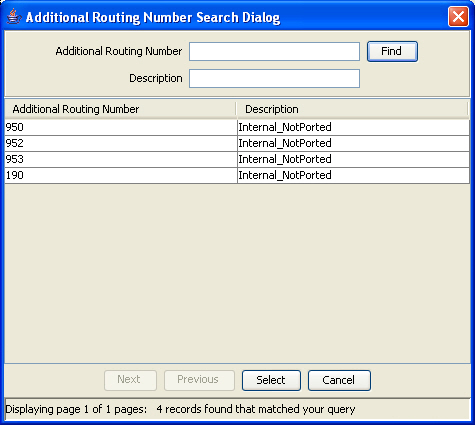
Description of the illustration np-additionalroutingnumbersearchdialogresults_2-5-0.jpg -
To select an additional routing number, highlight it in the grid and click Select.
Result: Your selection is inserted into the Additional Routing Number field.
Using the Donor ID Search Dialog
You can use the Donor ID Search Dialog to find a donor id number record on any tab that has a search button next to the Donor ID Number field.
Follow these steps to search for a donor ID number in the Donor ID Search Dialog.
-
Click the button to the right of the Donor ID Number field.
Result: You see the Donor ID Search Dialog.
-
Enter the search criteria in the query fields and click Find.
If the field is left empty, then the search retrieves all instances of that field.
Result: The search finds all the donor id numbers that match the search criteria and displays the results in the table in the Donor ID Search Dialog.
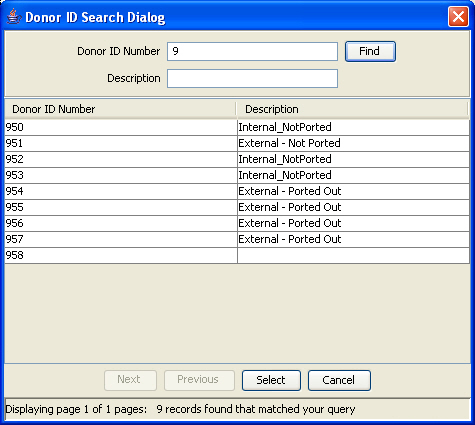
Description of the illustration np-donoridsearchdialogresults_2-5-0.jpg -
To select a donor ID number, highlight it in the table and click Select.
Result: Your selection is inserted into the Donor ID Number field.
Common Find Panel
The Common Find Panel allows you to look for commonly required data from the following tables and view the results on the same screen:
-
DN Range
-
Routing Number
-
PQYZ
-
Routing Destination
Common Find Panel logic
The search is based on the prefix you enter in the Find Number field. If it:
-
Matches at least one defined DN range with an Activation Date in the past, then the following data will be displayed:
-
Start and End of the matched DN range with the newest Activation Date
-
Activation Date of the matched DN range
-
Additional Routing Number, Donor ID Number, Port ID Number and Routing Number that is linked to the matched DN range
-
Entry Type of the matched DN Range
-
Number Type of the matched DN Range
-
Routing Destination that is linked to this Routing Number
-
PQYZ information shall be displayed as “Not Applicable”
-
URI of the matched DN Range
-
-
Does not match any range in the conditions described above (because there is no range match or because the matched ranges have their Activation Date in the future), then the PQYZ is queried. If a match is found the following data will be displayed:
-
PQYZ of the matching PQYZ entry
-
Routing Destination that is linked to the matching PQYZ entry
-
DN range information shall be displayed as “Not found”
-
Activation Date information shall be displayed as “Not found”
-
Routing Number information shall be displayed as “Not applicable”
-
Number Type of the matching PQYZ entry
-
URI of the matching PQYZ entry
-
In any other case all the information fields will be displayed as “Not found”
Common Find Panel fields
This table describes the function of each field in the Common Find Panel.
| Field | Description |
|---|---|
| Find Number | The number to look for in the PQYZ, DN Range, Routing Number and Routing Destination tables. |
| DN Start | Displays the start of the matched DN range with the newest activation date. |
| DN End | Displays the end of the matched DN range with the newest activation date. |
| Activation Date | Displays the activation date of the matched DN range. |
| Additional Routing Num | Displays the additional routing number of the matched DN range. |
| Donor ID Number | Displays the donor id of the matched DN range. |
| Port ID Number | Displays the port id of the matched DN range. |
| Entry Type (Tick for Operator) |
Displays the entry type for the matched DN range. Valid values are: O - external operator range S - subscriber range |
| Number Type |
Displays the number type for the matched DN range or PQYZ entry. Valid values are:
|
| URI (DN Range) | Displays the URI of the matched DN range. |
| Routing Number | Displays the Routing Number that is linked to the matched DN range and shows its description in the text box below. |
| PQYZ | Displays the PQYZ prefix that matches the Find Number value and shows its description in the text box below. |
| URI (PQYZ) | Displays the URI of the matching PQYZ entry. |
| Routing Destination | Displays the routing destination for the matching PQYZ prefix or Routing Number. |
Using the Common Find Panel
Follow these steps to find and view data using a common number prefix.
-
Select the Common Find Panel in the NP/Subscriber and Network screen.
-
In the Find Number field, enter the number to search for, and click Find.
Result: A list of the records that match the Find Number value displays.