B MO SMS Prepaid Intercept on B-Party Configuration Procedures
Appendix C, MO SMS Prepaid Intercept on B-Party Configuration Procedures, describes the procedures necessary to configure the EAGLE to redirect MO SMS messages from a prepaid B-party subscriber to a specific SMSC.
Introduction
The MO SMS Prepaid Intercept on B-Party feature allows the existing Prepaid Intercept Phase 1 feature to redirect MO SMS messages based on whether the B-Party of the subscriber is prepaid.
Note:
The B-party is checked only if the A-party is not a prepaid subscriber.Provisioning the MO SMS Prepaid Intercept on B-Party Feature
- Enable the MO SMS Prepaid Intercept on B-Party
feature using the
enable-ctrl-featcommand and turn the MO SMS Prepaid Intercept on B-Party on using thechg-ctrl-featcommand. Perform the procedure Activating the Prepaid SMS Intercept Phase 1 Feature. - Configure the service selectors for the MO SMS
Prepaid Intercept on B-Party feature using the
ent-srvselcommand. Perform the procedure Adding a Service Selector Entry for the MO SMS B-Party Routing Feature. - Configure entries in the PPSOPTS table for a prepaid
portability type using the
chg-ppsoptscommand. Perform these procedures.- To configure the point code entries in the PPSOPTS table, perform the procedure Configuring Point Code Entries for the Prepaid SMS Intercept Phase 1 Feature.
- To configure the GTA entries in the PPSOPTS table, perform the procedure Configuring GTA Entries for the Prepaid SMS Intercept Phase 1 Feature.
- Configure the B-Party check option. Perform the procedure Configuring the B-Party Check Option for the Prepaid SMS Intercept Phase 1 Feature.
Activating the Prepaid SMS Intercept Phase 1 Feature
This procedure is used to enable and turn on the Prepaid SMS Intercept Phase 1 feature.
The feature access key is based on the feature’s part number and the serial number of the EAGLE, making the feature access key site-specific.
The
enable-ctrl-feat command enables the
Prepaid SMS Intercept Phase 1 feature by inputting the feature’s access key and
the feature’s part number with these parameters:
:fak – The feature
access key provided by Oracle. The feature access key contains 13 alphanumeric
characters and is not case sensitive
:partnum – The
Oracle-issued part number of the Prepaid SMS Intercept Phase 1 feature,
893006701.
If the feature is being enabled with a temporary feature access key, the feature must not be in the in-use, expired, or unavailable state.
The
enable-ctrl-feat command requires that
the database contain a valid serial number for the EAGLE, and that this serial
number is locked. This can be verified with the
rtrv-serial-num command. The EAGLE is
shipped with a serial number in the database, but the serial number is not
locked. The serial number can be changed, if necessary, and locked once the
EAGLE is on-site, with the
ent-serial-num command. The
ent-serial-num command uses these
parameters.
:serial – The serial
number assigned to the EAGLE. The serial number is not case sensitive.
:lock – Specifies
whether or not the serial number is locked. This parameter has only one value,
yes, which locks the serial number.
Once the serial number is locked, it cannot be changed.
Note:
To enter and lock the EAGLE’s serial number, theent-serial-num command must be entered
twice, once to add the correct serial number to the database with the
serial parameter, then again with the
serial and the
lock=yes parameters to lock the serial
number. You should verify that the serial number in the database is correct
before locking the serial number. The serial number can be found on a label
affixed to the control shelf (shelf 1100).
Once the feature has been enabled, the feature must be
activated with the
chg-ctrl-feat command. The
chg-ctrl-feat command uses these
parameters:
:partnum – The
Oracle-issued part number of the Prepaid SMS Intercept Phase 1 feature,
893006701.
:status=on – used to
turn the Prepaid SMS Intercept Phase 1 feature on.
The status of the features in the EAGLE is shown with
the
rtrv-ctrl-feat command.
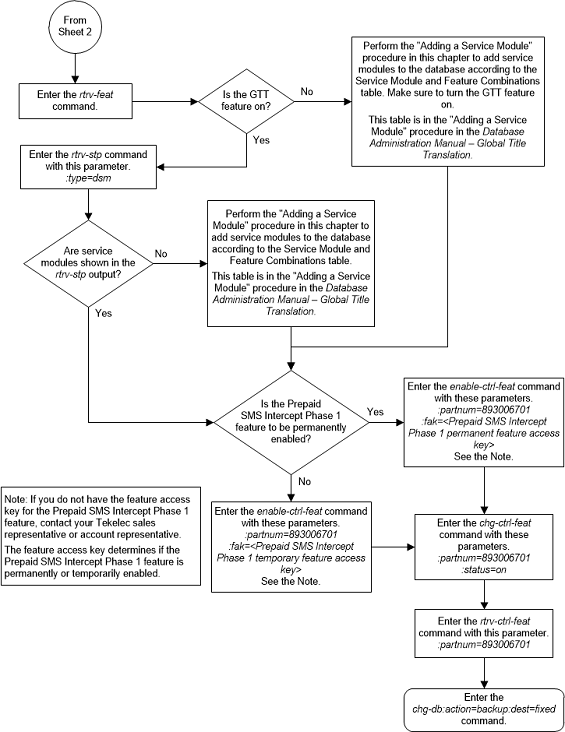
The Prepaid SMS Intercept Phase 1 requires that DSM or
SLIC cards are installed and provisioned in the EAGLE. The
rtrv-stp command can be used to verify
if DSMs or SLIC cards are provisioned in the database. Specifying the
type=dsm (the SLIC must be in odd
numbered card slots) or
type=slic (the SLIC in the even
numbered card slots) parameter with the
rtrv-stp command displays the DSM or
SLIC cards.
Figure B-1 Activate the Prepaid SMS Intercept Phase 1 Feature - Sheet 1 of 3
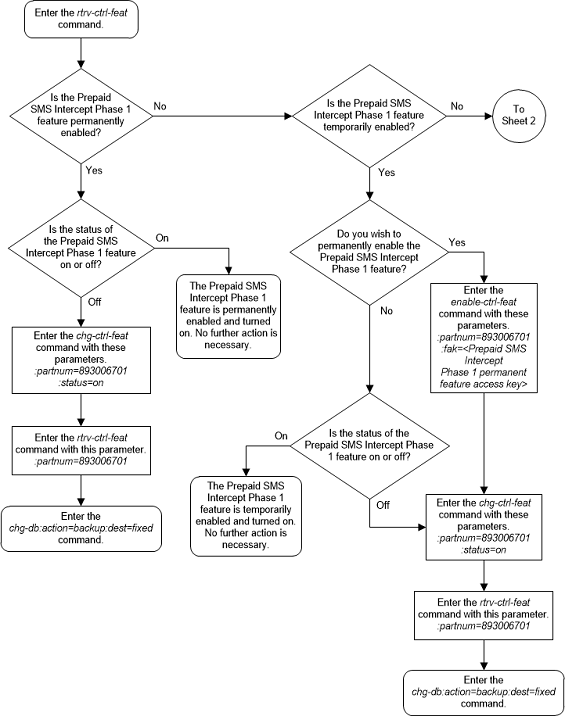
Figure B-2 Activate the Prepaid SMS Intercept Phase 1 Feature - Sheet 2 of 3
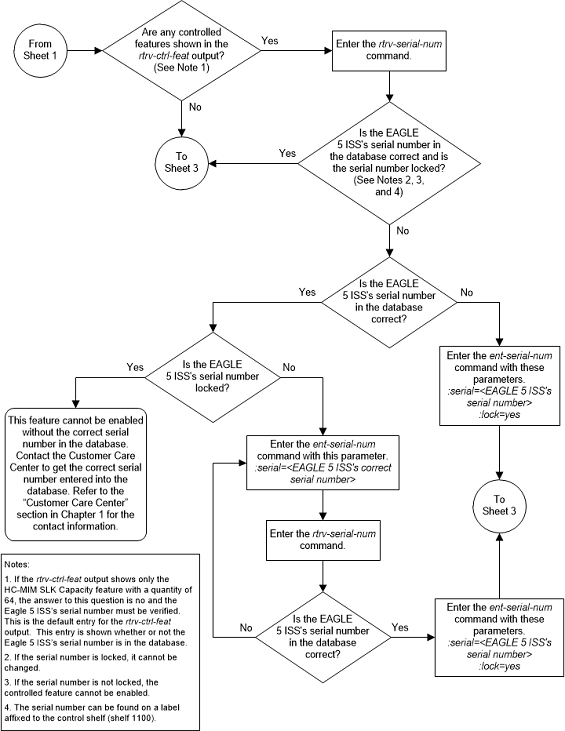
Figure B-3 Activate the Prepaid SMS Intercept Phase 1 Feature - Sheet 3 of 3
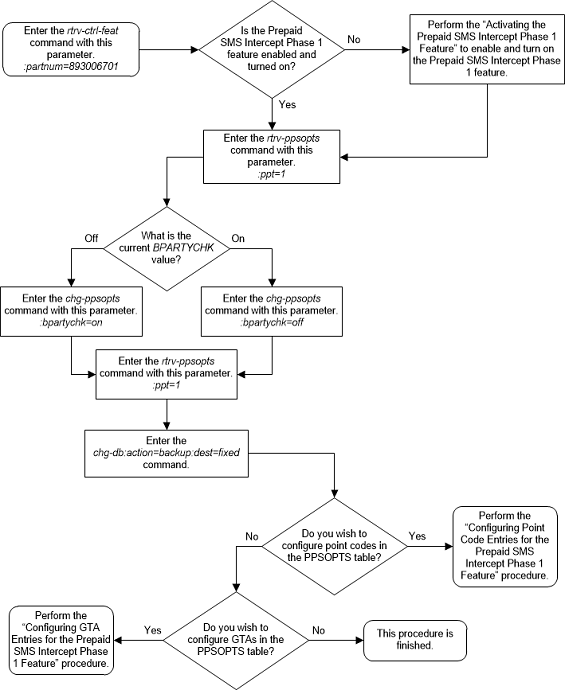
Configuring the B-Party Check Option for the Prepaid SMS Intercept Phase 1 Feature
rtrv-ppsopts command output using the
bpartychk parameter of the
chg-ppsopts command. The
bpartychk parameter has two values:
- off — Prepaid Check on B-Party is not performed
- on — Prepaid Check on B-Party is performed.
Point code and global title address (GTA) entries can
also be configured with the
chg-ppsopts command. Perform the
procedure
Configuring Point Code Entries for the Prepaid SMS Intercept Phase 1 Feature
to configure the point code entries. Perform the procedure
Configuring GTA Entries for the Prepaid SMS Intercept Phase 1 Feature
to configure the GTA entries.
The Prepaid SMS Intercept Phase 1 feature must be
enabled and turned on before this procedure can be performed. The status of the
Prepaid SMS Intercept Phase 1 feature can be verified by entering the
rtrv-ctrl-feat command. Perform the
procedure
Activating the Prepaid SMS Intercept Phase 1 Feature
to enable and turn on the Prepaid SMS Intercept Phase 1 feature, if necessary.
Figure B-4 Configure the B-Party Check Option for the Prepaid SMS Intercept Phase 1 Feature
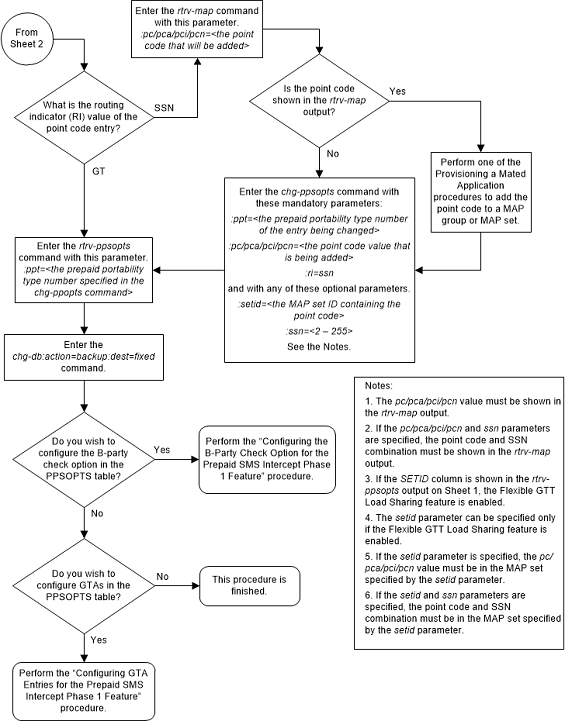
Configuring Point Code Entries for the Prepaid SMS Intercept Phase 1 Feature
This procedure is used to add point code entries to the
PPSOPTS table, or remove point code entries from the PPSOPTS table using these
parameters of the
chg-ppsopts command.
:ppt – The prepaid
portability type number of the entry that is being changed, from 1 to 32.
:pc/pca/pci/pcn – The
point code for the IN platform, or the value
none. The value
none removes the point code from the
entry that is being changed.
pc/pca- An ANSI point codepci- An ITU-I point codepcn- A 14-bit ITU-N point codeNote:
Refer to Chapter 2, Configuring Destination Tables in Database Administration - SS7 User's Guide for a definition of the point code types that are used on the EAGLE and for a definition of the different formats that can be used for ITU national point codes.
:ri – The routing
indicator for the IN platform
- gt - Routes on the GT value. If the Intermediate Global Title Loadsharing feature is enabled and turned on, the mated relay node (MRN) table is used to determine how the message is routed. If the Intermediate Global Title Loadsharing feature is not enabled or not turned on, the message is routed to the point code in the entry that is being changed.
- ssn - Routes on the SSN value. The mated application (MAP) table determines how the message is routed.
:setid – The MRN set or
MAP set ID that contains the point code in the entry that us being changed.
This parameter can be specified only if the Flexible GTT Load Sharing feature
is enabled. This parameter must be specified if the Flexible GTT Load Sharing
feature is enabled. If the Flexible GTT Load Sharing feature is enabled, the
point code must be in the MRN set or MAP set specified by the
setid parameter. If the
ssn parameter is specified with the
ri=ssn parameter, the point code and
SSN value must be in the MAP set specified by the
setid parameter.
:ssn - The subsystem
number that is assigned to the point code entry. The values for this parameter
are 2 - 255, or
none. The value
none removes the existing subsystem
number from the point code entry. The default value for this parameter is
none.
Table B-1 shows the parameter combinations that can be used in this procedure.
Table B-1 CHG-PPSOPTS Parameter Combinations
| Adding a Point Code Entry | Removing a Point Code or SSN Entry |
|---|---|
| :ppt = the prepaid portability type that is being changed | :ppt = the prepaid portability type that is being changed |
| :pc/pca/pci/pcn = the point code value that is being added | :pc/pca/pci/pcn = none |
| :ri = gt, ssn | :ssn = none |
| :setid = the MRN or MAP set ID containing the point code | |
| :ssn = 2 - 255 |
Global title address (GTA) entries and the B-Party check
option can also be configured with the
chg-ppsopts command. Perform
Configuring the B-Party Check Option for the Prepaid SMS Intercept Phase 1 Feature
to configure the B-Party check option. Perform
Configuring GTA Entries for the Prepaid SMS Intercept Phase 1 Feature
to configure the GTA entries.
The Prepaid SMS Intercept Phase 1 feature must be
enabled and turned on before this procedure can be performed. The status of the
Prepaid SMS Intercept Phase 1 feature can be verified by entering the
rtrv-ctrl-feat command. Perform
Activating the Prepaid SMS Intercept Phase 1 Feature
to enable and turn on the Prepaid SMS Intercept Phase 1 feature, if necessary.
The point code that will be specified in this procedure
must be the DPC of a route. This can be verified by entering the
rtrv-rte command with the
dpca/dpci/dpcn parameter.
The
dpca/dpci/dpcn parameter
value must be the point code that will be specified in this procedure.
Canceling the
RTRV-MRN and
RTRV-MAP Commands
Because the
rtrv-mrn and
rtrv-map commands used in this
procedure can output information for a long period of time, the
rtrv-mrn and
rtrv-map commands can be canceled and
the output to the terminal stopped. There are three ways that the
rtrv-mrn and
rtrv-map commands can be canceled.
-
Press the
F9function key on the keyboard at the terminal where thertrv-mrnandrtrv-mapcommands were entered. -
Enter the
canc-cmdwithout thetrmparameter at the terminal where thertrv-mrnandrtrv-mapcommands were entered. -
Enter the
canc-cmd:trm=<xx>, where<xx>is the terminal where thertrv-mrnandrtrv-mapcommands were entered, from another terminal other that the terminal where thertrv-mrnandrtrv-mapcommands were entered. To enter thecanc-cmd:trm=<xx>command, the terminal must allow Security Administration commands to be entered from it and the user must be allowed to enter Security Administration commands. The terminal’s permissions can be verified with thertrv-secu-trmcommand. The user’s permissions can be verified with thertrv-userorrtrv-secu-usercommands.
For more information about the
canc-cmd command, refer to
Commands User's Guide.
Figure B-5 Configure Point Code Entries for the Prepaid SMS Intercept Phase 1 Feature - Sheet 1 of 3
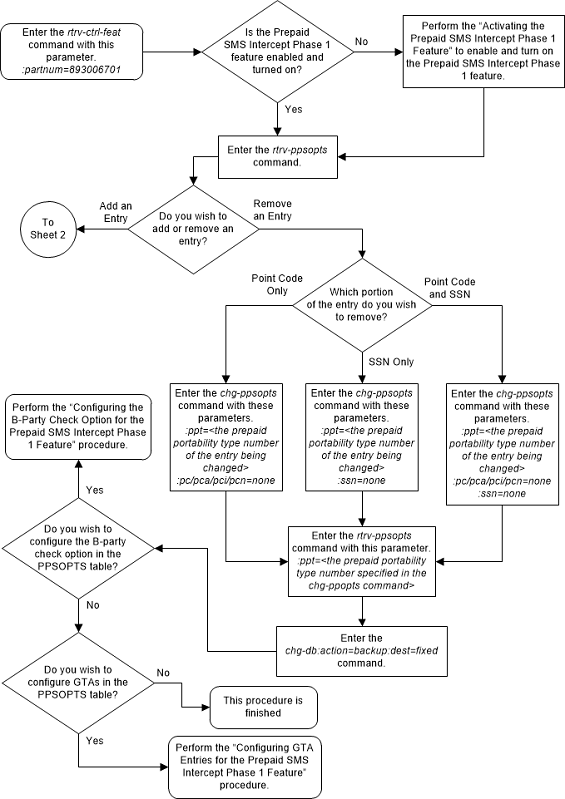
Figure B-6 Configure Point Code Entries for the Prepaid SMS Intercept Phase 1 Feature - Sheet 2 of 3
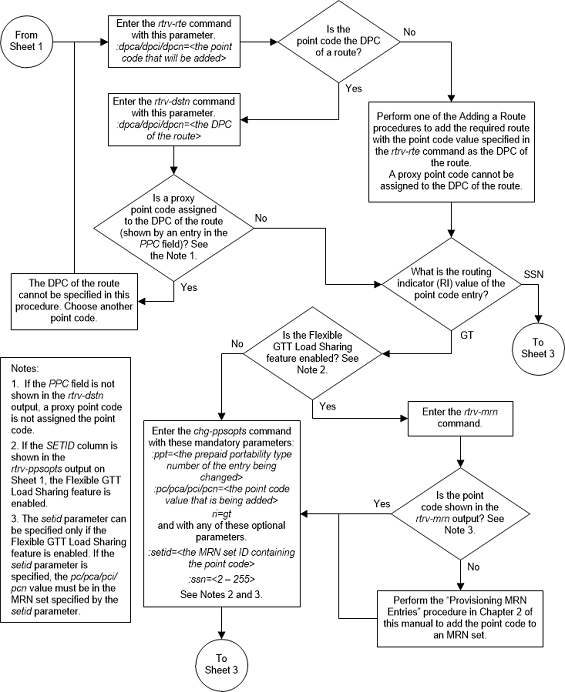
Figure B-7 Configure Point Code Entries for the Prepaid SMS Intercept Phase 1 Feature - Sheet 3 of 3
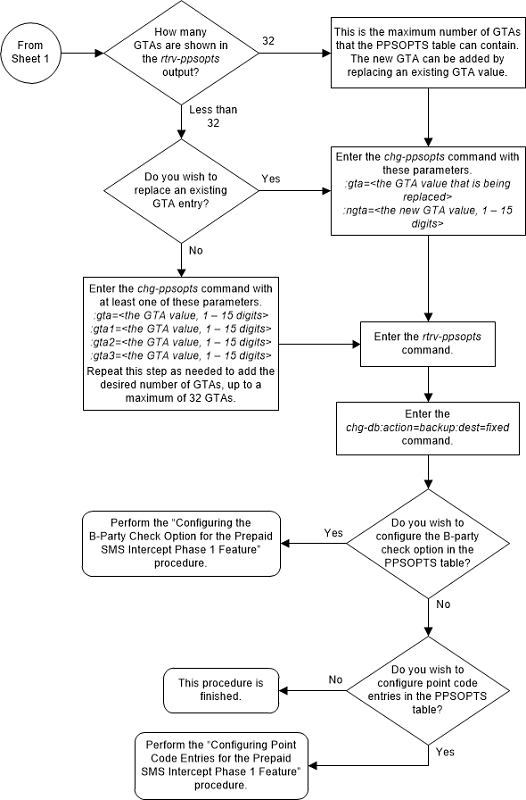
Configuring GTA Entries for the Prepaid SMS Intercept Phase 1 Feature
This procedure is used to add global title address (GTA)
entries to the PPSOPTS table, remove GTA entries from the PPSOPTS table, or
replace existing GTA entries with new GTA entries using these parameters of the
chg-ppsopts command.
:gta – The global title
address that is being added, consisting of 1 to 15 digits, or the global title
address that is being removed, shown in the
rtrv-ppsopts output.
:gta1 – The global
title address that is being added, consisting of 1 to 15 digits.
:gta2 – The global
title address that is being added, consisting of 1 to 15 digits.
:gta3 – The global
title address that is being added, consisting of 1 to 15 digits.
:ngta – The global
title address value that replaces an existing GTA entry. If a new GTA being
added, the
ngta parameter value must contain 1 to
15 digit. If an existing GTA entry is being removed, the
ngta parameter value must be
none.
The GTA entry is the address for an IN platform and determines whether or not an incoming message is screening by the Prepaid SMS Intercept Phase 1 feature.
The PPSOPTS table can contain a maximum of 32 GTA
entries. To remove or replace a GTA entry, a GTA entry must be shown in the
rtrv-ppsopts output. To add GTA
entries, blank GTA entries must be shown in the
rtrv-ppsopts output.
A maximum of four GTA entries can be added with the
chg-ppsopts command. To add more than
four GTA entries to the PPSOPTS table, enter the
chg-ppsopts command with the
gta,
gta1,
gta2, and
gta3 parameters as needed to add the
desired number of GTA entries, up to the maximum of 32 GTA entries.
Point code entries and the B-Party check option can also
be configured with the
chg-ppsopts command. Perform the
procedure
Configuring the B-Party Check Option for the Prepaid SMS Intercept Phase 1 Feature
to configure the B-Party check option. Perform the procedure
Configuring Point Code Entries for the Prepaid SMS Intercept Phase 1 Feature
to configure the point code entries.
The Prepaid SMS Intercept Phase 1 feature must be
enabled and turned on before this procedure can be performed. The status of the
Prepaid SMS Intercept Phase 1 feature can be verified by entering the
rtrv-ctrl-feat command. Perform the
procedure
Activating the Prepaid SMS Intercept Phase 1 Feature
to enable and turn on the Prepaid SMS Intercept Phase 1 feature, if necessary.
Figure B-8 Configure GTA Entries for the Prepaid SMS Intercept Phase 1 Feature - Sheet 1 of 2
Figure B-9 Configure GTA Entries for the Prepaid SMS Intercept Phase 1 Feature - Sheet 2 of 2
Turning Off the Prepaid SMS Intercept Phase 1 Feature
This procedure is used to turn off the Prepaid SMS
Intercept Phase 1 feature, using the
chg-ctrl-feat command.
The
chg-ctrl-feat command uses the
following parameters:
:partnum - The part
number of the Prepaid SMS Intercept Phase 1, 893006701.
:status=off – used to
turn off the Prepaid SMS Intercept Phase 1 feature.
The status of the Prepaid SMS Intercept Phase 1 feature
must be
on and is shown with the
rtrv-ctrl-feat command.
Caution:
If the Prepaid SMS Intercept Phase 1 feature is turned off, the screening of incoming messages from an MSC by the EAGLE based on the MAP operation code will not be performed.Figure B-10 Turn Off the Prepaid SMS Intercept Phase 1 Feature
