12 Allowed Originating Point Code (OPC) Screen Configuration

Chapter 12, Allowed Originating Point Code (OPC) Screen Configuration, contains the procedures necessary to configure allowed originating point code screens.

Introduction

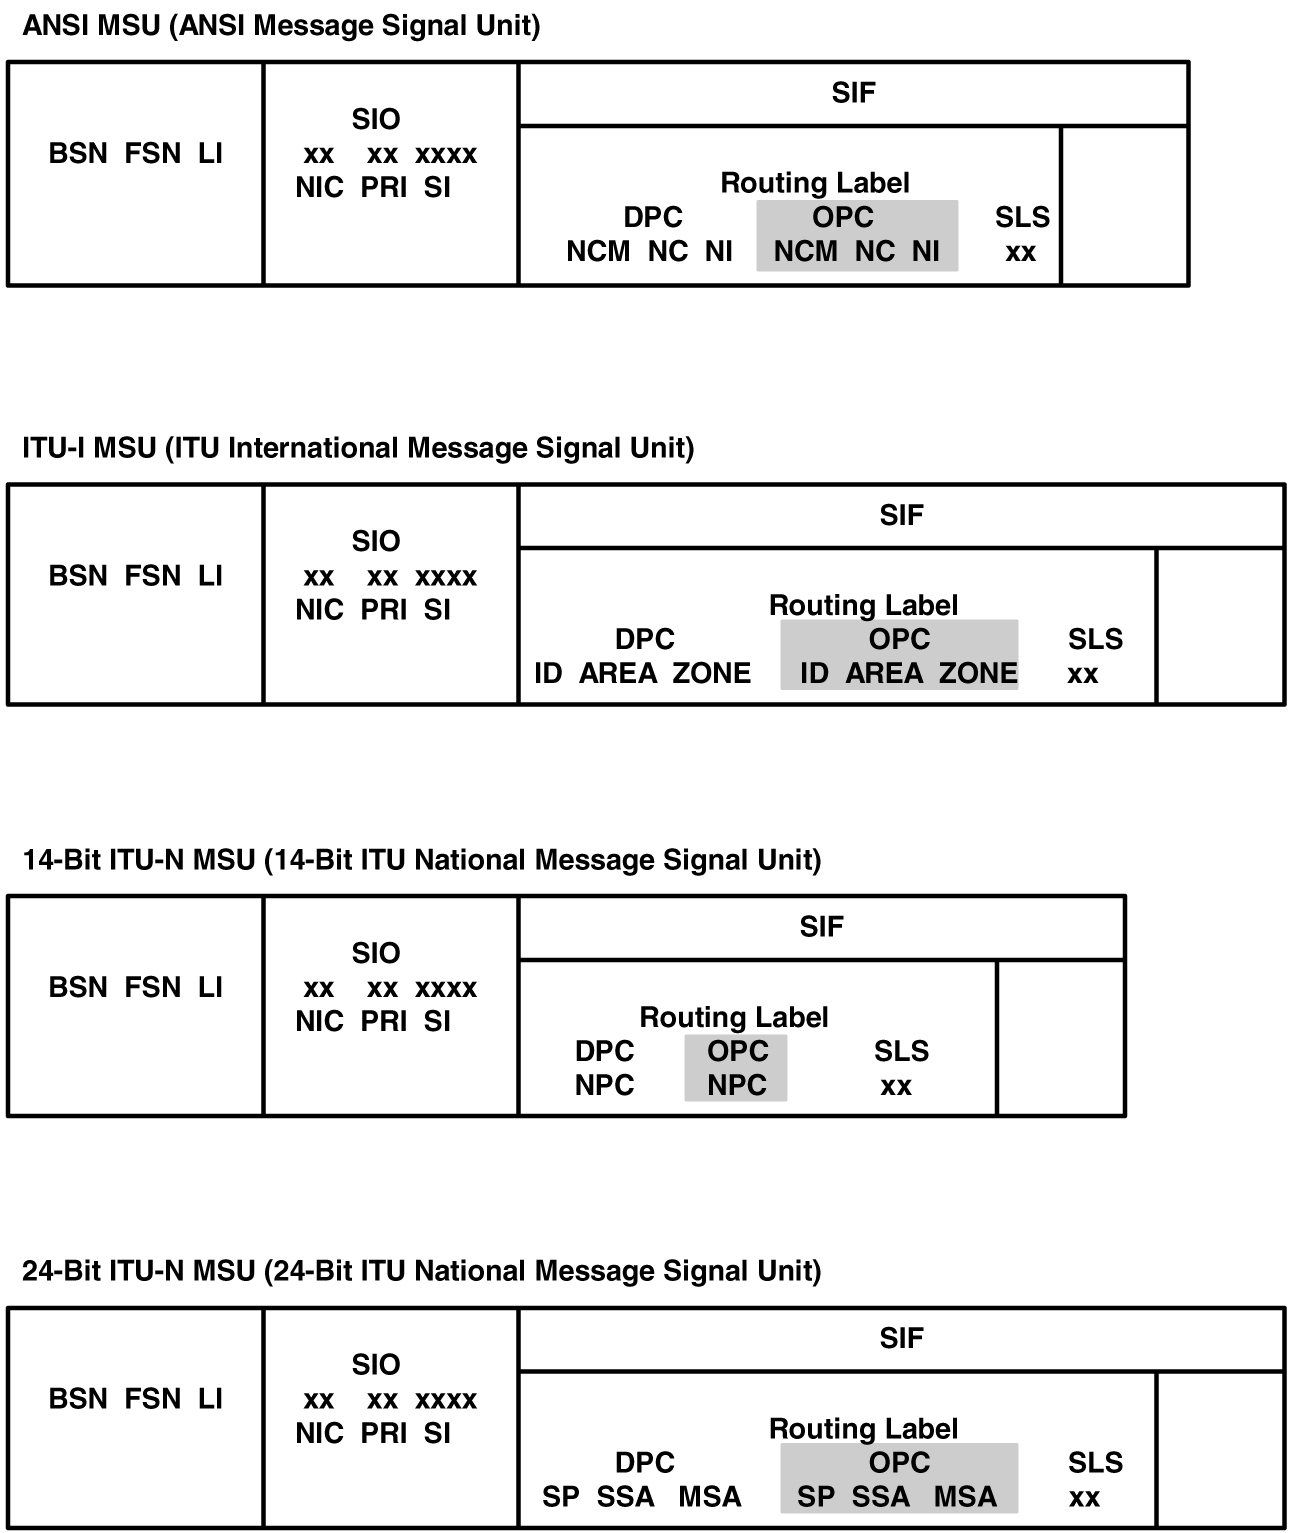
The allowed originating point code (OPC) screen identifies a set of OPC's that are allowed to send SS7 messages into the network. The gray shaded areas in Figure 12-4 shows the fields of the SS7 message that are checked by the allowed OPC screening function.

Gateway Screening Actions

If a match is not found, the message is discarded.

If a match is found, the nsfi is examined to determine the next step in the screening process. If the nsfi value is any value other than stop, the next screening reference (nsr) is identified and the screening process continues to the next screen identified by the nsfi and nsr parameter values.

If the nsfi is equal to stop, the screening process stops and the message is processed. If a gateway screening stop action set is specified with the screen, shown by the actname parameter value, the message is processed according to the gateway screening stop actions that are assigned to the gateway screening stop action set.
  • If the rdct (redirect) gateway screening stop action is specified,the message is diverted from the original destination and sent to another destination with the Database Transport Access feature, specified by global title translation, for further processing.
  • If the cncf gateway screening stop action is specified, the PIP parameter in the incoming ISUP IAM message is converted to the GN parameter. The GN parameter in the incoming ISUP IAM message is converted to the PIP parameter. The message is then sent to the node specified by the DPC in the routing label in the message. For more information on the Calling Name Conversion Facility feature, see Calling Name Conversion Facility (CNCF) Configuration.
  • If the tlnp gateway screening stop action is specified, ISUP IAMs that pass gateway screening are processed either by the ISUP NP with EPAP feature (if the ISUP NP with EPAP feature is enabled and turned on) or by the Triggerless LNP feature (if the Triggerless LNP feature is turned on). The ISUP NP with EPAP feature is discussed in more detail in G-Port User's Guide. The Triggerless LNP feature is discussed in more detail in ELAP Administration and LNP Feature Activation Guide.
  • If the tinp gateway screening stop action is specified, ISUP IAMs that pass gateway screening are intercepted by the Triggerless ISUP based Number Portability (TINP) feature and converted to include the routing number (RN) if the call is to a ported number. The TINP feature is discussed in more detail in G-Port User's Guide.
  • If the tif, tif2, or tif3 gateway screening stop actions are specified, TIF processing is applied to the message.
  • If the sccp gateway screening stop action is specified, MTP routed SCCP UDT/XUDT are forwarded to the service modules for further processing.

Allowed OPC Screening Actions

Figure 12-1 through Figure 12-3 show the screening actions of the allowed OPC screen.

Figure 12-1 Allowed OPC Screening Actions - Sheet 1 of 3

img/allowed_opc-1_231.jpg

Figure 12-2 Allowed OPC Screening Actions - Sheet 2 of 3

img/gws_stop_actions_01_140964.jpg

Figure 12-3 Allowed OPC Screening Actions - Sheet 3 of 3

img/gws_stop_actions_02_140964.jpg

Figure 12-4 Allowed OPC Screening Functions

img/c_introduction_10_dbags-fig5.jpg

Adding an Allowed OPC Screen

This procedure is used to add an allowed originating point code (OPC) screen to the database using the ent-scr-opc command. The parameters used by the ent-scr-opc command are shown in the Gateway Screening Attributes section. The general rules that apply to configuring gateway screening entities are shown in the Gateway Screening Configuration section.

The examples in this procedure are used to add the allowed OPC screen data shown in Table 12-1 and based on the example configurations shown in Figure 2-3, Figure 2-7, and Figure 2-9.

Table 12-1 Example Gateway Screening Allowed OPC Configuration Table

Screening Reference NI NC NCM NSFI NSR
gws4 001 001 001 blkopc gws3
fld2 010 010 010 blkopc fld3
isp1 015 015 015 blkopc isp1
tup1 017 017 017 sio tup1

Note:

If you using multiple-part ITU national point codes with gateway screening, see the 14-Bit ITU National Point Code Formats section.

The allowed OPC screen can reference one of the following screens.

  • Blocked OPC
  • Allowed SIO
  • Allowed DPC
  • Blocked DPC
  • Allowed CGPA

Verifying the Gateway Screening Configuration

Enter the following commands to verify that these screens are in the database.

  • rtrv-scr-blkopc:all=yes
  • rtrv-scr-sio:all=yes
  • rtrv-scr-dpc:all=yes
  • rtrv-scr-blkdpc:all=yes
  • rtrv-scr-cgpa:all=yes

Gateway Screening Configuration Procedures

If the desired screen is not in the database, perform one of these procedures to add the desired screen to the database or change an existing screen in the database.

Specifying a Range of Values

A range of values can be specified for the point code parameters ni, nc, or ncm.

If a range of values is specified for any of these parameters, and the value of the other parameters match existing values for the screening reference name, the range of values for the point code parameter cannot include any values for that parameter that are currently provisioned for the screening reference name.

For example, screening reference name scr1 contains these entries:

SR    NI       NC       NCM      NSFI    NSR/ACT
SCR1  240      001      010      CGPA    ------
SCR1  241      010      020      STOP    ------

Another entry for screening reference scr1 with the ni value of 240 and the nc value of 001 cannot be specified if the range of values for the ncm parameter includes the value 010.

The ANSI point code parameter values can be specified as a single value, a range of values, or with an asterisk (*). The asterisk specifies all possible values for the ni, nc, and ncm parameters. Table 12-2 shows the valid combinations of these parameter values.

Table 12-2 Valid Value Combinations for ANSI Point Code Parameters

NI NC NCM
Single Value Single Value Single Value
Single Value Single Value Range of Values
Single Value Single Value Asterisk
Single Value Range of Values Asterisk
Single Value Asterisk Asterisk
Range of Values Asterisk Asterisk
Asterisk Asterisk Asterisk

A range of values can also be specified for an ITU-I or 24-bit ITU-N point code parameter using a combination of asterisks (*) and single values for the point code parameters. Table 12-3 shows the valid combinations of the ITU-I parameter values. Table 12-4 shows the valid combinations of the 24-bit ITU-N parameter values.

Table 12-3 Valid Value Combinations for ITU-I Point Code Parameters

ZONE AREA ID
Single Value Single Value Single Value
Single Value Single Value Asterisk
Single Value Asterisk Asterisk
Asterisk Asterisk Asterisk

Table 12-4 Valid Value Combinations for 24-Bit ITU-N Point Code Parameters

MSA SSA SP
Single Value Single Value Single Value
Single Value Single Value Asterisk
Single Value Asterisk Asterisk
Asterisk Asterisk Asterisk
  1. Verify that the gateway screening feature is on, by entering the rtrv-feat command.

    If the gateway screening feature is on, the GWS field is set to on.

    Note:

    Thertrv-feat command output contains other fields that are not used by this procedure. If you wish to see all the fields displayed by thertrv-feat command, see thertrv-feat command description inCommands User's Guide.

    If the gateway screening feature is on, shown by the entry GWS = on in the rtrv-feat command output, skip step 2, and go to step 3.

  2. Turn the gateway screening feature on by entering this command.

    chg-feat:gws=on

    Note:

    Once the gateway screening feature is turned on with thechg-feat command, it cannot be turned off.

    Note:

    The gateway screening feature must be purchased before you turn this feature on with thechg-feat command. If you are not sure if you have purchased the gateway screening feature, contact your Oracle Sales Representative or Account Representative.

    When the chg-feat has successfully completed, this message should appear.

    rlghncxa03w 06-10-28 11:43:04 GMT EAGLE5 36.0.0
    CHG-FEAT: MASP A - COMPLTD
  3. Display all allowed OPC screens in the database using the rtrv-scr-opc command.

    The following is an example of the possible output.

    rlghncxa03w 06-10-25 15:25:30 GMT EAGLE5 36.0.0
    SCREEN = ALLOWED OPC
    SR    REF  RULES
    IEC   YES     2
    WRD2  YES     1
    WRD4  YES     9

    If the screening reference names that you wish to add with this procedure are not shown in the rtrv-scr-opc command output, go to step 4. For this example, the screening reference names are not shown. If these screening reference names are shown in the rtrv-scr-opc command output, make sure the screening data you wish to enter is not already in the database by entering the rtrv-scr-opc command with the screening reference name. For example, enter the rtrv-scr-opc:sr=iec command. The following is an example of the possible output.

    rlghncxa03w 06-10-25 15:26:30 GMT  EAGLE5 36.0.0
    SCREEN = ALLOWED OPC
    SR    NI       NC       NCM      NSFI    NSR/ACT
    IEC   240      001      010      STOP    ------
    IEC   241      010      *        CGPA    cg04 
    
    SR      NPC                      NSFI    NSR/ACT
    IEC     00235                    CGPA    cg04
    IEC     00240                    CGPA    cg01
    
    SR      ZONE   AREA     ID       NSFI    NSR/ACT
    IEC     1      003      4        BLKOPC  blk1
    IEC     1      003      5        STOP    ------

    If a gateway screening stop action set is to be assigned to the allowed OPC screen being added to the database, go to step 4.

    Step 4 verifies the gateway screening stop action set names in the database. The gateway screening stop action set names are assigned only if the NSFI of the screen being added in this procedure is STOP. If the NSFI of the new screen will be STOP, but a gateway screening stop action set name will not be assigned to the new screen, skip steps 4, 5, and 6, and go to step 7. If the NSFI of the new screen is not STOP, skip steps 4 and 5, and go to step 6.

  4. Display the gateway screening stop action sets in the database with the rtrv-gws-actset command.

    This is an example of the possible output.

    rlghncxa03w 06-10-25 15:27:30 GMT EAGLE5 36.0.0
    ACT  ACT    ACT  ACT  ACT  ACT  ACT  ACT  ACT  ACT  ACT  ACT
    ID   NAME   1    2    3    4    5    6    7    8    9    10
    --   ------ ---- ---- ---- ---- ---- ---- ---- ---- ---- ----
    1    copy   copy      
    2    rdct   rdct      
    3    cr     copy rdct 
    4    cncf   cncf      
    5    cpcncf copy cncf 
    6    cncfrd cncf rdct 
    7    cpcfrd copy cncf rdct
    
    GWS action set table is (7 of 16) 44% full

    If the required gateway screening stop action set is not in the database, perform the Configuring Gateway Screening Stop Action Sets procedure to configure the required gateway screening stop action set.

    Note:

    If the gateway screening stop action set being assigned to theAllowed OPC screen does not contain the redirect stop action, skip step 5 and go to step 6.
  5. Verify the point codes of adjacent nodes by entering the rtrv-ls command.

    The following is an example of the possible output.

    rlghncxa03w 06-10-10 11:43:04 GMT EAGLE5 36.0.0
                                     L3T SLT              GWS GWS GWS
    LSN          APCA   (SS7)  SCRN  SET SET BEI LST LNKS ACT MES DIS SLSCI NIS
    e1e2         001-207-000   none  1   1   no  B   6    off off off no    off
    ls1305       000-005-000   none  1   1   no  A   1    off off off no    off
    ls1307       000-007-000   none  1   1   no  A   1    off off off no    off
    e1m1s1       001-001-001   none  1   1   no  A   7    off off off no    off
    e1m1s2       001-001-002   none  1   1   no  A   7    off off off no    off
    
                                     L3T SLT              GWS GWS GWS
    LSN          APCI   (SS7)  SCRN  SET SET BEI LST LNKS ACT MES DIS SLSCI NIS
    e1e2i        1-207-0       none  1   1   no  B   4    off off off ---   on
    ls1315       0-015-0       none  1   1   no  A   1    off off off ---   off
    ls1317       0-017-0       none  1   1   no  A   1    off off off ---   on
    e1m2s1       1-011-1       none  1   1   no  A   7    off off off ---   off
    e1m2s2       1-011-2       none  1   1   no  A   7    off off off ---   off
    
    Link set table is (10 of 1024) 1% full.

    Caution:

    Redirecting SLTA/SLTM messages prevents SLTA/SLTM messages from being returned to the EAGLE. The signaling link carrying these messages will fail if these messages are not returned to the EAGLE. To prevent SLTA/SLTM messages from being redirected, gateway screening stop action sets containing the redirect stop action should not be assigned to Allowed OPC screens containing the adjacent point code of a linkset.

    Note:

    If the NSFI of the screen being added in this procedure is STOP, skip step 6 and go to step 7.
  6. Enter the commands in the Verifying the Gateway Screening Configuration section to verify that the screen that will be specified by the NSFI/NSR parameter combination in step 8 is in the database.

    If the desired screen is not in the database, perform one of the procedures shown in the Gateway Screening Configuration Procedures section to add the desired screen to the database or change an existing screen in the database.

    Note:

    If the point code being added in this procedure is not an ITU-I or 14-bit ITU-N spare point code, skip step 7 and to step 8.

    Note:

    If the point code being added in this procedure is an ITU-I or 14-bit ITU-N spare point code and the screening reference contains ITU-I or 14-bit ITU-N spare point codes, skip step 7 and go to step 8.
  7. Display the status of the ITU National and International Spare Point Code Support feature by entering the rtrv-ctrl-feat command with the ITU National and International Spare Point Code Support feature part number.

    Enter this command.

    rtrv-ctrl-feat:partnum=893013601

    This is an example of the possible output.

    rlghncxa03w 06-10-25 15:25:30 GMT EAGLE5 36.0.0
    The following features have been permanently enabled:
    
    Feature Name              Partnum   Status Quantity
    Spare Point Code Support  893013601 on     ----
    
    The following features have been temporarily enabled:
    
    Feature Name              Partnum   Status Quantity   Trial Period Left
    Zero entries found.
    
    The following features have expired temporary keys:
    
    Feature Name              Partnum
    Zero entries found.

    If the ITU National and International Spare Point Code Support feature is enabled, go to step 8.

    If the ITU National and International Spare Point Code Support feature is not enabled, perform the “Activating the ITU National and International Spare Point Code Support Feature” procedure in Database Administration - SS7 User's Guide to enable the ITU National and International Spare Point Code Support feature as required. After the feature has been enabled, go to step 8.

  8. Add a new allowed OPC screen to the database using the ent-scr-opc command.

    If a gateway screening stop action is to be assigned to the allowed OPC screen being changed, enter the ent-scr-opc command with the nsfi=stop parameter and the actname parameter with the name of a gateway screening stop action set shown in the output of the rtrv-gws-actset command executed in step 4.

    Caution:

    Redirecting SLTA/SLTM messages preventsSLTA/SLTM messages from being returned to the EAGLE. The signaling link carrying these messages will fail if these messages are not returned to the EAGLE. To prevent SLTA/SLTM messages from being redirected, gateway screening stop action sets containing the redirect stop action should not be assigned to Allowed OPC screens containing the adjacent point code of a linkset, shown in step 5.

    The following list contains the values for ni, nc, ncm, zone, area, id, npc, msa, ssa, and sp parameters:

    • ni – 0 - 255 or an asterisk (*)
    • nc – 0 - 255 or an asterisk (*)
    • ncm – 0 - 255 or an asterisk (*)
    • zone – 0 - 7 or an asterisk (*)
    • area – 0 - 255 or an asterisk (*)
    • id – 0 - 7 or an asterisk (*)
    • npc – 1 - 16383 or an asterisk (*)
    • msa – 0 - 255 or an asterisk (*)
    • ssa – 0 - 255 or an asterisk (*)
    • sp – 0 - 255 or an asterisk (*)

    A range of values can be specified for the ni, nc, and ncm parameters. See the “Specifying a Range of Values” section for more information on how the asterisk and a range of values are used for the ni, nc, and ncm parameters.

    To add a spare point code to the allowed OPC screen, the pcst=s parameter must be specified. To add a non-spare point code to the allowed OPC screen, the pcst parameter does not have to be specified. If the pcst parameter is specified for a screen containing an ITU-I or 14-bit ITU-N non-spare point code, the value must be none.

    For this example, enter these commands.

    ent-scr-opc:sr=gws4:ni=001:nc=001:ncm=001:nsfi=blkopc:nsr=gws3

    A message similar to the following should appear.

    rlghncxa03w 06-10-25 15:28:30 GMT  EAGLE5 36.0.0
    ENT-SCR-OPC: SCREEN SET AFFECTED - GWS4  1% FULL
    ENT-SCR-OPC: MASP A - COMPLTD

    ent-scr-opc:sr=fld2:ni=010:nc=010:ncm=010:nsfi=blkopc:nsr=fld3

    A message similar to the following should appear.

    rlghncxa03w 06-10-25 15:29:30 GMT  EAGLE5 36.0.0
    ENT-SCR-OPC: SCREEN SET AFFECTED - FLD2  1% FULL
    ENT-SCR-OPC: MASP A - COMPLTD

    ent-scr-opc:sr=isp1:ni=015:nc=015:ncm=015:nsfi=blkopc:nsr=isp1

    A message similar to the following should appear.

    rlghncxa03w 06-10-25 15:29:30 GMT  EAGLE5 36.0.0
    ENT-SCR-OPC: SCREEN SET AFFECTED - ISP1  1% FULL
    ENT-SCR-OPC: MASP A - COMPLTD

    ent-scr-opc:sr=tup1:ni=017:nc=017:ncm=017:nsfi=sio:nsr=tup1

    A message similar to the following should appear.

    rlghncxa03w 06-10-25 15:29:30 GMT  EAGLE5 36.0.0
    ENT-SCR-OPC: SCREEN SET AFFECTED - TUP1  1% FULL
    ENT-SCR-OPC: MASP A - COMPLTD
  9. Verify the changes using the rtrv-scr-opc command with the screening reference name used in step 8.
    For this example, enter these commands.

    rtrv-scr-opc:sr=gws4

    The following is an example of the possible output.

    rlghncxa03w 06-10-25 15:30:30 GMT  EAGLE5 36.0.0
    SCREEN = ALLOWED OPC
    SR    NI       NC       NCM      NSFI    NSR/ACT
    GWS4  001      001      001      BLKOPC  GWS3

    rtrv-scr-opc:sr=fld2

    The following is an example of the possible output.

    rlghncxa03w 06-10-25 15:31:30 GMT  EAGLE5 36.0.0
    SCREEN = ALLOWED OPC
    SR    NI       NC       NCM      NSFI    NSR/ACT
    FLD2  010      010      010      BLKOPC  FLD3

    rtrv-scr-opc:sr=isp1

    The following is an example of the possible output.

    rlghncxa03w 06-10-25 15:31:30 GMT  EAGLE5 36.0.0
    SCREEN = ALLOWED OPC
    SR    NI       NC       NCM      NSFI    NSR/ACT
    ISP1  015      015      015      BLKOPC  ISP1

    rtrv-scr-opc:sr=tup1

    The following is an example of the possible output.

    rlghncxa03w 06-10-25 15:31:30 GMT  EAGLE5 36.0.0
    SCREEN = ALLOWED OPC
    SR    NI       NC       NCM      NSFI    NSR/ACT
    TUP1  017      017      017      SIO     TUP1
  10. Backup the new changes using the chg-db:action=backup:dest=fixed command.
    The following messages should appear, the active Maintenance and Administration Subsystem Processor (MASP) appears first.
    BACKUP (FIXED) : MASP A - Backup starts on active MASP.
    BACKUP (FIXED) : MASP A - Backup on active MASP to fixed disk complete.
    BACKUP (FIXED) : MASP A - Backup starts on standby MASP.
    BACKUP (FIXED) : MASP A - Backup on standby MASP to fixed disk complete.

Figure 12-5 Add an Allowed OPC Screen - Sheet 1 of 5


Figure 12-6 Add an Allowed OPC Screen - Sheet 2 of 5


Figure 12-7 Add an Allowed OPC Screen - Sheet 3 of 5


Figure 12-8 Add an Allowed OPC Screen - Sheet 4 of 5


Figure 12-9 Add an Allowed OPC Screen - Sheet 5 of 5


Removing an Allowed OPC Screen

This procedure is used to remove an allowed originating point code (OPC) screen from the database using the dlt-scr-opc command. The parameters used by the dlt-scr-opc command are shown in the Gateway Screening Attributes section. The general rules that apply to configuring gateway screening entities are shown in the Gateway Screening Configuration section.

The example in this procedure removes the allowed OPC screen gws4 from the database.

Note:

If you using multiple-part ITU national point codes with gateway screening, see the 14-Bit ITU National Point Code Formats section.

The allowed OPC screen can only be referenced by a screen set.

Enter the rtrv-scrset:nsfi=opc command to verify that none of the screen sets reference the allowed OPC screen being removed from the database.

To change the NSFI of any of the screen sets, perform the Changing a Screen Set procedure.

  1. Display the allowed OPC screens in the database using the rtrv-scr-opc command.

    The following is an example of the possible output.

    rlghncxa03w 06-10-25 15:25:30 GMT EAGLE5 36.0.0
    SCREEN = ALLOWED OPC
    
    SR    REF  RULES
    GWS4  YES     1
    IEC   YES     6
    ISP1  YES     1
    TUP1  YES     1
    WRD2  YES     1
    WRD4  YES     9

    From the rtrv-scr-opc output, display the allowed OPC screen you wish to remove using the rtrv-scr-opc command with the screening reference name. For this example, enter this command.

    rtrv-scr-opc:sr=gws4

    The following is an example of the possible output.

    rlghncxa03w 06-10-25 15:25:30 GMT  EAGLE5 36.0.0
    SCREEN = ALLOWED OPC
    SR    NI       NC       NCM      NSFI    NSR/ACT
    GWS4  001      001      001      BLKOPC  GWS7
  2. Enter the rtrv-scrset:nsfi=opc command to verify that none of the screen sets reference the allowed OPC screen being removed from the database.

    To change the NSFI of any of the screen sets, perform the Changing a Screen Set procedure.

  3. Remove the allowed OPC screen from the database using the dlt-scr-opc command with the screening reference name shown in the rtrv-scr-opc output in step 1 and with the point code parameter values (ni, nc, ncm, or zone, area, id, or npc, or msa, ssa, sp) of the screen being removed from the database. The values for these parameters must be entered exactly as shown in the rtrv-scr-opc output.

    To remove an entry containing either an ITU-I or a 14-bit ITU-N spare point code, the pcst=s parameter must be specified with the dlt-scr-opc command.

    To remove an entry containing either an ITU-I or a 14-bit ITU-N non-spare point code, the pcst parameter does not have to be specified with the dlt-scr-opc command. If the pcst parameter is specified, the value must be none.

    For this example, enter this command.

    dlt-scr-opc:sr=gws4:ni=001:nc=001:ncm=001

    A message similar to the following should appear.

    rlghncxa03w 06-10-25 15:26:30 GMT  EAGLE5 36.0.0
    DLT-SCR-OPC: SCREEN SET AFFECTED - GWS4  0% FULL
    DLT-SCR-OPC: MASP A - COMPLTD
  4. Verify the changes using the rtrv-scr-opc command with the screening reference name used in step 3.

    For this example, enter this command.

    rtrv-scr-opc:sr=gws4

    The following is an example of the possible output.

    E2573 Cmd Rej: SR or NSR does not reference an existing SR

    This message shows that the specified screening reference name is not in the database and the action of the dlt-scr-opc command in step 3 was successful. If the specified screening reference name contained more than one entry when the dlt-scr-opc command was executed in step 3, the rtrv-scr-opc:sr= command output would show the remaining entries in the screening reference instead of error message E2573.

  5. Backup the new changes using the chg-db:action=backup:dest=fixed command.

    The following messages should appear, the active Maintenance and Administration Subsystem Processor (MASP) appears first.

    BACKUP (FIXED) : MASP A - Backup starts on active MASP.
    BACKUP (FIXED) : MASP A - Backup on active MASP to fixed disk complete.
    BACKUP (FIXED) : MASP A - Backup starts on standby MASP.
    BACKUP (FIXED) : MASP A - Backup on standby MASP to fixed disk complete.

Figure 12-10 Remove an Allowed OPC Screen


Changing an Allowed OPC Screen

This procedure is used to change the attributes of an allowed originating point code (OPC) screen in the database using the chg-scr-opc command. The parameters used by the chg-scr-opc command are shown in the Gateway Screening Attributes section. The general rules that apply to configuring gateway screening entities are shown in the Gateway Screening Configuration section.

The example in this procedure is used to change the point code for the allowed OPC screen wrd2 to 230-230-230, the NSFI to blkopc, and the NSR to wrd6.

Note:

If you using multiple-part ITU national point codes with gateway screening, see the 14-Bit ITU National Point Code Formats section.

The allowed OPC screen can reference one of the following screens.

  • Blocked OPC
  • Allowed SIO
  • Allowed DPC
  • Blocked DPC
  • Allowed CGPA

Verifying the Gateway Screening Configuration

Enter the following commands to verify that these screens are in the database.

  • rtrv-scr-blkopc:all=yes
  • rtrv-scr-sio:all=yes
  • rtrv-scr-dpc:all=yes
  • rtrv-scr-blkdpc:all=yes
  • rtrv-scr-cgpa:all=yes

Gateway Screening Configuration Procedures

If the desired screen is not in the database, perform one of these procedures to add the desired screen to the database or change an existing screen in the database.

Specifying a Range of Values

A range of values can be specified for the point code parameters ni, nc, or ncm.

If a range of values is specified for any of these parameters, and the value of the other parameters match existing values for the screening reference name, the range of values for the point code parameter cannot include any values for that parameter that are currently provisioned for the screening reference name.

For example, screening reference name scr1 contains these entries:

SR    NI       NC       NCM      NSFI    NSR/ACT
SCR1  240      001      010      CGPA    ------
SCR1  241      010      020      STOP    ------

Another entry for screening reference scr1 with the ni value of 240 and the nc value of 001 cannot be specified if the range of values for the ncm parameter includes the value 010.

The ANSI point code parameter values can be specified as a single value, a range of values, or with an asterisk (*). The asterisk specifies all possible values for the ni, nc, and ncm parameters. Table 12-5 shows the valid combinations of these parameter values.

Table 12-5 Valid Value Combinations for ANSI Point Code Parameters

NI NC NCM
Single Value Single Value Single Value
Single Value Single Value Range of Values
Single Value Single Value Asterisk
Single Value Range of Values Asterisk
Single Value Asterisk Asterisk
Range of Values Asterisk Asterisk
Asterisk Asterisk Asterisk

A range of values can also be specified for an ITU-I or 24-bit ITU-N point code parameter using a combination of asterisks (*) and single values for the point code parameters. Table 12-6 shows the valid combinations of the ITU-I parameter values. Table 12-7 shows the valid combinations of the 24-bit ITU-N parameter values.

Table 12-6 Valid Value Combinations for ITU-I Point Code Parameters

ZONE AREA ID
Single Value Single Value Single Value
Single Value Single Value Asterisk
Single Value Asterisk Asterisk
Asterisk Asterisk Asterisk

Table 12-7 Valid Value Combinations for 24-Bit ITU-N Point Code Parameters

MSA SSA SP
Single Value Single Value Single Value
Single Value Single Value Asterisk
Single Value Asterisk Asterisk
Asterisk Asterisk Asterisk
  1. Display the allowed OPC screens in the database using the rtrv-scr-opc command.

    The following is an example of the possible output.

    rlghncxa03w 06-10-25 15:25:30 GMT EAGLE5 36.0.0
    SCREEN = ALLOWED DPC
    SR    REF  RULES
    GWS4  YES     1
    IEC   YES     6
    ISP1  YES     1
    TUP1  YES     1
    WRD2  YES     1
    WRD4  YES     9

    From the rtrv-scr-opc output, display the allowed OPC screen you wish to remove using the rtrv-scr-opc command with the screening reference name. For this example, enter this command.

    rtrv-scr-opc:sr=wrd2

    The following is an example of the possible output.

    rlghncxa03w 06-10-25 15:25:30 GMT  EAGLE5 36.0.0
    SCREEN = ALLOWED OPC
    SR    NI       NC       NCM      NSFI    NSR/ACT
    WRD2  243      015      001      STOP    ------

    If a gateway screening stop action set is to be assigned to the allowed OPC screen being changed in the database, go to step 2.

    Step 2 verifies the gateway screening stop action set names in the database. The gateway screening stop action set names are assigned only if the NSFI of the screen being changed in this procedure is STOP. If the NSFI of the screen will be changed to STOP, but a gateway screening stop action set name will not be assigned to the screen, skip steps 2, 3, and 4 and go to step 5. If the NSFI of the screen will not be STOP, skip step 2 and 3, and go to step 4.

  2. Display the gateway screening stop action sets in the database with the rtrv-gws-actset command.

    This is an example of the possible output.

    rlghncxa03w 06-10-25 15:26:30 GMT EAGLE5 36.0.0
    ACT  ACT    ACT  ACT  ACT  ACT  ACT  ACT  ACT  ACT  ACT  ACT
    ID   NAME   1    2    3    4    5    6    7    8    9    10
    --   ------ ---- ---- ---- ---- ---- ---- ---- ---- ---- ----
    1    copy   copy      
    2    rdct   rdct      
    3    cr     copy rdct 
    4    cncf   cncf      
    5    cpcncf copy cncf 
    6    cncfrd cncf rdct 
    7    cpcfrd copy cncf rdct
    
    GWS action set table is (7 of 16) 44% full

    If the required gateway screening stop action set is not in the database, perform the Configuring Gateway Screening Stop Action Sets procedure to configure the required gateway screening stop action set.

    Note:

    If the gateway screening stop action set being assigned to the Allowed OPC screen does not contain the redirect stop action, skip step 3 and go to step 4.
  3. Verify the point codes of adjacent nodes by entering the rtrv-ls command.

    The following is an example of the possible output.

    rlghncxa03w 06-10-10 11:43:04 GMT EAGLE5 36.0.0
                                     L3T SLT              GWS GWS GWS
    LSN          APCA   (SS7)  SCRN  SET SET BEI LST LNKS ACT MES DIS SLSCI NIS
    e1e2         001-207-000   none  1   1   no  B   6    off off off no    off
    ls1305       000-005-000   none  1   1   no  A   1    off off off no    off
    ls1307       000-007-000   none  1   1   no  A   1    off off off no    off
    e1m1s1       001-001-001   none  1   1   no  A   7    off off off no    off
    e1m1s2       001-001-002   none  1   1   no  A   7    off off off no    off
    
                                     L3T SLT              GWS GWS GWS
    LSN          APCI   (SS7)  SCRN  SET SET BEI LST LNKS ACT MES DIS SLSCI NIS
    e1e2i        1-207-0       none  1   1   no  B   4    off off off ---   on
    ls1315       0-015-0       none  1   1   no  A   1    off off off ---   off
    ls1317       0-017-0       none  1   1   no  A   1    off off off ---   on
    e1m2s1       1-011-1       none  1   1   no  A   7    off off off ---   off
    e1m2s2       1-011-2       none  1   1   no  A   7    off off off ---   off
    
    Link set table is (10 of 1024) 1% full.

    Caution:

    Redirecting SLTA/SLTM messages prevents SLTA/SLTM messages from being returned to the EAGLE. The signaling link carrying these messages will fail if these messages are not returned to the EAGLE. To prevent SLTA/SLTM messages from being redirected, gateway screening stop action sets containing the redirect stop action should not be assigned to Allowed OPC screens containing the adjacent point code of a linkset.

    Note:

    If the NSFI of the screen being changed in this procedure will be STOP, or if the NSFI of the screen is not being changed, skip step 4 and go to step 5.
  4. Enter the commands in the Verifying the Gateway Screening Configuration section to verify that the screen that will be specified by the NSFI/NSR parameter combination in step 6 is in the database.

    If the desired screen is not in the database, perform one of the procedures shown in the Gateway Screening Configuration Procedures section to add the desired screen to the database or change an existing screen in the database.

    Note:

    If any of these conditions apply to this procedure, skip this step and go to step 6:
    • The point code in the screen is not being changed.
    • The screen being changed contains either an ANSI or 24-bit ITU-N point code.
    • The ITU-I or 14-bit ITU-N non-spare point code in the screen is not being changed to an ITU-I or 14-bit ITU-N spare point code.
    • The point code in the screen is an ITU-I or 14-bit ITU-N spare point code or the screening reference contains other screens with ITU-I or 14-bit ITU-N spare point codes.
  5. Display the status of the ITU National and International Spare Point Code Support feature by entering the rtrv-ctrl-feat command with the ITU National and International Spare Point Code Support feature part number.

    Enter this command.

    rtrv-ctrl-feat:partnum=893013601

    This is an example of the possible output.

    rlghncxa03w 06-10-25 15:25:30 GMT EAGLE5 36.0.0
    The following features have been permanently enabled:
    
    Feature Name              Partnum   Status Quantity
    Spare Point Code Support  893013601 on     ----
    
    The following features have been temporarily enabled:
    
    Feature Name              Partnum   Status Quantity   Trial Period Left
    Zero entries found.
    
    The following features have expired temporary keys:
    
    Feature Name              Partnum
    Zero entries found.

    If the ITU National and International Spare Point Code Support feature is enabled, go to step 6.

    If the ITU National and International Spare Point Code Support feature is not enabled, perform the “Activating the ITU National and International Spare Point Code Support Feature” procedure in Database Administration - SS7 User's Guide to enable the ITU National and International Spare Point Code Support feature as required. After the feature has been enabled, go to step 6.

  6. Change the attributes for the allowed OPC using the chg-scr-opc command.

    If a gateway screening stop action is to be assigned to the allowed OPC screen being changed, enter the chg-scr-opc command with the nsfi=stop parameter and the actname parameter with the name of a gateway screening stop action set shown in the output of the rtrv-gws-actset command executed in step 2.

    Caution:

    Redirecting SLTA/SLTM messages prevents SLTA/SLTM messages from being returned to the EAGLE. The signaling link carrying these messages will fail if these messages are not returned to the EAGLE. To prevent SLTA/SLTM messages from being redirected, gateway screening stop action sets containing the redirect stop action should not be assigned to Allowed OPC screens containing the adjacent point code of a linkset, shown in step 3.

    The current values for the ni, nc, ncm, zone, area, id, npc, msa, ssa, and sp parameters must be entered exactly as shown in the rtrv-scr-opc output in step 1.

    The following list contains the values for the nni, nnc, nncm, nzone, narea, nid, and nnpc parameters:

    • nni – 0 - 255 or an asterisk (*)
    • nnc – 0 - 255 or an asterisk (*)
    • nncm – 0 - 255 or an asterisk (*)
    • nzone – 0 - 7 or an asterisk (*)
    • narea – 0 - 255 or an asterisk (*)
    • nid – 0 - 7 or an asterisk (*)
    • nnpc – 1 - 16383 or an asterisk (*)
    • nmsa – 0 - 255 or an asterisk (*)
    • nssa – 0 - 255 or an asterisk (*)
    • nsp – 0 - 255 or an asterisk (*)

    A range of values can be specified for the nni, nnc, and nncm parameters. See the Specifying a Range of Values section for more information on how the asterisk and a range of values are used for the nni, nnc, and nncm parameters.

    To change an ITU-I or 14-bit ITU-N spare point code to a non-spare point code, both the pcst=s and npcst=none parameters must be specified with the chg-scr-opc command.

    To change an ITU-I or 14-bit ITU-N non-spare point code to a spare point code, the npcst=s parameter must be specified with the chg-scr-opc command. The pcst parameter does not have to be specified.

    If the current point code in the screen being changed is either an ITU-I or 14-bit ITU-N spare point code, the pcst=s parameter must be specified with the chg-scr-opc command.

    If the current point code in the screen being changed is either an ITU-I or 14-bit ITU-N non-spare point code, the pcst parameter does not have to be specified with the chg-scr-opc command. If the pcst parameter is specified for a screen containing either an ITU-I or 14-bit ITU-N non-spare point code, the pcst parameter value must be none.

    For this example, enter this command.

    chg-scr-opc:sr=wrd2:ni=243:nc=015:ncm=001:nni=230:nc=230 :ncm=230:nsfi=blkopc:nsr=wrd6

    A message similar to the following should appear.

    rlghncxa03w 06-10-25 15:27:30 GMT  EAGLE5 36.0.0
    CHG-SCR-OPC: SCREEN SET AFFECTED - WRD2  1% FULL
    CHG-SCR-OPC: MASP A - COMPLTD
  7. Verify the changes using the rtrv-scr-opc command with the screening reference name used in step 6.

    For this example, enter this command.

    rtrv-scr-opc:sr=wrd2

    The following is an example of the possible output.

    rlghncxa03w 06-10-25 15:28:30 GMT  EAGLE5 36.0.0
    SCREEN = ALLOWED OPC
    SR    NI       NC       NCM      NSFI    NSR/ACT
    WRD2  230      230      230      BLKOPC  WRD6
  8. Backup the new changes using the chg-db:action=backup:dest=fixed command.

    The following messages should appear, the active Maintenance and Administration Subsystem Processor (MASP) appears first.

    BACKUP (FIXED) : MASP A - Backup starts on active MASP.
    BACKUP (FIXED) : MASP A - Backup on active MASP to fixed disk complete.
    BACKUP (FIXED) : MASP A - Backup starts on standby MASP.
    BACKUP (FIXED) : MASP A - Backup on standby MASP to fixed disk complete.

Figure 12-11 Change an Allowed OPC Screen - Sheet 1 of 6


Figure 12-12 Change an Allowed OPC Screen - Sheet 2 of 6


Figure 12-13 Change an Allowed OPC Screen - Sheet 2 of 6


Figure 12-14 Change an Allowed OPC Screen - Sheet 2 of 6


Figure 12-15 Change an Allowed OPC Screen - Sheet 2 of 6


Figure 12-16 Change an Allowed OPC Screen - Sheet 2 of 6