Dashboard Tools

The ISR Dashboard provides various tools that allow you to perform specific functions on each page.

  • Paging Tool
  • Search Tools
  • Column Sorting Tool
  • Download Tool
  • Import Link

Paging Tool

The ISR Dashboard provides a paging tool to help you navigate through pages if the data that displays is greater than the number set for the Settings, List Display Entries per Pageparameter.

Note:

This paging tool displays ONLY if the elements in the list require more than one page for display. For more information about setting the display entries per page, see Editing My Settings.

You can click on "Next" to move to the next page, or Previous to move to the previous page. If more than one page exists, the number for each page displays with the navigation tools. You can click on any page number to display the data on that page.

Search Tools

The ISR Dashboard provides a search tool you can use to search for specific information in the ISR database. The search feature is applicable to:

  • Recordings
  • Routes

Basic Search for Recordings

You can perform a basic search for a specific recording. A basic search uses an exact match on a single common search field and does not support wildcard matching.

To perform a basic search for a recording:

  1. Click Recordings in the main menu. A list of recordings stored in the ISR database display.
    This screenshot shows the Recordings page.
  2. In the drop-down box (at the top-right of the Recordings page), select the information about the recording(s) that you want to search. Valid values are:
    • From - ID of the caller for this call.

    • To - ID of the recipient for the call.

    • Session ID - Session ID derived from the X-ISR-UCID

    • Label - In the case where Label is mentioned in the route, it is displayed in place of the From and To values. This depends on the Route Type.
  3. In the text box, enter the information required dependent on the selection you made in Step 2.

    For example, if you selected From in the drop-down box, enter the ID of the caller associated with a recording for which you want to search. All the recordings associated with that caller ID display in a list.

    Note:

    You can select a recording and click on Details to reference the “Session ID”, “From”, and "To" information for the recording if required.
  4. Click Search to find all recordings based on the search criteria. All matching recordings display in the recordings list.
  5. Once matching Recordings are displayed, you can play individual recordings by clicking Details.
  6. Click the Previous button to go back to the original search page.
  7. Click the Refresh button to load all Recordings.

Advanced Search for Recordings

You can perform more advanced searches for recordings. Advanced searches allow more search options, including multiple search fields and partial matching.

To perform an advanced search for a recording:

  1. On the Recordings page, click Advanced Search.

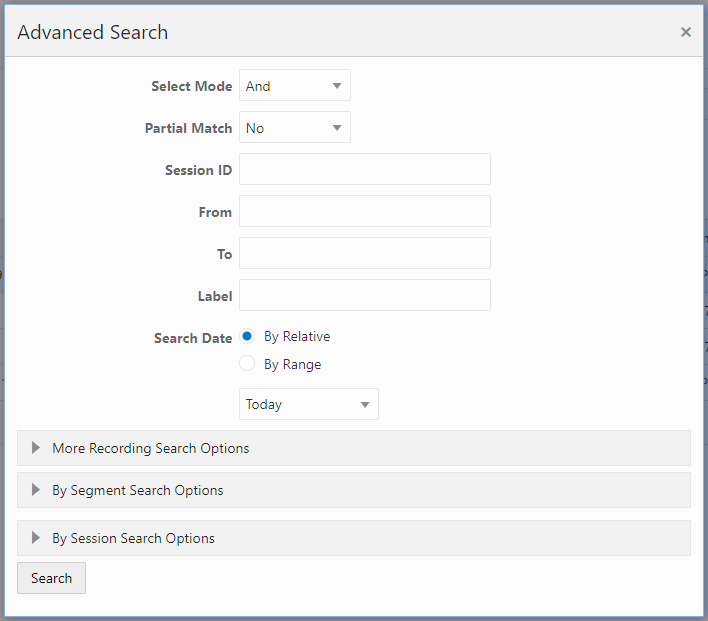
    The following dialog box displays.

    This screenshot shows the Advanced Search page.
  2. Select Mode—Select whether to perform the search using AND or OR.
    • AND—Returns results where recordings match ALL fields you specify. For example, if you specify From as "123", File Name as "Recording1", and "Search Date as "Today", then the results of the search show all recordings with a start date matching the current date, AND a value of "123" in the From field, AND file name of "Recording1".

    • OR—Returns results where recordings match ANY of the fields you specify. For example, if you specify From as "123", File Name as "Recording1", and Search Date as "Last 7 Days", then the results of the search show any recordings with a value of "123" in the From field, OR a file name of "Recording1", a start date within the last seven days (OR a a result that includes all of these).

  3. Partial Match—When enabled, the ISR finds recordings that partially match the values entered in the search fields.
  4. Session ID—The unique Session ID derived from the X-ISR-UCID on which to perform the search.
  5. From—The From SIP URI to perform the search on.
  6. To—The To SIP URI to perform the search on.
  7. Label—The route label to perform a search on.
  8. Search Date—Select whether you want to search for recordings By Relative or By Range:

    By Relative—Allows you to perform a search for recordings that happened "Today" (default), within the Last 7 Days, or within the Last 30 Days.

    By Range—Allows you to perform a recording search, based on the date range you specify.

    Note:

    Search Date is always included in the advanced search terms. Therefore, when using Search Mode "OR" with a large date range, many recordings may be returned.
  9. If you select a Search Date By Range, enter the From Date and To Date in the format MM/DD/YYYY, or click on the calendar icon next to the text box to select the dates for which you want to search for recordings. In the From Date and To Date boxes, select the time in the format HH:MM for which you want to search for recordings. The time displayed shows the time zone set by the logged in user. By default, the From Date is always behind the To Date time by 4 hours.

    In the "From Date and To Date boxes, select the time in the format HH:MM for which you want to search for recordings.

    Note:

    For convenience, clicking in the text box displays a pop-up calender for which you can select the month, day, and year.
  10. Click Search to find all recordings based on the search criteria. All matching recordings display in the recordings list.
  11. Once matching Recordings are displayed, you can play individual recordings by clicking Details.
  12. Click the Previous button to go back to the original search page.
  13. Click the Refresh button to load all Recordings.
More Recording Search Options

You can perform recording searches based on additional search criteria as follows.

To perform a more advanced search for recordings:

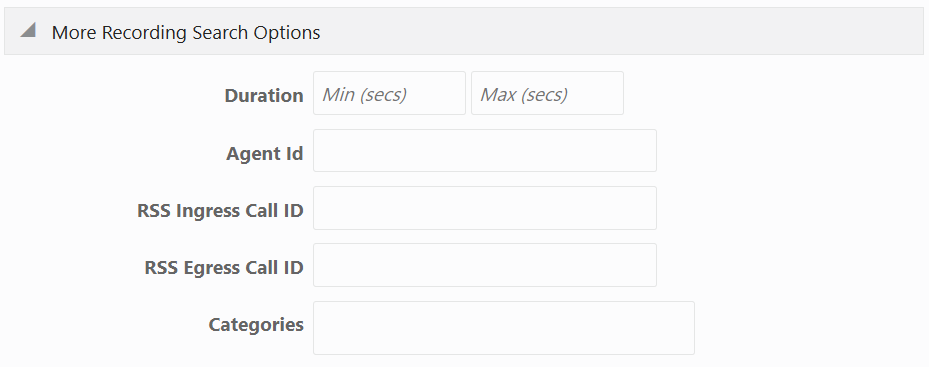
  1. In the Advanced Search dialog box, click More Recording Search Options to expand the dialog box.
    This screenshot shows the More Recording Search Options page.
  2. Duration Min—The minimum duration, in seconds, of a recording. Valid values are numeric characters. For example, 15.
  3. Duration Max—The maximum duration, in seconds, of a recording. Valid values are numeric characters. For example 24.

    Using the examples in Steps 3 and 4, the results would include all recordings that had a recording duration between and including 15 and 24 seconds.

  4. Agent ID—The ID of the agent that answered the call. This is the value set In the Dashboard or API.
  5. RSS Ingress Call ID—The ingress call ID derived from the call-id received in the initial SIP INVITE.
  6. RSS Egress Call ID—The egress call ID derived from the call-id used in the egress call leg for the recording, if using pass-thru mode.
  7. Categories—The name of the category for which you want to search for recordings. The category you enter in this field must already exist in the database. For more information about creating and searching categories, see Recording Details.
  8. Click Search to find all recordings based on the search criteria. All matching recordings display in the recordings list.
Recording Search by Segment

You can search for recordings by segment.

To search for recordings based on segment:
  1. In the Advanced Search dialog box, click By Segment Search Options to expand the dialog box.
  2. Media Type—Select the recorded file type, either Audio or Video.
  3. File Name—Enter the segment file name, for example, 1-9599@10.1.2.3.4.seg0.wav.
Recording Search by Custom Data

You can search for recordings by custom data values.

To search for recordings based on custom data values:
  1. In the Advanced Search dialog box, click By Custom Data Search Options to expand the dialog box.
    This screenshot shows the By Custom Data Search Otions page.
  2. The currently configured Custom Data Field names are listed. Enter the value(s) for which you want to search next to the corresponding Custom Data Field name(s).
  3. ClickSearch to find all recordings based on the specified custom data. All matching recordings display in the recordings list.

    Note:

    Custom Data search parameters are applied in addition to any other search options defined, including date ranges.
Recording Search by Session

You can search for recordings by session criteria if required.

To search for recordings based on session criteria:

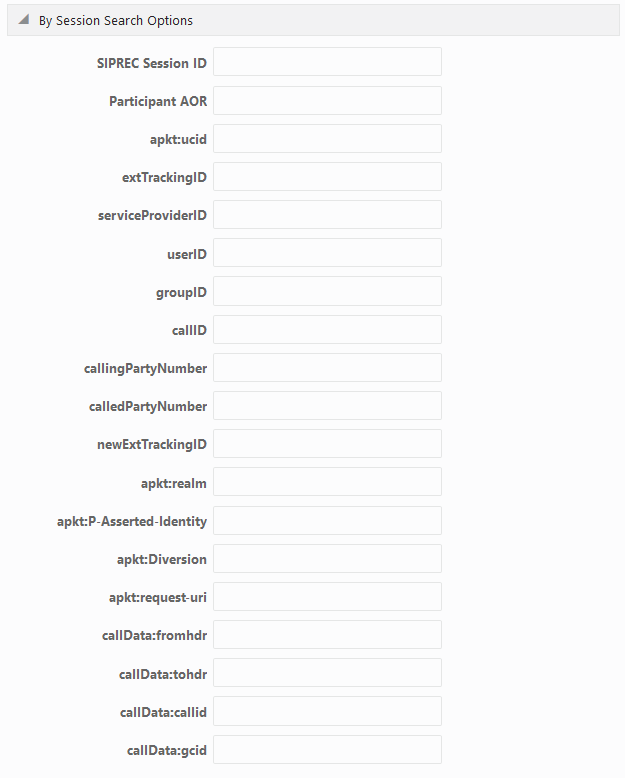
  1. In the Advanced Search dialog box, click By Session Search Options to expand the dialog box.
    This screenshot shows the Advanced Search dialog box's By Session Search Options dialog box.
  2. SIPREC Session ID—The SIP recording session ID number for which you want to search.

    Note:

    You can select a recording and click on the Details icon to reference the SIPREC Session ID information for the recording if required.
  3. Participant AOR—The participant’s address of record (AOR) associated with the call that was recorded.
  4. apkt:ucid—The Universal Call ID (UCID) of the incoming caller.
  5. extTrackingID—The external tracking ID that was used when an incoming call was transferred to another recipient.
  6. ServiceProviderID—The Service Provider ID that was used on the incoming call.
  7. userID—The user ID on the incoming call.
  8. groupID—The group ID on the incoming call.
  9. callID—The call ID of the incoming call.
  10. callingPartyNumber—The source number of the incoming call.
  11. calledPartyNumber—The destination number of the incoming call.
  12. newExtTrackingID—The new external tracking ID that was used when an incoming call was transferred a second time to another recipient.

    Note:

    The extTrackingID, ServiceProviderID, userID, groupID, callID, callingPartyNumber, calledPartyNumber, and newExtTrackingID parameters are specific to a SIPREC integration with Broadsoft’s Broadworks platform and may not be shown in all installations.
  13. apkt:in-realm—The name of the ISR realm that received the SIPREC session (in-realm).
  14. apkt:P-Asserted-Identity—The remote party’s ID in the SIPREC session. The ISR uses the P-Asserted-Identity header field to convey the proven identity of the originator of a request within a trusted network.
  15. apkt:Diversion—The call forwarding phone number from the SIPREC session, to which the incoming call was diverted. Diversion is a call forwarding feature that lets an incoming call to a called party be redirected to a third party.
  16. apkt:request-uri—The Uniform Resource Identifier (URI) in the header of the request message of the SIPREC session. The URI in the request message contains sufficient information to initiate and maintain the SIPREC communication session.
  17. Click Search to perform the search based on the recording session parameters you specified. All matching recordings display in the recordings list.

    Note:

    Session search parameters are applied in addition to any other search options defined, including date ranges.

Basic Search for Routes

You can perform a basic search for Routes configured in the ISR database based on the route pattern.

To perform a basic search for a route:

  1. Click Admin in the main menu (or Edit System Configurations on the Home page).
  2. Click Routes. A list of routes display in the routes list.
    This screenshot shows the Routes page.
  3. In the drop-down box (on the upper-left of the page), select the account for which you want to search for a route(s).

    Note:

    The values in the drop-down box include any accounts you’ve added to the ISR database.
  4. In the text box (on the upper-right of the page), enter the route pattern for which to search. This field does not support partial matches.
  5. Click Search to perform the search based on the criteria you specified. All matching routes display in the routes list.

Column Sorting Tool

In the ISR Dashboard, you can sort the list of recordings in ascending or descending order by clicking the column heading.

To sort the recording data in the recording list:

  • Click any of the column headings to sort that column in ascending or descending order. The Up Arrow icon indicates the column is currently in ascending order. The Down Arrow icon indicates the column is in descending order.

Download Tool

You can download a single specific recording file for playing immediately, or save the recording (.wav file) to a storage location on your PC to listen to later. You can also download the metadata for all recordings in the recording list to a CSV file on your PC.

Downloading a Single Recording File

You can download a single recording file to play immediately, or save the recording to your PC to play later.

To download a single recording file:

  1. Click Recordings. The recordings list displays.
  2. Select a recording by clicking on the row and clicking the Details button to bring up the Recording Details page. Click the segment(s) (for example, the Segment 1 tab) and click Download.

    The ISR stores the file in a temporary folder on your computer.

  3. Click Open with and select the application for which to play the .wav recording file or click Save File to save the .wav recording file to a location on your PC for listening to later.

    Note:

    If you click the Download icon more than once for the same recording, additional copies of the same file are saved, appending a numerical digit to the file name. For example:

    rss_g711-24-1841@172.30.58.237 (1).wav,

    rss_g711-24-1841@172.30.58.237 (2).wav,

    rss_g711-24-1841@172.30.58.237 (3).wav, etc.

    Note:

    The names of these options may vary between browsers.
  4. Click OK. Your browser immediately opens and plays the .wav file, or downloads it to your PC for listening later.

Downloading a Recording List to a CSV File

You can download Recordings to .CSV file (<filename>.csv) per page (List Entries Per Page) basis and then open the file for viewing using an application that recognizes the CSV format (for example, Notepad® or Microsoft® Excel). The resulting file contains the details of each recording (not the actual recorded files).

Note:

Default List Entries per Page is 10 and only 10 Recordings are downloaded to the .CSV file.

To download a recording list’s metadata to a CSV file:

  1. On the Recordings page, click Download as CSV file to download the current list of recordings to a CSV file.
  2. Include Details—Place a checkmark in the check box to include all details about the recording in the CSV file.

    Note:

    If you click Download as CSV file without checking the Include Details box, the ISR Dashboard only downloads the information in the columns that currently display in the recordings list. If you place a checkmark in the Include Details box, the ISR Dashboard includes all column attribute information, including those columns, not listed in the current recording list. Custom data fields will appear as one column with key and value pair in the form of array (for example, [{"recordcount"=>"23"}, {"Custom"=>"custom1"}]).

    The ISR automatically provides a filename of recordingResults.csv and stores the file in a temporary folder on your computer.

  3. Click Open with and select the application for which to open the resulting CSV file.
or
Click Save File to save the CSV file to your PC.

    Note:

    If you choose Save File, and you click Download as CSV file more than once, each time the ISR generates a CSV file, it appends a numerical digit to the file name. For example:

    recordingResults (1).csv

    recordingResults (2).csv

    recordingResults (3).csv

    Note:

    The names of these options may vary between browsers.
  4. Click OK. The CSV file is opened with the application you specified, or is saved to your PC for viewing later.

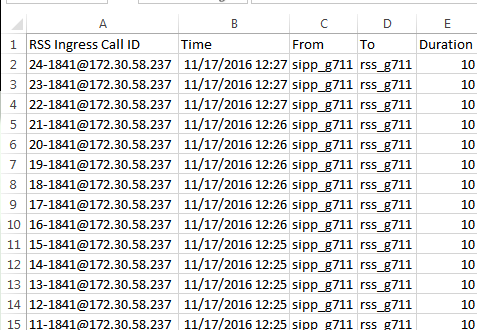
    Example CSV file with recordings and no detail specified

    This image shows an example CSV file with recordings and no detail specified.

    Example CSV file with recordings and detail specified

    This image shows an example CSV file with recordings and detail specified.

    The following table identifies some of the columns that can display in the CSV file.

    Column Heading Description
    To Specifies the To SIP URI. This is the URI for where the call is going.
    Time Specifies the starting GMT time and date of the recording in the format YYYY-MM-DD HH:MM:SS, respectively.

    Note: In the date format, M = month, D = day, and Y = year.

    In the time format, H = hours, M = minutes, S = seconds.

    Session ID Specifies the Session ID assigned to the incoming call. Format may be specified as x-isr-ucid-<session id>@<local host>.
    Rating Specifies the score assigned to a recording by a reviewer and can be assigned as needed by your organization. Scoring is based on 1 to 5 stars.
    RSS Ingress Call ID Specifies the call ID assigned by the RSS to the incoming call.
    RSS Egress Call ID Specifies the call ID assigned by the RSS to the outgoing leg of the call (pass-thru mode only).
    Notes Specific notes, if any, entered by users through the dashboard.
    Hours Specifies the length of time, in hours, a user spent reviewing, transcribing, and commenting on the recording.
    From Specifies the From SIP URI. This is the URI from where the call session was coming.
    File Name Specifies the name of the recording file.
    Duration Specifies the length of the recording (in seconds).
    Custom Fields Specifies a unique set of meta-data associated with the recording (i.e., Transaction ID, Account Number, Unique Call ID). For more information on Custom Fields, see "FACE Custom Data" in the Oracle Communications Interactive Session Recorder API Guide.
    Completed Specifies whether or not this recording resulted in a complete transaction, added by the dashboard user.
    Agent ID Specifies the ID of the Agent answering the call.

Import Link

The ISR allows administrators to specify account and/or route parameters in a comma separated value (CSV) file, save the file, and then import the information into the ISR database using the ISR Dashboard's Import link (located in the top right corner of both the Accounts and Routes pages) . An administrator can use any application that can save to a CSV file (i.e., Microsoft® Excel, Notepad®, etc.) when inputting the account and/or route information into the file.

Note:

The import link is for Super User and Account Administrators only.