5 Auditing and Reconciling Network Elements from the LSMS
This chapter describes how to audit network element data. In most cases, an audit of the subscription data contained on the network element can be initiated from the LSMS. An audit compares the subscription version data at the network element with that at the LSMS.
Introduction
This chapter describes auditing and optional reconciling of network element data. An audit compares the LNP data at the network element with that at the LSMS. At any time, except as noted in Audit and Reconcile Function Summary.
You can also choose to reconcile any discrepancies found during an audit. Reconciling allows you to update only the LNP database records that are found to be different during an audit.
Although auditing without reconciling does not result in synchronized LNP databases, you can perform an audit without a reconcile for information purposes.
Methods of Auditing and Reconciling
You can perform audits and optional reconciles in either of the following ways:
-
Through the LSMS GUI; see Managing Audit and Reconcile from the LSMS GUI
-
Through the
lsmsclaacommand line interface; see Performing an Audit Using the Command Line
Operator Action at Network Element
An audit does not require any operator action at the network element. However, it is possible for the NE operator to disable the ability to process an audit. This is sometimes necessary when the NE operator is trying to debug a problem. If the NE operator has disabled the ability to process an audit, the LSMS will receive a rejection that is posted on the GUI as the following error message:
Connection already in use or operation not enabled at NE '<IP address>'
If this message occurs, perform the procedure described in Enabling RTDBLSMS Audit on ELAP.
Types of Data to Audit and Reconcile
The LSMS offers the following types of audits that compare records in the LSMS to records in a specified network element:
-
Single SV/NPB Audit—This type allows you to audit a single subscription version or number pool block per supported network element at any time. If the audit reveals any discrepancy, you can choose to reconcile immediately.
-
Range Audit—You can audit the following types of ranges:
-
Time Range Audit—One or both of the following types of regional data found to have been created, modified, or deleted by the LSMS between the specified start and end date and time for the audit (which must be during the previous seven days.)
-
Subscription version data
-
Number pool block data
-
-
Object Range Audit—One or more of the following types of data that are stored in the LSMS databases within the specified range of starting and ending values:
-
Subscription version data
-
All TNs in the network element’s LNP database
-
All TNs within an NPA-NXX range
-
-
Number pool block data
-
All NPBs in the network element’s LNP database
-
Single SV/NPB
-
All NPBs within an NPA-NXX range
-
-
NPA Split data
-
All TNs in the network element’s LNP database with a specified Old NPA
-
All TNs within a specified Old NPA range
-
-
Default GTT data
-
All default GTTs in the network element’s LNP database with a specified NPA-NXX
-
All default GTTs within an NPA-NXX range
-
-
Override GTT data
-
All override GTTs in the network element’s LNP database with a specified LRN
-
All override GTTs within an LRN range
-
-
-
For more information about these types of data, refer to the Database Administrator's Guide for LSMS.
How Records Are Compared During an Audit
LNP data is determined to be out of synchronization by calculating a CRC (Cyclic Redundancy Check)-32 checksum for each specified type of LNP data record at both the LSMS and at the network element, and then comparing the checksums. If the checksums do not match, it is assumed that the records do not match.
Because some network element LNP database objects may contain attributes that are not stored in the LSMS LNP database, and vice versa, the computation of a checksum may not include all attributes. In addition, some attributes, such as LNP type, that are common to both the LSMS and network element LNP databases but which have different values, are not included in the computation of the checksums. Table 5-1 shows which attributes are included in checksums for each type of LNP data object.
Table 5-1 LNP Data Type Attributes Included in Checksums
| LNP Data Type | Attributes Included in Checksum | Attributes Not Included in Checksum |
|---|---|---|
|
NPA Split |
|
|
|
Number Pool Block |
|
|
|
Subscription Version |
|
|
|
Default GTT |
|
|
|
Override GTT |
|
|
Discrepancies Detected by Audit
An audit can detect the discrepancies shown in Table 5-2. Each discrepancy is counted, displayed on the GUI, and recorded in the audit log file (see Audit Error Messages).
Table 5-2 Audit Data Discrepancies
| Discrepancy Type | Description |
|---|---|
|
Different |
Mismatching checksums indicate that the network element has the LNP data object in its database; however, one or more attributes of the object are different from the equivalent attributes on the LSMS. |
|
Missing |
The network element’s LNP database does not contain this object, but the LSMS LNP database does contain it; the LSMS did not receive a checksum for this object. |
|
Extra |
The network element’s LNP database contains an object that the LSMS LNP database does not contain; the LSMS received a checksum for an object not in its database. |
Duplicate Data Detected by Audit
In addition to detecting these discrepancies, all types of audit except auditing by time range also detect whether duplicate data resides in the LSMS and network element LNP databases. Duplicate data is not considered to be a discrepancy and cannot be corrected by performing a reconcile operation. Each duplicate LNP data object detected is counted and recorded in the audit log file. If duplicate LNP data is detected, contact the unresolvable-reference.html#GUID-4DCE85D7-E15B-482F-B188-B54BBCAD7463.
Note:
It is recommended that you correct any duplicates as soon as they are found, even before performing a reconcile. If the duplicates are not corrected, future audits may show these duplicates as different types of discrepancies at different times, and it will be more difficult to determine whether the discrepancies have been caused by originally duplicate data.Displaying Audit Results
Results of an audit are made available in the following ways:
-
Displayed as they are calculated either on:
-
The Audit Results tab of the GUI if the audit is initiated from the GUI (see Single SV/NPB Audit and Optional Reconcile from LSMS GUI or Range Audit and Optional Reconcile from LSMS GUI)
-
On the command line interface if the audit is initiated from the command line and the
detailsparameter is specified (see Performing an Audit Using the Command Line)
-
-
Stored in a log (see Audit Error Messages).
Note:
Starting with LSMS Release 8.X, the audit log also contains information about partial audit results when an audit is aborted or otherwise interrupted. For more information about how this information can be used, see Continuing an Interrupted Object Range Audit.
-
If discrepancies are found for either subscription versions or number pool blocks, discrepancy files are created with full details about how the information is different. For more information, see Discrepancy Files.
Reconciling
Any discrepancies detected during an audit can be optionally reconciled as soon as the audit completes in one of the following ways:
-
The user clicks the Reconcile button at the completion of a Single SV/NPB audit initiated from the GUI (see Single SV/NPB Audit and Optional Reconcile from LSMS GUI)
-
The user clicks the Reconcile Now button at the completion of a Range audit initiated from the GUI (see Range Audit and Optional Reconcile from LSMS GUI)
-
The user specifies the
reconcileparameter when starting the audit from the command line (see Performing an Audit Using the Command Line)
Starting with LSMS 8.X, any discrepancies detected during an Object Range audit can also be reconciled up to seven days later by selecting the Save Reconcile button at the completion of the audit and then later initiating a Post-Audit Reconcile (see Post-Audit Reconcile from the GUI).
Audit and Reconcile Function Summary
Table 5-3 shows the functions performed for each type of audit.
Table 5-3 Audit Types and Functions
| Audit Type | Rate | Generates Audit Log | Generates Full-Detail Discrepancy Log for SVs and NPBs | Records Interrupted Audit Results | Can Be Reconciled Later |
|---|---|---|---|---|---|
|
Object Range |
24 million records per hour |
Yes |
Yes |
Yes |
Yes |
|
Time Range |
100 records per second1 |
Yes |
Yes |
No |
Yes |
|
Single SV/NPB1 |
100 records per second1One record per second2 |
Yes |
Yes |
No |
No |
|
1Single SV/NPB Audits use the normal update channel, which can process 50 records per second, but performance of Single SV/NPB is limited by how fast the GUI can process the display, which may take up to five seconds. |
|||||
Audit Restrictions
Before starting any audit, consider the following restrictions:
-
Only one Single SV/NPB audit of a given network element can be performed at a time. If you attempt to start a Single SV/NPB audit of a network element that is already performing a Single SV/NPB audit or reconcile, an error message will be posted and no additional audit action will occur. You can perform a Single SV/NPB audit for each supported network element simultaneously, and a Single SV/NPB audit can be performed on a given network element at the same time as a Range Audit is performed for that network element.
-
Only one Range audit or bulk load of a given network element can be performed at a time. If you attempt to start a Range audit of a network element that is already performing any other database synchronization operation, an error message will be posted and no additional audit action will occur. You can perform a Range audit for each supported network element simultaneously, subject to the restrictions described in Maximum Number of Simultaneous Synchronization Operations.
-
An audit performed at the same time that automatic resynchronization is occurring between the LSMS and the network element may result in false discrepancies because some of the LSMS data may not have been sent yet over the normal update connection to the network element. At the end of an audit, it is recommended that you determine whether an automatic resynchronization (also called short resynchronization) has occurred (look at the notifications area of the GUI). If an automatic resynchronization has occurred or is currently running, it is recommended that you perform another audit when the automatic resynchronization has completed.
-
A Range audit may time out at other times, for example, when the network element is busy or when synchronization is occurring between the Number Portability Administration Center (NPAC) and the LSMS. (For more information about when NPAC-to-LSMS synchronization occurs, refer to the Alarms and Maintenance Guide). If the LSMS is processing a lot of other data, the audit may eventually time out, a time-out message will be posted, and no audit action will occur.
In addition, consider the following usage note about Audit by Time Range:
-
Except in the case of a SV and/or NPB that has been deleted, the SV and/or NPB to audit will be retrieved from the LSMS database. For the case where an NPA Split has been created that changes the SV and/or NPB residing in the LSMS database, this feature will only audit the new, post-split SV and/or NPB. This is the case both during the NPA Splits’s permissive dialing period and after the period ends. For more information about NPA Splits, refer to the Database Administrator's Guide for LSMS.
Audit and Reconcile Timeline
This section provides an overview of how audit and reconcile is performed.
Single SV/NPB Audit and Reconcile Timeline
Figure 5-1 illustrates how data is sent to a network element before, during, and after a Single SV/NPB audit followed by a reconcile.
Figure 5-1 Timeline for a Single SV/NPB Audit with Reconcile

The following describes the stages in more detail:
- T1
-
Single SV/NPB audit begins: The LSMS user decides to initiate a Single SV/NPB audit. To start the audit at the LSMS, see Managing Audit and Reconcile from the LSMS GUI. No action is required at the network element.
A single SV/NPB audit completes very quickly; the LSMS user cannot abort the operation.
When this stage is complete, the LSMS user can choose to reconcile immediately discrepancies that were found in the network element’s LNP database, start another audit, or terminate the audit session.
- T2
-
Reconcile: The LSMS user decides to reconcile. To choose to reconcile, see 8 in Range Audit and Optional Reconcile from LSMS GUI . No action is required at the network element.
During this stage, a modify command is sent to the network element if the SV or NPB is identified as different or missing in the NE’s database, or a delete command is sent if the SV or NPB is identified as being extra in the NE’s LNP database (but not existing in the LSMS LNP database).
- T3
- Normal operations resume
Range Audit and Reconcile Timeline
Figure 5-2 illustrates how data is sent to a network element before, during, and after a range audit followed by a reconcile.
Figure 5-2 Timeline for a Range Audit with Reconcile

The following describes the range audit and reconcile stages in more detail:
- T1
-
Range audit begins: The LSMS user decides to initiate a range audit. To start the audit at the LSMS, see Managing Audit and Reconcile from the LSMS GUI, 8. No action is required at the network element.
At any time during this stage, the LSMS user can choose to abort the operations. If aborted, the user can choose to terminate the operation (closing the Range Audit window), or start another range audit (either with the same ranges or different ranges).
Note:
Starting with LSMS Release 8.X, whenever an audit is interrupted, the LSMS records both completely and partially audited records in the Audit Log file. The user can examine the audit log file to determine which records have not yet been audited and perform another audit of a smaller set of records. For more information, see Continuing an Interrupted Object Range Audit.
When this stage is complete, the LSMS user can choose to reconcile immediately discrepancies that were found in the network element’s LNP database, start another audit, or terminate the audit session.
Note:
Starting with LSMS Release 8.X, the user can also choose to reconcile discrepancies at a later time.
- T2
-
Reconcile: The LSMS user decides to reconcile. To choose to reconcile, see Range Audit and Optional Reconcile from LSMS GUI.
During this stage, modify commands are sent to the network element for all data identified as different and missing in the NE’s database, and delete commands are sent to the NE for all data identified as being extra in the NE’s LNP database (but not existing in the LSMS LNP database).
Some differences between the LSMS and NE databases (such as capacity) may cause the NE to reject some of the downloaded commands. These rejections would also occur during a normal update. All commands rejected by the network element are recorded in the audit log file (see Audit Error Messages).
At any time during this stage, the LSMS user can choose to abort the operations. If aborted, this operation can be either restarted or terminated.
- T3
- Normal operations resume.
Managing Audit and Reconcile from the LSMS GUI
This section describes the following audit and reconcile procedures you can perform through the LSMS GUI.
You can also perform certain audit and reconcile functions of SVs or NPBs or both using the lsmsclaa AUDIT function (see Performing an Audit Using the Command Line).
Audit Error Messages
For a listing of error messages that can appear on the GUI, along with explanation of possible cause and suggested recovery, see LSMS GUI Messages.
Single SV/NPB Audit and Optional Reconcile from LSMS GUI
Use the following procedure to manage from the LSMS user interface an audit and optional reconcile of a single subscription version or number pool block at a network element.
- Start the Audit window using either of the following:
- Right-click the LSMS Console window’s EMS status icon that corresponds to the network element to be audited, and select LNP Database Synchronization-> Single SV/NPB Audit. The Single SV/NPB tab of the Audit window displays. If a different tab displays, click the Single SV/NPB tab. An example of this window is shown in Figure 5-3.
Figure 5-3 Single SV/NPB Audit Window, Audit Range Tab

- Right-click the LSMS Console window’s EMS status icon that corresponds to the network element to be audited, and select LNP Database Synchronization-> Single SV/NPB Audit.
- To initiate the audit, click the Start button. The display automatically changes to the Audit Results tab.A single audit completes very quickly, and the popup message shown in Figure 5-4 displays.
Note:
It is generally not necessary to perform any action at the network element before starting an audit. However, it is possible for the NE operator to disable the ELAP’s ability to be audited. If the following error message is returned, contact the NE operator to request that the procedure described inEnabling RTDBLSMS Audit on ELAP be performed:Connection already in use or operation not enabled at NE ‘<IP address>’
Table 5-4 describes the meaning of the fields in this window.Figure 5-4 Single SV/NPB Audit Window, Audit Results Tab
 To view the audit log file, click the View Log button. For more information about the log file, see Audit Error Messages.
Table 5-4 Audit Results Fields
Field Description Possible Values LSMS Total
Number of data records that have been audited in the LSMS LNP database
00000000—99999999
NE Total
Number of data records that have been audited in the NE LNP database
00000000—99999999
Same
Number of LNP data records that are identical in both the LSMS and the NE LNP databases
00000000—99999999
Missing
Number of LNP data records that are present in the LSMS LNP database, but not in the NE LNP database
00000000—99999999
Extra
Number of LNP data records that are present in the NE LNP database, but not in the LSMS LNP database
00000000—99999999
Different
Number of LNP data records that are present in both the LSMS LNP database and the NE LNP database, but with different checksums
00000000—99999999
Discrepancy Total
Total number of LNP data record discrepancies (Missing, Extra, and Different)
00000000—99999999
Start Date/Time
Time the audit phase was started
MM/DD hh:mm:ss1
End Date/Time
Time the audit phase completed successfully or was abnormally terminated
MM/DD hh:mm:ss1
Elapsed Time
Amount of time the audit took to complete or the amount of time the audit had run before the user aborted it or a failure occurred.
hh:mm:ss1[A|F]2
Full-Record Discrepancy Combobox
List of LNP database objects whose full-record discrepancy file from the previous audit is available for viewing
Number Pool Blocks or Subscription Versions
1 MM indicates month, range 01—12
DD indicates day, range 01—31
hh indicates hour, range 00—23
mm indicates minute, range 00—59
ss indicates second, range 00—59
2 A is appended at the end of the time is the operation is aborted.
F is appended at the end of the time is the operation fails.
- Examine the Audit Results tab to determine whether the object is listed as Missing, Extra, or Different and decide if you want to reconcile it.
- If you choose to reconcile, click the Reconcile button. The reconcile update is sent over the same connection as normal updates. When the reconcile completes, a window similar to the example shown in Figure 5-5 displays.
Note:
The Reconcile button is selectable only if you have logged in as a member of thelsmsuser,lsmsuext, orlsmsalluser group.Click OK; you have now completed this procedure.Figure 5-5 Reconcile Complete

- If you choose to reconcile, click the Reconcile button.
Range Audit and Optional Reconcile from LSMS GUI
Use the following procedure to manage from the LSMS user interface a Time Range audit or Object Range audit and optional reconcile of data at a network element.
- Start the Audit window using either of the following:
- Right-click the LSMS Console window’s EMS status icon that corresponds to the network element to be audited, and select LNP Database Synchronization->Range Audit. The Audit Range tab of the Audit window displays. If a different tab displays, click the Audit Range tab. An example of this window is shown in Figure 5-6.
Figure 5-6 Audit Window, Audit Range Tab

- Right-click the LSMS Console window’s EMS status icon that corresponds to the network element to be audited, and select LNP Database Synchronization->Range Audit.
- To initiate the audit, click the Start button. The display automatically changes to the Audit Results tab (shown in Figure 5-7), and the Start button is replaced by the Abort button.The progress is indicated by start time, elapsed time, numbers appearing in the various columns for the selected data types, and status reported in the status field at the bottom of the window.
Note:
It is generally not necessary to perform any action at the network element before starting an audit. However, it is possible for the NE operator to disable the ELAP’s ability to be audited. If the following error message is returned, contact the NE operator to request that the procedure described inEnabling RTDBLSMS Audit on ELAPbe performed:Connection already in use or operation not enabled at NE ‘<IP address>’Table 5-6 describes the meaning of the fields in this window.Figure 5-7 Audit Window, Audit Results Tab

Table 5-6 Audit Results Fields
Field Description Possible Values LSMS Total
Number of data records that have been audited in the LSMS LNP database
00000000—99999999
NE Total
Number of data records that have been audited in the NE LNP database
00000000—99999999
Same
Number of LNP data records that are identical in both the LSMS and the NE LNP databases
00000000—99999999
Missing
Number of LNP data records that are present in the LSMS LNP database, but not in the NE LNP database
00000000—99999999
Extra
Number of LNP data records that are present in the NE LNP database, but not in the LSMS LNP database
00000000—99999999
Different
Number of LNP data records that are present in both the LSMS LNP database and the NE LNP database, but with different checksums
00000000—99999999
Discrepancy Total
Total number of LNP data record discrepancies (Missing, Extra, and Different)
00000000—99999999
Start Date/Time
Time the audit phase was started
MM/DD hh:mm:ss1
End Date/Time
Time the audit phase completed successfully or was abnormally terminated
MM/DD hh:mm:ss1
Elapsed Time
Amount of time the audit took to complete or the amount of time the audit had run before the user aborted it or a failure occurred.
hh:mm:ss1[A|F]2
Full-Record Discrepancy Combobox
List of LNP database objects whose full-record discrepancy file from the previous audit is available for viewing
Number Pool Blocks or Subscription Versions
1 MM indicates month, range 01—12
DD indicates day, range 01—31
hh indicates hour, range 00—23
mm indicates minute, range 00—59
ss indicates second, range 00—59
2 A is appended at the end of the time is the operation is aborted.
F is appended at the end of the time is the operation fails.
To view the audit log file, click the View Log button. For more information about the log file, see Audit Error Messages.
To abort while an audit is in progress, click the Abort button. A confirmation dialog displays, as shown in Figure 5-8.audit
Figure 5-8 Abort Operation Dialog

- When the audit completes, an information dialog similar to Figure 5-9 displays.
Figure 5-9 Audit Complete Information Dialog

- When the audit completes or is terminated, the Audit window displays similar to the example shown in Figure 5-10. In this example, discrepancies in SVs and NPBs have been found, so a discrepancy file for each category has been created, the Full-Record Discrepancy Log area has become selectable, and the pull-down allows you to select which discrepancy file you would like to view. If you wish to view both files, first view one file, then view the other. For more information about the discrepancy files, see Discrepancy Files.Examine the Audit Results tab to determine whether any objects are listed as Missing, Extra, or Different and decide if you want to reconcile them.
Figure 5-10 Audit Complete

- If you choose to reconcile immediately, ensure that you have considered any possible NPA Splits as described in 3; then click the Reconcile Now button. Reconcile updates are sent over the same connection as normal updates. When the reconcile completes, a window similar to the example shown in Figure 5-11 displays.
Note:
The Reconcile Now button is selectable only if you have logged in as a member of thelsmsuser,lsmsuext, orlsmsalluser group.Click OK; a window similar to the example shown in Figure 5-12 displays.Figure 5-11 Reconcile Complete
 Click OK; you have now completed this procedure.
Figure 5-12 Reconcile Operation Complete

- If you choose to reconcile immediately, ensure that you have considered any possible NPA Splits as described in 3; then click the Reconcile Now button.
Post-Audit Reconcile from the GUI
Starting with LSMS release 8.X, a reconcile of an Object Range Audit can be performed at a time later than immediately after an audit completes. This function can be used in the following situations:
-
If a large number of discrepancies is found during an audit, you might want to postpone the reconcile until a later time to avoid impacting normal traffic.
-
If an Object Range Audit is aborted or interrupted, you can perform a Post-Audit Reconcile for all of the objects that were successfully audited before the interruption. You can also examine the Audit log to determine which objects were successfully audited, and perform another audit for objects that were not completely audited (for more information, see Continuing an Interrupted Object Range Audit).
The Post-Audit reconcile function is enabled by the creation of a Reconcile file that contains all the discrepant data found during the corresponding audit. Reconcile files are kept eight days and then deleted.
Note:
Any reconcile (whether immediate or postponed) can be performed only once. When a reconcile has been performed, the reconcile file is no longer available for selection from the Post-Audit Reconcile window.To perform a Post-Audit reconcile, perform the following procedure to choose among the available reconcile files.
- Click the Browse button and select the file that corresponds to the audit you wish to now reconcile. The example in Figure 5-13 shows a file has been selected.
Figure 5-13 Post-Audit Reconcile Window, Input File Tab

- Click Start. After the LSMS finds the file to use for reconciling, the Post Audit Reconcile pop-up window shown in Figure 5-14 displays.
Figure 5-14 Post Audit Reconcile Initialized

- Click OK. The Audit Results window displays, an example is shown in Figure 5-15.
Figure 5-15 Audit Results Tab

- Ensure that you have considered any possible NPA Splits as described in 2; then click the Reconcile Now button. Reconcile updates are sent over the same connection as normal updates. When the reconcile completes, a window similar to the example shown in Figure 5-16 displays.
Figure 5-16 Reconcile Complete

- Click OK; a window similar to the example shown in Figure 5-17 displays. Click OK; you have now completed this procedure.
Figure 5-17 Reconcile Operation Complete

Performing an Audit Using the Command Line
Use the following procedure to perform a network element audit and optional reconcile of subscription versions (SVs) or Number Pool Blocks (NPBs) through the LSMS command line interface (lsmsclaa).
Note:
Starting with LSMS Release 8.X, the lsmsclaa AUDIT command can be used only to perform a Single SV or NPB Audit.The lsmsclaa command does not display a progress bar or provide a way to cancel the audit while in progress. Results of the audit performed by this command are stored in the LsmsAudit.log file (see Audit Error Messages) and in discrepancy files (see Discrepancy Files).
For more information about using the lsmsclaa command, refer to the Alarms and Maintenance Guide.
Use this procedure to perform an audit of SVs or NPBs from the command line.
Audit Logs
Audit log files are generated for Range Audits that are initiated either from the GUI or from the command line. One log file is created for each day that a Range audit is performed. The log file is named LsmsAudit.log.<MMDD>, where <MMDD> is the timestamp that contains month and day. This log file is located in the directory /var/TKLC/lsms/logs/<CLLI>, where <CLLI> is the Common Language Location Identifier of the network element being audited. Log files are maintained for seven days after they are created; then they are automatically removed from the LSMS.
Note:
No log file is generated for a Single SV/NPB Audit.Viewing Audit Log Files
You can view audit log files in either of the following ways
-
If you are performing a Range audit from the GUI, any time after a Range audit has begun, you can view the audit log file by clicking the View Log button. If the browser window used for displaying reports and logs is not already open, it is opened automatically and displays the log file.
-
You can also use one of the following methods to open the window shown in Figure 5-18 used to browse for this log:
Figure 5-18 Browsing for Audit Log Files

-
Select ... from the main menu of the LSMS Console window.
-
Click on the LSMS Console window’s EMS Status Icon that corresponds to the network element being audited so that the icon is highlighted. Right-click and select .
Scroll down to find the folder that has the <CLLI> name for the NE that is being audited. Double-click the folder name, and then double click the file name LsmsAudit.log.<MMDD> that corresponds to the month and day you desire.
-
Audit Log File Contents
Whenever a Range audit is started, the audit log file for that day is appended (if this is the first audit of the day, the file is created). For each audit performed on that day, the audit log file contains information similar to the information displayed on the Audit Range, Audit Results, and Download Results tabs, such as start and end times for each stage, and numbers of missing, extra, and different objects in various LNP categories. The log and window also record whether database entries are present at the LSMS but missing at the NE, present at the NE but missing at the LSMS, or present at both the LSMS and NE but containing different values.
The audit log file contains the following sections:
-
Note:
Starting with LSMS Release 8.X, summary sections for Object Range Audits indicate whether object types were completely audited, partially audited, or not audited, and shows results for both completely and partially audited object types.
Audit Log File Example for Two Completed Audits
Figure 5-19 shows an example of an audit log file that contains two separate audits and reconciles performed on the same day.
Figure 5-19 Example of an Audit Log File for Two Completed Audits


Audit Log File Example for a Partially Completed Audit
Figure 5-20 shows an example of an audit log file for an Object Range Audit that was interrupted.
Figure 5-20 Example of Audit Log File for Partially Completed Audit

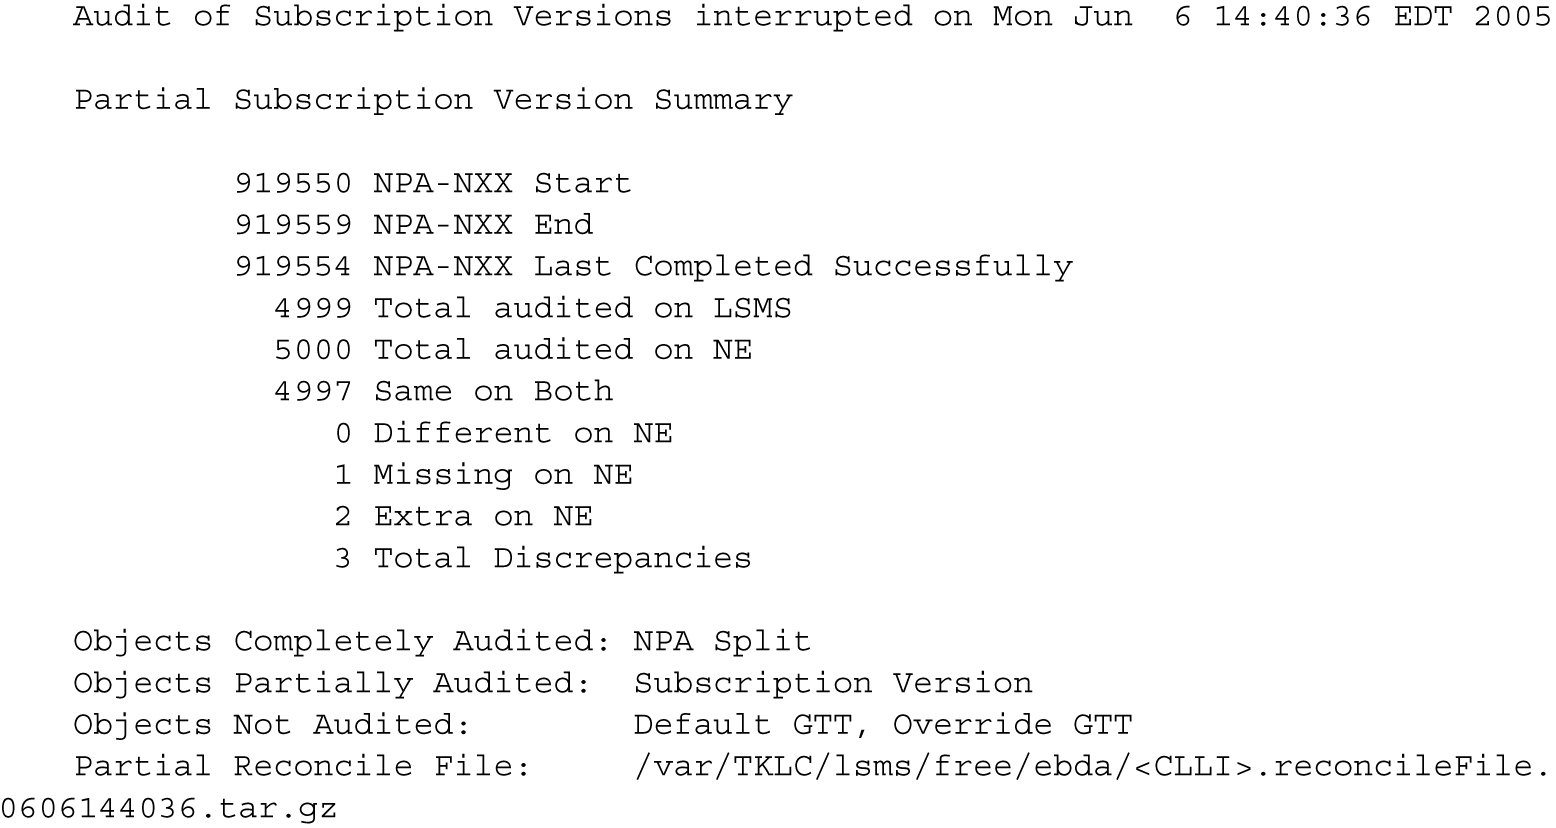
Continuing an Interrupted Object Range Audit
Starting with LSMS Release 8.X, if an Object Range Audit is interrupted, you can interpret the contents of the audit log file to determine how many objects were completely audited. After the interruption has been resolved, you can complete your original audit goal by performing the following actions in any order (the file shown in Figure 5-20 is used as an example):
-
Perform a Post-Audit Reconcile (see Post-Audit Reconcile from the GUI), selecting the Partial Reconcile File listed in the Audit log (
<CLLI>.reconcileFile. 0606144036.tar.gzin the example file). This Post-Audit Reconcile will reconcile the three discrepancies found in the Subscription Version range from 919550 to 919554 (there were no discrepancies found in the NPA Splits). -
Perform another Range audit and reconcile of just SVs in the range 910555 to 910559.