3.3.2 Procedure 5 BACKUP EUIDB

This section lists the procedures, in order, that must be performed to backup the system prior to Full upgrade. Save the backup to third-party server instead of ELAP-A/B which are to be upgraded.

Table 3-9 Procedure 5 BACKUP EUIDB

STEP # This procedure backs up the EuiDB. Note: Estimated time of completion is 5 minutes. Check off (√) each step as it is completed. Boxes have been provided for this purpose under each step number. Should this procedure fail, Contact Oracle technical services and ask for FULL UPGRADE ASSISTANCE.

1.

☐

Active ELAP:

Login to the Active ELAP server as user “elapdev”.

E5APP-B-b login: elapdev 
Password:****** 
[elapdev@E5APP-B-b elapdev]# 

2.

☐

Active ELAP:

Stop the ELAP Application

[elapdev@E5APP-B-b ~]$ service Elap stop 
[elapdev@E5APP-B-b ~]$

3.

☐

Active ELAP:

Switch user to root.

$su -  
Password: <root_password>  

4.

☐

Active ELAP:

Switch user to elapconfig.

$su - elapconfig

5.

☐

Active ELAP:

Login as “elapconfig” to start the ELAP Configuration utility.

Select option “6” and press enter.

/-----ELAP Configuration Menu----------\ 
/----------------------------------------\ 
|  1 | Display Configuration             | 
|----|-----------------------------------| 
|  2 | Configure Network Interfaces Menu | 
|----|-----------------------------------| 
|  3 | Set Time Zone                     | 
|----|-----------------------------------| 
|  4 | Exchange Secure Shell Keys        | 
|----|-----------------------------------| 
|  5 | Change Password                   | 
|----|-----------------------------------| 
|  6 | Platform Menu                     | 
|----|-----------------------------------| 
|  7 | Configure NTP Server              | 
|----|-----------------------------------| 
|  8 | Mate Disaster Recovery            | 
|----|-----------------------------------| 
|  e | Exit                              | 
\----------------------------------------/  
Enter Choice: 6 

6.

☐

Active ELAP:

1) Select “3” and press return to start the MySQL Backup.

2) Select “Y” when prompted and press return.

NOTE: The MyISAM backup taken in this step, will be used, if in any case the full upgrade from ELAP 10.2 to ELAP 11.1 fails. For ELAP 11.1 we will use the InnoDB mysql backup for EuiDB taken at step 10 after changing the mysql engine.

 /-----ELAP Platform Menu-\ 
/--------------------------\ 
|  1 | Initiate Upgrade    | 
|----|---------------------| 
|  2 | Reboot MPS          | 
|----|---------------------| 
|  3 | MySQL Backup        | 
|----|---------------------| 
|  4 | RTDB Backup         | 
|----|---------------------| 
|  e | Exit                | 
\--------------------------/ 
Enter Choice:3 

 Are you sure you want to back up the MySQL database on MPS 
A? [N]: Y 
Backing up the NPDB... 
NPDB Backed up Successfully to 
/var/TKLC/appl/free/npdbBackup_Floater04_20231116041558.sql. gz 

7.

☐

Active ELAP:

Select “e” and press Enter to exit the Platform Menu.

 /-----ELAP Platform Menu-\ 
/--------------------------\ 
|  1 | Initiate Upgrade    | 
|----|---------------------| 
|  2 | Reboot MPS          | 
|----|---------------------| 
|  3 | MySQL Backup        | 
|----|---------------------| 
|  4 | RTDB Backup         | 
|----|---------------------| 
|  e | Exit                | 
\--------------------------/ 
Enter Choice:e 

8.

☐

Active ELAP:

Enter e to exit the ELAP Configuration Menu.

/-----ELAP Configuration Menu----------\ 
/----------------------------------------\ 
|  1 | Display Configuration             | 
|----|-----------------------------------| 
|  2 | Configure Network Interfaces Menu | 
|----|-----------------------------------| 
|  3 | Set Time Zone                     | 
|----|-----------------------------------| 
|  4 | Exchange Secure Shell Keys        | 
|----|-----------------------------------| 
|  5 | Change Password                   | 
|----|-----------------------------------| 
|  6 | Platform Menu                     | 
|----|-----------------------------------| 
|  7 | Configure NTP Server              | 
|----|-----------------------------------| 
|  8 | Mate Disaster Recovery            | 
|----|-----------------------------------| 
|  e | Exit                              | 
\----------------------------------------/  
Enter Choice:e 

9.

☐

ACTIVE ELAP

Please note that the alter mysql engine step needs to be executed when upgrading from ELAP 10.x to 11.x. If upgrading from 11.x to 11.y, the engine will already be updated to InnoDB.

Hence, we would verify the mysql engine using the below command before running the alter_Table_Elap_11.0.pl

mysql -uroot -p EuiDB -e "show table status\G;"

Example: The example below contains a snapshot of only one table in EuiDB. The actual output will show all the tables present in EuiDB.
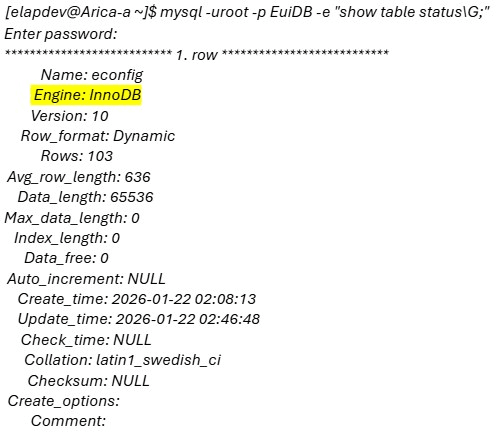

MySQL table-status output showing the InnoDB storage engine.

If the command output shows the engine as InnoDB, we don't need to run the alter_table_Elap_11.0.pl. If the engine is already InnoDB, then skip step

10,11,12 and jump to restart Elap application. If the engine is MyISAM, continue with the next steps in this procedure.

10.

☐

ACTIVE ELAP:

Follow the steps mentioned below to change the mysql engine from MyISAM to InnoDB:

  1. Download the alter_Table_Elap_11.0.pl script.
  2. Keep it in /usr/TKLC/elap/bin directory.
  3. Update the permissions. cd /usr/TKLC/elap/bin chmod 755 alter_Table_Elap_11.0.pl chown elapdev:elap alter_Table_Elap_11.0.pl
  4. Switch to elapdev user.

    su – elapdev

  5. Run the script. cd /usr/TKLC/elap/Bin/ ./ alter_Table_Elap_11.0.pl

Example:

[elapdev@Devloan03 ~]$ cd /usr/TKLC/elap/bin/

[elapdev@Devloan03 bin]$ ./ alter_Table_Elap_11.0.pl Success.

11.

☐

Active ELAP: Check the update by logging in to EuiDB:

[epapdev@Manaus-A free]$ mysql -uroot -p<mysql_password>  mysql> use EuiDB; 
Reading table information for completion of table and column names 
You can turn off this feature to get a quicker startup with 
-A 
mysql> show table status\G; *************************** 1. row 
*************************** 
Name: alarmInfo 
Engine: InnoDB 
Version: 10 

12.

☐

Active ELAP:

Take the EuiDB backup again after converting the engine from MyISAM to InnoDB.

Repeat Steps 3 to 8 of this Procedure 5 to take the EuiDB backup again for InnoDB.

13.

☐

Active ELAP:

Re-start the ELAP Application for Active ELAP.

[root@E5APP-B-b ~]# service Elap start 
[root@E5APP-B-b ~]# 

14.

☐

Active ELAP: Note down the timestamp in log.

Run the following command

$ date

This procedure is complete!