4 Running Test Cases Using ATS
4.1 Running NWDAF Test Cases using ATS
This section describes how to run Networks Data Analytics Function (NWDAF) test cases using ATS.
Prerequisites
To run NWDAF test cases, ensure that the following prerequisites are met:
- The ATS version must be compatible with the NWDAF release.
- The NWDAF and ATS must be deployed in the same namespace.
- The NWDAF must be deployed using the appropriate custom
values.yamlfile as per the configuration to be tested. The customvalues.yamlfile is available with the NWDAF documentation package. Ensure that you deploy the NWDAF for ATS using the correct custom value file based on the selected NWDAF configuration.
Logging into ATS
Running ATS
Before logging into ATS, you need to ensure that ATS is deployed successfully using HELM charts.
For example:
Figure 4-1 Verify ATS Deployment

For more information on verifying ATS deployment, see Verifying ATS Deployment.
Note:
To modify default log in password, refer to Modifying Login Password.To log in to ATS, open a browser and provide the IP Address and port details as <Worker-Node-IP>:<Node-Port-of-ATS>.
Figure 4-2 ATS Login
To run ATS, enter the login credentials. Click Sign in. A screen displaying the NWDAF pre-configured pipelines appears.
Figure 4-3 Pipelines
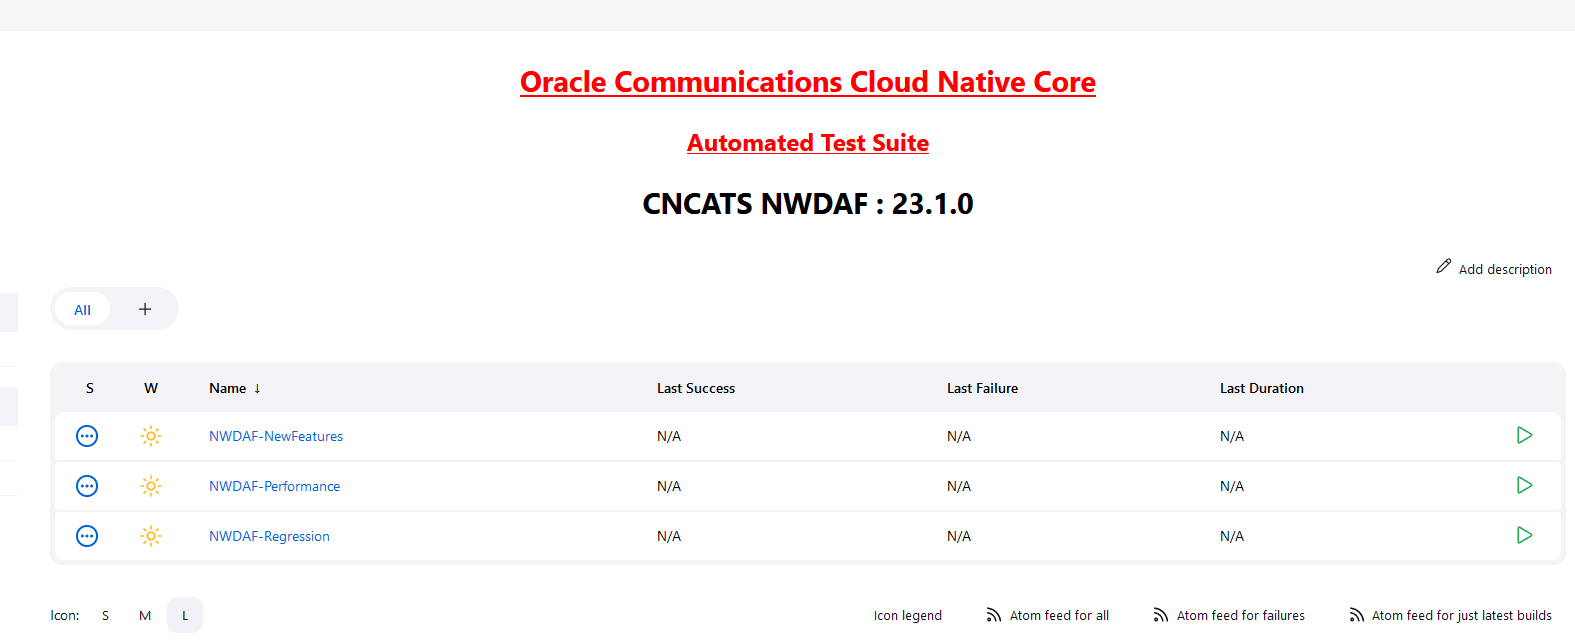
The NWDAF ATS has three configured pipelines:
- NWDAF-NewFeatures
- NWDAF-Performance
- NWDAF-Regression
Configure NWDAF Pipelines
To run configure a pipeline perform the following steps:
- Select the pipeline you want to run the test cases on, click NWDAF-NewFeatures or NWDAF-Regression or NWDAF-Performance in the Name column. The following screen appears:
Figure 4-4 Pipeline Configuration

In the above screen:
- Click Configure to configure the NWDAF pipeline.
- Click Build History box to view all the previous pipeline executions, and the Console Output of each execution.
- The Stage View represents the previously executed pipelines for reference.
- The Test Results Analyzer is the plugin integrated into the OCNWDAF-ATS. This option can be used to display the build-wise history of all the executions. It will provide a graphical representation of the past execution together.
- Click Configure to configure the environment parameters of the pipeline. User must wait for the page to load completely. Once the page loads completely, move to the Pipeline section:
Note:
Make sure that the following page loads completely before you perform any action on it. Also, do not modify any configuration other than shown below.Figure 4-5 Configure Pipeline
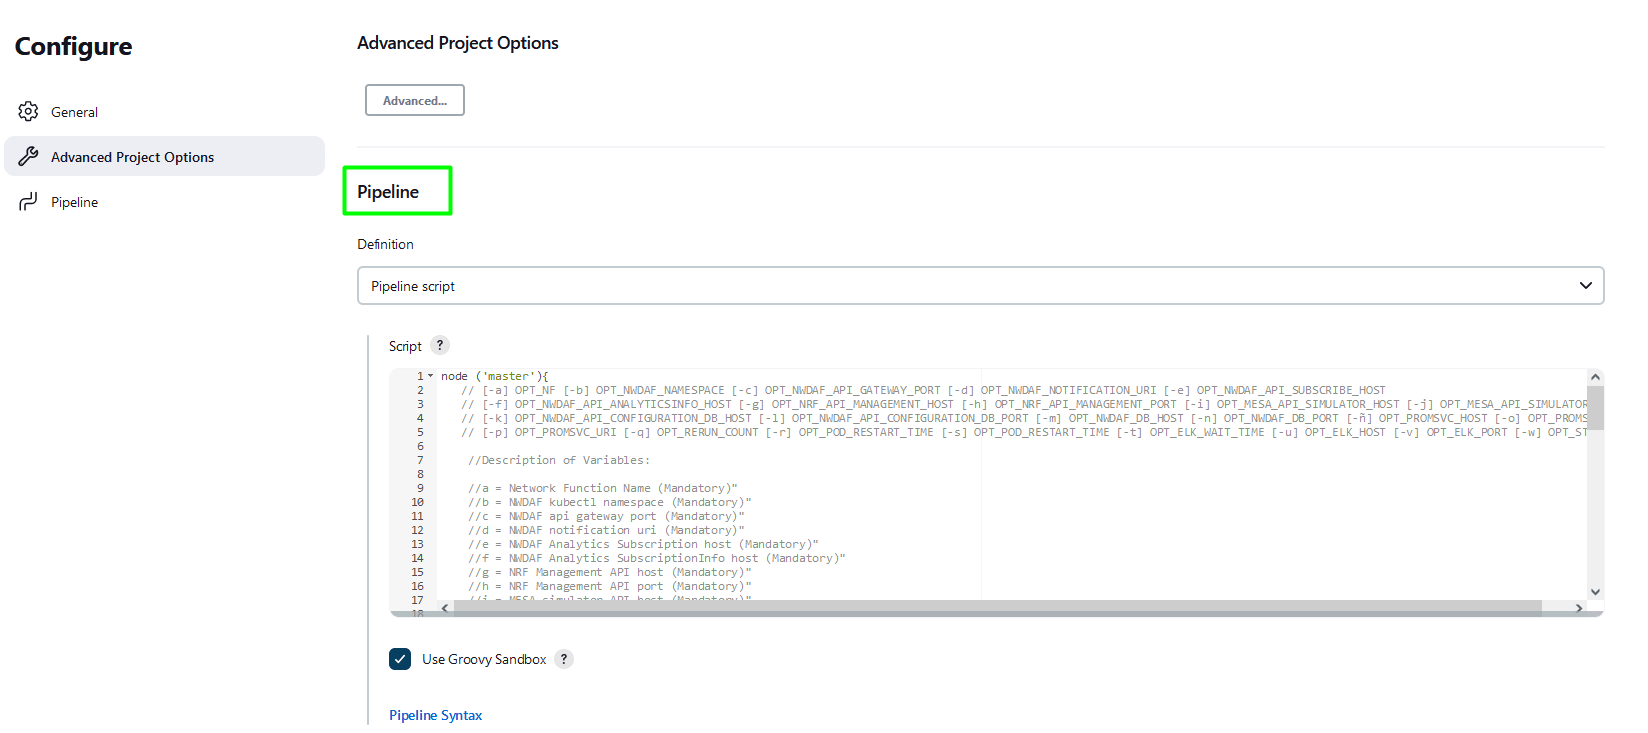
Note:
Remove the existing default content of the pipeline script. - Depending on the pipeline you want to configure, use the respective script. The following scripts are available at:
/var/lib/jenkins/ocnwdaf_tests/pipeline_scripts:- NewFeatures_Pipeline_script.txt
- Regression_Pipeline_script.txt
- Performance_Pipeline_script.txt
- Update the script of the pipeline you want to configure, and update the parameters according to the ATS and NWDAF environment you want to test.
- Click Save.
- To run the test cases, click Build with Parameters.
- The TestSuite multi-option page is displayed, ensure the SUT value is NWDAF.
Figure 4-6 TestSuite Page
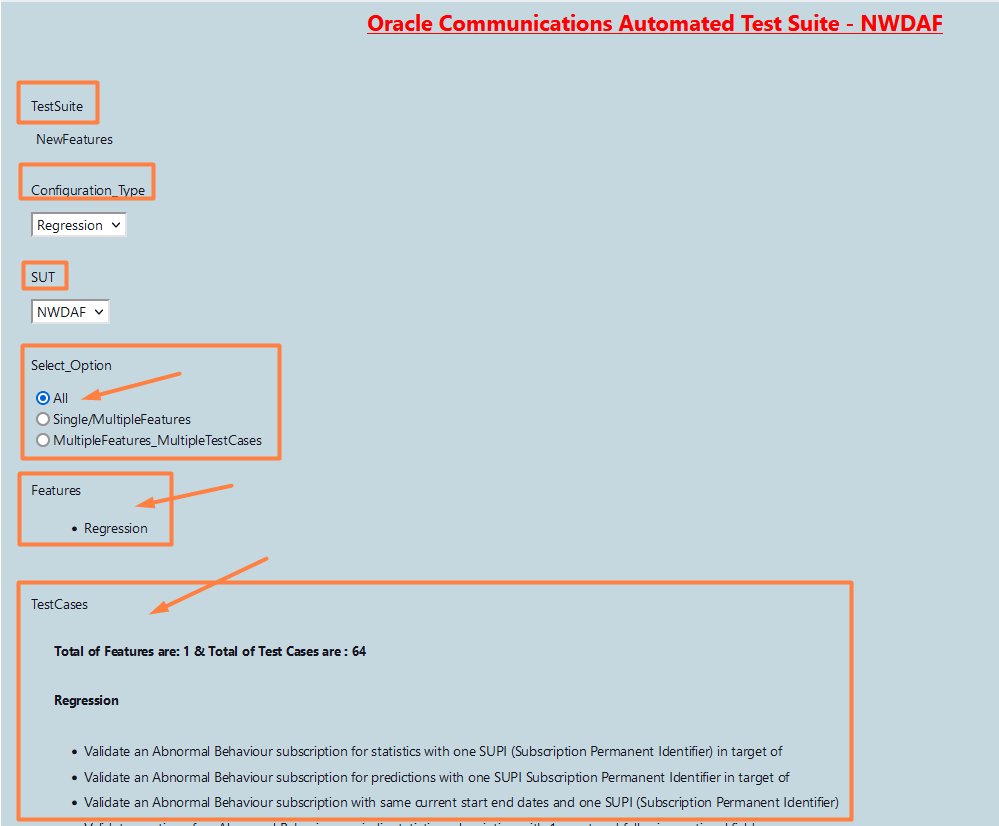
- To run all scripts available, select All and click Build.
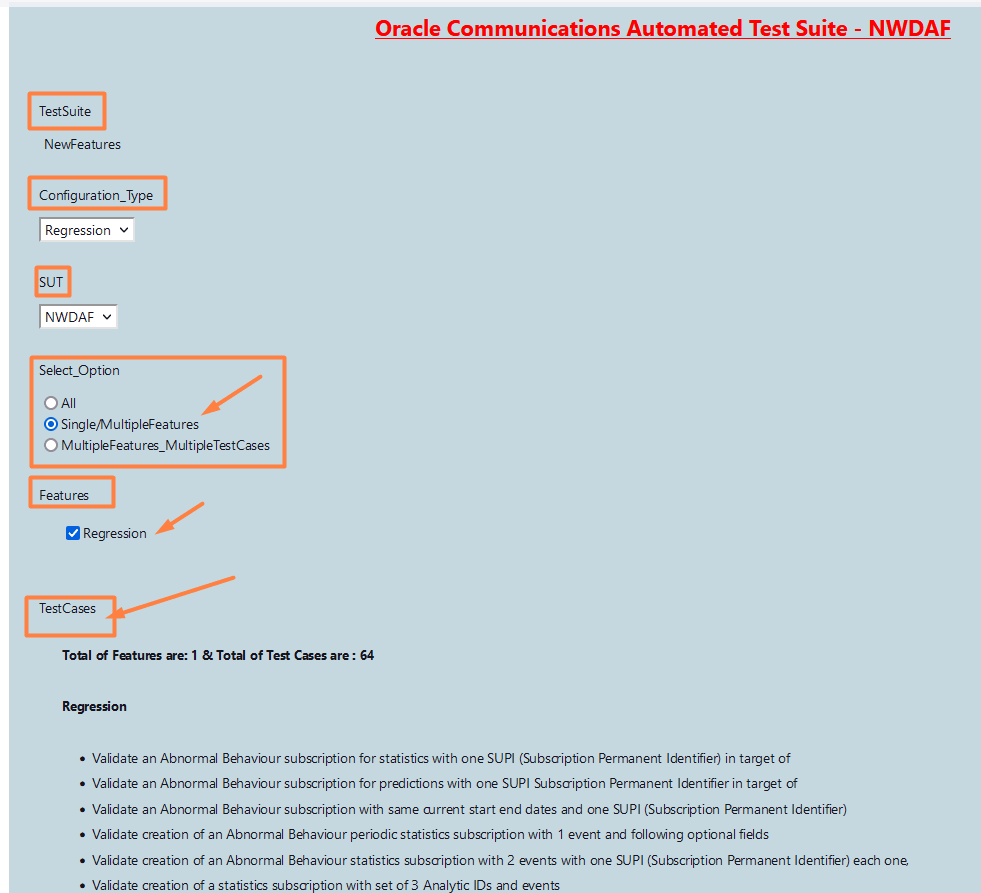
- To run scripts on a specific feature, select Single/MultipleFeatures option and select the Feature you want to run the test on and click Build.
Figure 4-7 Single/Multiple Features
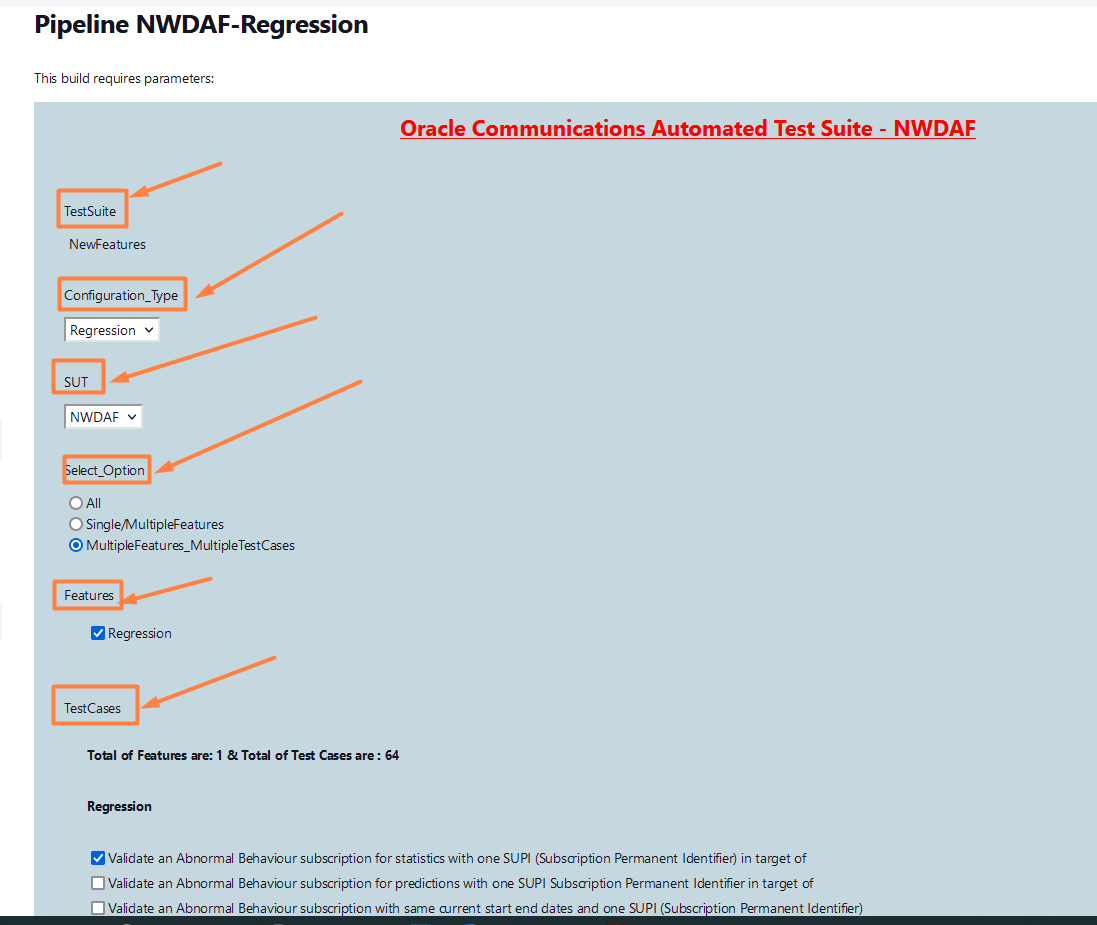
- To run scripts on a specific test scenario, select MultipleFeatures_MultipleTestCases option and select the Feature and the TestCases you want to run the test on and click Build.
Figure 4-8 Multiple Features and Testcases
- The Build History menu displays the list of running jobs, select the latest job displayed in the list.
- Click the Console Output option for this job. The jobs progress can be visualized in the log.
4.2 Running OCNADD Test Cases using ATS
4.2.1 Prerequisites
- The ATS version must be compatible with the OCNADD release.
- The OCNADD, ATS, and Stub must be deployed in the same namespace.
4.2.2 Logging into ATS
Running ATS
[ocnadd@k8s-bastion ~]$ helm status ocats -n ocnadd
NAME: ocats
LAST DEPLOYED: Sat Nov  3 03:48:27 2022
NAMESPACE: ocnadd
STATUS: deployed
REVISION: 1
TEST SUITE: None
NOTES:
# Copyright 2018 (C), Oracle and/or its affiliates. All rights reserved.

Thank you for installing ocats-ocnadd.

Your release is named ocats , Release Revision: 1.
To learn more about the release, try:

  $ helm status ocats
  $ helm get ocats
[ocnadd@k8s-bastion ~]$ kubectl get pod -n mad | grep ocats
ocats-ocats-ocnadd-54ffddb548-4j8cx 1/1 Running 0 9h
[ocnadd@k8s-bastion ~]$ kubectl get svc -n mad | grep ocats
ocats-ocats-ocnadd LoadBalancer 10.20.30.40 <pending> 8080:12345/TCP 9hFor more information on verifying ATS deployment, see Verifying ATS Deployment.
Figure 4-9 ATS Login
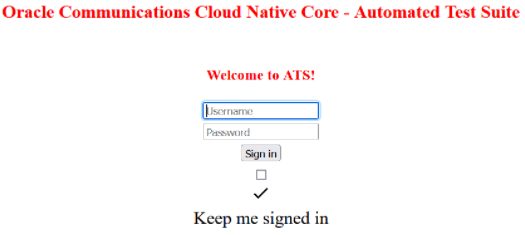
- Enter the login credentials. Click
Sign in. The following screen appears.
Figure 4-10 OCNADD Pre-Configured Pipelines
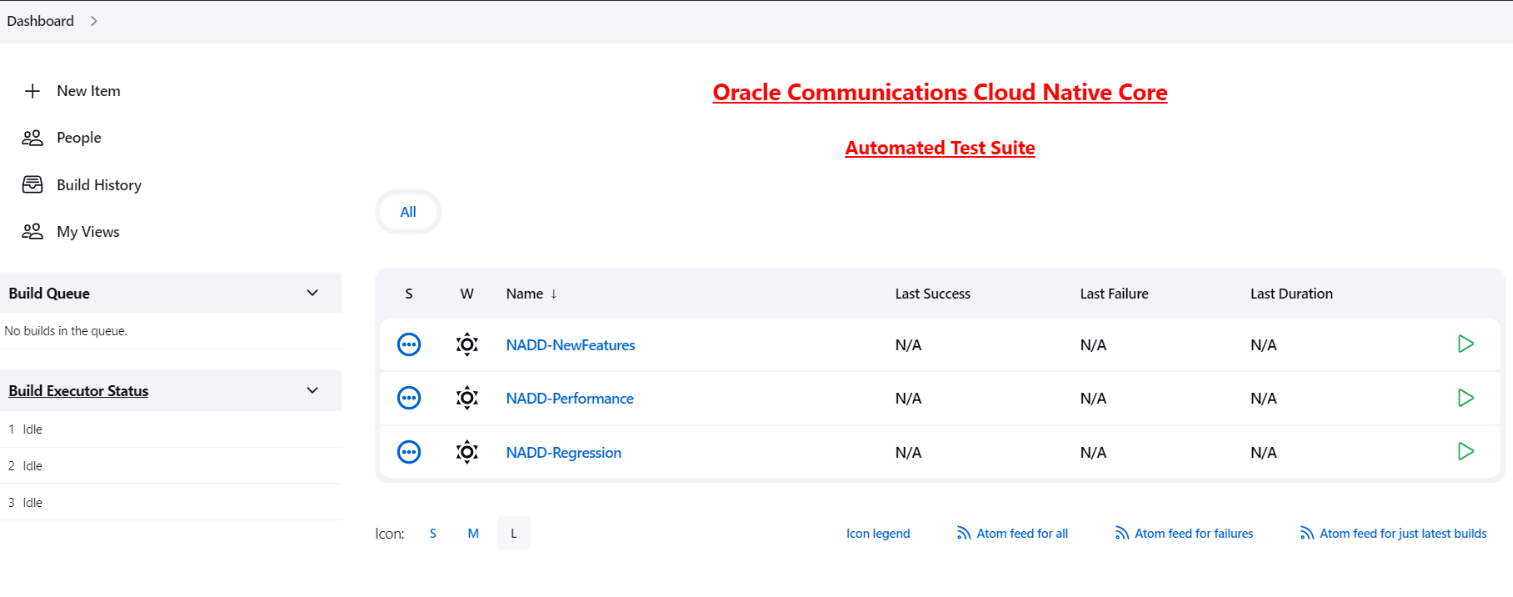
OCNADD ATS has three pre-configured pipelines.
- OCNADD-NewFeatures: This pipeline has all the test cases delivered as part of OCNADD ATS - 23.1.0.
- OCNADD-Performance: This pipeline is not operational as of now. It is reserved for future releases of ATS.
- OCNADD-Regression: This pipeline is not operational as of now. It is reserved for future releases of ATS.
4.2.3 OCNADD-NewFeatures Pipeline
OCNADD-NewFeatures Pipeline
- Click OCNADD-NewFeatures in the Name column. The
following screen appears:
Figure 4-11 Configuring OCNADD-New Features
 In the above screen:
- Click Configure to configure OCNADD-New Features.
- Click Build History box to view all the previous pipeline executions, and the Console Output of each execution.
- The Stage View represents the previously executed pipelines for reference.
- The Test Results Analyzer is the plugin integrated into the OCNADD-ATS. This option can be used to display the build-wise history of all the executions. It will provide a graphical representation of the past execution together.
- Click Configure. Once the page loads completely, click the Pipeline tab:
Note:
Make sure that the Configure page loads completely before you perform any action on it. Also, do not modify any configuration other than shown below.The Pipeline section of the configuration page appears as follows:Figure 4-12 Pipeline Section
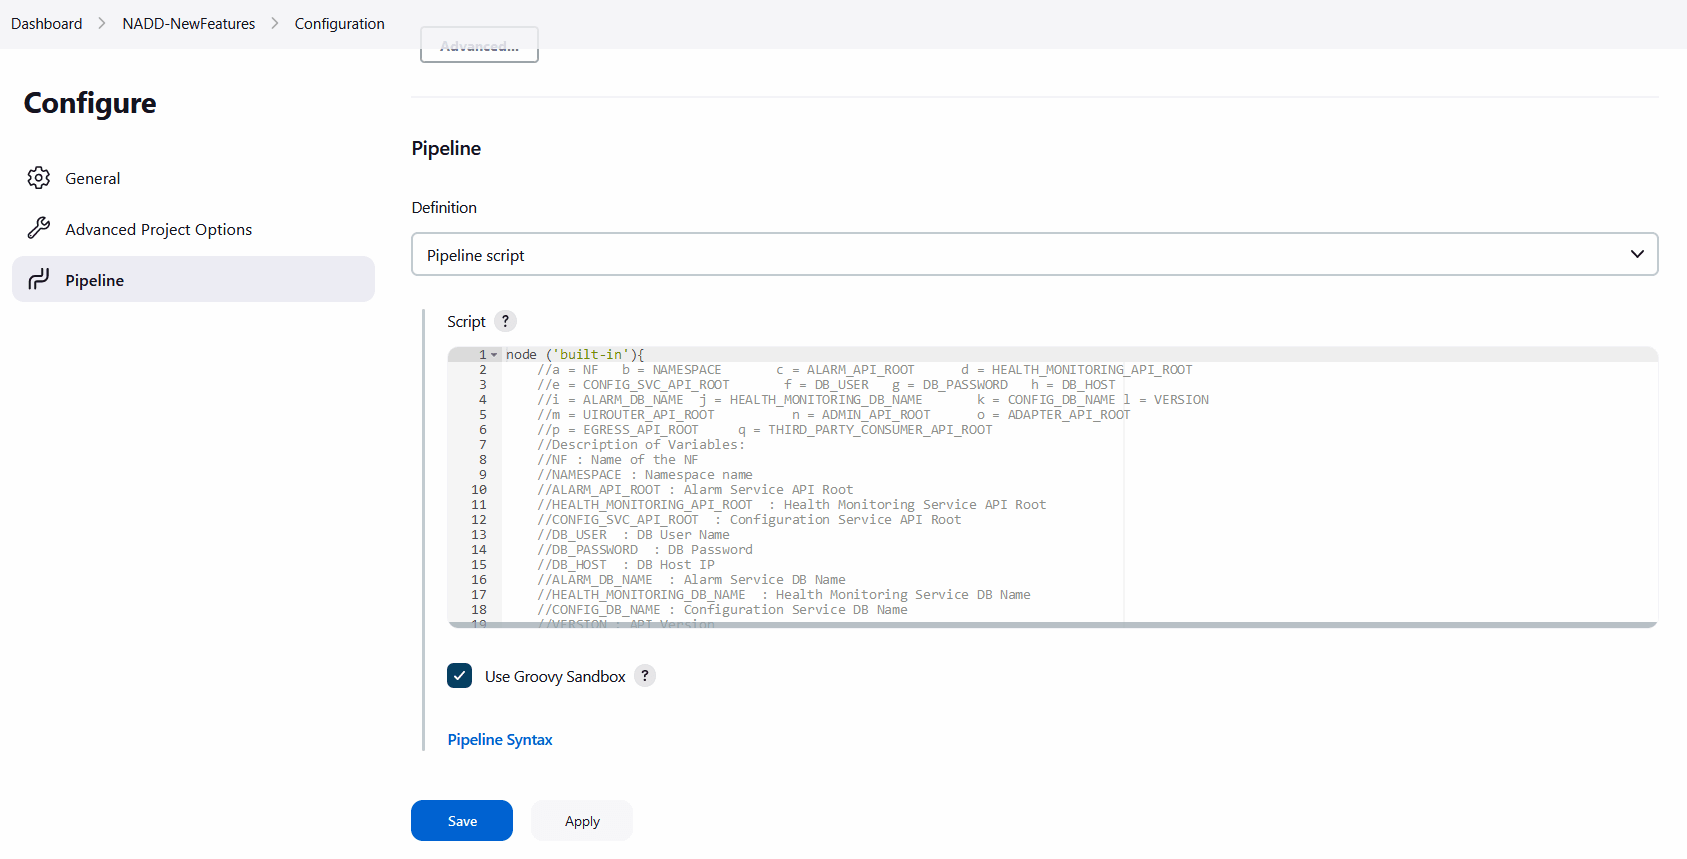
Important:
Remove the existing default content of the pipeline script and copy the following script content.The content of the pipeline script is as follows:node('built-in'){ //a= NF b = NAMESPACE c = VERSION d = DB_HOST e = DB_USER f = DB_PASSWORD //g= ALARM_DB_NAME h = HEALTH_MONITORING_DB_NAME i = CONFIG_DB_NAME //j= ALARM_API_ROOT k = HEALTH_MONITORING_API_ROOT l = CONFIG_SVC_API_ROOT //m= UIROUTER_API_ROOT n = ADMIN_API_ROOT o = THIRD_PARTY_CONSUMER_API_ROOT //p= BACKUP_RESTORE_IMG_PATH q = ALERT_MANAGER_URI //Descriptionof Variables: //NF: Name of the NF //NAMESPACE: Namespace name //VERSION: API Version //DB_HOST: DB Host IP //DB_USER: DB User Name //DB_PASSWORD: DB Password //ALARM_DB_NAME: Alarm Service DB Name //HEALTH_MONITORING_DB_NAME: Health Monitoring Service DB Name //CONFIG_DB_NAME: Configuration Service DB Name //ALARM_API_ROOT: Alarm Service API Root //HEALTH_MONITORING_API_ROOT: Health Monitoring Service API Root //CONFIG_SVC_API_ROOT: Configuration Service API Root //UIROUTER_API_ROOT: UI Router API Root //ADMIN_API_ROOT: Admin Service API Root //THIRD_PARTY_CONSUMER_API_ROOT: Third Pary Consumer API Root //BACKUP_RESTORE_IMG_PATH: Repository path forBackup restore image //ALERT_MANAGER_URI: Alert Manager API Root sh ''' sh /var/lib/jenkins/ocnadd_tests/preTestConfig-NewFeatures-NADD.sh \ -a NADD \ -b v2 \ -c <ocnadd-namespace> \ -d <DB_HOST> \ -e <DB_USER> \ -f <DB_PASSWORD> \ -g alarm_schema \ -h healthdb_schema \ -i configuration_schema\ -j ocnaddalarm:9099 \ -k ocnaddhealthmonitoring:12591 \ -l ocnaddconfiguration:12590 \ -m ocnaddbackendrouter:8988\ -n ocnaddadminservice:9181 \ -o ocnaddthirdpartyconsumer:9094 \ -p <repo-path>/ocdd.repo/ocnaddbackuprestore:<tag>\ -q occne-kube-prom-stack-kube-alertmanager.occne-infra.svc.<domainName>:80/<clusterName>\ ''' load "/var/lib/jenkins/ocnadd_tests/jenkinsData/Jenkinsfile-NADD-NewFeatures"}You can modify pipeline script parameters from "-b" to "-q" on the basis of your deployment environment, click on 'Save' after making the necessary changes.
The description of all the script parameters is as follows:
- a: Name of the NF to be tested in the capital (NADD).(Must not be modified)
- b: Namespace in which the NADD is deployed. (ocnadd)
- c: API Version. (v2)
- d: DB Host IP as provided during deployment of NADD. (10.XX.XX.XX)
- e: DB Username as provided during deployment of NADD.
- f: DB password as provided during deployment of NADD.
- g: DB Schema Name of ocnaddalarm microservice as provided during deployment of NADD. (alarm_schema)
- h: DB Schema Name of ocnaddhealthmonitoring microservice as provided during deployment of NADD. (healthdb_schema)
- i: DB Schema Name of ocnaddconfiguration microservice as provided during deployment of NADD. (configuration_schema)
- j: API root endpoint to reach ocnaddalarm microservice of NADD. (<Worker-Node-IP>:<Node-Port-of-ocnaddalarm>) or default value
- k: API root endpoint to reach ocnaddhealthmonitoring microservice of NADD. (<Worker-Node-IP>:<Node-Port-of-ocnaddhealthmonitoring>) or default value
- l: API root endpoint to reach ocnaddconfiguration microservice of NADD. (<Worker-Node-IP>:<Node-Port-of-ocnaddconfiguration>) or default value
- m: API root endpoint to reach ocnaddbackendrouter microservice of NADD. (Not used in the current release, use the default value)
- n: API root endpoint to reach ocnaddadminservice microservice of NADD. (Not used in the current release, use the default value)
- o: API root endpoint to reach ocnaddthirdpartyconsumer microservice of NADD. (<Worker-Node-IP>:<Node-Port-of-ocnaddthirdpartyconsumer>) or default value
- p: Repository path for ocnaddbackuprestore image.
- q: API root endpoint to reach alert manager microservice.
Running OCNADD Test Cases
- Click the Build with Parameters link
available in the left navigation pane of the
NADD-NewFeatures Pipeline screen. The following
page appears:
Figure 4-13 Pipeline NADD_NewFeatures
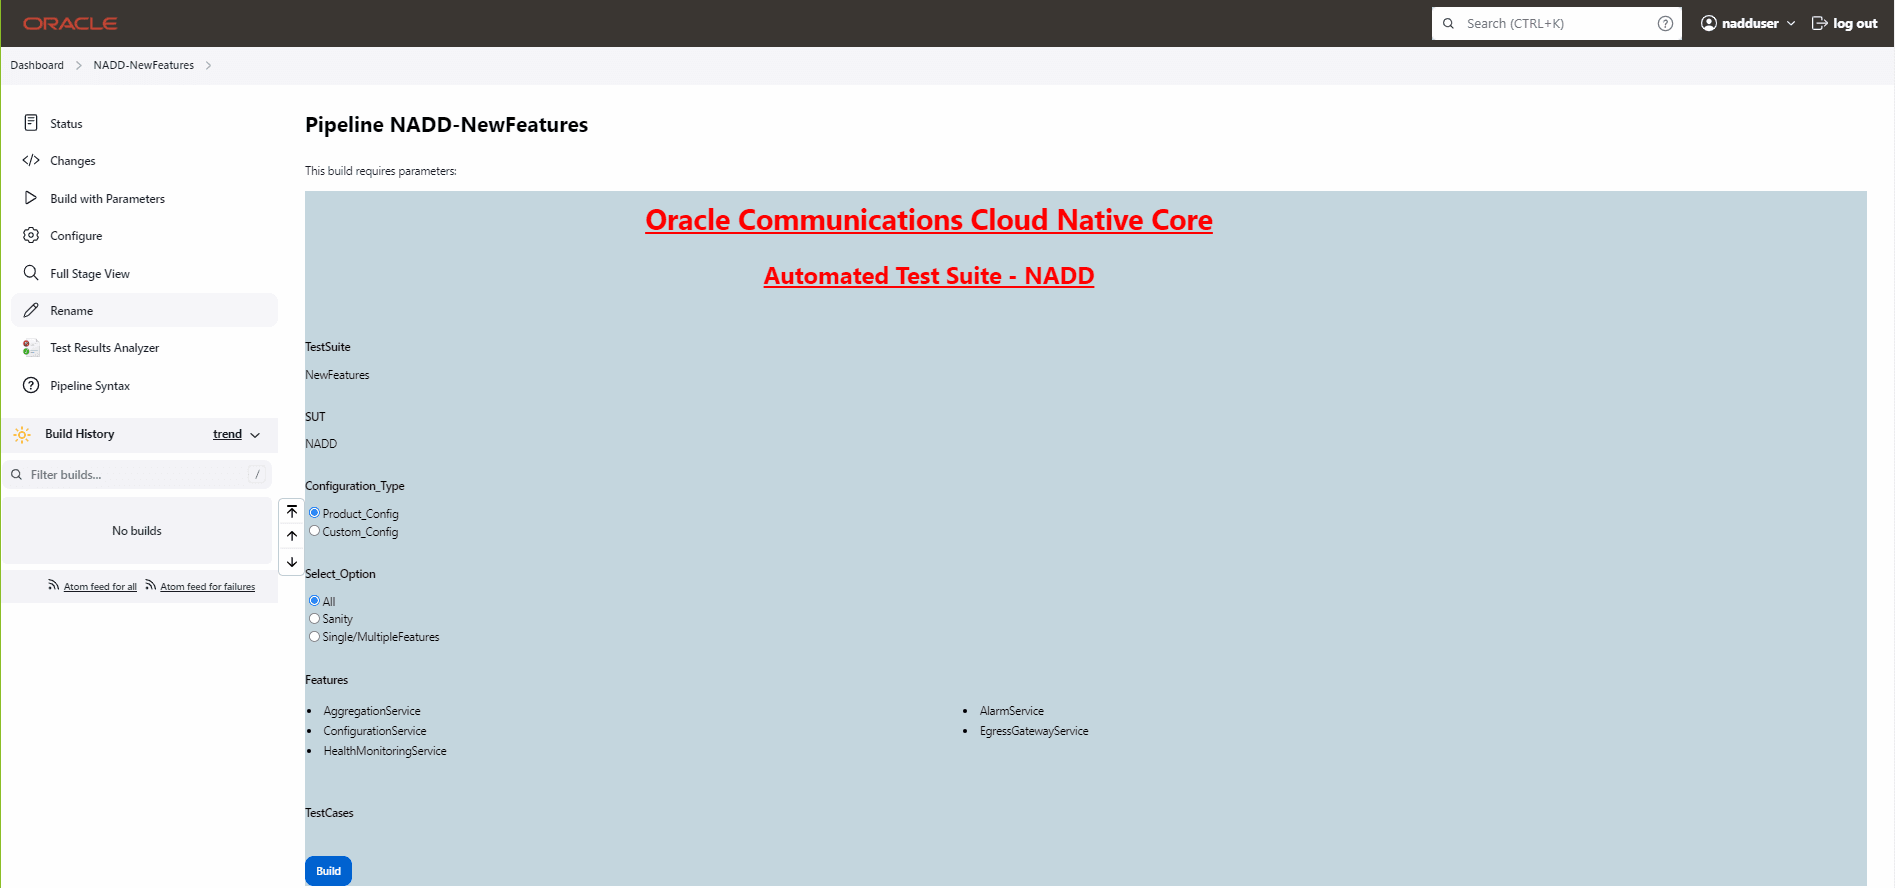
- Select Configuration_Type as Product_Config.
- In Select_Option:
- Select All to run all the feature test cases and click the Build button to execute the pipeline
- Choose Single/MultipleFeatures to run the specific feature test cases and click the Build button to execute the pipeline