7 Access Control Lists
Oracle® Communications Security Shield Cloud Service (Security Shield) Access Control Lists allow you to configure rules and enforcement actions for inbound and outbound calling numbers and called numbers.
Topics:
- Access Control Lists Controls and Actions
- About Access Control Lists and Upgrades
- Access Control List Enforcement Actions
- Access Control List Number Sorting Behavior on Phone Number Searches
- The All Numbers List
- Add a New Access Control List
- Delete an Access Control List
- Edit the Name of an Access Control List
- Add a New Rule to an Access Control List
- Delete a Rule from an Access Control List
- Edit a Phone Number on an Access Control List Rule
- Change the Call Direction for an Access Control List Rule
- Change the Enforcement Action on an Access Control List Rule
- Simulate a Phone Number Lookup
Access Control Lists Controls and Actions
The Oracle® Communications Security Shield Cloud Service (Security Shield) Access Control Lists page displays lists of phone numbers and rules you create to control call traffic in and out of your telecommunications network. You can create lists for enterprise-wide control as well as for controlling calls to specific individuals or destinations.
The Access Control List page displays the system-generated All Rules List along with any lists you create in the left pane and the details of the lists in the right pane. The All Rules List is a summary view of all your access controlled phone numbers and rules.
Note:
You cannot rename or delete the All Rules List.The following screen capture shows an example of the Access Control List page with the system-named All Rules List, and some user-created lists in the left pane and the details of the highlighted list in the right pane.
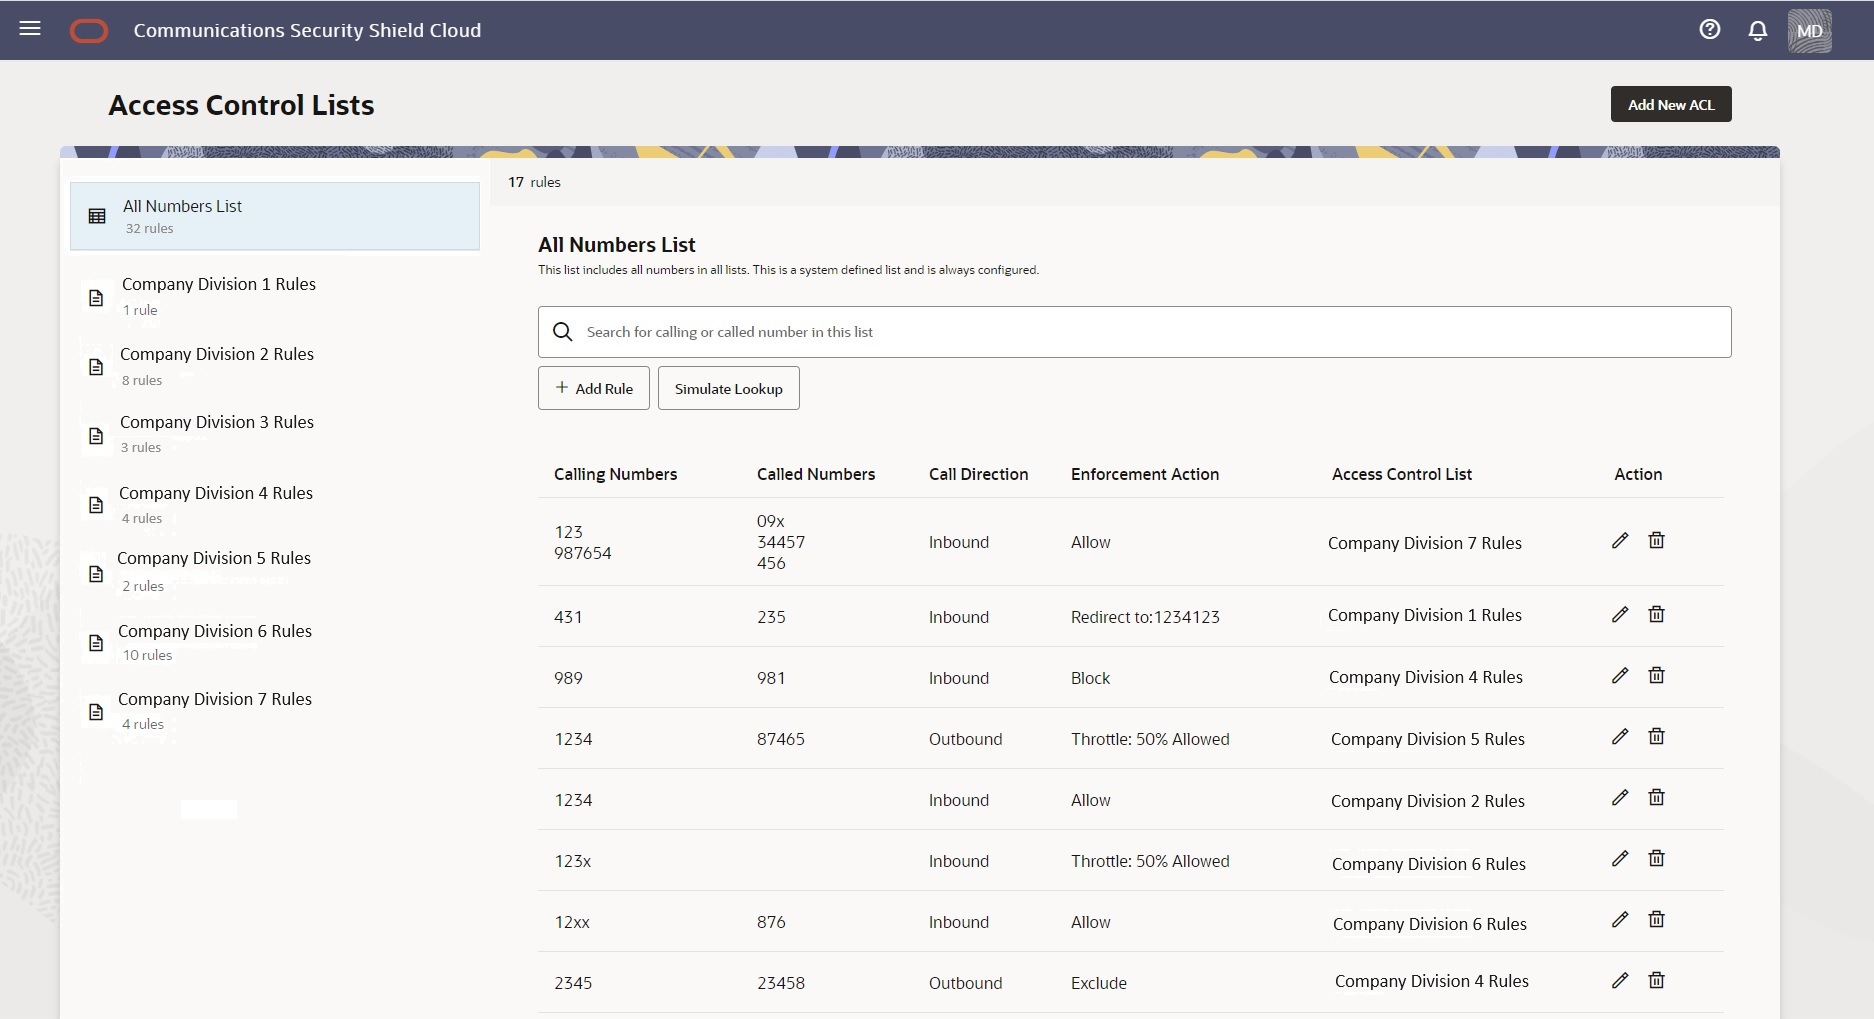
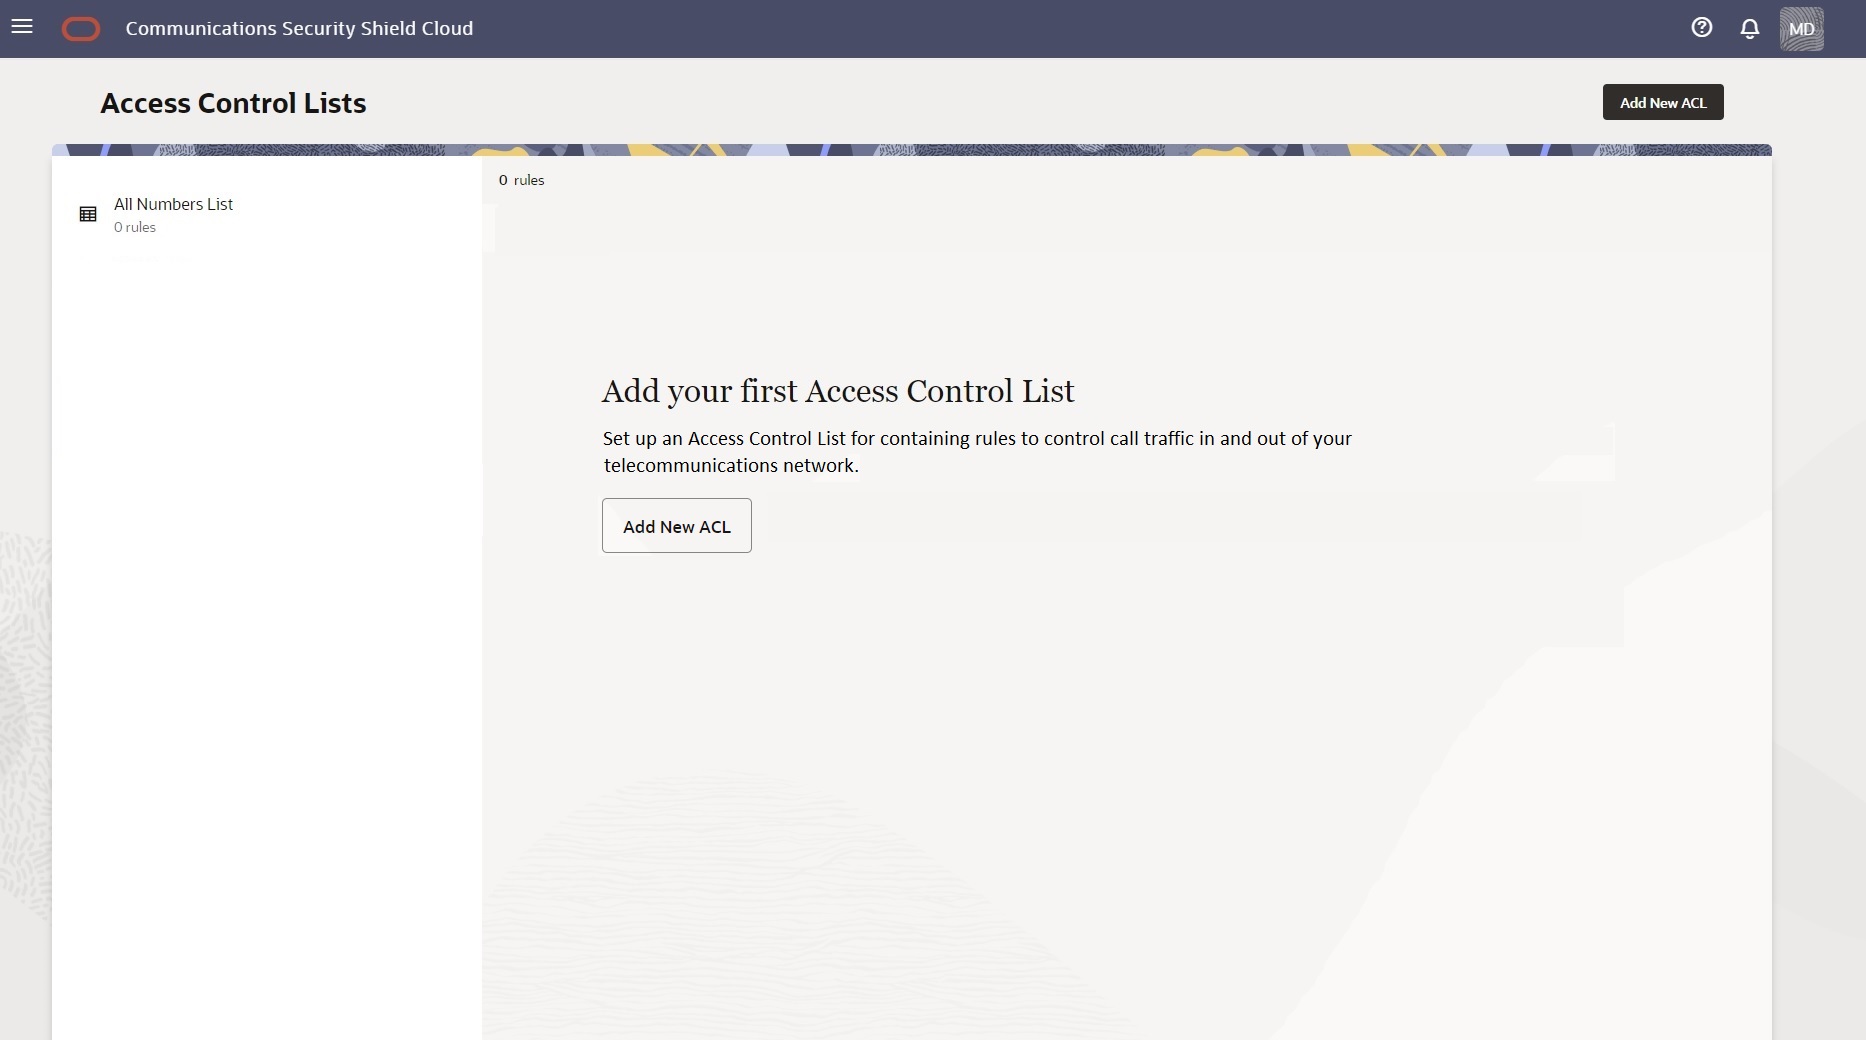
Use the Add New ACL button to add an Access Control list. You can add up to ten lists. When you reach the limit, the system deactivates the Add New ACL button. Each user-created list displays the edit and delete icons when you hover over the list name. For new customers, the Access Control List interface displays only the All Rules List, which is empty until you add lists. For upgrading customers, the system imports your preexisting access control lists and populates the All Rules List with the numbers from the imported lists.
- When working with the All Rules List, the right pane displays the Search field and the Simulate Lookup button.
- When working with a user-created list, the right pane displays the Search field but not the Simulate Lookup button.
Note:
You may find that Search on the All Rules List is especially useful when you don't know which access control list contains a number you want to find because the search results identifies the list.When no user-created Access Control lists exist, for example, when you first install Security Shield or when you delete all your user-created lists, Security Shield displays the message shown in the following screen capture. (Click Add ACL List to add a list.)
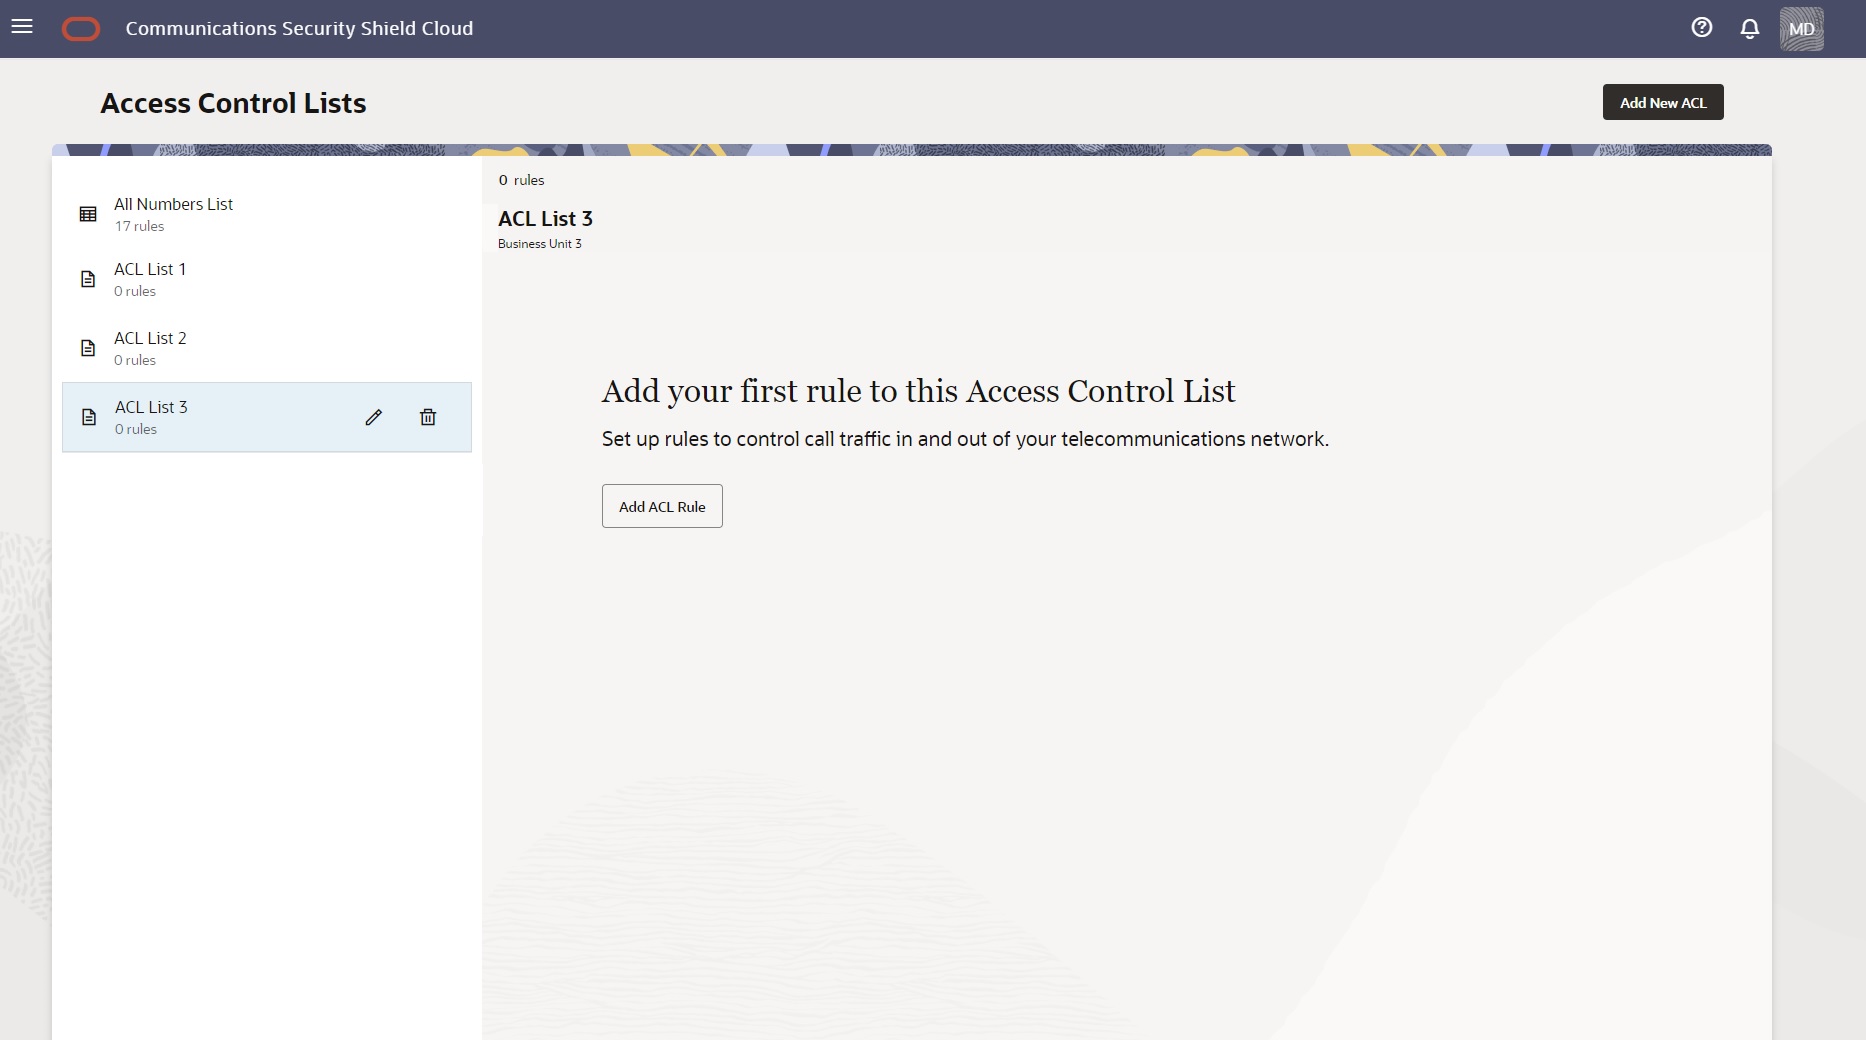
When a user-created Access Control list contains no rules, for example, when you first create the list or when you delete all the rules on the list, Security Shield displays the message shown in the following screen capture. (Click Add ACL Rule to add a phone number.)
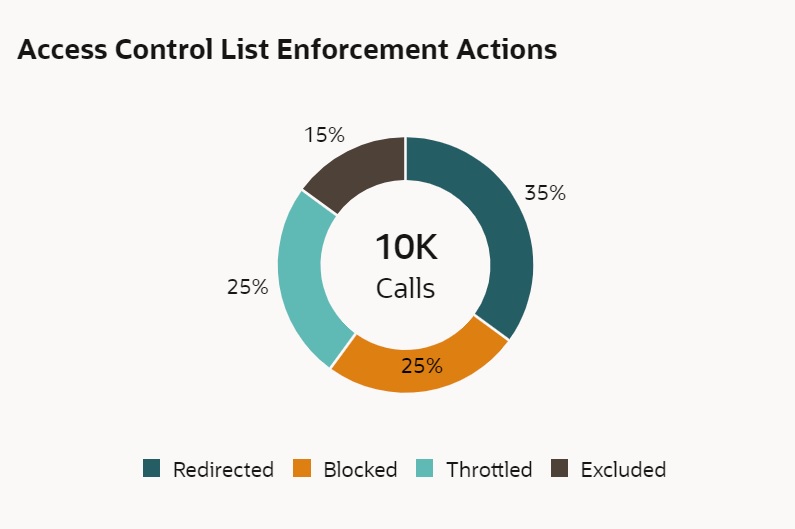
When you create access control lists, the Security Shield reports their cumulative enforcement actions on the Access Control List Enforcement Actions tile on the Dashboard. The tile shows total number of inbound and outbound enforcement actions taken and displays a pie chart with the percent of actions taken per enforcement type. When you hover over a section of the pie chart, the tile shows the action taken and the number of call actions for the type.
Security Shield processes Access Control Lists (ACL) independently from regular threat processing and an action taken due to an ACL match over-rides decisions made due to threat analysis. Calls that match an ACL rule are also fully analyzed for threat status. The threat status is reported as part of the Security Shield Dashboard statistics and is also available in the analytics reports environment. The system reports both the ACL status and the threat status of the call.
About Access Control Lists and Upgrades
When Oracle upgrades Oracle® Communications Security Shield Cloud Service (Security Shield), the system migrates your preexisting access control lists with their preexisting names and rules.
In the upgrade process, Security Shield migrates you preexisting numbers configured for inbound to the Calling Number list and numbers configured for outbound to the Called Number list.
Access Control List Enforcement Actions
When you create an access control list rule, you must specify the enforcement action that you want Oracle® Communications Security Shield Cloud Service (Security Shield) to apply.
You can choose from the following enforcement actions for an access control list rule.
Allow —Allows inbound calls, but will evaluate the inbound call against Traffic Pumping, Spoofing, and Toll Fraud threat detection. Allow ignores the risk assessment and classifies the call as "Good". The Allow action does not evaluate the call against Fraud, Spam, and Call Center detection
Block —Blocks calls from the selected calling and called numbers on the list from proceeding in the specified direction.
Exclude—Allows inbound calls while still evaluating against Traffic Pumping, Spoofing, and Toll Fraud threat detection. Exclude ignores the risk assessment and classifies excluded calls as "Good". The Exclude action does not evaluate against Fraud Risk, Spam Risk, and Call Center call detection.
Redirect —Sends inbound calls from the selected calling and called numbers on the list to the destination that you specify. For example, you can route specific numbers with a history of fraudulent activity associated with them, or that come from specific international destinations, to a security desk for additional screening. All calls to a specific phone number go to the same specified redirect destination because Security Shield does not support redirecting to multiple locations per phone number. You can specify a redirect number per inbound phone number.
Note:
You might see some fluctuation where the actual value sometimes differs from the configured value.Access Control List Number Sorting Behavior on Phone Number Searches
The following information explains how Oracle® Communications Security Shield Cloud Service (Security Shield) sorts phone numbers when you perform a phone number search on an access control list. Security Shield uses the longest matched pattern, whether from a regular entry or from a wild card entry, to return search results. A regular entry will return an exact match and the wild card entry will return the phone number with the fewest wild card characters.
The scenarios used for the explanation assume that the database contains two tables. One table contains regular phone numbers, which contain no wild card characters, and the other table contains phone numbers that contain wild card characters.
The following table contains the list of regular phone numbers used for the subsequent explanation in this topic.
Table 7-1 Regular Entries
| ID | List ID | Phone Number | Action | Direction |
|---|---|---|---|---|
| 1 | 101 | 9871562313 | Allow | Inbound |
| 3 | 101 | +9871562313 | Block | Inbound |
| 5 | 101 | 1234567890 | Block | Outbound |
| 7 | 101 | 3276458901 | Allow | Inbound |
| 9 | 101 | 774436712 | Block | Outbound |
The following table contains the list of phone numbers with wild cards used for the subsequent explanation in this topic.
Table 7-2 Wild card Entries
| ID | List ID | Phone Number | Action | Direction |
|---|---|---|---|---|
| 2 | 101 | 98715623XX | Allow | Inbound |
| 4 | 101 | +9871XXXXXX | Block | Inbound |
| 6 | 101 | 1XXXXXXXXX | Block | Outbound |
| 8 | 101 | 8373XXXXXX | Allow | Inbound |
| 10 | 101 | 77442671X | Allow | Outbound |
| 12 | 101 | 12XXXXXXXX | Allow | Outbound |
| 14 | 101 | 123XXXXXXX | Block | Outbound |
| 16 | 101 | 1234XXXXXX | Allow | Outbound |
| 18 | 101 | 12345XXXXX | Block | Outbound |
| 20 | 101 | 123456XXXX | Allow | Outbound |
| 22 | 101 | 1234567XXX | Block | Outbound |
| 24 | 101 | 12345678XX | Allow | Outbound |
| 26 | 101 | 123456789X | Block | Outbound |
| 28 | 101 | 123456782X | Block | Inbound |
Longest Match Scenarios
- Regular Entries—Assume that Security Shield receives a lookup request for 1234567890, which is an Outbound call. Our example database includes ten numbers that match this pattern. The first match is a direct match, which is the regular entry ID 5. Other matches come from the wild card table with IDs 6, 12, 14, 16, 18, 20, 22, 24 and 26, as X can represent any number from 0-9. Because the regular entry 1234567890 is a direct match, Security Shield discards other entries and displays only 1234567890 as the response.
- Wild card Entries—Assume that Security Shield receives a lookup request for 1234567891. The Regular Entries table contains no matching number, but the Wild card Entries table displays potential matches in IDs 6, 12, 14, 16, 18, 20, 22, 24 and 26. Security Shield seeks the longest match among those IDs, which comes from the wild card pattern with the fewest number of wild card characters (X). ID 26 satisfies the criteria and Security Shield displays 123456789x as the response.
Sorting Order Rules
- Security Shield sorts the results by the length of the number. For example, the Regular Entry with ID 9 and the Wild card Entry with ID 10 both have a length equal to nine characters or digits, therefore these phone numbers come before numbers with a length greater than nine characters or digits in ascending order and the opposite in descending order.
- If a number contains the plus character (+) it earns lower priority in the sorting order than the same number that does not containing plus character in ascending order and high priority in descending order. For example, Regular Entry with ID 1 (9871562313) and with ID 3 (+9871562313), In Ascending order the correct order is 9871562313 > +9871562313 and in descending order it is +9871562313 > 9871562313.
- Wild cards always earn lower priority than regular numbers after some of the digits have been directly matched and opposite for descending order. For example, Regular Number 1234567890 will always come before 123456789X in ascending order and the opposite in descending order.
Descending Order
The following list shows the descending sort order for the results of the preceding example entries.
+9871XXXXXX
98715623XX
+9871562313
9871562313
9871562313
8373XXXXXX
3276458901
1XXXXXXXXX
12XXXXXXXX
123XXXXXXX
1234XXXXXX
12345XXXXX
123456XXXX
1234567XXX
12345678XX
123456789X
1234567890
123456782X
774436712
77442671X
Ascending Order
The following list shows the ascending sort order for the results of the preceding example.
77442671X
774436712
123456782X
1234567890
123456789X
12345678XX
1234567XXX
123456XXXX
12345XXXXX
1234XXXXXX
123XXXXXXX
12XXXXXXXX
1XXXXXXXXX
3276458901
8373XXXXXX
9871562313
+9871562313
98715623xx
+9871xxxxxx
The All Numbers List
On the Access Control List page, the Oracle® Communications Security Shield Cloud Service (Security Shield) displays the system-named All Numbers List. The All Numbers list is a summary view of all your access control lists. You can edit and delete phone numbers on the All Numbers List and add new numbers. You cannot rename or delete the All Numbers list.
The Access Control List page always displays the All Numbers List as the first list in the left pane. In the right pane, the All Numbers List displays the Search field, the Simulate Lookup button, and the Add Rule button. The display lists the phone numbers and their attributes under the Calling Numbers, Called Numbers, Call Direction, Enforcement Action, Access Control List headings and the Actions icons. The pane also includes a description of the list, when one exists. (You can write a description for any user-created list.) If you do not know which list contains the phone number you want to edit, use Search on the All Numbers List. The search results identify the list.

Note:
When you add phone numbers, edit phone number attributes, and delete phone numbers on one of your user-created access control lists, the All Numbers List reflects the same information.Search Field
At the top-left of the right pane, the All Numbers List displays the Search field. Use Search when looking for an exact match to a phone number.
Search supports searching for phone numbers that include wild card characters in the suffix. For example, 1615410x. Any number matching this search criteria from left to right (exact match) is a match. The following are matches: +1615410x, +1615410xx, and +1615410xxx.
You can also perform partial-number search by typing as much of the first part of a phone number as you want and omit the trailing numbers. For example, suppose you want to see all phone numbers that begin with +1 615 410 because you are looking for +1 615 410 0001 or you want to see all numbers with the +1 615 410 prefix. Enter +1 615 410 in Search and the system will display all phone numbers that begin with +1 615 410. For each phone number found on the All Numbers List, the results also show the specified call direction, the specified enforcement action, and the name of the user-created list that contains the phone number, as shown in the following screen capture.
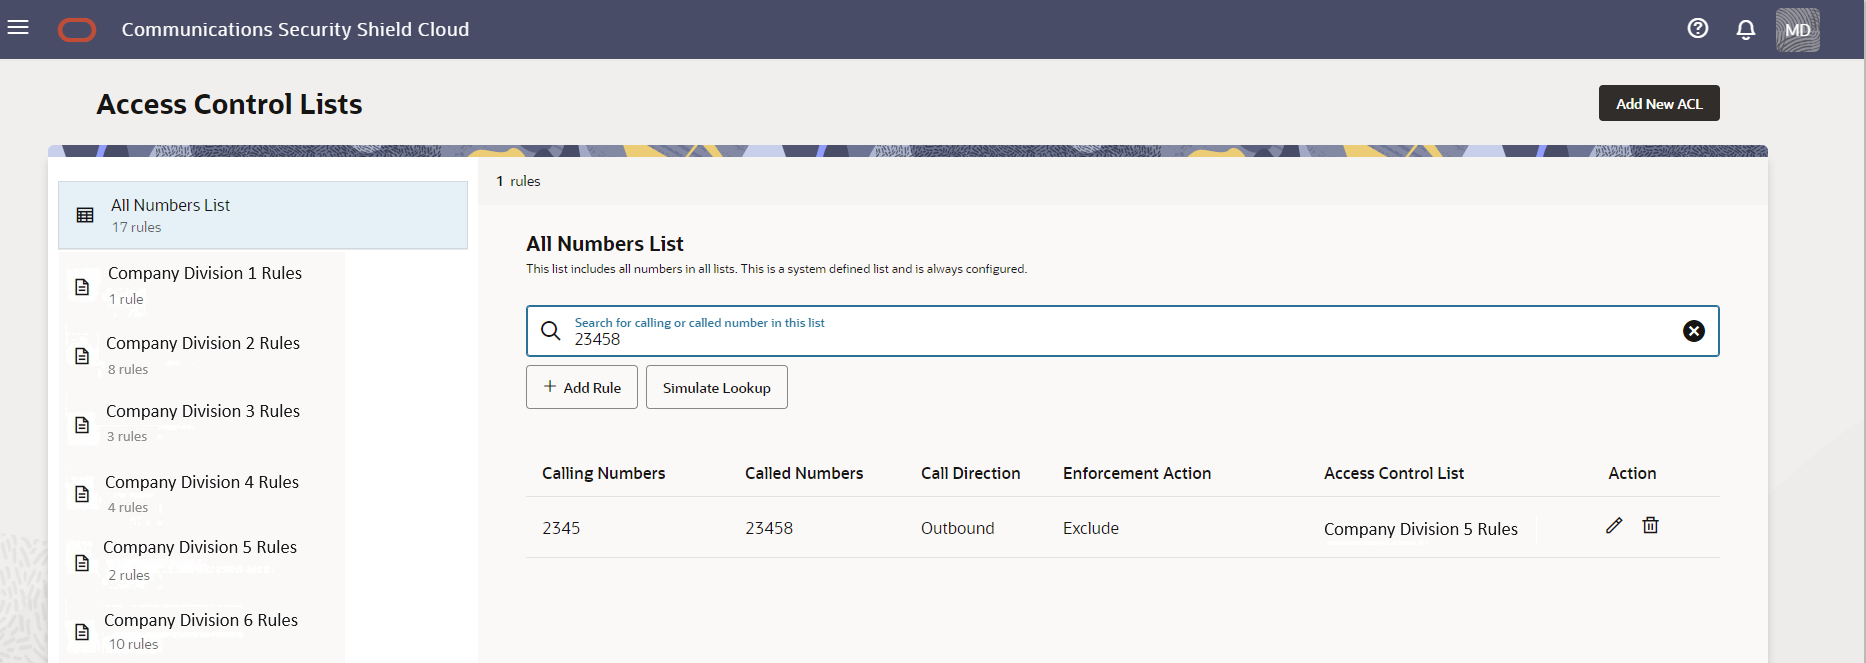
- Match found—The Access Control Lists page displays
the Calling Numbers, Called Numbers, Call
Direction,Enforcement Action, and name of the list that
contains the number, as shown in the following screen
capture.
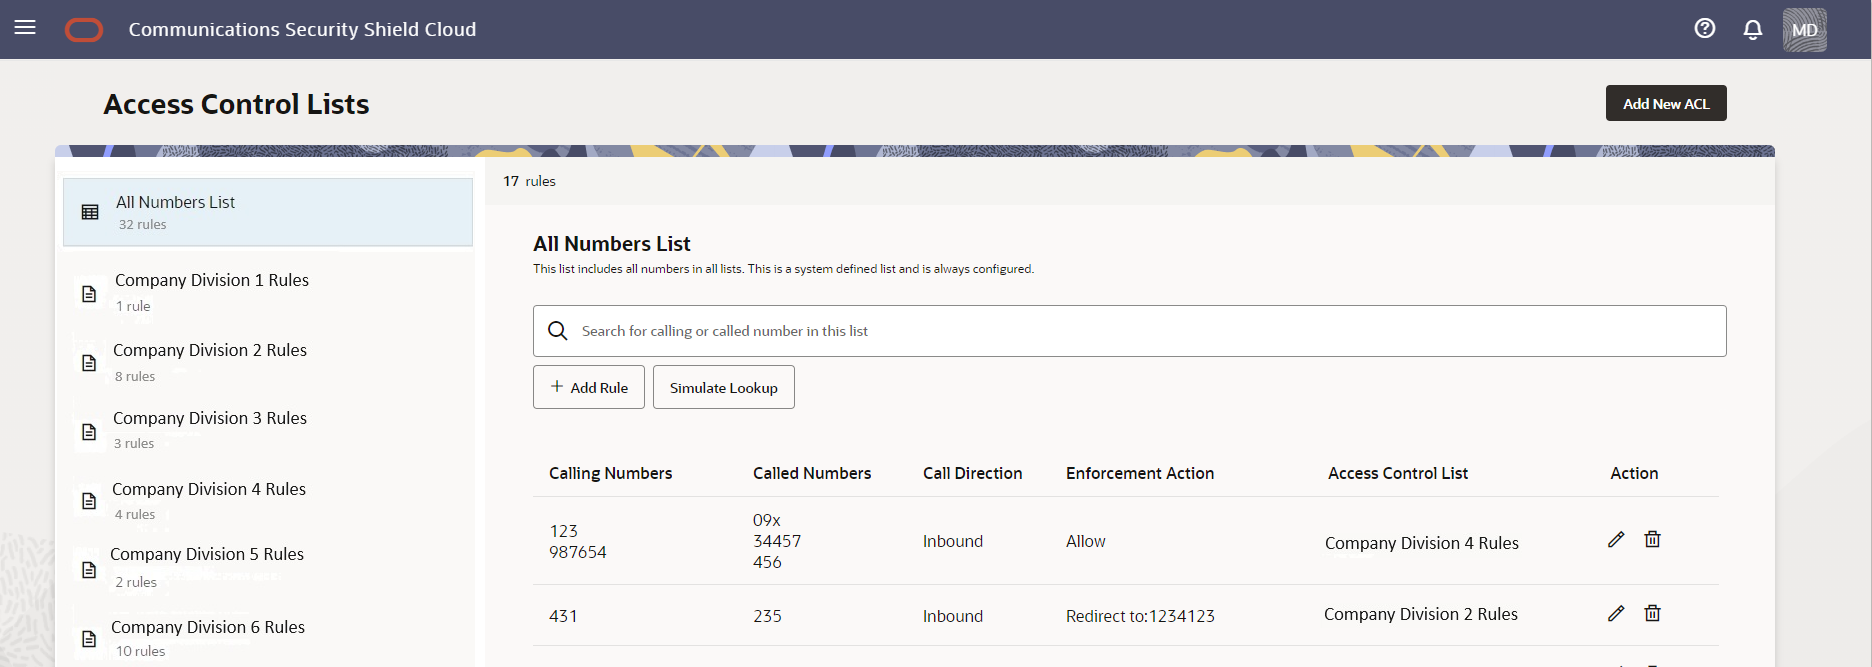
- No match found—The Access Control Lists page
displays a message that says "No Data Available". If you
want to add the number to the list, click + Add
Rule. When you save the rule, the system
adds it to the All Numbers List and to the user-created list
that you specified (if you specified one).

Note:
Search can display up to 1,000 results, which you can scroll through. The results display in ascending order, onlySimulate Lookup Button
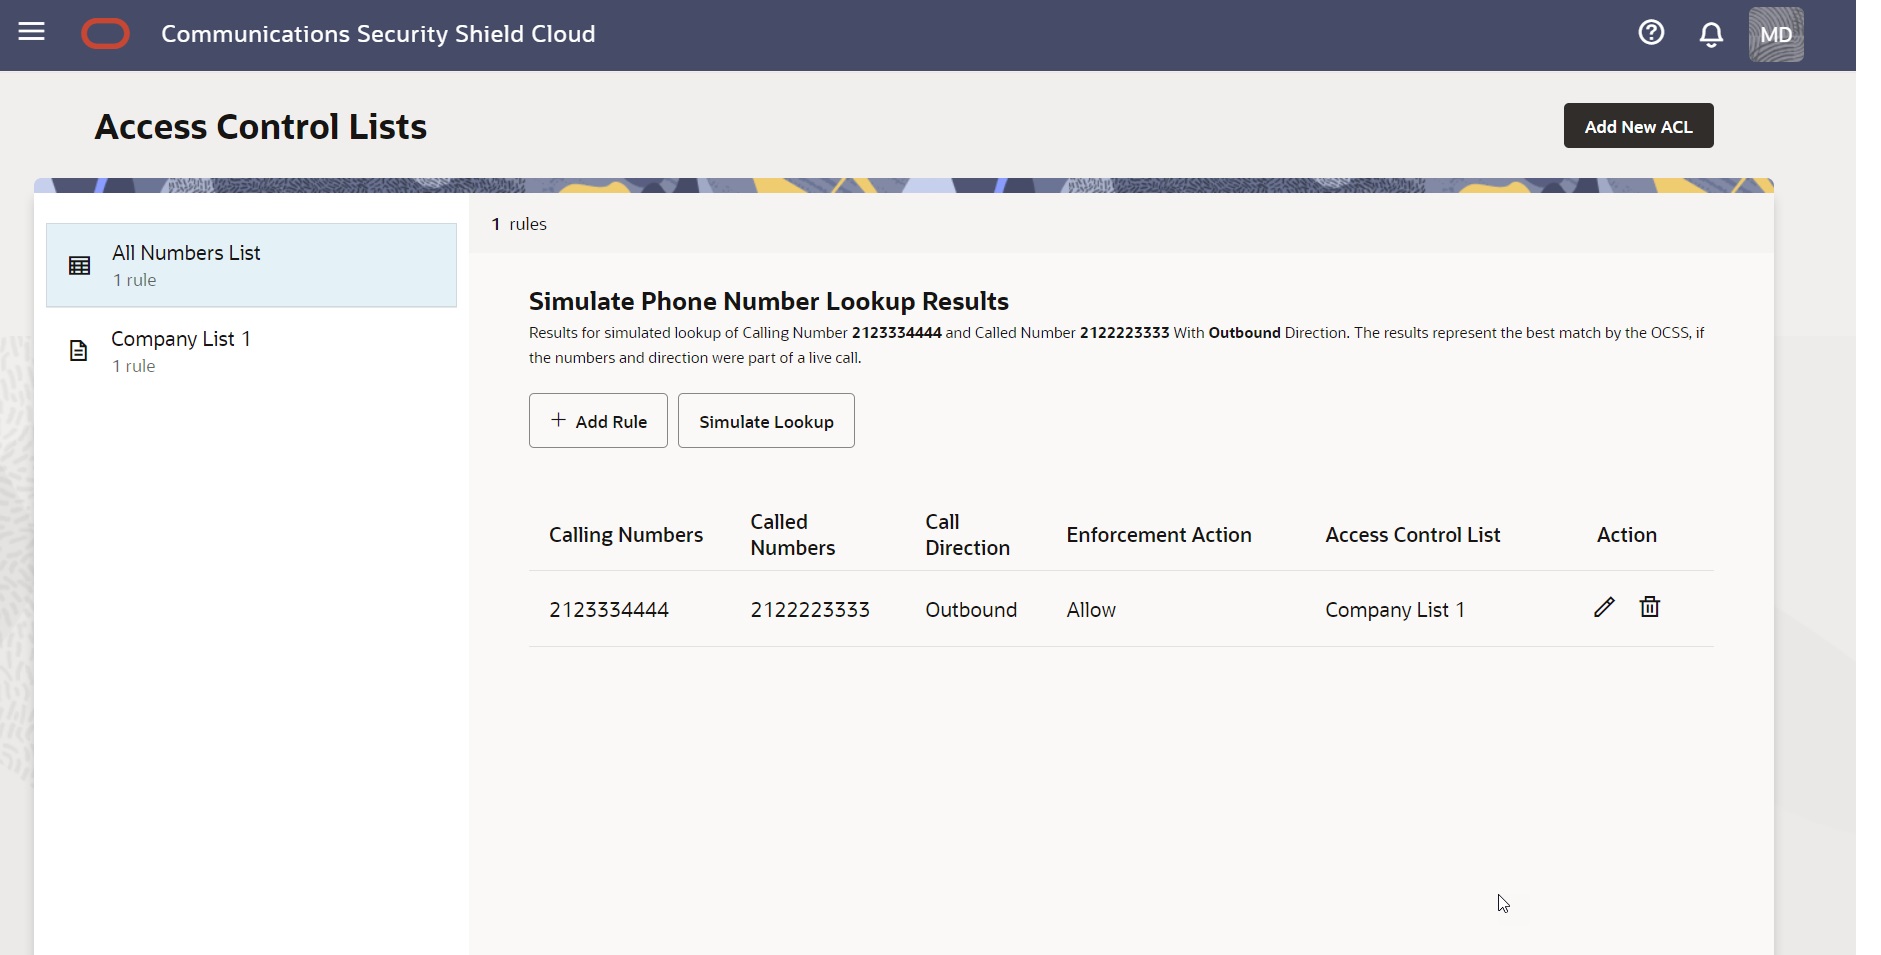
Near the top-right of the right pane, the All Numbers List page displays the Simulate Lookup button. Use Simulate Lookup when you want to know how the Security Shield will enforce access control on a phone number on your list. The results show the Call Direction, the Enforcement Action that the session border controller will apply, and the name of the list that contains the phone number, as shown in the following screen capture.
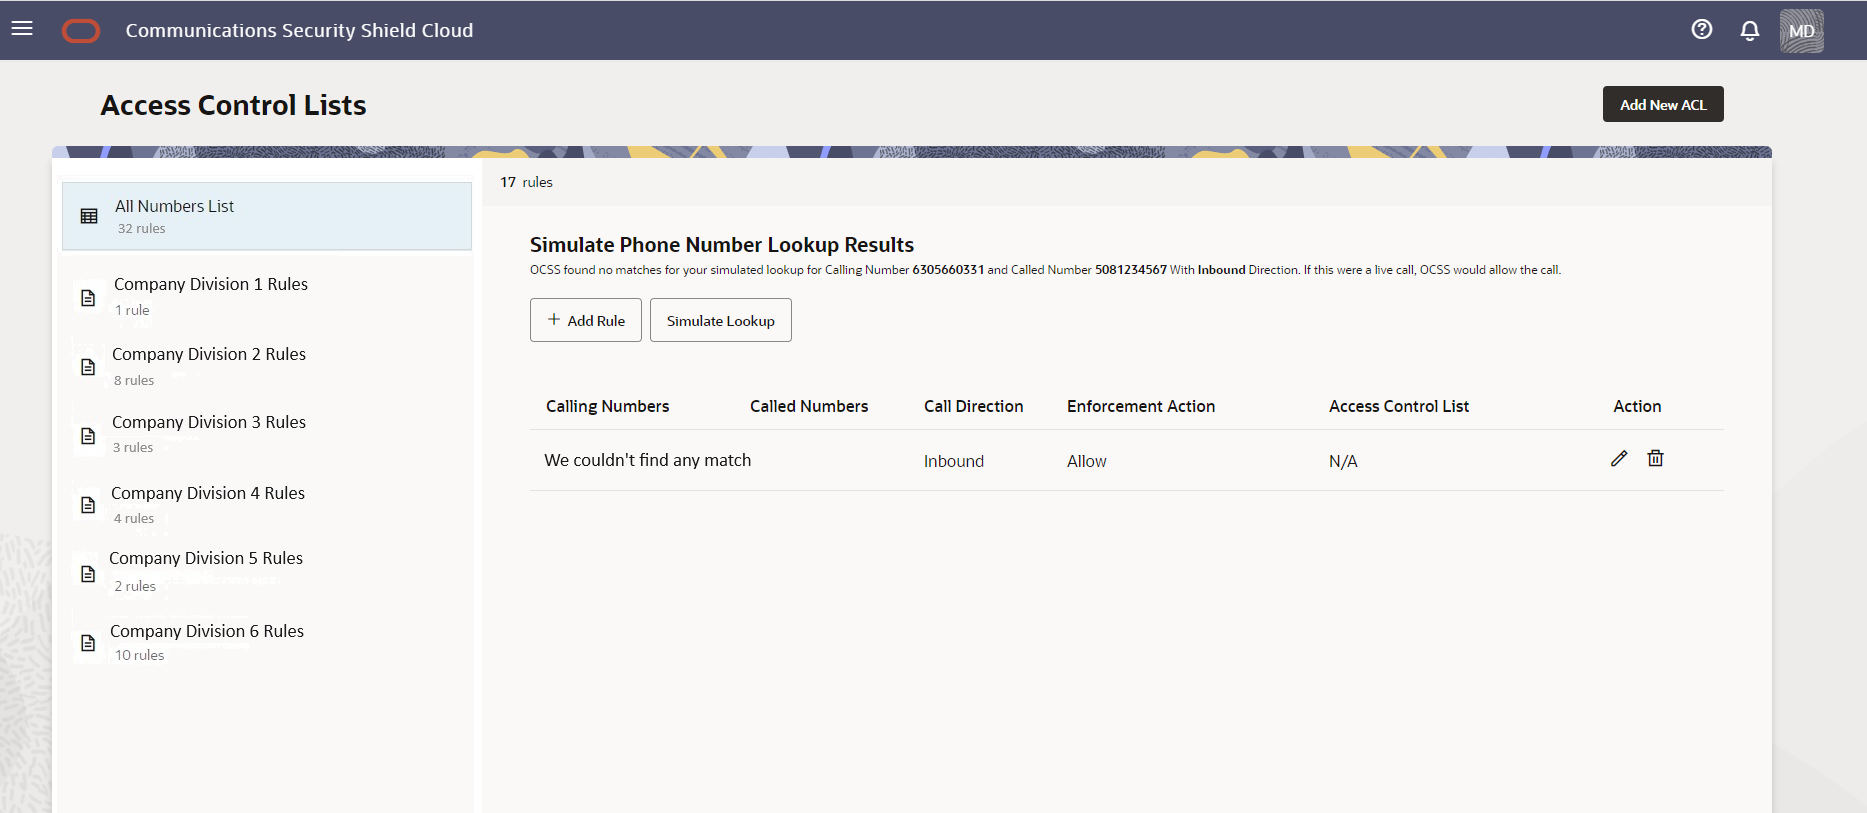
When Simulate Lookup does not find a match to the number you entered, the GUI allows the call because the phone number does not exist on any of your access control lists. The Simulate Phone Number Lookup Results page displays the "We couldn't find any match" message as shown in the following screen capture.
Add a New Access Control List
You can create your own access control lists to organize phone numbers and rules for how you want to control inbound and outbound calls. Oracle® Communications Security Shield Cloud Service (Security Shield) supports up to ten user-created access control lists.
Delete an Access Control List
When you want to delete an Oracle® Communications Security Shield Cloud Service (Security Shield) access control list, you can do so at any time from the Access Control List page.
Edit the Name of an Access Control List
When you want to edit the name of an Oracle® Communications Security Shield Cloud Service (Security Shield) access control list, you can do so at any time from the Access Control List page.
Add a New Rule to an Access Control List
When you want to add one or more rules to an Oracle® Communications Security Shield Cloud Service (Security Shield) access control list, you can do so at any time from the Access Control Lists page.
In the following procedure, you can specify one or more Calling Numbers, Called Numbers, or both for the rule to use as criteria for matching calls to the enforcement action. You can select only one call direction per rule.
Phone numbers must be from 1-25 digits or in E.164 international format. You can use the x character as a wild card for number ranges, but only as a suffix. For example, To specify an 11-digit number in the range +1 603-555-0000 to +1 603-555-9999, enter +1 603-555-xxxx.
Note:
If you try to add the same phone number with the same attributes to two access control lists, the system displays an error message.Delete a Rule from an Access Control List
When you want to delete one or more rules from an Oracle® Communications Security Shield Cloud Service (Security Shield) access control list, you can do so at any time from the Access Control List page.
Note:
If you do not know which list contains the rule you want to delete, use Search on the All Rules List. The search results will identify the list.Edit a Phone Number on an Access Control List Rule
When you want to edit phone a number in an Oracle® Communications Security Shield Cloud Service (Security Shield) Access Control List, you can do so at any time from the Access Control List page.
Note:
If you do not know which list contains the phone number you want to edit, use Search on the All Rules List. The search results identify the list that contains the number.Change the Call Direction for an Access Control List Rule
When you want to change the call direction on an Oracle® Communications Security Shield Cloud Service (Security Shield) access control list rule, you can do so at any time from the Access Control Lists page.
Note:
If you do not know which list contains the rule you want to edit, use Search on the All Rules List. The search results will identify the list that contains the number.Change the Enforcement Action on an Access Control List Rule
When you want to change the enforcement action on an Oracle® Communications Security Shield Cloud Service (Security Shield) Access Control List Rule, you can do so at any time from the Access Control List page.
Because Security Shield allows you to change the enforcement action on a particular rule, be aware that the purpose of the access control list might start to loose meaning or become confusing when you change the enforcement action on a rule.
For example, suppose an access control list is named "Allow Inbound Calls" and you change the enforcement action on a rule in that list to "Block". The block rule still belongs to the "Allow Inbound Calls" list, which can cause confusion because the enforcement action does not correspond to the list name. Oracle recommends either renaming the list or moving the changed number to a list of blocked numbers. If you do not have one, you can create one.
Note:
If you do not know which list contains the rule you want to edit, use Search on the All Rules List. The search results will identify the list that contains the number.Simulate a Phone Number Lookup
When you want to know what enforcement action your Session Border Controller will apply to a phone number, or which of your Oracle® Communications Security Shield Cloud Service (Security Shield) Access Control lists contains a phone number, use the Simulate Lookup function.
In the following procedure, you must enter both the Called Number and the Calling Number. Simulate Lookup cannot return a result with only one or the other. Simulate Phone Number Lookup does not accept wild cards.