Registrations
The Registrations page allows you to examine the registration events detected on the monitored platform. Examples of these events are: a SIP device tries to publish itself as an on-line entity willing to engage itself in communication with other devices, changes this status to off-line, or queries a central authority about this status. Registration events are generated using the SIP protocol method 'REGISTER'.
The Registrations page contains two panels: the first is the Registered Users panel, which provides an overview of the number of registered devices and the fluctuation over time, and the Registrations Table, which groups the events for one subscriber (one AOR in SIP terminology) and gives more details.
Registered Users Panel
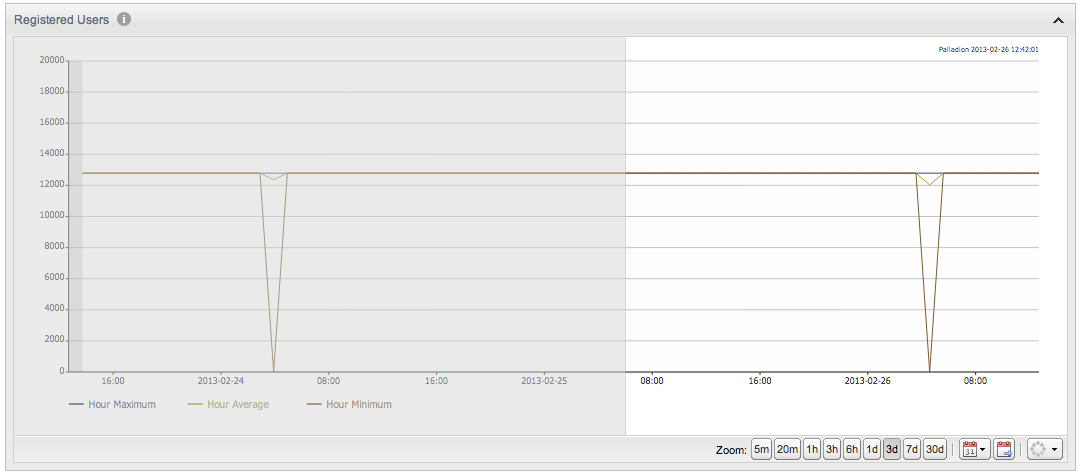
The top panel contains a chart that traces the total number of registered users over time. The sampling interval is 1 minute for drawing the sample's minimum, maximum, and average values.
By default, a window of three hours is presented. The time frame can be adjusted and the chart allows for panning. For more information on using charts, see " Charts ".
Figure 4-51 Registered Users Panel While Dragging Time Window

Description of "Figure 4-51 Registered Users Panel While Dragging Time Window"
Note:
If Operations Monitor has no registration information over a period of time (due to factors like recent start up, downtime, or lack of traffic), that interval is indicated in the chart by a gray area (as seen on the left side of Figure 4-51).
Registrations Table
The Registrations panel contains a table of the registrations events, grouped by SIP user. The list is ordered chronologically, presenting the latest event as the first entry by default. The table can be resorted and/or filtered. For more information, see "Filtering".
Note:
If the system setting Group New Registrations from the Same User is true, duplicate registration events in state 'New' from the same users are grouped together. However, since the grouping is done on each requested chunk, duplication removal over different chunks does not work.
Table 4-9 lists the column descriptions for the Registrations table:
Table 4-9 Registration Table
| Column | Description |
|---|---|
|
User |
Contains the user part of the AOR; if the system setting Use users domains is enabled, the domain part is also included in this field. When specifying a filtering token, all users that contain that token (position independent) will be shown. |
|
Contacts |
Filtering is done by matching a given string. All the contacts provided by the registering device are listed here, each as a SIP URI. |
|
Source IP address |
The IP address of the network device that initiated the registration event. Filtering is done by matching a given string. |
|
Destination IP address |
The IP address of the network server targeted by the registering device. Filtering is done by matching a given string. |
|
Timestamp |
The moment in time when the event occurred. Filter by specifying an interval (between Before and After) or a Date (the On date selector). |
|
Registrars |
The device configured in Settings/Platform Devices that was targeted by the subscriber's device when registering. When trying to filter by a certain device, a list of configured devices is presented out of which one or more can be selected. |
|
Event |
The type of registration event; the table below is detailed on each defined type. For filtering one can choose to filter the presented list to only include some of the possible events. |
|
Code |
The SIP code that the registration message exchange finished with. Filter by specifying any valid SIP reply code. |
Skype for Business Registration Events
You can view Skype for Business Registration events in the Registrations table under Registrations.
Registration Event Categories
Registration events are categorized as follows:
-
Failed
Final response code is bigger than 299.
-
Unauthorized
Two consecutive transactions are answered with 401, or when one 401 transaction is not followed by another REGISTER request in the next 5 seconds.
-
New
Anew contact binding was created for this user.
-
Gone
Another registration request was answered by the registrar, and the binding was not found in the response.
-
Expired
A binding is considered expired when the time interval specified in the 'expires' parameter from the registrar's answer is over. No messages are associated with this type of event.
Registrations Table Actions
The Registrations table provides a few action buttons.
-
Click the Registration details button when a row is selected in the table, and a window appears containing more details for individual registration events; this window can be also opened by simply double-clicking on the selected row in the table.
-
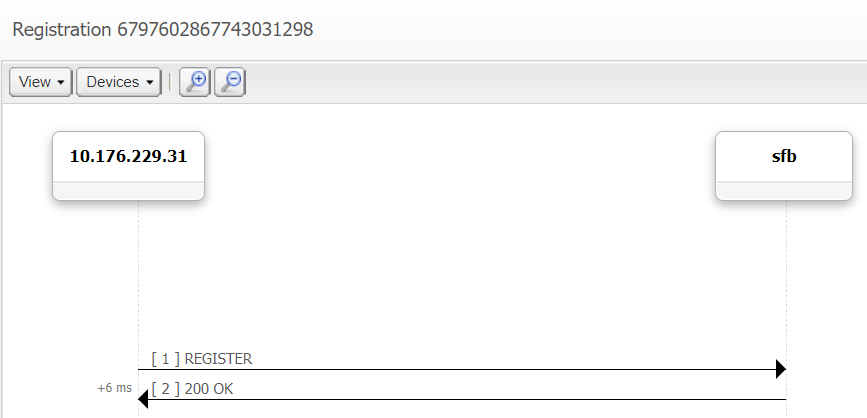
Click the Message flow button to open a SIP message flow diagram window that depicts the network entities involved and message exchange of the registration event.
-
The CSV export button allows to have all table entries exported into a CSV file. If the contents of the table have been filtered, the contents of the exported CSV file will only contain the filtered results.
Note:
Many of these actions are available by right-clicking (see Figure 4-52).
Right-Click Contextual Menu
Right-click menu actions are as follows:
-
Filter table for ... allows you to filter for:
-
Other registration events of the same user or contact.
-
The same code or event type.
-
All registrations involving the same address or device.
-
-
WHOIS information for ... allows you to inquire who is the owner of the IP used as the source of the registration. A window appears that contains the record stored into the WHOIS database for the given address.
-
Create trace with user ... loads the Traces page with the User field pre-filled with the value taken from the corresponding registration event.
-
Track user ... loads the User Tracking page with the User field pre-filled in the search panel taken from the event.
Paging
The paging bar allows you to navigate the entries. With the Newer and Older buttons you can step to the next page of newer respective older entries (see Figure 4-53).
The Now button takes you to the first page, showing the newest entries. The date picker (see Figure 4-54) allows you to choose an arbitrary first date and time period.
The loading bar will show when entries are being fetched. To fill up a page while applying filters, this might require several calls to the server and might take some time. The blue bar in the loading bar shows the range that has been searched.
The Refresh button to the right reloads the current entries and shows their updated states.
You can also set the Refresh button to auto-refresh mode. Please note that auto-refresh mode in combination with filtering of a grid can lead to longer refresh times than selected.
Registration Details
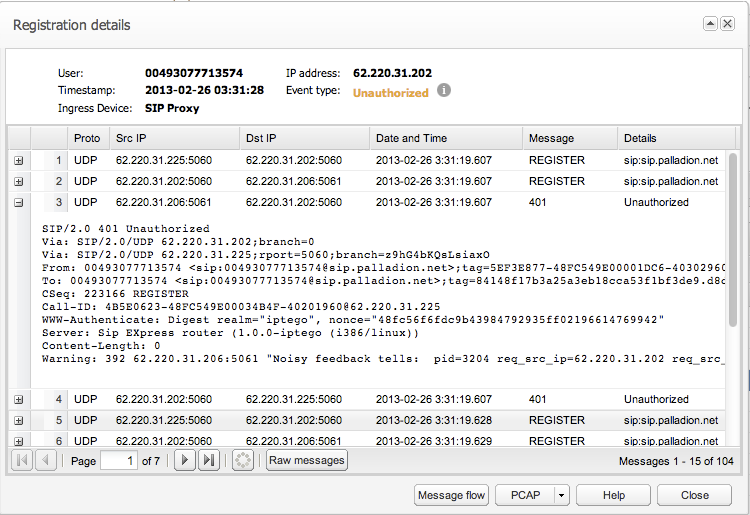
The details window for a registration event contains the following information:
-
The user of full AOR (subjected to settings).
-
The timestamp when the event occurred.
-
The network entity of the platform having received the registration request (the ingress device).
-
The IP address used to originate the requests.
-
The type of registration event.
-
A table that contains details about the exchanged messages in this event, listed in chronological order.
Table 4-10 lists the columns in Registration Details window.
Table 4-10 Registration Details Window
| Column | Description |
|---|---|
|
Proto |
The network transport protocol used to carry the SIP messages from client to the platform. This field can be either UDP or TCP. |
|
Source |
The IP address of the device that generated the message; can be either the client's or one of platform boxes, depending on the direction. |
|
Source Hwaddr |
The Ethernet address of the device that relayed the network packet just before being mirrored to Operations Monitor. |
|
Destination |
The IP address of the device that received the message; just as with Source, it can be either the client's or platform's. |
|
Destination Hwaddr |
The Ethernet address of the device that received the network packet just before being mirrored to Operations Monitor. |
|
Date and Time |
The moment in time when the mirrored network packet was received by Operations Monitor. |
|
Method/Code |
The type of SIP request or code returned in reply. |
|
RURI/Reason |
The SIP Request-URI the request was targeted to (for requests) or the reason phrase (contained in replies). |
Registration Details Actions
Click the Raw messages button to view the raw SIP message as seen on the network. You can click the button again to display brief messages.
Note:
You can view one raw message at a time by double-clicking on any of the table's entries, as shown in Figure 4-55.
Figure 4-55 Registration Details Window with One Expanded Raw Message

Description of "Figure 4-55 Registration Details Window with One Expanded Raw Message"
Beside the Help and Close buttons, the details window contains a Message flow button and a PCAP button. The Message flow button creates a SIP message flow diagram, and the PCAP button allows you to save the shown network packets into a PCAP file.


