4 Searching for Topology Graphs
This chapter describes how to search for topology graphs and customize the search.
Searching for a Topology Graph
To search for a topology graph:
-
On the UTIA home page, click the Networks icon in the top-left corner.
This opens the Topology Graphs search pane with a list of topology graph records that you have saved (if any). These topology graph records show the corresponding names, descriptions, and the number of components. See "Customizing a Topology Graph Search" for more information.
-
(Optional) Type the name or description of a topology graph in the Search field.
A list of related search results appears.
-
Choose a topology graph and click on it or select Render Map in the ellipsis options.
-
(Optional) Select Edit or Discard to edit or discard the topology graph search.
-
(Optional) Click Create New to customize a new topology graph search.
A Create New pane appears. See "Customizing a Topology Graph Search" for more information.
Customizing a Topology Graph Search
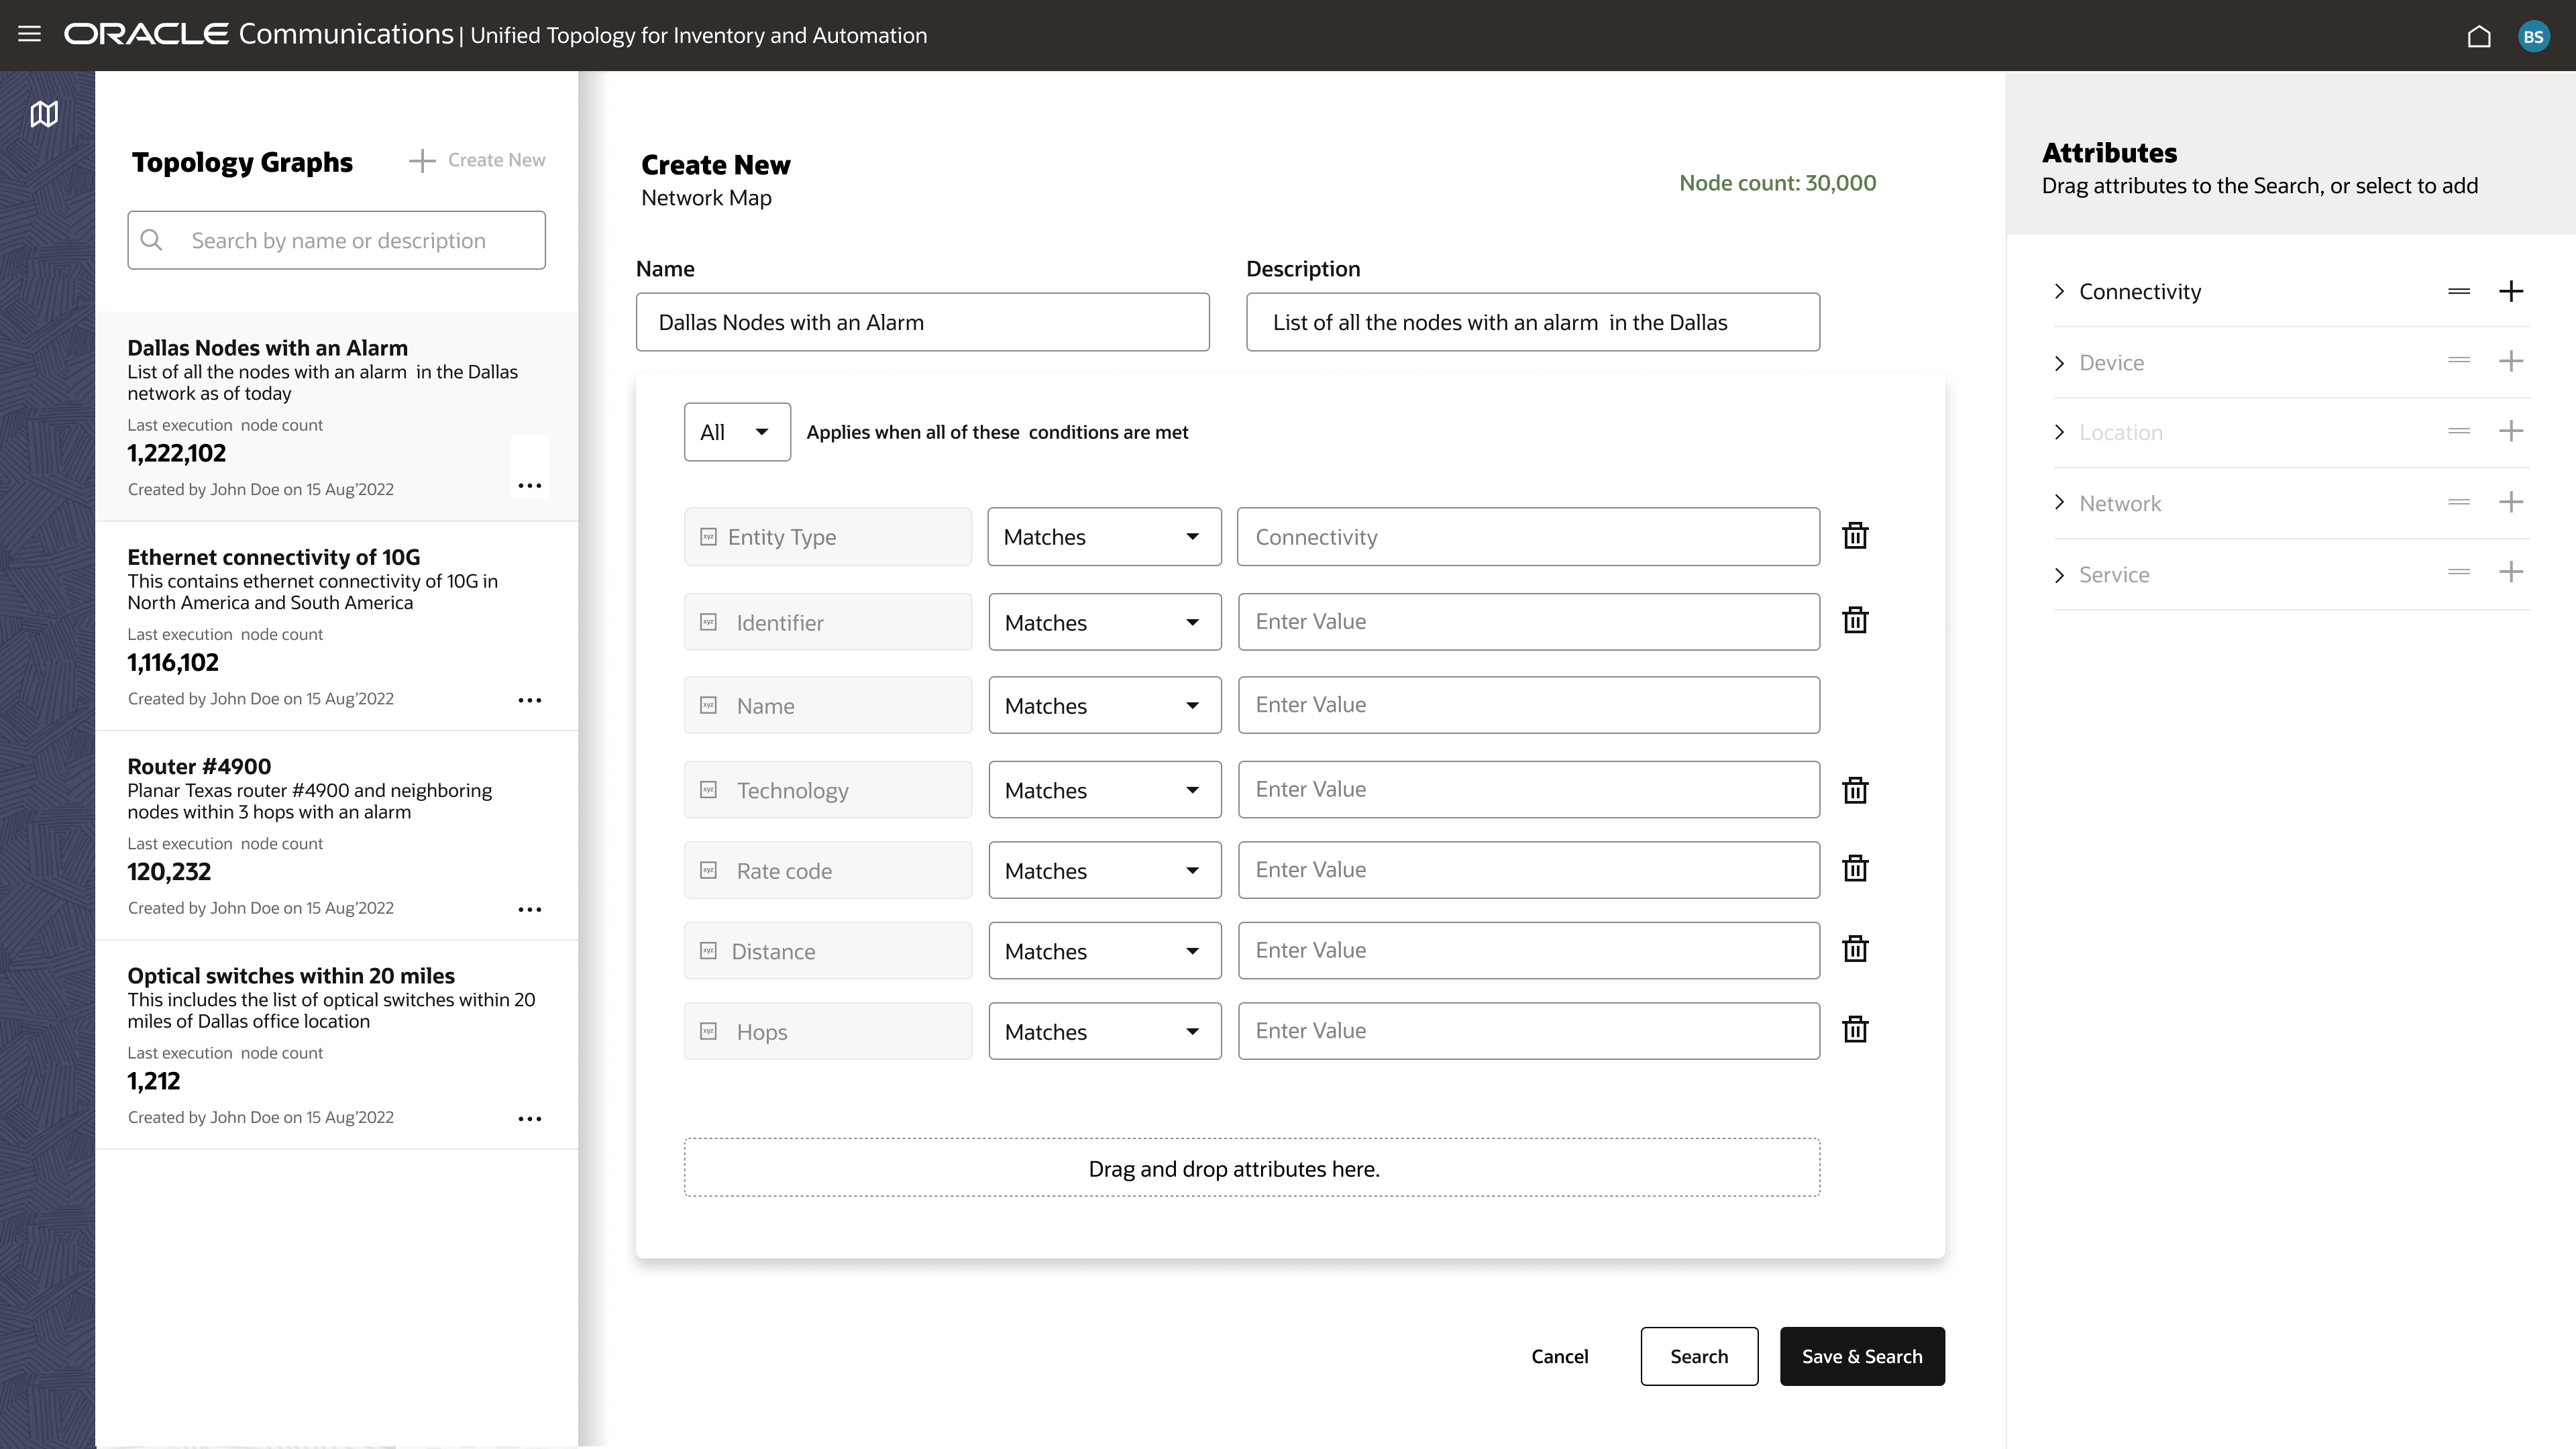
You can customize your topology graph search in the Create New search pane. You can use this customized topology graph search for quickly accessing and monitoring the topology graph without selecting the attributes every time.
To customize your topology graph search:
-
Enter a name and a description for the topology graph.
-
Select a condition from the dropdown list.
-
In the Attributes side pane, click the '=' icon of an entity to drag and drop the corresponding attributes to the topology graph. See "Selecting Attributes while Customizing a Topology Graph Search" for more information on the list of supported entities and the corresponding attributes.
-
(Optional) To add only a specific attribute within an entity, expand the entity and drag and drop the specific attribute to the list.
Note:
If you add a specific attribute to the list, the corresponding entity gets added to the list. -
(Optional) Click the '+ ' icon of the required attribute to add it to the list.
-
To remove an attribute or entity, click the Remove icon from the list of added attributes.
Note:
Removing an entity removes all corresponding attributes from the list. -
After you add all attributes, click Save & Search.
The customized topology graph search is saved and the corresponding topology graph appears. You can use this customized search from the list of saved searches for quickly accessing it.
-
(Optional) Click Search to open the topology graph without saving the search.
The topology graph that contains all the selected attributes appears.
-
(Optional) Click Cancel to cancel the search.
Figure 4-1 shows the Create New search pane.
Figure 4-1 Customizing Network Search
Selecting Attributes while Customizing a Topology Graph Search
You can select an entity and its corresponding attributes to customize a topology graph search. Select or enter the corresponding values of these attributes to customize your search. The search returns results with a topology graph that contains only the selected entity types.
You can add only one entity from the list of entities. Adding an entity adds all the corresponding attributes to the search.
The list of supported entities are:
- Connectivity
- Device
- Location
- Network
- Service
Each entity has a list of attributes. You can select all or a few of these attributes. By selecting a set of attributes, you can customize your topology graph to display only the corresponding information.
Except for Service, all other entities have both generic and entity-specific attributes. The list of these specific attributes varies with the entity that you select. The Service entity has only two attributes, Name and Version.
Table 4-1 lists the generic attributes.
Table 4-1 Generic Attributes
| Attribute | Description |
|---|---|
| Identifier | The identifier of the topology component. You can enter an identifier or select from the list of identifiers. |
| Name | The name of the topology component. You can enter a name or select from the list of names. |
| Technology | Enter the technology to search for the topology components operating under the technology. |
| Rate Code | Enter the rate code to view the topology components that are associated with it. |
| Hops | Enter the number of hops or select from the list, to search for the topology components within that number. |
| Vendor | Enter the name of the vendor to search for all the topology components of the vendor. |
| Category | Enter a category for Network or a device category
for Connectivity, Device, and Location.
The values for category can be National, Regional, CircleCore, Aggregate, Pre-Aggregate, and Access. |
Table 4-2 lists the entity-specific attributes.
Table 4-2 Entity-Specific Attributes
| Attribute | Description |
|---|---|
| Domain |
Enter the network address domain. This attribute is specific to Connectivity and Device. |
| Specification |
Enter the specification that is used to create the entity. This attribute is specific to Connectivity and Device. |
| Node Type | Enter the node type. |
| Distance |
Enter the distance to search for all the topology components available within the given distance from the location or device. Select the distance unit from the list beside this field. You can select Meter, Kilometer, or Mile as distance unit. This attribute is specific to Location and Device. |
| Device Specification |
Enter the device specification that is used to create the entity. This attribute is specific to Location and Network. |
| Area |
Enter the location area to search for all topology components available within that area. This attribute is specific to Location. |
| Circle |
Enter the circle to search for all topology components within the circle. This attribute is specific to Location. |
| SubCategory |
Enter the subcategory to search for all subnetworks with the specified types. See "Viewing Networks and Subnetworks" for more information. This attribute is specific to Network. |
| Topology Type |
Enter the topology type. This attribute is specific to Network. |
| Sub Type |
Enter the topology sub type. This attribute is specific to Network. |
Viewing Networks and Subnetworks
You can view multiple layers of a network by navigating up or down the network hierarchy. This can be achieved using the Category attribute in the Create New Topology Graph search page.
An example of a network hierarchy is:
National > Regional > CircleCore > Aggregate > Pre-Aggregate > Access
You can have either of the following types of networks:
- Multiple layers within a single network that follows the network hierarchy. For example: A Regional network has few nodes and one Aggregate subnetwork. You can see the subnetworks within the Aggregate subnetwork by clicking on it.
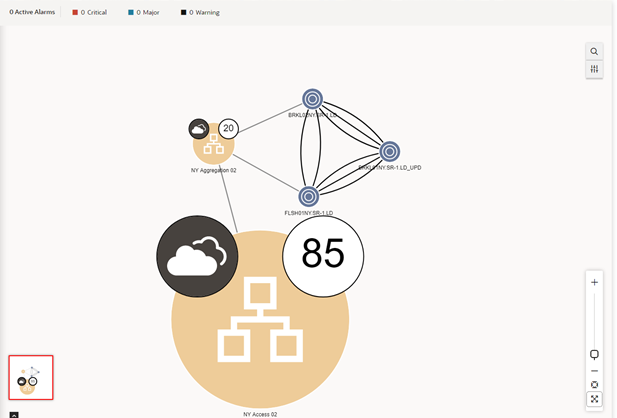
- Different types of subnetworks within a single parent network. For example: You can have a Regional network that in turn has its own nodes along with Aggregate and the corresponding Access networks. The nodes within the Access network can connect to the nodes within the Regional network through the Aggregate network. Figure 4-2 shows a network having different types of subnetworks.
- All the devices and connectivities exist within a single network. Oracle does not
recommend this approach.
Note:
Setting a device category attribute is supported on device or connectivity search.
To open any specific subnetwork, you need to enter the corresponding parent network name attribute in Name and the subnetwork type attribute in Category in the Create New Topology Graph search page.
Figure 4-2 Subnetworks within a Single Network
Adding Advanced Filters for Searching Topology Graphs
You can use the advanced filtering option while searching the topology graph to filter search results. The Search icon at the right corner of the canvas opens the Advanced Filter panel on the left side of the screen. In this panel, you can choose between the Search and Filter Topology or Ring Search options by selecting corresponding option from the dropdown list. The Search and Filter Topology option appears by default. See "Using Search and Filter Topology" and "Using Ring Search" for information on using the two options.
The list of filters supported are:
-
Location
-
Network Type
-
Device Type
-
Technology
Using Search and Filter Topology
The Search and Filter Topology panel has a search bar with filter options under it. Each filter option represents one filter type, such as Location or Network Type. Each option has a value chosen by default. To see the list of filters supported, see "Adding Advanced Filters for Searching Topology Graphs". Below the search bar is a list of all the nodes and edges in a topology graph. The nodes are grouped into categories by Location, while the edges are grouped separately.
You can search for nodes/edges by applying filters.
To search for nodes/edges using filters:
-
Select a filter option below the search bar. You may select any number of filter options.
The selected filter option appears inside the search bar. When you choose a filter option, a list of related filters appears below the search bar. You can scroll horizontally and view more filters by selecting the 'More' option.
-
To change the value of the selected filter, click on it and select any number of values from the list.
The filter option changes to reflect the value chosen.
-
The topology graph on the canvas only shows the nodes/edges matching the search criteria.
Note:
When filters are applied:
-
The corresponding nodes/edges appear in the panel.
-
The highlighted nodes appear along with their associated edges in the canvas. When filters are removed, the entire topology appears.
-
For edge search, the terminal nodes of the matching edges appear on the canvas.
Using Ring Search
The Ring Search option allows you to search for rings in a network topology. When you switch to this option, it highlights all the rings in the topology graph. The panel features a list of rings in the topology graph along with a list of nodes and edges associated with the rings.
You can view ring information by selecting a ring from the list. The chosen ring is highlighted on the canvas, and the Ring Capacity panel appears on the right side of the canvas. This panel provides details on the Total Capacity and Capacity Consumed by the ring, as well as information about the nodes and edges within the ring.
You can choose any number of rings to view on the topology. You can also filter ring search by applying filters using the filter options below the search bar. See "Using Search and Filter Topology" to know more about applying filters.

