NMS Extract Parameters and Bucket Configuration
Note:
You must complete these setup steps before starting the ELT processes to load data into the Oracle Utilities Analytics Warehouse (OUAW). Unlike other source systems, these configurations have to be set up using the Oracle Utilities Analytics Administration portal.- NMS ETL Parameter Configuration
- Country Parameter
- Interruptions Count for CEMI Parameter
- Momentary Outage Duration Parameter
- Number of Retention Days Parameter
- Priority Indicator Bit Parameter
- Switch Plan Aborted Step Status Key(s) Parameter
- Switch Plan Begin State Key(s) Parameter
- Switch Plan End State Key(s) Parameter
- Switch Plan Failed Step Status Key(s) Parameter
- Switch Sheet Planned Category Parameter
- Event Status Parameter
- Account Type Parameter
- NMS Bucket Configuration
- Configure NMS Buckets
- Configure NMS Parameters
NMS ETL Parameter Configuration
Note:
- During extraction of source data to BI data warehouse, there are certain parameters that need to be configured by implementation to identify or filter data in accordance with business requirements. Once these parameters have been set up by the end user, the ELT process can then use this information to selectively extract data or to transform it from the source application and populate it into the warehouse.
- The ELT job that loads these parameters into the warehouse is configured to be initial load only. Any incremental changes to these parameters after the initial run is not going to be automatically captured in Oracle Utilities Analytics because any changes made to the existing parameters can cause inconsistencies in the loaded data. However, if there is a need to reconfigure the parameters, they can be changed on the source system and reloaded into the warehouse through certain additional steps. The star schema tables would also need to be truncated and reloaded. For the detailed steps involved in reloading the parameters, see Configure ETL Parameters and Buckets.
Country Parameter
This single-valued parameter sets the appropriate country code.
- Navigate to the Maintain NMS ETL Parameters page through the Edit button located on the NMS ETL Parameters page.
- Click Add New Row and select Country from the Parameter Type drop-down menu.
- Populate the required fields and click Save.
- To provide multiple values, click Add New Row again and enter additional values.
To add a new parameter value or modify an existing one, see Configure NMS Parameters.
Interruptions Count for CEMI Parameter
This single-valued parameter sets the number of interruptions that you should have experienced to calculate the CEMI index. This is required by the Control Zone Outage and City Outage extracts.
- Navigate to the Maintain NMS ETL Parameters page through the Edit button located on the NMS ETL Parameters page.
- Click Add New Row and select Interruptions Count for CEMI from the Parameter Type drop-down menu.
- Populate the required fields and click Save.
- To provide multiple values, click Add New Row again and enter additional values.
To add a new parameter value or modify an existing one, see Configure NMS Parameters.
Momentary Outage Duration Parameter
This single-valued parameter sets in minutes the duration to be used for determining if an outage is a momentary outage or a sustained outage. This is required by the Control Zone Outage and City Outage extracts.
- Navigate to the Maintain NMS ETL Parameters page through the Edit button located on the NMS ETL Parameters page.
- Click Add New Row and select Momentary Outage Duration from the Parameter Type drop-down menu.
- Populate the required fields and click Save.
- To provide multiple values, click the Add New Row button again and enter additional values.
To add a new parameter value or modify an existing one, see Configure NMS Parameters.
Number of Retention Days Parameter
This single-valued parameter sets the number of days in which restored outage data is retained in the Recent Call, Recent Crew, Recent Job and Recent Customer Outage facts.
- Navigate to the Maintain NMS ETL Parameters page through the Edit button located on the NMS ETL Parameters page.
- Click Add New Row and select Number of Retention Days from the Parameter Type drop-down menu.
- Populate the required fields and click Save.
- To provide multiple values, click the Add New Row button again and enter additional values.
To add a new parameter value or modify an existing one, see Configure NMS Parameters.
Priority Indicator Bit Parameter
This single-valued parameter sets the Nth bit, which indicates the priority of the complaint registered in the Incidents table required by the Call fact extracts.
- Navigate to the Maintain NMS ETL Parameters page through the Edit button located on the NMS ETL Parameters page.
- Click Add New Row and select Priority Indicator Bit from the Parameter Type drop-down menu.
- Populate the required fields and click Save.
- To provide multiple values, click the Add New Row button again and enter additional values.
To add a new parameter value or modify an existing one, see Configure NMS Parameters.
Switch Plan Aborted Step Status Key(s) Parameter
This single-valued parameter sets the codes used to identify the aborted steps status of a Switch Plan. This is required by the Switch Plan extracts.
- Navigate to the Maintain NMS ETL Parameters page through the Edit button located on the NMS ETL Parameters page.
- Click Add New Row and select Switch Plan Aborted Step Status Key(s) from the Parameter Type drop-down menu.
- Populate the required fields and click Save.
- To provide multiple values, click the Add New Row button again and enter additional values.
To add a new parameter value or modify an existing one, see Configure NMS Parameters.
Switch Plan Begin State Key(s) Parameter
This single-valued parameter sets the codes used to identify the initial states of Switch Plans.
- Navigate to the Maintain NMS ETL Parameters page through the Edit button located on the NMS ETL Parameters page.
- Click Add New Row and select Switch Plan Begin State Key(s) from the Parameter Type drop-down menu.
- Populate the required fields and click Save.
- To provide multiple values, click the Add New Row button again and enter additional values.
To add a new parameter value or modify an existing one, see Configure NMS Parameters.
Switch Plan End State Key(s) Parameter
This single-valued parameter identifies the final states of Switch Plans.
- Navigate to the Maintain NMS ETL Parameters page through the Edit button located on the NMS ETL Parameters page.
- Click Add New Row and select Switch Plan End State Key(s) from the Parameter Type drop-down menu.
- Populate the required fields and click Save.
- To provide multiple values, click the Add New Row button again and enter additional values.
To add a new parameter value or modify an existing one, see Configure NMS Parameters.
Switch Plan Failed Step Status Key(s) Parameter
This single-valued parameter sets the codes used to identify the failed steps states of a Switch Plan. This is required by the Switch Plan extracts.
- Navigate to the Maintain NMS ETL Parameters page through the Edit button located on the NMS ETL Parameters page.
- Click Add New Row and select Switch Plan Failed Step Status Key(s) from the Parameter Type drop-down menu.
- Populate the required fields and click Save.
- To provide multiple values, click the Add New Row button again and enter additional values.
To add a new parameter value or modify an existing one, see Configure NMS Parameters.
Switch Sheet Planned Category Parameter
This single-valued parameter sets the Planned Category code for Switch Sheets.
- Navigate to the Maintain NMS ETL Parameters page through the Edit button located on the NMS ETL Parameters page.
- Click Add New Row and select Switch Sheet Planned Category from the Parameter Type drop-down menu.
- Populate the required fields and click Save.
- To provide multiple values, click the Add New Row button again and enter additional values.
To add a new parameter value or modify an existing one, see Configure NMS Parameters.
Event Status Parameter
This multi-valued parameter holds a list of excluded Event Status values. Those event status values specified in the parameters are excluded from the extract.
- Navigate to the Maintain NMS ETL Parameters page through the Edit button located on the NMS ETL Parameters page.
- Click Add New Row and select Event Status from the Parameter Type drop-down menu.
- Populate the required fields and click Save.
- To provide multiple values, click the Add New Row button again and enter additional values.
To add a new parameter value or modify an existing one, see Configure NMS Parameters.
Account Type Parameter
This multi-valued parameter holds a list of excluded Account Type values. Those account type values specified in the parameters are excluded from the extract.
- Navigate to the Maintain NMS ETL Parameters page through the Edit button located on the NMS ETL Parameters page.
- Click Add New Row and select Account Type from the Parameter Type drop-down menu.
- Populate the required fields and click Save.
- To provide multiple values, click the Add New Row button again and enter additional values.
To add a new parameter value or modify an existing one, see Configure NMS Parameters.
NMS Bucket Configuration
Oracle Utilities Analytics Warehouse (OUAW) allows you to define a set of ranges, each representing a bucket, for which extracted measures can be grouped and classified. This allows for reports that show data as a group that matches a particular classification or bucket. For example, in Oracle Utilities Network Management System, analysts may want to classify the outage duration based on certain ranges of duration (for example, 0-30 days, 30-60 days, 60-90 days, and so on. The maximum value is 9999999).
- At least one bucket should have the start range set to 0.
- At least one bucket should have the end range set to 99999.
- There should not be overlaps within the bucket ranges. For example, if there is a bucket with start range 1 and end range 10, there cannot be an overlapping bucket with start range 5 and end range 13 (5 to 10 is the overlapping range).
- Similarly, there should not be any gaps in the bucket ranges. For example, if there is a bucket with start range as 1 and end range as 10, the start range for the next consecutive bucket should be 11.
Note:
The ELT job that loads these buckets into the warehouse is configured to be initial load only. Any incremental changes after the initial run is not going to be automatically captured in Oracle Utilities Analytics because any changes made to the existing values can cause inconsistencies in the loaded data. However, in case it is necessary to reconfigure the buckets, these can be changed on the source system and reloaded into the warehouse through certain additional steps. The star schema tables would also need to be truncated and reloaded. For detailed steps, see Configure ETL Parameters and Buckets.Outage Duration Bucket Configuration
This configuration defines the bucket ranges used for classifying each outage based on how long it took before the outage was addressed and closed. The Restored Customer Outage fact uses this bucket configuration to map the outage duration measure to the corresponding bucket range. The configured data is extracted into the Outage Duration dimension through a separate ELT job.
To set this bucket value, navigate to the Maintain NMS Bucket Configuration page through the Edit button located on the NMS Bucket Configuration page. Click Add Bucket Range and select Outage Duration Bucket from the Bucket Type drop-down menu. Populate the required fields and click Save. To provide multiple values, click the Add New Row button again and enter additional values.
To add a new bucket value or modify an existing one, see Configure NMS Buckets.
Estimated Restoration Duration Bucket Configuration
This configuration defines the bucket ranges used for classifying each outage based on how long it took before the outage was addressed and closed. The Restored Customer Outage fact uses this bucket configuration to map the outage duration measure to the corresponding bucket range. The configured data is extracted into the Outage Duration dimension via a separate ELT job.
To set this bucket value, navigate to the Maintain NMS Bucket Configuration page through the Edit button located on the NMS Bucket Configuration page. Click Add Bucket Range button and select Estimated Restoration Duration Bucket from the Bucket Type drop-down menu. Populate the required fields and click Save. To provide multiple values, click the Add New Row button again and enter additional values.
To add a new bucket value or modify an existing one, see Configure NMS Buckets.
Duration Deviation Bucket Configuration
This configuration defines the bucket ranges used for classifying an outage based on how much its actual restoration time deviated from its estimated restoration time. The Restored Customer Outage fact uses this bucket configuration to map the duration deviation measure to the corresponding bucket range. The configured data is extracted into the Duration Deviation dimension via a separate ELT job.
To set this bucket value, navigate to the Maintain NMS Bucket Configuration page through the Edit button located on the NMS Bucket Configuration page. Click Add Bucket Range button and select Duration Deviation Bucket from the Bucket Type drop-down menu. Populate the required fields and click Save. To provide multiple values, click the Add New Row button again and enter additional values.
To add a new bucket value or modify an existing one, see Configure NMS Buckets.
Customers Out Bucket Configuration
This configuration defines the bucket range for classifying the number of customers that were out during an outage event. The configured data is extracted into the Customers Out bucket dimension through a separate ELT job.
To add a new bucket value or modify an existing one, see Configure NMS Buckets.
Configure NMS Buckets
This page details how to add and modify bucket values for Oracle Utilities Network Management System (NMS) application.
Bucket Configuration Overview
Oracle Utilities Analytics Warehouse (OUAW) allows you to define a set of ranges, each representing a bucket, for which extracted measures can be grouped and classified. This allows the creation of reports that show data as a group that matches a particular classification or bucket.
- At least one bucket should have the start range as 0.
- At least one bucket should have the end range as 99999.
- There is no overlapping of bucket ranges. For example, if there is a bucket with start range 1 and end range 10, there cannot be an overlapping bucket with start range 5 and end range 13 (5 to 10 is the overlapping range).
- The bucket ranges don't have gaps. For example, if there is a bucket with start range as 1 and end range as 10, the start range for the next consecutive bucket should be 11.
Note:
The ELT job that loads these buckets into the warehouse is configured to be initial load only. Any incremental changes after the initial run is not going to be automatically captured in Oracle Utilities Analytics because any changes made to the existing values can cause inconsistencies in the loaded data. However, in case it is necessary to reconfigure the buckets, these can be changed on the source system and reloaded into the warehouse through certain additional steps. The star schema tables would also need to be truncated and reloaded. For the detailed steps involved in reloading the buckets, see Configure ETL Parameters and Buckets.Add a New Bucket Value
- Navigate to NMS Bucket Configuration under NMS Configuration (located on the Home tab of the Oracle Utilities Analytics Administration page).
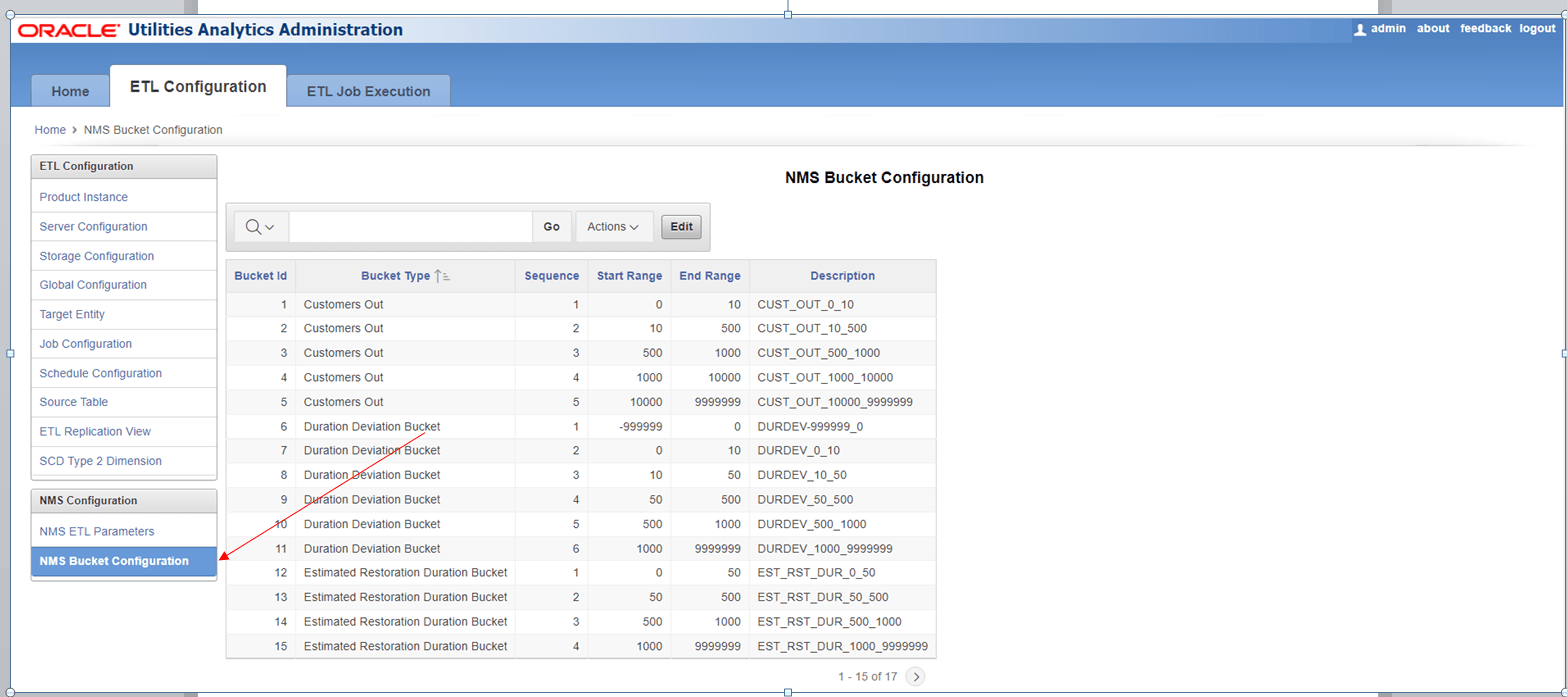
- Click Edit to open the Maintain NMS Bucket Configuration page.
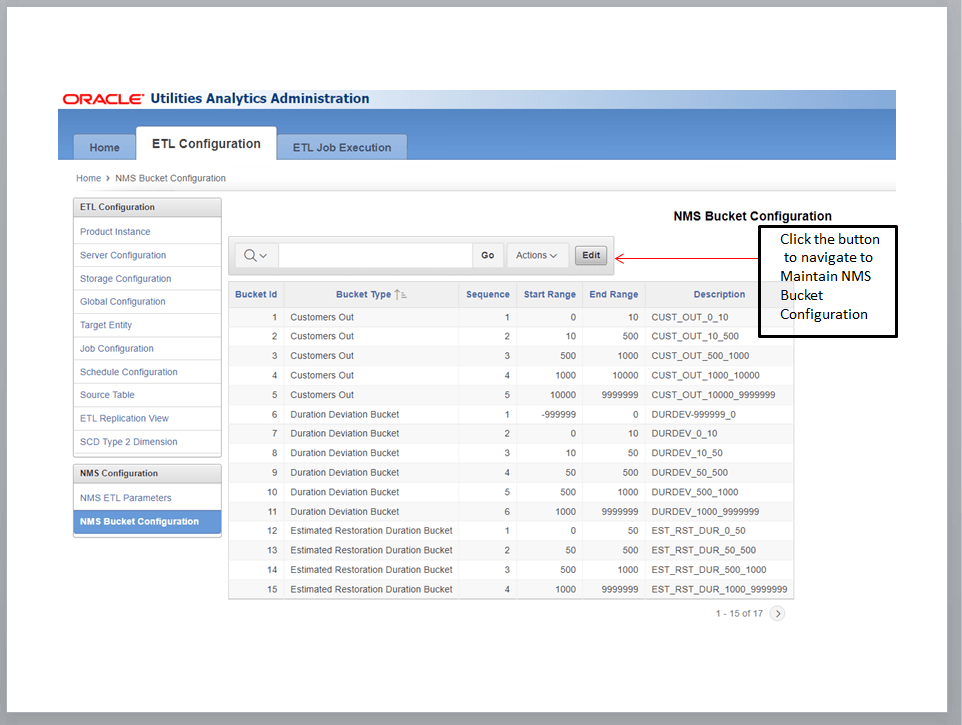
- Click Add Bucket Range and select the bucket type from the drop-down menu under Bucket Type column.
- Provide the Sequence, Start Range, End Range, and Description values.
Note: The sequence number can start from 0. For single-valued buckets, this will hold a single value. However, for multi-valued buckets, the sequence number can be incremented for every additional value.
- Once the values are added, click Save.
Modify an Existing Bucket Value
- Click Edit on NMS Bucket Configuration to open the Maintain NMS ETL Bucket Configuration page.
- Provide the Start Range and End Rangefor the bucket value that is to be modified.

- Click Save.
Configure NMS Parameters
This page details how to add and modify parameter values for Oracle Utilities Network Management System (NMS) application.
Parameter Configuration Overview
Note:
The ELT job that loads these parameters into the warehouse is configured to be initial load only. Any incremental changes to these parameters after the initial run is not going to be automatically captured in Oracle Utilities Analytics because any changes made to the existing parameters can cause inconsistencies in the loaded data. However, if there is a need to reconfigure the parameters, they can be changed on the source system and reloaded into the warehouse through certain additional steps. The star schema tables would also need to be truncated and reloaded. For the detailed steps involved in reloading the parameters, see Configure ETL Parameters and Buckets.Add a New Parameter Value
- Navigate to NMS ETL Parameters under NMS Configuration (located on the Home tab of the Oracle Utilities Analytics Administration tool).
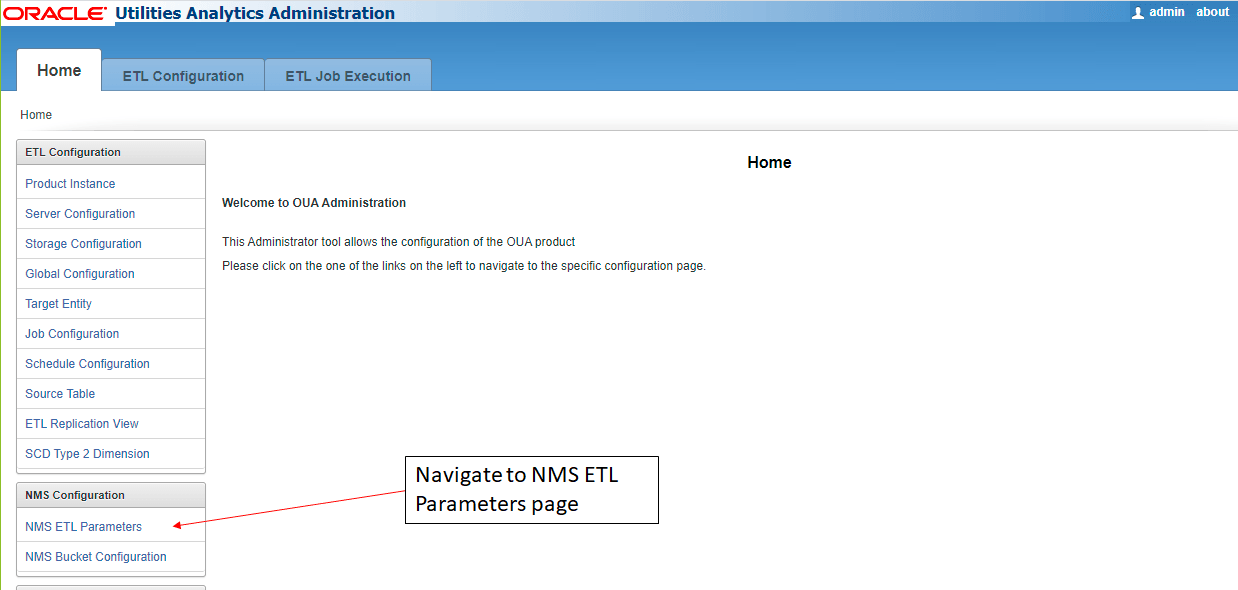
- Click Edit to open the Maintain NMS ETL Parameters page.
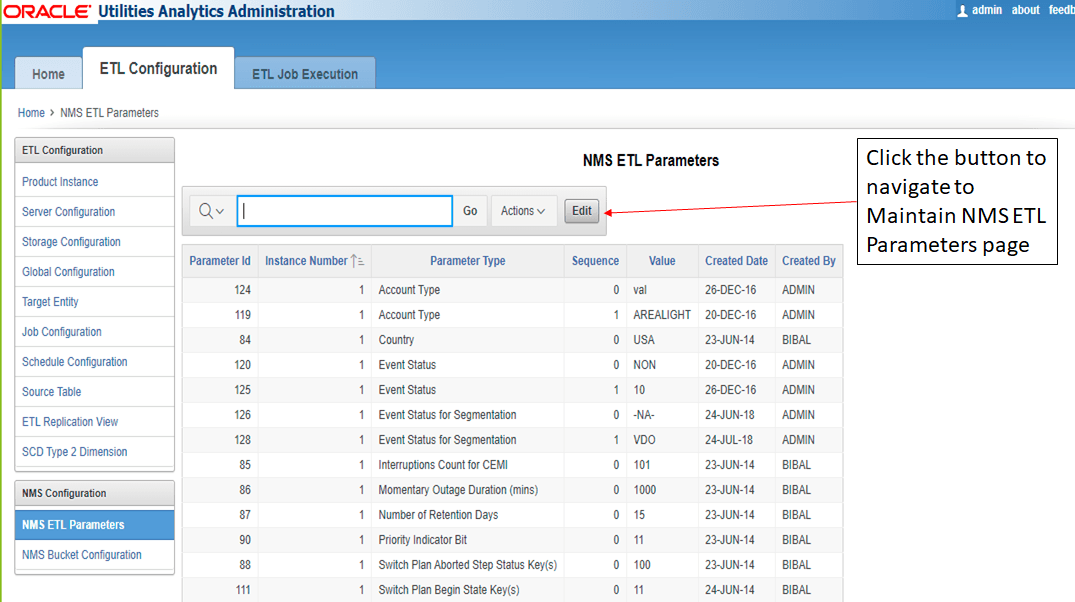
- Click Add New Row and select the parameter name from the drop-down menu under Parameter Type column.
- Provide the Instance Number, Sequence and Value. The sequence number can start from 0. For single-valued parameters, this will hold a single value. However, for multi-valued parameters, the sequence number can be incremented for every additional value.
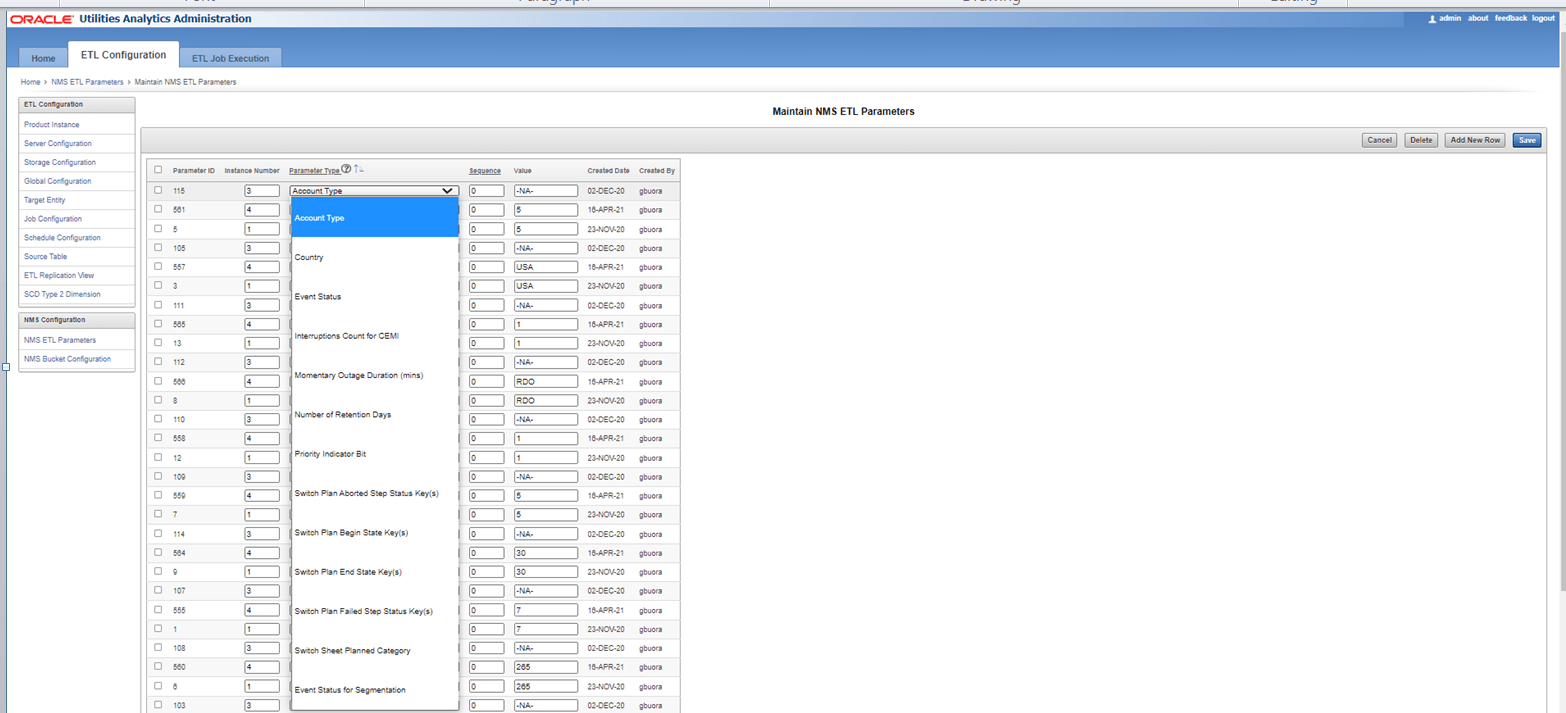
- Once the values are added, click Save.
Modify an Existing Parameter Value
- To modify an existing parameter value, click Edit on the NMS ETL Parameters page to open the Maintain NMS ETL Parameters page.
- Edit the value under the Value column of the parameter value that is to be modified.

- Click Save.